2003 Hyundai Tiburon dashboard
[x] Cancel search: dashboardPage 54 of 169

FEATURES OF YOUR HYUNDAI
1- 46
B710A01GK-GAT
HEATING AND COOLING CONTROL
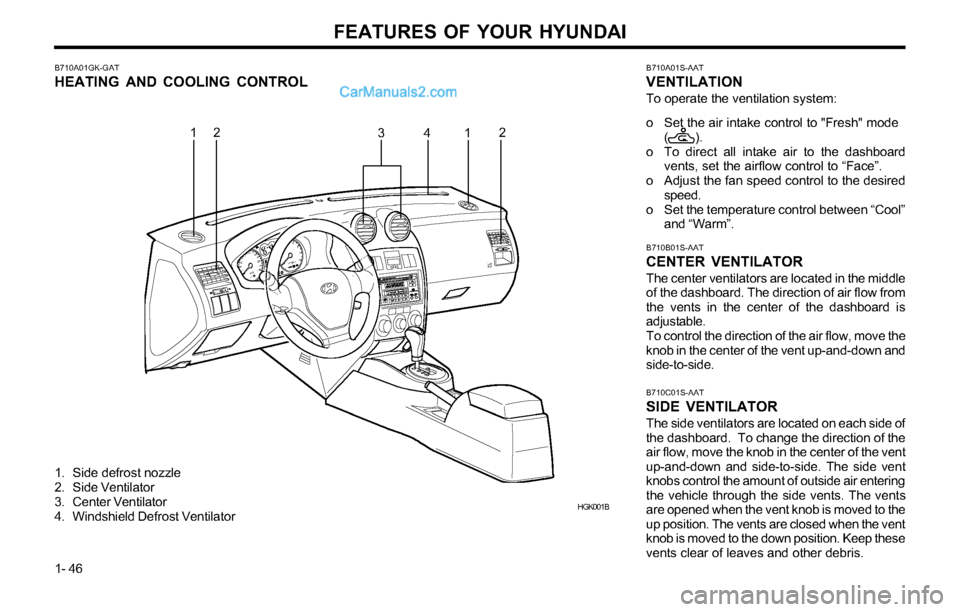
1. Side defrost nozzle
2. Side Ventilator
3. Center Ventilator
4. Windshield Defrost Ventilator
HGK001B
12
312
B710A01S-AAT
VENTILATION
To operate the ventilation system:
o Set the air intake control to "Fresh" mode
( ).
o To direct all intake air to the dashboard
vents, set the airflow control to “Face”.
o Adjust the fan speed control to the desired
speed.
o Set the temperature control between “Cool”
and “Warm”.
B710C01S-AAT
SIDE VENTILATOR
The side ventilators are located on each side of
the dashboard. To change the direction of the
air flow, move the knob in the center of the vent
up-and-down and side-to-side. The side vent
knobs control the amount of outside air entering
the vehicle through the side vents. The vents
are opened when the vent knob is moved to the
up position. The vents are closed when the vent
knob is moved to the down position. Keep these
vents clear of leaves and other debris.
B710B01S-AAT
CENTER VENTILATOR
The center ventilators are located in the middle
of the dashboard. The direction of air flow from
the vents in the center of the dashboard is
adjustable.
To control the direction of the air flow, move the
knob in the center of the vent up-and-down and
side-to-side.
4
Page 56 of 169

FEATURES OF YOUR HYUNDAI
1- 48
HGK016B670D02GK-AAT
Air Flow Control
This is used to direct the flow of air. Air can be
directed to the floor, dashboard outlets, or wind-
shield. Five symbols are used to represent
Face, Bi-Level, Floor, Floor-Defrost and De-
frost air position.
HGK005 B670C02S-AAT
Air Intake Control
This is used to select fresh outside air or
recirculation inside air.
To change the air intake control mode, (Fresh
mode, Recirculation mode) push the control
button.
FRESH MODE ( ) : The indicator light on
the button goes off when the air intake control
is fresh mode.
RECIRCULATION MODE ( ): The indicator
light on the button is illuminated when the air
intake control is recirculation mode.
With the "Fresh" mode selected, air enters the
vehicle from the outside and is heated or cooled
according to the function selected.With the "Recirculation" mode selected, air from
within the passenger compartment will be drawn
through the heating system and heated or cooled
according to the function selected.
NOTE:o It should be noted that prolonged opera-
tion of the heating in "Recirculation"
mode will give rise to fogging of the
windshield and side windows and the air
within the passenger compartment will
become stale. In addition, prolonged use
of the air conditioning with the "Recircu-
lation" mode selected may result in the
air within the passenger compartment
becoming excessively dry.
o When the ignition switch is turned "ON"
the air intake control will change to "Re-
circulation" mode (regardless of switch
position). This is normal operation.
Page 57 of 169

FEATURES OF YOUR HYUNDAI
1- 49
HGK023
HGK024
Floor-Level
Air is discharged through the floor vents, wind-
shield defroster nozzle, side defroster nozzle,
side ventilator.
Floor-Defrost Level
Air is discharged through the windshield defrost
nozzle, the floor vents, side defroster nozzle,
side ventilator.
HGK025
Face-Level
Selecting the "Face" mode will cause air to be
discharged through the face level vents.
HGK022
Bi-Level
Air is discharged through the face vents and the
floor vents. This makes it possible to have
cooler air from the dashboard vents and warmer
air from the floor outlets at the same time.
HGK021
If the "Floor-Defrost" mode is selected, the A/C
will be turn on automatically and "Fresh" mode
will be activated.
Defrost-Level
Air is discharged through the windshield defrost
nozzle, side defroster nozzle, side ventilator.
If the "Defrost" mode is selected, the A/C will
turn on automatically and "Fresh" mode will be
activated.
Page 65 of 169

FEATURES OF YOUR HYUNDAI
1- 57 This is used to direct the flow of air. Air can be
directed to the floor, dashboard outlets, or wind-
shield. Four symbols are used to represent
Face, Bi-Level, Floor and Floor-Defrost air
position.
B980D01Y-AAT
Heating and Cooling System Off
Press the "OFF" button to stop the operation of
the heating and cooling system.
B980E01GK-GAT
Air Flow Control
HGK019
HGK021
HGK022
Face-Level
When selecting the "Face" mode, the indicator
light will come on, causing air to be discharged
through the face level vents.
Bi-Level
When selecting the "Bi-Level" mode, the indica-
tor light will come on and the air will be dis-
charged through the face vents and the floorvents. This makes it possible to have cooler air
from the dashboard vents and warmer air from
the floor outlets at the same time.
Floor-Level
When selecting the "Floor-Level" mode, the
indicator light will come on and the air will be
discharged through the floor vents, windshield
defroster nozzle, side defroster nozzle, side
ventilator.
HGK023
HGK024
Page 94 of 169

FEATURES OF YOUR HYUNDAI
1- 86
HGK062
o Be sure that the cassette label is not loose
or peeling off or tape ejection may be diffi-
cult.
o Never touch or soil the actual audio tape
surfaces.
o Keep all magnetized objects, such as elec-
tric motors, speakers or transformers away
from your cassette tapes and tape player
unit.
o Store cassettes in a cool, dry place with the
open side facing down to prevent dust from
settling in the cassette body.
o Avoid repeated fast reverse usage to replay
one given tune or tape section. This can
cause poor tape winding to occur, and even-
tually cause excessive internal drag and
poor audio quality in the cassette. If this
occurs, it can sometimes be corrected by
fast winding the tape from end to end sever-
al times. If this does not correct the problem,
do not continue to use the tape in your
vehicle.
SSAR042B
Head
Cotton applicator
o The playback head, capstan and pinch roll-
ers will develop a coating of tape residue
that can result in deterioration of sound
quality, such as a wavering sound. They
should be cleaned monthly using a commer-
cially available head cleaning tape or spe-
cial solution available from audio specialty
shops. Follow the supplier’s directions care-
fully and never oil any part of the tape player
unit.
o Always be sure that the tape is tightly wound
on its reel before inserting in the player.
Rotate a pencil in the drive sprockets to
wind up any slack.
SSAR053B
NOTE:Look at a tape before you insert it. If the tape
is loose, tighten it by turning one of the
hubs with a pencil or your finger. If the label
is peeling off, do not put it in the drive
mechanism. .
Do not leave tapes sitting where they are
exposed to hot, warm, or, high humidity,
such as on top of the dashboard or in the
player. If a tape is exposed to extreme heat
or cold, let it reach a moderate temperature
before putting it in the player.
Page 146 of 169

DO-IT-YOURSELF MAINTENANCE
6-15 Good
G200B03YBurned out
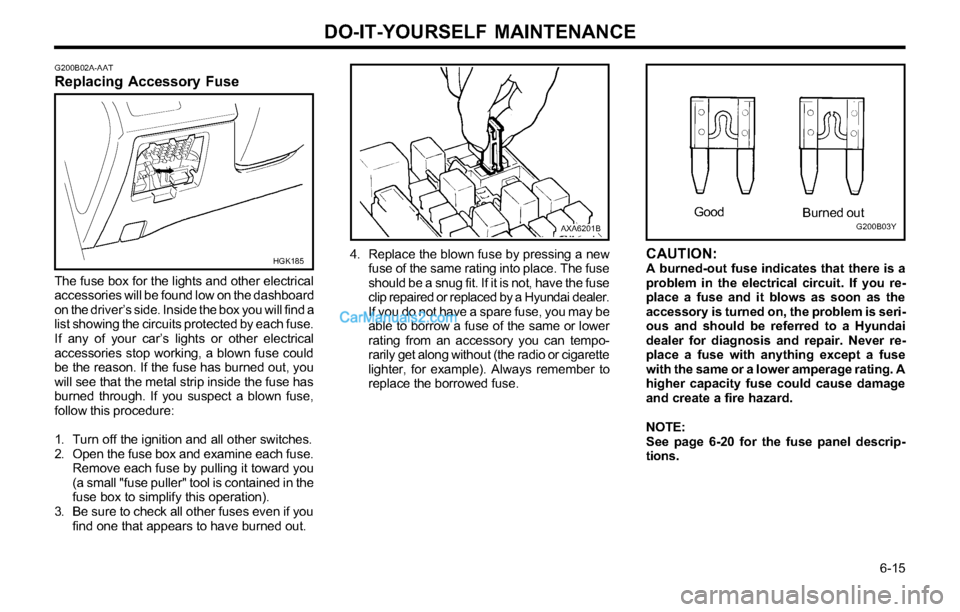
4. Replace the blown fuse by pressing a new
fuse of the same rating into place. The fuse
should be a snug fit. If it is not, have the fuse
clip repaired or replaced by a Hyundai dealer.
If you do not have a spare fuse, you may be
able to borrow a fuse of the same or lower
rating from an accessory you can tempo-
rarily get along without (the radio or cigarette
lighter, for example). Always remember to
replace the borrowed fuse.
CAUTION:A burned-out fuse indicates that there is a
problem in the electrical circuit. If you re-
place a fuse and it blows as soon as the
accessory is turned on, the problem is seri-
ous and should be referred to a Hyundai
dealer for diagnosis and repair. Never re-
place a fuse with anything except a fuse
with the same or a lower amperage rating. A
higher capacity fuse could cause damage
and create a fire hazard.
NOTE:
See page 6-20 for the fuse panel descrip-
tions.
AXA6201B G200B02A-AAT
Replacing Accessory Fuse
The fuse box for the lights and other electrical
accessories will be found low on the dashboard
on the driver’s side. Inside the box you will find a
list showing the circuits protected by each fuse.
If any of your car’s lights or other electrical
accessories stop working, a blown fuse could
be the reason. If the fuse has burned out, you
will see that the metal strip inside the fuse has
burned through. If you suspect a blown fuse,
follow this procedure:
1. Turn off the ignition and all other switches.
2. Open the fuse box and examine each fuse.
Remove each fuse by pulling it toward you
(a small "fuse puller" tool is contained in the
fuse box to simplify this operation).
3. Be sure to check all other fuses even if you
find one that appears to have burned out.
HGK185