Page 137 of 205

WHAT TO DO IN AN EMERGENCY 3- 7
D060D02A-AAT3. Loosen Wheel NutsD060E01A-AAT4. Put the Jack in Place
The wheel nuts should be loosened slightly
before raising the car. To loosen the nuts, turn
the wrench handle counterclockwise. When
doing this, be sure that the socket is seated
completely over the nut so it cannot slip off. For
maximum leverage, position the wrench so the
handle is to the left as shown in the drawing.
Then, while holding the wrench near the end of
the handle, push down on it with steady pres-
sure. Do not remove the nuts at this time. Just
loosen them about one-half turn.The base of the jack should be placed on firm,
level ground. The jack should be positioned as
shown in the drawing.
D060F02E-AAT5. Raising the Car
After inserting a bar into the wheel nut wrench,
install the bar into the jack as shown in the
drawing. To raise the vehicle, turn the wheel nut
wrench clockwise. As the jack begins to raise
the vehicle, double check that it is properly
positioned and will not slip. If the jack is on soft
ground or sand, place a board, brick, flat stone
or other object under the base of the jack to keep
it from sinking.
Raise the car high enough so that the fully
inflated spare tire can be installed. To do this,
you will need more ground clearance than is
required to remove the flat tire.
D060D01Y
HFC4022
Wrench bar
Wheel nut wrench
HEF-111A
Page 138 of 205

3- 8 WHAT TO DO IN AN EMERGENCY
!
WARNING:Do not get under the car when it is sup-
ported by the jack! This is very dangerous
as the vehicle could fall and cause serious
injury or death. No one should stay in the
car while the jack is being used.
D060G02Y-AAT6. Changing Wheels
D060H02A-AAT7. Reinstall Wheel Nuts
Loosen the wheel nuts and remove them with
your fingers. Slide the wheel off the studs and
lay it flat so it cannot roll away. To put the wheel
on the hub, pick up the spare tire, line up the
holes with the studs and slide the wheel onto
them. If this is difficult, tip the wheel slightly and
get the top hole in the wheel lined up with the top
stud. Then jiggle the wheel back and forth until
the wheel can be slid over the other studs.
WARNING:Wheels and wheel covers may have sharp
edges. Handle them carefully to avoid pos-
sible severe injury. Before putting the wheel
into place, be sure that there is nothing on
the hub or wheel (such as mud, tar, gravel,
etc.) that interferes with the wheel from
fitting solidly against the hub. If there is,
remove it. If there is not good contact on the
mounting surface between the wheel and
hub, the wheel nuts could come loose and
cause the loss of a wheel. Loss of a wheel
may result in loss of control of the vehicle.
This may cause serious injury or death.To reinstall the wheel, hold it on the studs, put
the wheel nuts on the studs and tighten them
finger tight. The nuts should be installed with
their small diameter ends directed inward. Jiggle
the tire to be sure it is completely seated, then
tighten the nuts as much as possible with your
fingers again.
D060G01YD060G02Y
D060H01Y
!
Page 139 of 205

WHAT TO DO IN AN EMERGENCY 3- 9
D080A01A-AATIF YOUR CAR MUST BE TOWEDD060I01Y-AAT8. Lower Vehicle and Tighten NutsD060J01A-AATAfter Changing Wheels
Lower the car to the ground by turning the jack
handle counterclockwise. Then position the
wrench as shown in the drawing and tighten the
wheel nuts. Be sure the socket is seated com-
pletely over the nut. Do not stand on the wrench
handle or use an extension pipe over the wrench
handle.
Go around the wheel tightening every other nut
until they are all tight. Then double-check each
nut for tightness and reinstall the wheel cover.
After changing wheels, have a technician tighten
the wheel nuts to their proper torque as soon as
possible.
Wheel nut tightening torque:Steel wheel & aluminium alloy wheel:
65-80 lb.ft (900-1,100 kg.cm)If you have a tire gauge, remove the valve cap
and check the air pressure. If the pressure is
lower than recommended, drive slowly to the
nearest service station and inflate to the correct
pressure. If it is too high, adjust it until it is correct.
Always reinstall the valve cap after checking or
adjusting tire pressure. If the cap is not re-
placed, air may leak from the tire. If you lose a
valve cap, buy another and install it as soon as
possible.
After you have changed wheels, always secure
the flat tire in its place in the trunk and return the
jack, jack handle, and tools to their proper
storage locations.
CAUTION:Your car can be damaged if towed incor-
rectly!
If your car has to be towed, it should be done by
your Hyundai dealer or a commercial tow truck
service. This will help assure that your car is not
damaged in towing. Also, professionals are
generally aware of state and local laws govern-
ing towing. In any case, rather than risk damage
to your car, it is suggested that you show this
information to the tow truck operator. Be sure
that a safety chain system is used and that all
state and local laws are observed.
!
o OK FOR AUTOMATIC OR MANUAL
TRANSAXLE EQUIPPED VEHICLE
D060D02Y
D040B01YHEF-209
Page 140 of 205

3- 10 WHAT TO DO IN AN EMERGENCY
D080B01A-AATTowing a Car With Manual TransaxleD080C02A-AATTowing a Car With Automatic Transaxle
o If the car is being towed with the rear wheels
on the ground, be sure the parking brake is
released.
o If the car is being towed with the front wheels
on the ground, be sure that the transaxle is
in neutral. Also, be sure that the ignition key
is in the "ACC" position. This is necessary to
prevent damage to the steering lock mecha-
nism, which is not designed to hold the front
wheels straight while the car is being towed.
o If any of the loaded wheels or suspension
components are damaged, a towing dolly
must be used.
CAUTION:A car with an automatic transaxle should
never be towed from the rear with the front
wheels on the ground. This can cause se-
rious damage to the transaxle. If the car
must be towed from the rear, a towing dolly
must be used under the front wheels.
If the car is being towed with the rear wheels on
the ground, be sure the parking brake is re-
leased.
NOTE:Before towing, check the level of the
transaxle fluid. If it is below the "HOT" mark
on the dipstick, add fluid. If you cannot add
fluid, a towing dolly must be used as de-
scribed above.!
o OK FOR AUTOMATIC OR MANUAL
TRANSAXLE EQUIPPED VEHICLE
WITH NO DAMAGE o NOT OK FOR AUTOMATIC
TRANSAXLE EQUIPPED VEHICLE
o OK FOR MANUAL TRANSAXLE o OK FOR AUTOMATIC OR MANUAL
TRANSAXLE EQUIPPED VEHICLE
HEF-210HEF-211HEF-212
Page 141 of 205

WHAT TO DO IN AN EMERGENCY 3- 11
D080D02A-AATEmergency Towing
For emergency towing when no commercial
tow vehicle is available, attach a tow cable,
chain or strap to one of the tie-down hooks
under the front of your car. Do not attempt to tow
your vehicle in this manner on any unpaved
surface. This could result in serious damage to
your car.
Nor should towing be attempted if the wheels,
drive train, axles, steering or brakes are dam-
aged. Before towing, be sure the transaxle is in
neutral and the key is in "ACC" (with the engine
off) or in the "ON" position (with the engine
running). A driver must be in the towed car to
steer it and operate the brakes.
!
D120A01A-AATIF YOU LOSE YOUR KEYS
If you lose your keys, many Hyundai dealers
can make you a new key if you have your key
number.
If you lock the keys inside your car and you
cannot obtain a new key, many Hyundai dealers
can use special tools to open the door for you.
CAUTION:If the car is being towed with all four wheels
on the ground, it can be towed only from the
front. Be sure that the transaxle is in neutral.
Do not tow at speeds greater than 30 mph
(50 km/h) and for more than 15 miles (25
km). Be sure the steering is unlocked by
placing the key in the "ACC" position.
D080D02Y
Page 142 of 205
4. CORROSION PREVENTION &
APPEARANCE CARE
Corrosion protection ......................................................................... 4-2
To help prevent corrosion ................................................................ 4-2
Washing and waxing ........................................................................ 4-3
Cleaning the interior ......................................................................... 4-4
4
Page 143 of 205

4- 2 CORROSION PREVENTION AND APPEARANCE CARE
E020B01A-AATKeep Your Car Clean
The best way to prevent corrosion is to keep
your car clean and free of corrosive materials.
Attention to the underside of the car is particu-
larly important.
o If you live in a high-corrosion area — where
road salts are used, near the ocean, areas
with industrial pollution, acid rain, etc.—, you
should take extra care to prevent corrosion.
In winter, hose off the underside of your car
at least once a month and be sure to clean
the underside thoroughly when winter is
over.
o When cleaning underneath the car, give
particular attention to the components under
the fenders and other areas that are hidden
from view. Do a thorough job; just dampening
the accumulated mud rather than washing it
away will accelerate corrosion rather than
prevent it. Water under high pressure and
steam are particularly effective in removing
accumulated mud and corrosive materials.
o When cleaning lower door panels, rocker
panels and frame members, be sure that
drain holes are kept open so that moisture
can escape and not be trapped inside to ac-
celerate corrosion.
E020A01A-AAT
TO HELP PREVENT CORROSION
You can help prevent corrosion from getting
started by observing the following:
E010D01A-AATMoisture Breeds Corrosion
Moisture creates the conditions in which corro-
sion is most likely to occur. For example, cor-
rosion is accelerated by high humidity, particu-
larly when temperatures are just above freez-
ing. In such conditions, the corrosive material is
kept in contact with the car surfaces by mois-
ture that is slow to evaporate.
Mud is particularly corrosive because it is slow
to dry and holds moisture in contact with the
vehicle. Although the mud appears to be dry, it
can still retain the moisture and promote corro-
sion.
High temperatures can also accelerate corro-
sion of parts that are not properly ventilated so
the moisture can be dispersed. For all these
reasons, it is particularly important to keep your
car clean and free of mud or accumulations of
other materials. This applies not only to the
visible surfaces but particularly to the underside
of the car.
E010C01A-AATHigh-Corrosion Areas
If you live in an area where your car is regularly
exposed to corrosive materials, corrosion pro-
tection is particularly important. Some of the
common causes of accelerated corrosion are
road salts, dust control chemicals, ocean air
and industrial pollution.
E010B01A-AATCommon Causes of Corrosion
The most common causes of corrosion on your
car are:
o Road salt, dirt and moisture that is allowed to
accumulate underneath the car.
o Removal of paint or protective coatings by
stones, gravel, abrasion or minor scrapes
and dents which leave unprotected metal
exposed to corrosion.
E010A01A-AATCORROSION PROTECTION
Protecting Your Hyundai from Corro-
sion
By using the most advanced design and con-
struction practices to combat corrosion,
Hyundai produces cars of the highest quality.
However, this is only part of the job. To achieve
the long-term corrosion resistance your
Hyundai can deliver, the owner's cooperation
and assistance is also required.
Page 144 of 205

CORROSION PREVENTION AND APPEARANCE CARE 4- 3
E020E01A-AATDon't Neglect the Interior
Moisture can collect under the floor mats and
carpeting to cause corrosion. Check under the
mats periodically to be sure the carpeting is dry.
Use particular care if you carry fertilizers, clean-
ing materials or chemicals in the car.
These should be carried only in proper contain-
ers and any spills or leaks should be cleaned up,
flushed with clear water and thoroughly dried.
E020D01A-AATKeep Paint and Trim in Good Condition
Scratches or chips in the finish should be
covered with "touch-up" paint as soon as pos-
sible to reduce the possibility of corrosion. If
bare metal is showing through, the attention of
a qualified body and paint shop is recommended.
E020C01A-AATKeep Your Garage Dry
Don't park your car in a damp, poorly ventilated
garage. This creates a favorable environment
for corrosion. This is particularly true if you
wash your car in the garage or drive it into the
garage when it is still wet or covered with snow,
ice or mud. Even a heated garage can contrib-
ute to corrosion unless it is well ventilated so
moisture is dispersed.
E030A01A-AATWASHING AND WAXING
Washing Your Hyundai
Never wash your car when the surface is hot
from being in the sun. Always wash your car in
the shade.
Wash your car frequently. Dirt is abrasive and
can scratch the paint if it is not removed. Air
pollution or acid rain may damage the paint and
trim through chemical action if pollutants are
allowed to remain in contact with the surface. If
you live near the ocean or in an area where road
salts or dust control chemicals are used, you
should pay particular attention to the underside
of the car. Start by rinsing the car to remove dust
and loose dirt. In winter, or if you have driven
through mud or muddy water, be sure to thor-
oughly clean the underside as well. Use a hard
direct stream of water to remove accumulations
of mud or corrosive materials. Use a good
quality car-washing solution and follow the
manufacturer's directions on the package.
These are available at your Hyundai dealer or
auto parts outlet. Don't use strong household
detergents, gasoline, strong solvents or abra-
sive cleaning powders as these may damage
the finish.
Use a clean sponge or cloth, rinse it frequently
and don't damage the finish by rubbing too hard.
For stubborn spots, dampen them frequently
and remove them a little at a time.
To clean whitewall tires, use a stiff brush or
soapy steel-wool scouring pad.To clean plastic wheel covers, use a clean
sponge or soft cloth and water.
To clean cast aluminum alloy wheels, use a mild
soap or neutral detergent. Do not use abrasive
cleaners. Protect the bare-metal surfaces by
cleaning, polishing and waxing. Because alumi-
num is subject to corrosion, be sure to give
aluminum alloy wheels special attention in win-
ter. If you drive on salted roads, clean the
wheels thoroughly afterwards.
After washing, be sure to rinse thoroughly. If
soapy water dries on the finish, streaking will
result.
When the weather is warm and the humidity low,
you may find it necessary to rinse each section
immediately after washing to avoid streaking.
After rinsing, dry the car using a damp chamois
or soft, absorbent cloth. The reason for drying
the car is to remove water from the car so it will
dry without water spots. Don't rub, this can
damage the finish.
If you find any nicks or scratches in the paint,
use touch-up paint to cover them to prevent
corrosion. To protect the paintwork of the car
against corrosion, you must clean your Hyundai
(at least once a month). Give special attention
to the removal of salt, mud and other sub-
stances on the underside of the splashboards
of the car. Make sure that the outlets and the
 1
1 2
2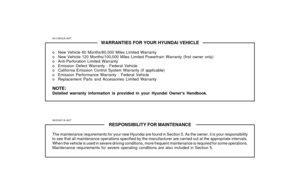 3
3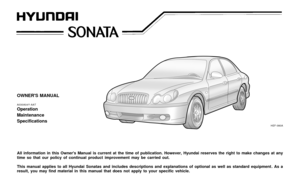 4
4 5
5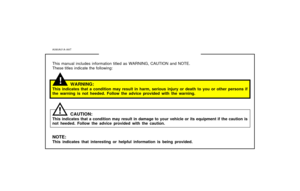 6
6 7
7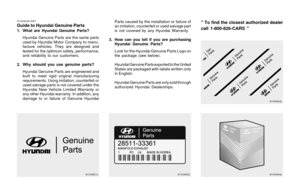 8
8 9
9 10
10 11
11 12
12 13
13 14
14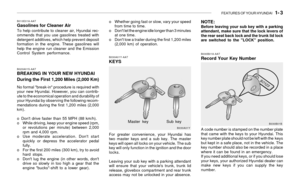 15
15 16
16 17
17 18
18 19
19 20
20 21
21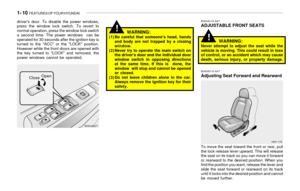 22
22 23
23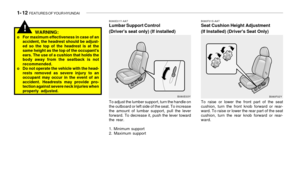 24
24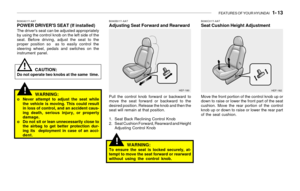 25
25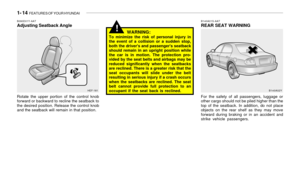 26
26 27
27 28
28 29
29 30
30 31
31 32
32 33
33 34
34 35
35 36
36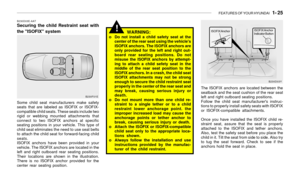 37
37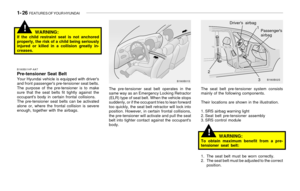 38
38 39
39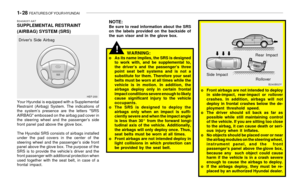 40
40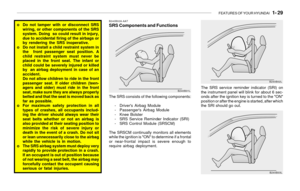 41
41 42
42 43
43 44
44 45
45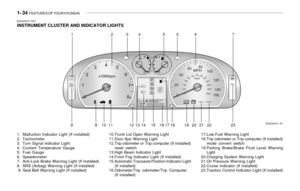 46
46 47
47 48
48 49
49 50
50 51
51 52
52 53
53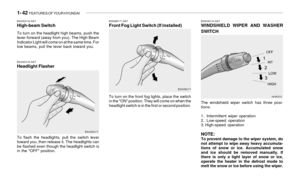 54
54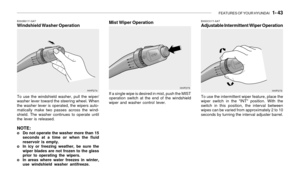 55
55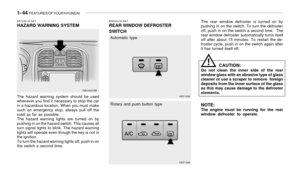 56
56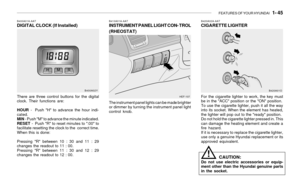 57
57 58
58 59
59 60
60 61
61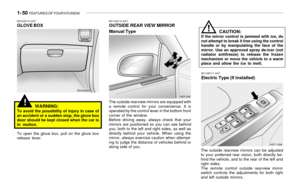 62
62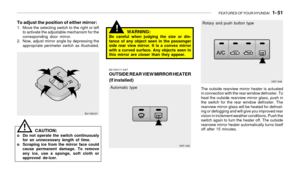 63
63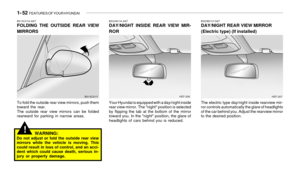 64
64 65
65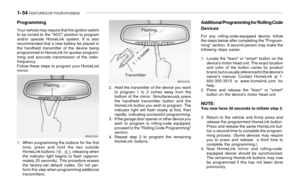 66
66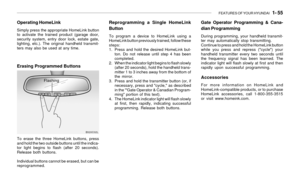 67
67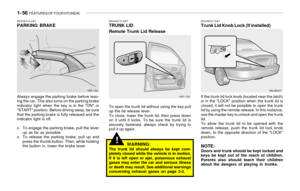 68
68 69
69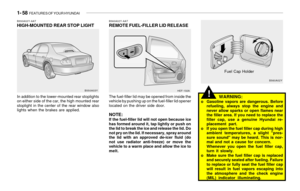 70
70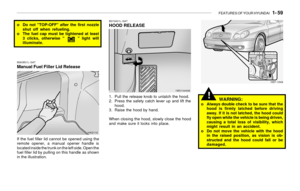 71
71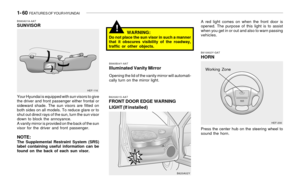 72
72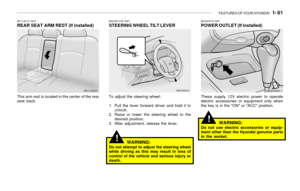 73
73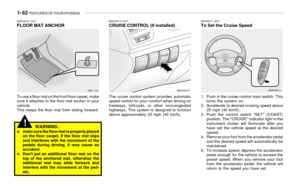 74
74 75
75 76
76 77
77 78
78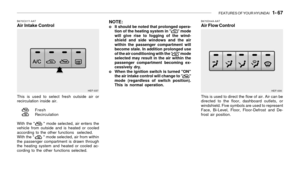 79
79 80
80 81
81 82
82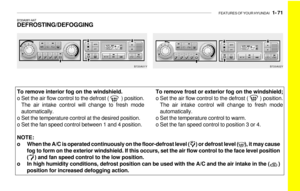 83
83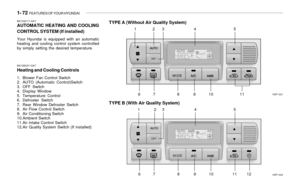 84
84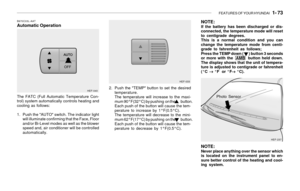 85
85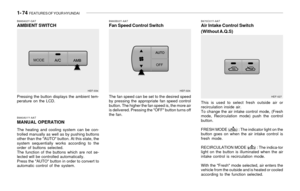 86
86 87
87 88
88 89
89 90
90 91
91 92
92 93
93 94
94 95
95 96
96 97
97 98
98 99
99 100
100 101
101 102
102 103
103 104
104 105
105 106
106 107
107 108
108 109
109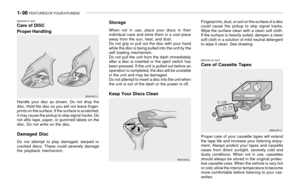 110
110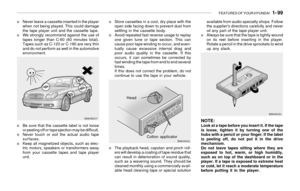 111
111 112
112 113
113 114
114 115
115 116
116 117
117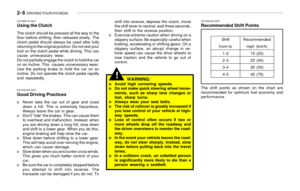 118
118 119
119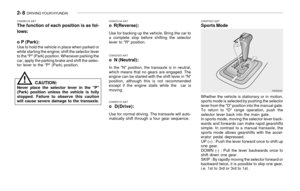 120
120 121
121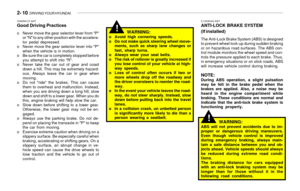 122
122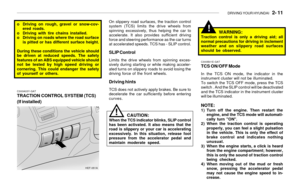 123
123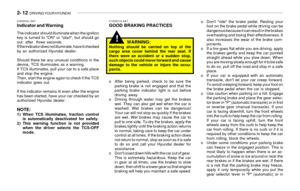 124
124 125
125 126
126 127
127 128
128 129
129 130
130 131
131 132
132 133
133 134
134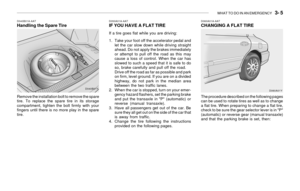 135
135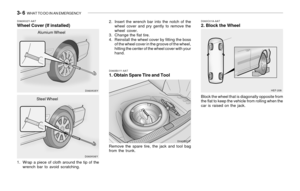 136
136 137
137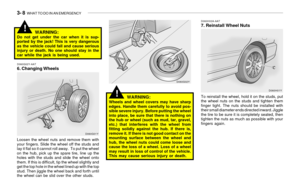 138
138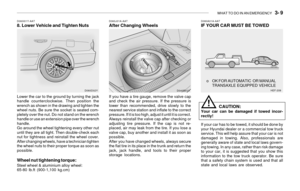 139
139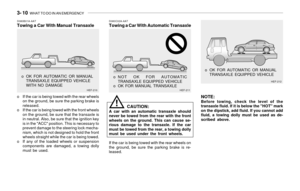 140
140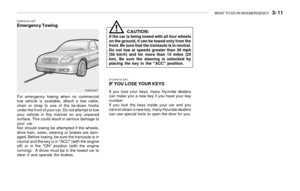 141
141 142
142 143
143 144
144 145
145 146
146 147
147 148
148 149
149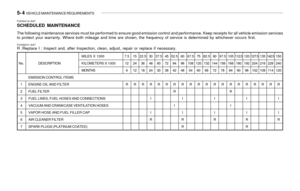 150
150 151
151 152
152 153
153 154
154 155
155 156
156 157
157 158
158 159
159 160
160 161
161 162
162 163
163 164
164 165
165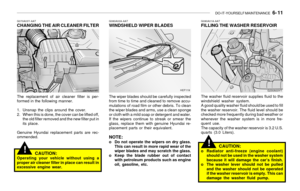 166
166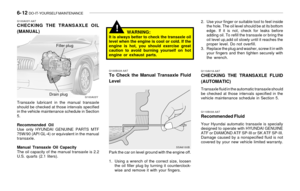 167
167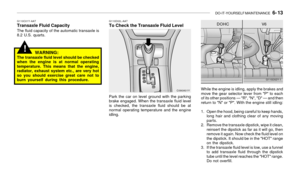 168
168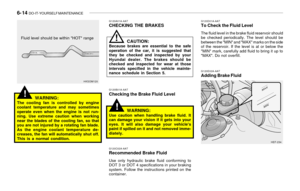 169
169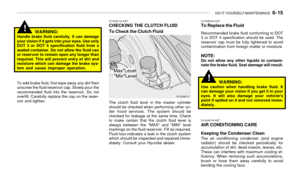 170
170 171
171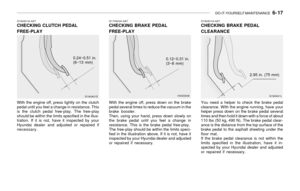 172
172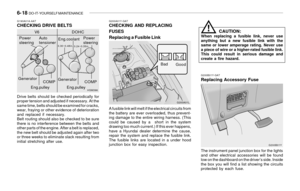 173
173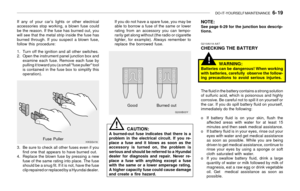 174
174 175
175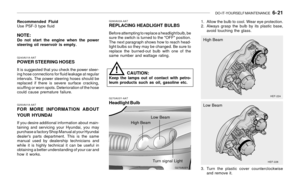 176
176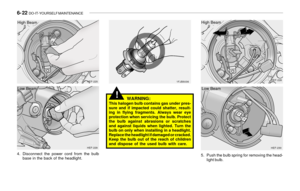 177
177 178
178 179
179 180
180 181
181 182
182 183
183 184
184 185
185 186
186 187
187 188
188 189
189 190
190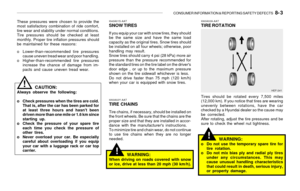 191
191 192
192 193
193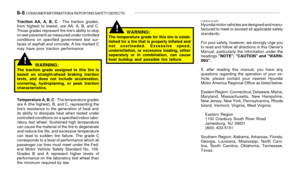 194
194 195
195 196
196 197
197 198
198 199
199 200
200 201
201 202
202 203
203 204
204