2003 Hyundai Santa Fe air condition
[x] Cancel search: air conditionPage 87 of 221
FEATURES OF YOUR HYUNDAI 1- 75
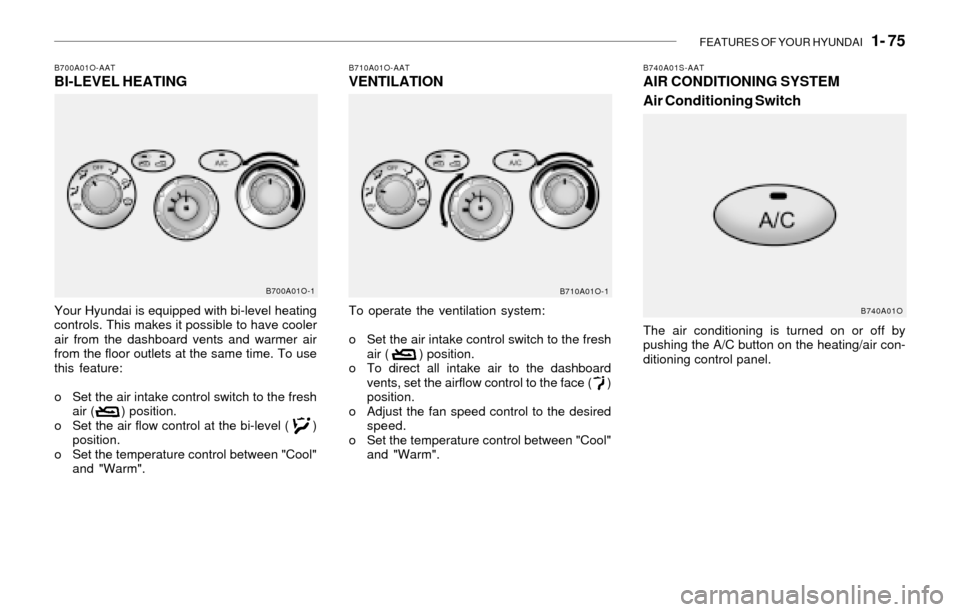
To operate the ventilation system:
o Set the air intake control switch to the fresh
air ( ) position.
o To direct all intake air to the dashboard
vents, set the airflow control to the face ( )
position.
o Adjust the fan speed control to the desired
speed.
o Set the temperature control between "Cool"
and "Warm".
B710A01O-AATVENTILATIONB700A01O-AATBI-LEVEL HEATING
Your Hyundai is equipped with bi-level heating
controls. This makes it possible to have cooler
air from the dashboard vents and warmer air
from the floor outlets at the same time. To use
this feature:
o Set the air intake control switch to the fresh
air ( ) position.
o Set the air flow control at the bi-level ( )
position.
o Set the temperature control between "Cool"
and "Warm".
B700A01O-1B710A01O-1
B740A01S-AATAIR CONDITIONING SYSTEM
Air Conditioning Switch
The air conditioning is turned on or off by
pushing the A/C button on the heating/air con-
ditioning control panel.
B740A01O
Page 88 of 221
1- 76 FEATURES OF YOUR HYUNDAI
B730A01FC-GATOperation Tips
o To keep dust or unpleasant fumes from
entering the car through the ventilation sys-
tem, temporarily set the air intake control
switch to the position. Be sure to return
the control switch to the position when
the irritation has passed to keep fresh air in
the vehicle. This will help keep the driver alert
and comfortable.
o Air for the heating/cooling system is drawn
in through the grilles just ahead of the wind-
shield. Care should be taken that these are
not blocked by leaves, snow, ice or other
obstructions.
o To prevent interior fog on the windshield, set
the air intake control switch to the fresh air
( ) position and fan speed to the desired
position.
o Adjust the fan control to the desired speed.
For greater cooling, turn the fan control to
one of the higher speeds or temporarily
select the recirculate ( ) position on the
air intake control switch.
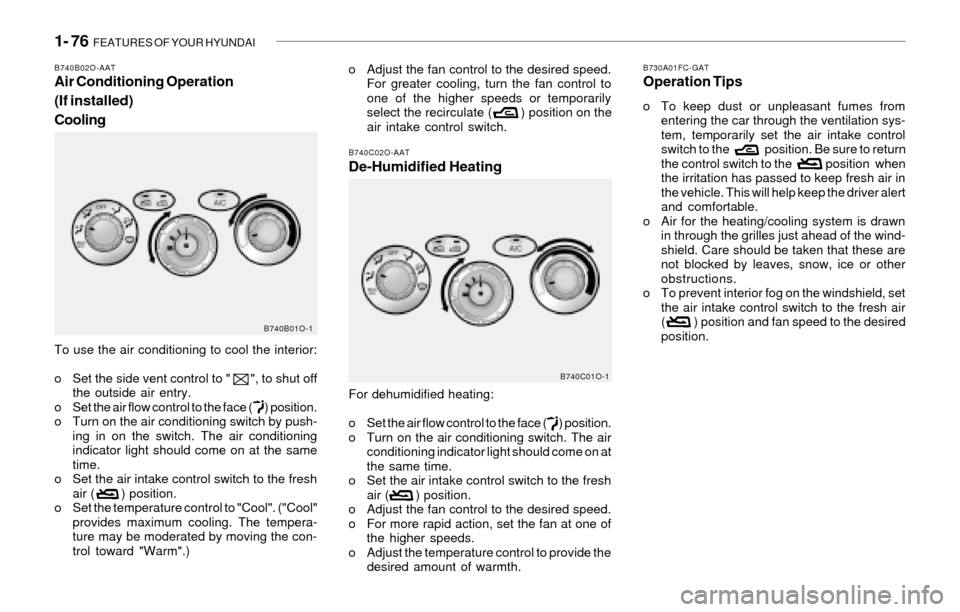
B740C02O-AATDe-Humidified Heating
For dehumidified heating:
o Set the air flow control to the face ( ) position.
o Turn on the air conditioning switch. The air
conditioning indicator light should come on at
the same time.
o Set the air intake control switch to the fresh
air ( ) position.
o Adjust the fan control to the desired speed.
o For more rapid action, set the fan at one of
the higher speeds.
o Adjust the temperature control to provide the
desired amount of warmth.
B740C01O-1
To use the air conditioning to cool the interior:
o Set the side vent control to " ", to shut off
the outside air entry.
o Set the air flow control to the face ( ) position.
o Turn on the air conditioning switch by push-
ing in on the switch. The air conditioning
indicator light should come on at the same
time.
o Set the air intake control switch to the fresh
air ( ) position.
o Set the temperature control to "Cool". ("Cool"
provides maximum cooling. The tempera-
ture may be moderated by moving the con-
trol toward "Warm".)
B740B02O-AATAir Conditioning Operation
(If installed)
Cooling
B740B01O-1
Page 90 of 221

1- 78 FEATURES OF YOUR HYUNDAI
B970A01Y-AATAUTOMATIC HEATING AND COOLING
CONTROL SYSTEM (If installed)
Your Hyundai is equipped with an automatic
heating and cooling control system controlled
by simply setting the desired temperature.
B970B01O-AATHeating and Cooling Controls
1. Temperature Control Button
2. AUTO (Automatic Control) Switch
3. Display Window
4. Air Flow Control Switch
5. Blower Fan Speed Control Switch 6. OFF Switch
7. Air Conditioning Switch
8. Air Intake Control Switch
9. Defroster Switch
10. Inside Temperature Sensor
11. Ambient Switch
B970B01O
12 3 45
6 7 8 9 10 11
Page 91 of 221

FEATURES OF YOUR HYUNDAI 1- 79
B970C02O-AATAutomatic OperationNOTE:If the battery has been discharged or dis-
connected, the temperature mode will reset
to centigrade degree.
This is a normal condition and you can
adjust the temperature mode from centi-
grade to fahrenheit as follows;
Press the TEMP down ( ) button 3 seconds
or more with the AMB button held down.
The display shows that the unit of tempera-
ture is adjusted to centigrade or fahrenheit
(°C
® ®® ®
® °F or °F
® ®® ®
® °C).
The FATC (Full Automatic Temperature Con-
trol) system automatically controls the heating
and cooling by doing as follows:
1. Push the "AUTO" switch. The indicator light
will come on confirming that the Face, Floor
and/or Bi-Level modes as well as the blower
speed and, air conditioner will be controlled
automatically.
2. Push the "TEMP" button to set the desired
temperature.
The temperature will increase to the maxi-
mum 90°F(32°C) by pushing on the bu-
tton. Each push of the button will cause the
temperature to increase by 1°F(0.5°C).
The temperature will decrease to the mini-
mum 62°F(17°C) by pushing on the bu-
tton. Each push of the button will cause the
temperature to decrease by 1°F(0.5°C).
NOTE:Never place things on the sensor which is
located in the car on the instrument panel
to ensure better control of the heating and
cooling system.
B995A01O-GATAMBIENT SWITCH
Pressing the "AMB" button displays the ambient
temperature on display window.
B980A01Y-AATMANUAL OPERATION
The heating and cooling system can be con-
trolled manually as well as by pushing buttons
other than the "AUTO" button. At this state, the
system sequentially works according to the
order of buttons selected.
The function of the buttons which are not se-
lected will be controlled automatically.
Press the "AUTO" button in order to convert to
automatic control of the system.
B970C01O
HSM502B995A01O
Photo sensor
Page 92 of 221
1- 80 FEATURES OF YOUR HYUNDAI
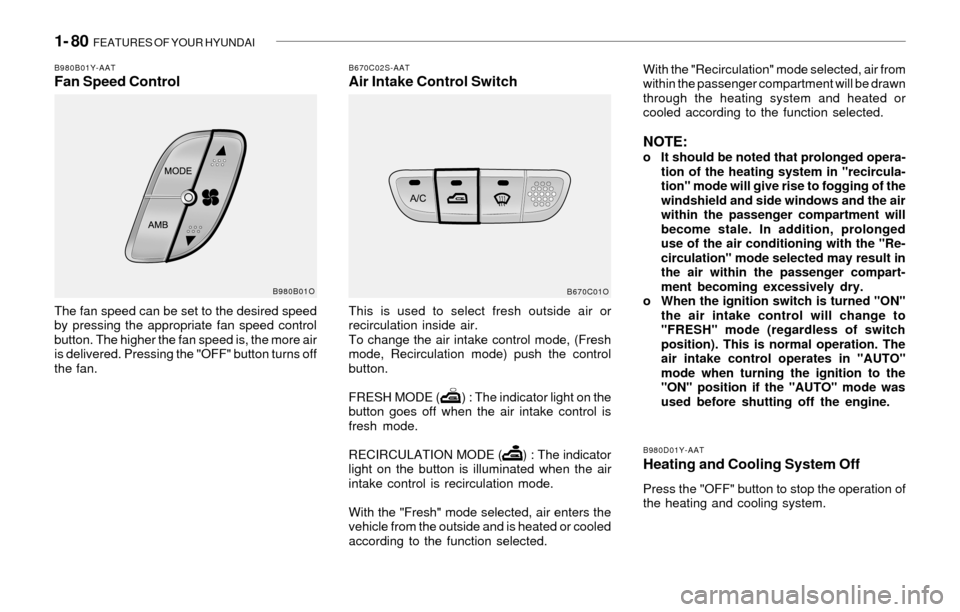
B980B01Y-AATFan Speed Control
The fan speed can be set to the desired speed
by pressing the appropriate fan speed control
button. The higher the fan speed is, the more air
is delivered. Pressing the "OFF" button turns off
the fan.
B670C02S-AATAir Intake Control SwitchWith the "Recirculation" mode selected, air from
within the passenger compartment will be drawn
through the heating system and heated or
cooled according to the function selected.
NOTE:o It should be noted that prolonged opera-
tion of the heating system in "recircula-
tion" mode will give rise to fogging of the
windshield and side windows and the air
within the passenger compartment will
become stale. In addition, prolonged
use of the air conditioning with the "Re-
circulation" mode selected may result in
the air within the passenger compart-
ment becoming excessively dry.
o When the ignition switch is turned "ON"
the air intake control will change to
"FRESH" mode (regardless of switch
position). This is normal operation. The
air intake control operates in "AUTO"
mode when turning the ignition to the
"ON" position if the "AUTO" mode was
used before shutting off the engine. This is used to select fresh outside air or
recirculation inside air.
To change the air intake control mode, (Fresh
mode, Recirculation mode) push the control
button.
FRESH MODE ( ) : The indicator light on the
button goes off when the air intake control is
fresh mode.
RECIRCULATION MODE ( ) : The indicator
light on the button is illuminated when the air
intake control is recirculation mode.
With the "Fresh" mode selected, air enters the
vehicle from the outside and is heated or cooled
according to the function selected.
B980D01Y-AAT
Heating and Cooling System Off
Press the "OFF" button to stop the operation of
the heating and cooling system.
B670C01O B980B01O
Page 95 of 221
FEATURES OF YOUR HYUNDAI 1- 83
When the "Defrost" button is pressed, the "Fresh"
mode will be automatically selected and the air
will be discharged through the windshield de-
froster nozzle, side defroster nozzle and side
ventilator.
To assist in defrosting, the air conditioning will
operate if ambient temperature is higher than
38.3°F(3.5°C) and automatically turns off if the
ambient temperature drops below
38.3°F(3.5°C).B740D01Y-AATOperation Tips
o If the interior of the car is hot when you first
get in, open the windows for a few minutes
to expel the hot air.
o When you are using the air conditioning
system, keep all windows closed to keep hot
air out.
o When moving slowly, as in heavy traffic, shift
to a lower gear. This increases engine speed,
which in turn increases the speed of the air
conditioning compressor.
o On steep grades, turn the air conditioning off
to avoid the possibility of the engine over-
heating.
o During winter months or in periods when the
air conditioning is not used regularly, run the
air conditioning once every month for a few
minutes. This will help circulate the lubri-
cants and keep your system in peak oper-
ating condition.
Page 96 of 221
1- 84 FEATURES OF YOUR HYUNDAI
B750A02A-AATSTEREO SOUND SYSTEM
How Car Audio Works
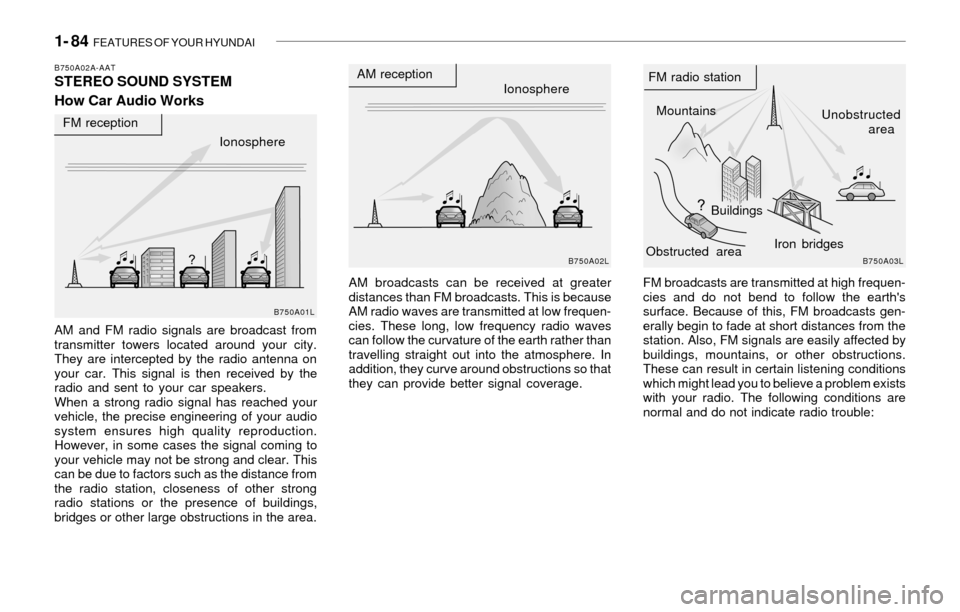
AM broadcasts can be received at greater
distances than FM broadcasts. This is because
AM radio waves are transmitted at low frequen-
cies. These long, low frequency radio waves
can follow the curvature of the earth rather than
travelling straight out into the atmosphere. In
addition, they curve around obstructions so that
they can provide better signal coverage. AM and FM radio signals are broadcast from
transmitter towers located around your city.
They are intercepted by the radio antenna on
your car. This signal is then received by the
radio and sent to your car speakers.
When a strong radio signal has reached your
vehicle, the precise engineering of your audio
system ensures high quality reproduction.
However, in some cases the signal coming to
your vehicle may not be strong and clear. This
can be due to factors such as the distance from
the radio station, closeness of other strong
radio stations or the presence of buildings,
bridges or other large obstructions in the area.FM broadcasts are transmitted at high frequen-
cies and do not bend to follow the earth's
surface. Because of this, FM broadcasts gen-
erally begin to fade at short distances from the
station. Also, FM signals are easily affected by
buildings, mountains, or other obstructions.
These can result in certain listening conditions
which might lead you to believe a problem exists
with your radio. The following conditions are
normal and do not indicate radio trouble:
Ionosphere
B750A02L
AM reception
Mountains
BuildingsUnobstructed
area FM radio station
B750A03L
Ionosphere FM reception
B750A01L
Obstructed areaIron bridges
Page 102 of 221
1- 90 FEATURES OF YOUR HYUNDAI
B260D02O-AAT1. Playing CD
o Insert the CD with the label facing upward.
o Insert the CD to start CD playback, during
radio operation.
o When a disc is in the CD deck, if you press
the CD button, the CD player will begin
playing even if the radio is being used.
o The CD player can be used when the ignition
switch is in either the "ON" or "ACC" position.
2. FF/REW ( / )
If you want to fast forward or reverse through
the compact disc track, push and hold the FF
( ) or REW ( ) button.
When you release the button, the compact disc
player will resume playing.
3. TRACK UP/DOWN
o The desired track on the disc currently being
played can be selected using the track
number.
o Press once to skip forward to the beg-
inning of the next track. Press once to
skip back to the beginning of the track.
4. SCAN Button
o Press the SCAN button to playback the first
10 seconds of each track.
o Press the SCAN button again within 10 sec.
when you have reached the desired track.
5. REPEAT Button
o To repeat the track you are currently listen-
ing to, press the RPT button. To cancel ,
press again.
o If you do not release RPT operation when the
track ends, it will automatically be replayed.
This process will be continued until you push
the button again.
6. EJECT Button
When the EJECT button is pressed with a
CD loaded, the CD will eject.
NOTE:o If the CD does not operate properly or if
the ER2 fault code is displayed, use one
of two methods to reset the CD deck
function.
- Remove the audio fuse for 5 minutes.
Then, reinstall the audio fuse.
- Diconnect the negative terminal of the
battery and wait 5 minutes. Then re-
connect the negative battery terminal.
o To assure proper operation of the unit,
keep the vehicle interior temperature
within a normal range by using the
vehicle's air conditioning or heating
system.
o When replacing the fuse, replace it with
a fuse having the correct capacity.o The preset station frequencies are all
erased when the car battery is discon-
nected. Therefore, all data will have to be
set again if this should occur.
o Do not add any oil to the rotating parts.
Keep magnets, screwdrivers and other
metallic objects away from the tape
mechanism and head.
o This equipment is designed to be used
only in a 12 volt DC battery system with
negative ground.
o This unit is made of precision parts. Do
not attempt to disassemble or adjust
any parts.
o When driving your vehicle, be sure to
keep the volume of the unit set low
enough to allow you to hear sounds
coming from the outside.
o Do not expose this equipment (includ-
ing the speakers) to water or excessive
moisture.