2003 Hyundai Getz automatic
[x] Cancel search: automaticPage 15 of 444

YOUR VEHICLE AT A GLANCE
B255A01TB-GAT INDICATOR SYMBOLS ON THE INSTRUMENT PANEL * A detail explanations of these items will be found on page 1-44
SRS (Airbag) Service Reminder Indicator ABS Service Reminder Indicator Turn Signal Indicator Lights High Beam Indicator Light Oil Pressure Warning Light Parking Brake/Brake Level Warning Light Charging System Warning Light Tail Gate Open Warning LightDoor Ajar Warning Light and Chime
Low Fuel Level Warning Light Malfunction Indicator Light Seat Belt Reminder Light
O/D OFF Indicator (Automatic transaxle only)
Electric Power Steering System (EPS)Warning Light
Diesel Pre-heat Indicator Light (Diesel only)
Fuel Filter Warning Light (Diesel only)
Immobilizer Indicator
Page 30 of 444

FEATURES OF YOUR HYUNDAI 1- 15
HTB025
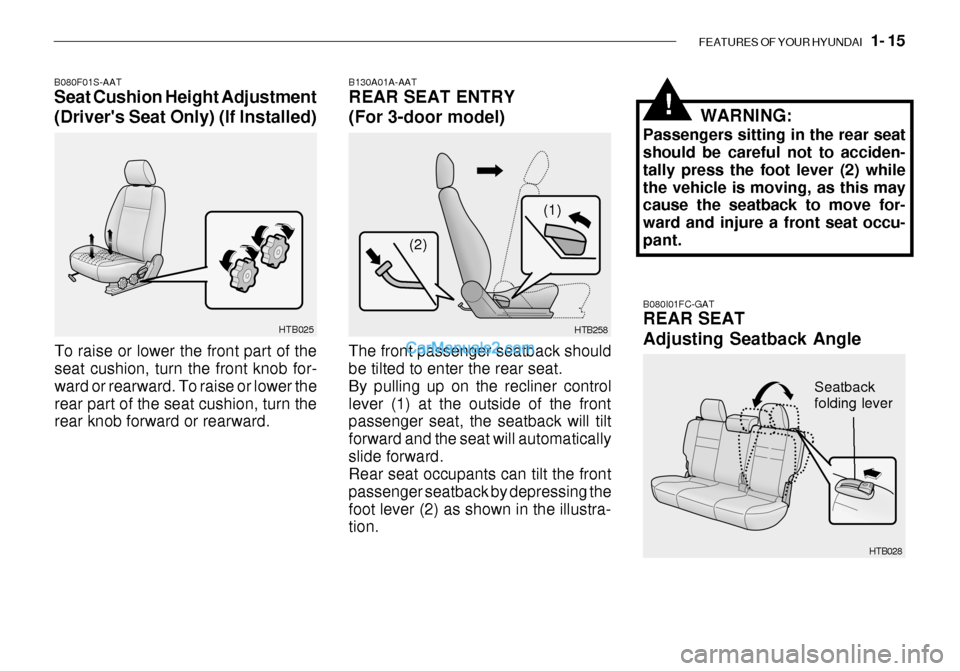
B080F01S-AAT Seat Cushion Height Adjustment (Driver's Seat Only) (If Installed)
To raise or lower the front part of the seat cushion, turn the front knob for- ward or rearward. To raise or lower therear part of the seat cushion, turn the rear knob forward or rearward. B130A01A-AAT REAR SEAT ENTRY (For 3-door model) The front passenger seatback should be tilted to enter the rear seat. By pulling up on the recliner controllever (1) at the outside of the front passenger seat, the seatback will tilt forward and the seat will automaticallyslide forward. Rear seat occupants can tilt the front passenger seatback by depressing thefoot lever (2) as shown in the illustra- tion. WARNING:
Passengers sitting in the rear seatshould be careful not to acciden- tally press the foot lever (2) whilethe vehicle is moving, as this may cause the seatback to move for- ward and injure a front seat occu-pant.
HTB258
!
HTB028
Seatback folding lever
B080I01FC-GAT REAR SEAT Adjusting Seatback Angle
(1)
(2)
Page 37 of 444

1- 22 FEATURES OF YOUR HYUNDAI
B180A02A-GAT SEAT BELTS 3-Point System with Emergency Locking Retrac-
tor (If Installed)To Fasten Your Belt
B180A01L
To fasten your seat belt, pull it out of the retractor and insert the metal tabinto the buckle. There will be an au- dible "click" when the tab locks into the buckle.The seat belt automatically adjusts to the proper length only after the lap belt is adjusted manually so that it fitssnugly around your hips. If you lean forward in a slow, easy motion, the belt will extend and let you move around. Ifthere is a sudden stop or impact, how- ever, the belt will lock into position. It
B170A04A-AAT HEIGHT ADJUSTABLE FRONT SEAT SHOULDER BELT(If Installed)
B170A01L
You can adjust the height of the shoul- der belt anchor to one of the 4 posi- tions.If the height of the adjusting seat belt is too near your neck, you will not be getting the most effective protection.The shoulder portion should be adjusted so that it lies across your chest and midway over your shouldernearest the door and not your neck. To adjust the height of the seat belt anchor, lower or raise the height ad-juster into an appropriate position. To raise the height adjuster, pull it up. To lower it, push it down while pressingthe height adjuster button. Release the button to lock the anchorinto position. Try sliding the release button to make sure that it has locked into the position.
WARNING:
o The height adjuster must be in the locked position when thevehicle is moving.
o The misadjustment of height of
the shoulder belt could reduce the effectiveness of the seat belt in a crash.
!
Page 38 of 444

FEATURES OF YOUR HYUNDAI 1- 23
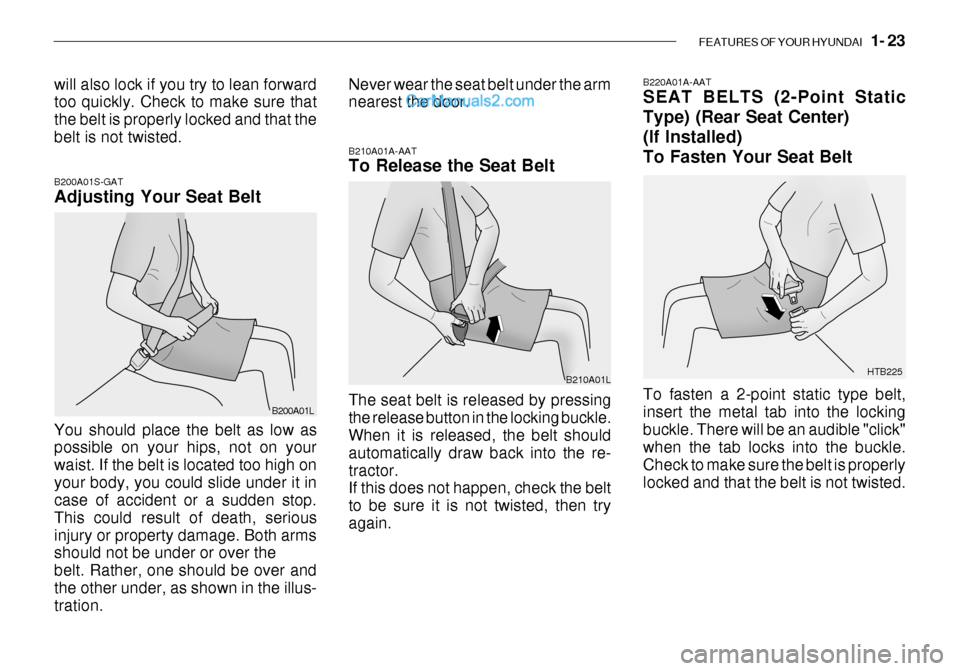
B200A01S-GAT Adjusting Your Seat Belt B210A01A-AAT To Release the Seat Belt
The seat belt is released by pressing the release button in the locking buckle. When it is released, the belt should automatically draw back into the re-tractor. If this does not happen, check the belt to be sure it is not twisted, then tryagain.
will also lock if you try to lean forward too quickly. Check to make sure that the belt is properly locked and that thebelt is not twisted.
B200A01L
You should place the belt as low as possible on your hips, not on your waist. If the belt is located too high onyour body, you could slide under it in case of accident or a sudden stop. This could result of death, seriousinjury or property damage. Both arms should not be under or over the belt. Rather, one should be over andthe other under, as shown in the illus- tration. Never wear the seat belt under the armnearest the door.
B210A01L
B220A01A-AAT SEAT BELTS (2-Point Static Type) (Rear Seat Center)(If Installed)To Fasten Your Seat Belt To fasten a 2-point static type belt, insert the metal tab into the lockingbuckle. There will be an audible "click" when the tab locks into the buckle. Check to make sure the belt is properlylocked and that the belt is not twisted. HTB225
Page 39 of 444

1- 24 FEATURES OF YOUR HYUNDAI
B220A01Y-GAT SEAT BELTS - Rear Seat Center's 3-Point System WithEmergency Locking Retractor(If installed)
1. Before fastening the rear seat cen-
ter belt, confirm the metal tab (a) and buckle (b) are latched together.
2. After confirming that (a) and (b) are latched, pull the seat belt out of theretractor and insert the metal tab (c)into the buckle (d).
There will be an audible "click" when the tab locks in the buckle. The seat belt automatically adjusts to the properlength only after the lap belt is adjusted manually so that it fits snugly around HTB192
HTB226
Correct
Shorten Too high
B220B01A-AAT Adjusting Your Seat Belt With a 2-point static type seat belt, the length must be adjusted manually so it fits snugly around your body. Fastenthe belt and pull on the loose end to tighten. The belt should be placed as low as possible on your hips, not onyour waist. If the belt is too high, it could increase the possibility of your being injured in an accident. B220C01A-AAT To Release the Seat Belt
When you want to release the seat belt, press the button in the locking buckle. HTB190
WARNING:
The center lap belt latching mecha- nism is different from those for the rear seat shoulder belts. When fas-tening the rear seat shoulder belts or the center lap belt, make sure they are inserted into the correctbuckles to obtain maximum protec- tion from the seat belt system and assure proper operation.
!
(a)
(b) (c)
(d)
Page 42 of 444

FEATURES OF YOUR HYUNDAI 1- 27
o Never allow a child to stand up or
kneel on the seat.
o Never use an infant carrier or child safety seat that "hooks" over a seatback; it may not provide ad- equate security in an accident.
o Never allow a child to be held in a person's arms while they are in a moving vehicle, as this could re-sult in serious injury to the child in the event of an accident or a sudden stop. Holding a child in amoving vehicle does not provide the child with any means of pro- tection during an accident, even if the person holding the child is wearing a seat belt.
o If the child restaint seat is not anchored properly, the risk of achild being seriously injured or killed in a collision greatly in- creases.
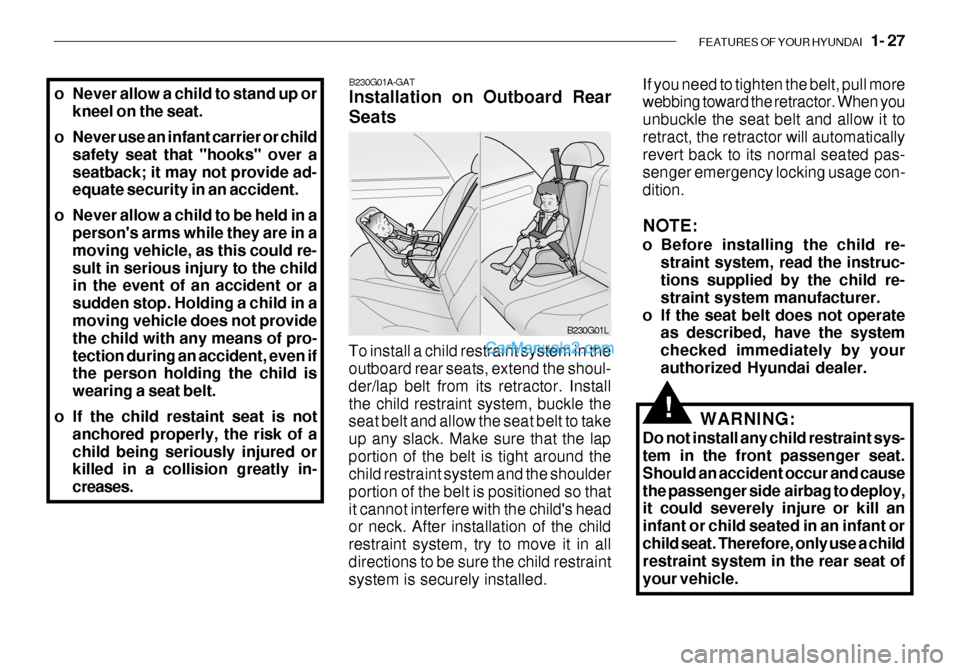
B230G01L
WARNING:
Do not install any child restraint sys- tem in the front passenger seat. Should an accident occur and causethe passenger side airbag to deploy, it could severely injure or kill an infant or child seated in an infant orchild seat. Therefore, only use a child restraint system in the rear seat of your vehicle.
If you need to tighten the belt, pull more webbing toward the retractor. When you unbuckle the seat belt and allow it toretract, the retractor will automatically revert back to its normal seated pas- senger emergency locking usage con-dition. NOTE:
o Before installing the child re-
straint system, read the instruc- tions supplied by the child re- straint system manufacturer.
o If the seat belt does not operate as described, have the systemchecked immediately by yourauthorized Hyundai dealer.
!
To install a child restraint system in the outboard rear seats, extend the shoul- der/lap belt from its retractor. Installthe child restraint system, buckle the seat belt and allow the seat belt to take up any slack. Make sure that the lapportion of the belt is tight around the child restraint system and the shoulder portion of the belt is positioned so thatit cannot interfere with the child's head or neck. After installation of the child restraint system, try to move it in alldirections to be sure the child restraint system is securely installed.B230G01A-GAT Installation on Outboard Rear Seats
Page 51 of 444

1- 36 FEATURES OF YOUR HYUNDAI
The SRS consists of the following com- ponents:
- Driver's Airbag Module
- Passenger's Airbag Module
- SRS Service Reminder Indicator (SRI)
- SRS Control Module (SRSCM)
The SRSCM continually monitors all elements while the ignition is "ON" to determine if a frontal or near-frontalimpact is severe enough to require airbag deployment.
B240B01FC-GAT SRS Components and Functions
B240B01L
B240B02L
The SRS service reminder indicator (SRI) on the instrument panel will blink for about 6 seconds after the ignitionkey is turned to the "ON" position or after the engine is started, after which the SRI should go out. The airbag modules are located both in the center of the steering wheel and in the front passenger's panel above theglove box. When the SRSCM detects a considerable impact to the front of the vehicle, it will automatically deploy theairbags.
B240B03L
Page 59 of 444

1- 44 FEATURES OF YOUR HYUNDAI
B260B01S-GAT
SRS (Airbag) Service Reminder Indicator (SRI)(If Installed)
The SRS service reminder indicator (SRI) comes on and flashes for about 6 seconds after the ignition key isturned to the "ON" position or after the engine is started, after which it will go out. This light also comes on when the SRS is not working properly. If the SRI doesnot come on, or continuously remains on after flashing for about 6 seconds when you turned the ignition key to the"ON" position or started the engine, or if it comes on while driving, have the SRS inspected by an authorizedHyundai Dealer. B260P02Y-GAT
ABS Service Reminder Indicator (SRI)(If Installed)
When the key is turned to the "ON" position, the Anti-Lock Brake System will come on and then go off in a fewseconds. If the ABS SRI remains on, comes on while driving, or does not come on when the key is turned to the"ON" position, this indicates that there may be a problem with the ABS. If this occurs, have your vehiclechecked by your Hyundai dealer as soon as possible. The normal braking system will still be operational, butwithout the assistance of the anti-lock brake system. B260C01A-AAT
O/D OFF Indicator (Automatic transaxleonly) (If Installed)
When the overdrive switch is turned on, the overdrive off indicator will go out. This amber indicator will be illumi-nated when the overdrive switch is turned off. B260D01A-AAT Turn Signal Indicator Lights
The blinking green arrows on the in- strument panel show the direction indi-cated by the turn signals. If the arrow comes on but does not blink, blinks more rapidly than normal, or does notilluminate at all, a malfunction in the turn signal system is indicated. Your dealer should be consulted for repairs.
! CAUTION:
If both ABS SRI and Parking Brake/ Brake fluid level warning lights re-main "ON" or come on while driv- ing, there may be a problem with E.B.D (Electronic Brake Force Dis-tribution). If this occurs, avoid sudden stops and have your vehicle checked byyour Hyundai dealer as soon as possible.