Page 121 of 392

.....................
Heating and Cooling .118
.........
What Each Control Does . 118
............
How to Use the System . 122
..........
To Turn Everything Of f . 127
...............
Climate Control System . 128
(EX model) .......
Fully-automatic Operation . 130
.......
Semi-automatic Operation . 131
Sunlight Sensor/ ............
Temperature Sensor . 134
...........................
Rear A/C Unit .135
.......................
Audio System (LX) .137
AM/FM/CD ........................
Audio System .137
.................
Operating the Radio . 137
.................
Adjusting the Sound . 141
..............................
Digital Clock .142
............
Audio System Lighting . 143
.........
Operating the CD Player . 143
.....
Operating the CD Changer . 145
....
CD Player Error Indications . 147
CD Changer Error .............................
Indications .148
Operating the Cassette .....................................
Player .149
............
Tape Search Functions . 151.......................
Audio System (EX) .153
AM/FM/Cassette/CD Audio ....................................
System .153
.................
Operating the Radio . 154
.................
Adjusting the Sound . 158
..............................
Digital Clock .159
............
Audio System Lighting . 159
Operating the Cassette .....................................
Player .160
............
Tape Search Functions . 162
.........
Operating the CD Player . 163
.....
Operating the CD Changer . 165
....
CD Player Error Indications . 166
CD Changer Error .............................
Indications .167
Audio System (Optional on U.S. ..............................
EX model) .168
AM/FM/Cassette/CD/DVD ........................
Audio System .168
.................
Operating the Radio . 170
.................
Adjusting the Sound . 174
..............................
Digital Clock .175
............
Audio System Lighting . 175
....................
Radio Frequencies . 176
........................
Radio Reception .176 Operating the Cassette
.....................................
Player .178
Caring f or the Cassette .....................................
Player .181
.........
Operating the CD Player . 182
.....
Operating the CD Changer . 184
.......
Protecting Compact Discs . 185
....
CD Player Error Indications . 186
CD Changer Error .............................
Indications .187
...........
Remote Audio Controls . 188
.......................
Thef t Protection .189
........
Rear Entertainment System . 190
............................
Security System .206
...............................
Cruise Control .207
HomeLink Universal ................................
Transceiver .210
Comf ort and Convenience Features
Comf ort and Convenience Feat ures117
Page 141 of 392
Your Honda’s audio system provides
clear reception on both AM and FM
bands, while the preset buttons allow
you to easily select your f avorite
stations.The ignition switch must be in
ACCESSORY (I) or ON (II) to
operate the audio system. Turn the
system on by pushing the PWR/
VOL knob or the AM/FM button.
Adjust the volume by turning the
knob.The band and f requency that the
radio was last tuned to is displayed.
To change bands, press the AM/FM
button. On the FM band, ST will be
displayed if the station is broadcast-
ing in stereo. Stereo reproduction on
AM is not available.
CONT INUED
On LX model
Audio System
AM/FM/CD Audio System
Operating the Radio
Comf ort and Convenience Feat ures137
Page 142 of 392

�µ�µ�µ
You can use any of f ive methods to
f ind radio stations on the selected
band: TUNE, SEEK, SCAN, AUTO
SELECT, and the Preset buttons.
Use the TUNE knob to
tune the radio to a desired f requency.
Turn the TUNE knob to the right to
tune to a higher f requency, or to the
lef t to tune to a lower f requency.
Turn the knob right or lef t until the
display reaches the desired
f requency. The SEEK f unction
searches the band for a station with
a strong signal. To activate it, press
theSEEKbaroneitherthe or side, then release it.
Depending on which side you press,
the system scans upward or down-
ward f rom the current f requency. It
stops when it finds a station with a
strong signal. The SCAN function
samples all the stations with strong
signals on the selected band. To
activate it, press the SCAN button,
then release it. You will see SCAN in
the display. The system will scan up
the band for a station with a strong
signal. When it f inds one, it will stop
and play that station for
approximately f ive seconds. If you do
nothing, the system will then scan
f or the next strong station and play
that f or f ive seconds. When it plays a
station that you want to continue
listening to, press the SCAN button
again.
Audio System
Comf ort and Convenience Feat ures
TUNE SEEK
SCA N
138
Page 143 of 392
�µ
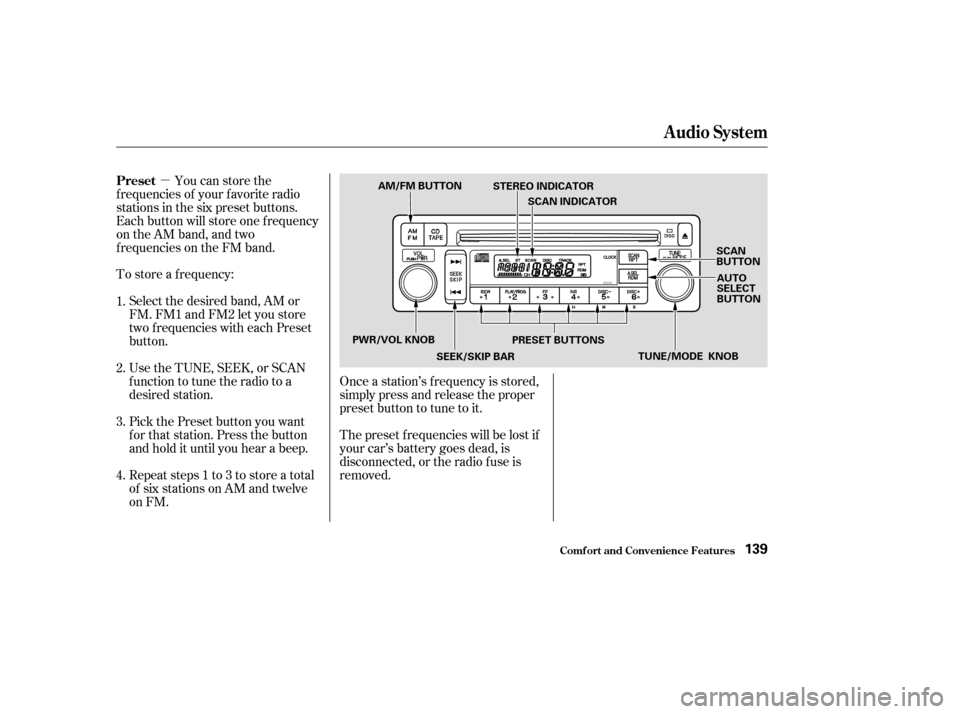
Repeat steps 1 to 3 to store a total
of six stations on AM and twelve
on FM. Pick the Preset button you want
for that station. Press the button
and hold it until you hear a beep. Select the desired band, AM or
FM. FM1 and FM2 let you store
two f requencies with each Preset
button.
To store a f requency:
Once a station’s f requency is stored,
simply press and release the proper
preset button to tune to it.
The preset f requencies will be lost if
your car’s battery goes dead, is
disconnected, or the radio f use is
removed.
You can store the
f requencies of your f avorite radio
stations in the six preset buttons.
Each button will store one f requency
on the AM band, and two
f requencies on the FM band.
UsetheTUNE,SEEK,orSCAN
function to tune the radio to a
desired station.
1.
2.
3.
4. Preset
Audio System
Comf ort and Convenience Feat ures139
AM/FM BUTTON
STEREO INDICATOR
SCAN INDICATOR
SCAN
BUTTONAUTO
SELECT
BUTTON
PWR/VOL KNOB SEEK/SKIP BARPRESET BUTTONS
TUNE/MODE KNOB
Page 144 of 392

�µIf you are
traveling far from home and can no
longer receive the stations you
preset, you can use the Auto Select
feature to find stations in the local
area.
If you are in a remote area, Auto
Select may not f ind six strong AM
stations or twelve strong FM stations.
If this happens, you will see a ‘‘0’’
displayed when you press any preset
button that does not have a station
stored. To activate Auto Select, press the
A. SEL button. A. SEL will f lash in
the display, and the system will go
into scan mode f or several seconds.
It automatically scans both bands,
looking f or stations with strong
signals. It stores the f requencies of
six AM stations and twelve FM
stations in the preset buttons. You
can then use the preset buttons to
select those stations. If you do not like the stations Auto
Select has stored, you can store
other f requencies in the preset
buttons. Use the TUNE, SEEK, or
SCAN f unction to f ind the desired
f requencies, then store them in the
selected preset buttons as described
previously.Auto Select does not erase the
f requencies that you preset pre-
viously. When you return home, turn
of f Auto Select by pressing the
A. SEL button. The preset buttons
will then select the f requencies you
originally set.
Audio System
Comf ort and Convenience Feat ures
AUTO SELECT
140
AUTO SELECT INDICATOR
SCAN BUTTON
TUNE
KNOB
A.SEL BUTTON
SEEK BAR
Page 145 of 392

�µ�µ
Bass, Treble, Balance, and Fader are
each adjustable. You select which of
these you want to adjust by pressing
the TUNE knob. The mode changes
fromBAStoTREtoFADtoBAL,
and then back to the selected audio
mode, each time you press the
TUNE knob. Each mode is shown in
the display as it changes.
These two
modes adjust the strength of the
sound coming f rom each speaker.
BAL adjusts the side-to-side strength,
while FAD adjusts the f ront-to-back
strength.
Select BAL or FAD by pressing the
TUNE knob. Adjust the Balance or
Fader to your liking by turning the
TUNE knob.
The displayed number shows you
the current setting.
When the adjustment level reaches
the center, you will see ‘‘ ’’. Use these modes to
adjust the tone to your liking. Select
TRE or BAS by pressing the TUNE
knob. Adjust the desired mode by
turning the TUNE knob.
The displayed number shows you
the current setting.
When the adjustment level reaches
the center, you will see ‘‘ ’’. The system will automatically return
the display to the selected audio
mode about f ive seconds af ter you
stop adjusting a mode with the
TUNE knob.
Adjusting the Sound
Balance/Fader
Treble/Bass
Audio System
Comf ort and Convenience Feat ures141
Adjustment Level
TUNE KNOB
Page 146 of 392
 or ON
(II). It shows the operation mode of
the radio, CD player, or optional
cassette player or CD changer")
The audio system display usually
shows the time when the ignition
switch is in ACCESSORY (I) or ON
(II). It shows the operation mode of
the radio, CD player, or optional
cassette player or CD changer when
you operate them, then goes back to
the time display af ter f ive seconds.You can quickly set the time to the
nearest hour. If the displayed time is
bef ore the half hour, pressing and
holding the clock button, then
pressing the RESET button (preset
6) sets the clock back to the previous
hour. If the displayed time is af ter
the half hour, the clock is set
f orward to the beginning of the next
hour.If your vehicle’s battery is
disconnected or goes dead, the time
setting will be lost. To set the time
again, follow the setting procedure. For example:
1:06 will reset to 1:00
1:52 will reset to 2:00
To set the clock, press and hold the
CLOCK (SCAN/RPT) button.
Change the hours by pressing the H
(preset 4) button until the numbers
advance to the desired time. Change
the minutes by pressing the M
(preset 5) button until the numbers
advance to the desired time.
Audio System
Comf ort and Convenience Feat ures
Digital Clock
142
RESET
MH
CLOCK BUTTON
Page 147 of 392
 or ON (II), insert
the disc into the CD slot. Push the
disc")
You operate the CD player with the
same controls used f or the radio. For inf ormation, see page .
With the ignition switch in
ACCESSORY (I) or ON (II), insert
the disc into the CD slot. Push the
disc in half way, the drive will pull it
in the rest of the way and begin to
play. The number of the track that is
playing is shown in the display.You can also play 3-inch (8-cm) discs
without using an adapter ring. Play
only standard round discs. Odd-
shaped CDs may jam in the drive or
cause other problems.
For best results when using CD-R
discs, use only high quality discs
labeled f or audio use. When
recording a CD-R, the recording
must be closed in order f or the disc
to be used by CD players. CD-RW
discs will not work in this unit.
You can use the instrument panel
brightness control knob to adjust the
illumination of the audio system (see
page ). The audio system
illuminates when the parking lights
are on, even if the radio is turned of f .
176
73
CONT INUED
Operating the CD Player A udio System L ighting Radio Frequencies and Reception
Audio System
Comf ort and Convenience Feat ures143
CD/TAPE BUTTON
AM/FM BUTTON CD SLOTRPT BUTTON
REPEAT INDICATOR
EJECT
BUTTON
PWR/VOL KNOB SEEK/SKIP BARRANDOM INDICATOR
A.SEL/RDM BUTTON
 o")