Page 2 of 415

T his Owner’s Manual should be considered
a permanent part of the vehicle, and should
remain with the vehicle when it is sold.
T he inf ormation and specif ications included
in this publication were in ef f ect at the time
of approval f or printing. Honda Motor Co.,
Ltd. reserves the right, however, to
discontinue or change specif ications or
design at any time without notice and
without incurring any obligation whatsoever. T his Owner’s Manual covers all models of
the Odyssey. You may f ind descriptions of
equipment and f eatures that are not on your
particular model.Si pref iere este Manual del
Propietario en español,
comuníquese con el concesionario
Honda.
POUR CLIENTS CANADIEN
A VIS IMPORT A NT : Si vous avez
besoin d’un Manuel du Conduct eur
en f rançais, veuillez demander à
votreconcessionnairede
commander le numéro de pièce
38S0X640
Owner’s Identif ication
OWNER
ADDRESS
V. I. N.
DELIVERY DATE
DEALER NAME DEALER NO.
ADDRESS
OWNER’S SIGNATURE
DEALER’S SIGNATURE
STREET
CITY STATE/PROVINCE ZIP CODE/
POSTAL CODE
(Date sold to original retail purchaser)
STREET
CITY STATE/PROVINCE ZIP CODE/
POSTAL CODE
Page 25 of 415

Pregnant women should also sit
upright and as f ar back as possible
f rom the steering wheel or
dashboard. This will reduce the risk
of injuries to both the mother and
her unborn child that can be caused
by a crash or an inf lating airbag.
Each time you have a check-up, ask
your doctor if it’s okay f or you to
drive.
Because protecting the mother is the
best way to protect her unborn child,
a pregnant woman should always
wear a seat belt whenever she drives
or rides in a vehicle.
Remember to keep the lap portion of
the belt as low as possible across
your hips. All passengers
must sit in locked, upright seats
andbeproperlyrestrainedbyseat
belts.
A passenger who is not
wearing a seat belt during a crash
or emergency stop can be thrown
against the inside of the vehicle,
against other occupants, or out of
the vehicle.
If they do, they
could be very seriously injured in a
crash.
Advice f or Pregnant Women
Additional Saf ety Precautions
Protecting Adults
Driver and Passenger Saf ety
Never let passengers ride in t he
cargo area or on t op of a f olded-down back seat .
Passengers should not st and up orchange seats while the vehicle ismoving.
T wo people should never use t hesame seat belt .
22
Page 79 of 415

This light comes on with the high
beam headlights. See page for
inf ormation on the headlight
controls.
On Canadian models, this indicator
comes on with reduced brightness
when the Daytime Running Lights
(DRL) are on (see page ).This indicator lights when you turn
the ignition switch to ON (II) with
the headlight switch of f and the
parking brake set. It should go of f if
youturnontheheadlightsorrelease
the parking brake. If it comes on at
any other time, it means there is a
problem with the DRL. There may
also be a problem with the high
beam headlights.
The lef t or right turn signal light
blinks when you signal a lane change
or turn. If the light does not blink or
blinks rapidly, it usually means one
of the turn signal bulbs is burned out
(see page ). Replace the bulb as
soon as possible, since other drivers
cannot see that you are signaling.
WhenyouturnontheHazard
Warning switch, both turn signal
lights blink. All turn signals on the
outside of the vehicle should f lash.
333
82
83Canadian models only
High Beam Indicator ‘‘Daytime Running
Lights’’ Indicator
Turn Signal and
Hazard Warning
Indicators
Indicator L ights
Inst rument s and Cont rols76
Page 88 of 415
To operate the wipers in mist mode,
push the control lever down. The
wipers run at high speed until you
release the lever. This gives you a
quick way to clear the windshield.
In intermittent, the wipers operate
every f ew seconds. You can vary
how of ten the wipers sweep the
windshield by turning the INT TIME
ring next to the rotary switch. The
sweep interval will change slightly
with speed; getting shorter as you
drive f aster. In low speed
intermittent and high speed driving,
the wipers run continuously. If you turn the INT TIME ring to the
shortest delay, the wipers will
change from intermittent to low
speed operation when vehicle speed
exceeds 12 mph (20 km/h).
Controls Near the Steering Wheel
Inst rument s and Cont rols85
Page 94 of 415

�µ
If the f ront wheels are turned, the
anti-thef t lock may sometimes make
it difficult to turn the key from
LOCK to ACCESSORY. Firmly turn
the steering wheel to the lef t or to
the right as you turn the key. You can insert or
remove the key only in this position.
To switch f rom ACCESSORY to
LOCK, you must push the key in
slightly as you turn it. The shif t lever
must also be in Park. The anti-thef t
lock will lock the steering column
when you remove the key.
The ignition switch is on the right
side of the steering column. It has
f our positions:
LOCK(0)
ACCESSORY (I)
ON (II)
START (III)As required by the FCC: This device complies with Part 15 of theFCC rules. Operation is subject to thef ollowing two conditions: (1) This devicemay not cause harmf ul interf erence, and(2) this device must accept anyinterf erence received, includinginterf erence that may cause undesiredoperation.
Changes or modif ications not expresslyapproved by the party responsible f orcompliance could void the user’sauthority to operate the equipment.
This device complies with IndustryCanada Standard RSS-210.Operation is subject to the f ollowing twoconditions: (1) this device may not causeinterf erence, and (2) this device mustaccept any interf erence that may causeundesired operation of the device.
CONT INUED
LOCK (0)
Ignition Switch
Keys and Locks
Inst rument s and Cont rols91
Page 193 of 415

�µ�µ
You can use the TUNE and SEEK/
SKIP bars while a disc is playing to
select passages and change tracks.
To move rapidly within a track, press
andholdtheTUNEbar.Pressthe
side to move forward. You will
seeCUEinthedisplay.Pressthe side to move backward. You
will see REW displayed. Release the
bar when the system reaches the
point you want.
Each time you press and release the side of the SEEK/SKIP bar,
the system skips forward to the
beginning of the next track. Press
the sidetoskipbackwardtothe
beginning of the current track. Press
it again to skip to the beginning of
the previous track. To activate the Repeat
f eature, press and release the RPT
button. You will see RPT in the
display. The system continuously
replays the current track. Press the
RPT button again to turn it off.
This feature,
when activated, plays the tracks on
the CD in random order, rather than
in the order they are recorded on the
CD. To activate Random Play, press
and release the A. SEL/RDM button.
You will see RDM in the display. The
system will then select and play
tracks randomly. This continues
until you deactivate Random Play by
pressing A. SEL/RDM again.
If the system is in Repeat mode, you
must turn it of f by pressing the RPT
button bef ore selecting Random Play.
When the system reaches the end of
the disc, it will return to the begin-
ning and play the disc again.
You can switch to the radio while a
CD is playing by pressing the AM/
FM button. Press the CD button to
return to playing the CD. The CD
will begin playing where it lef t of f .
If you turn the system of f while a CD
is playing, either with the PWR/VOL
knob or by turning off the ignition,
the disc will stay in the drive. When
youturnthesystembackon,theCD
will begin playing where it lef t of f .
Press the eject button to remove the
disc f rom the drive.
If you eject the disc, but do not
remove it from the slot, the system
will automatically reload the disc
af ter 15 seconds and put the CD
player in pause mode. To begin
playing the disc, press the CD button.
Audio System
Comf ort and Convenience Feat ures
REPEAT
RANDOM PLAY
190
Page 202 of 415
ordown( ).
Press the proper button and hold it
until the desired volume is reached,
then release it.
Two controls f or the audio system
are mount")
�Û�Ý
The top and bottom buttons adjust
thevolumeup( )ordown( ).
Press the proper button and hold it
until the desired volume is reached,
then release it.
Two controls f or the audio system
are mounted in the steering wheel
hub. These let you control basic
f unctions without removing your
hand f rom the wheel. The AUDIO/CH button has three
f unctions, depending on whether you
are listening to the radio, or playing a
cassette or CD.
If you are playing a cassette, use the
AUDIO/CH button to advance to the
next selection. You will see ‘‘FF’’
blinking in the display when you
press the AUDIO/CH button. The
system f ast f orwards until it senses a
silent period, then goes back to
PLAY.
If youareplayingaCD,thesystem
skips to the beginning of the next
track each time you push the
AUDIO/CH button. You will see the
disc and track number in the display.
If you are listening to the radio, use
the AUDIO/CH button to change
stations. Each time you press this
button, the system advances to the
next preset station on the band you
are listening to. You will see the
number of the selected Preset button
in the display. To change bands,
press the AM/FM button on the
audio system’s f ront panel.
On EX and EX-L models
Remote Audio Controls
Audio System
Comf ort and Convenience Feat ures199
AUDIO/CH
BUTTON
Page 210 of 415
�µ�µ
CONT INUED
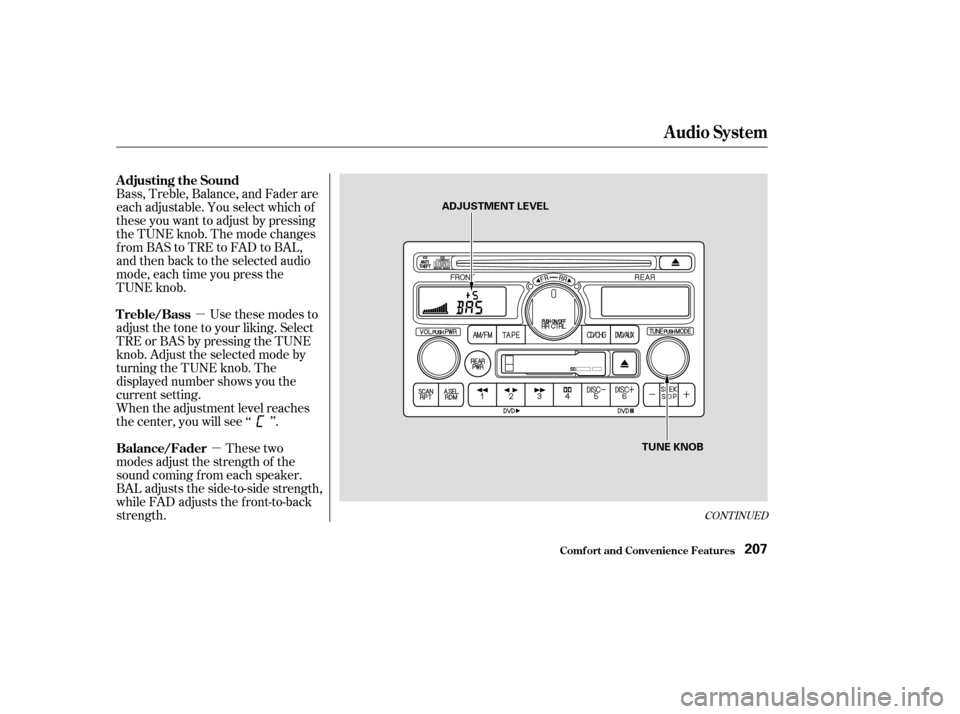
Bass, Treble, Balance, and Fader are
each adjustable. You select which of
these you want to adjust by pressing
the TUNE knob. The mode changes
fromBAStoTREtoFADtoBAL,
and then back to the selected audio
mode, each time you press the
TUNE knob. Use these modes to
adjust the tone to your liking. Select
TRE or BAS by pressing the TUNE
knob. Adjust the selected mode by
turning the TUNE knob. The
displayed number shows you the
current setting.
These two
modes adjust the strength of the
sound coming f rom each speaker.
BAL adjusts the side-to-side strength,
while FAD adjusts the f ront-to-back
strength. When the adjustment level reaches
the center, you will see ‘‘ ’’.
Audio System
Comf ort and Convenience Feat ures
Adjusting the Sound
Treble/Bass
Balance/Fader
207
ADJUSTMENT LEVEL
TUNE KNOB