Page 338 of 415
Remove the socket by turning it
one-quarter turn counterclockwise.
Pull the bulb straight out of its
socket.
Push the new bulb straight into
the socket until it bottoms.
Reinstall the socket into the light
assembly by turning it clockwise
until it locks.
When reinstalling the taillight
assembly, align and pop the snap
f asteners in place. Tighten the two
mounting screws and reinstall the
covers in place.Open the tailgate. Place a cloth on
the edge of the taillight cover.
Remove it by caref ully prying in
the notch on its edge with a small
f lat-tipped screwdriver.Determine which of the two bulbs
is burned out: taillight or back-up
light.
Remove the socket by turning it
one-quarter turn counterclockwise.
Turn on the lights to make sure
the new bulb is working.
2.
3.
5.
6.
7.
8.
9.
1.
CONT INUED
Lights
Maint enance
Replacing Rear Bulbs
(in Tailgate)
335
TAILLIGHT COVER
Page 339 of 415
Pull the bulb straight out of its
socket.
Push the new bulb straight into
the socket until it bottoms.
Insert the socket back into the
light assembly. Turn it clockwise
to lock it in place.
Reinstall the taillight cover.Pull the light assembly out of the
tailgate.
Remove the socket f rom the light
assembly by turning it one-quarter
turn counterclockwise.
Pull the bulb straight out of its
socket.
Push the new bulb straight into
the socket until it bottoms.
Place a cloth on the edge of the
lens segment on the passenger’s
side. Remove that lens segment by
caref ully prying on its edge with a
small f lat-tipped screwdriver.
Use a Phillips-head screwdriver to
remove the screw under the lens.
Turn on the lights to make sure
the new bulb is working.
1.
2. 3.
4.
5.
6.
7.
4.
5.
Lights
Maint enance
Replacing a High-mount Brake
Light Bulb
336
SCREW
Page 340 of 415
CONT INUED
Put the socket back into the light
assembly and turn it clockwise to
lock it in place.Remove the license light assembly
by caref ully prying on the lef t
edge of the lens with a f lat-tip
screwdriver and pulling the
assembly out.Remove the lens f rom the bulb
holder by pulling the lens while
squeezing the tabs on both sides
of the holder.
Pull the bulb straight out of its
socket. Push the new bulb in until
it bottoms in the socket.
Put the light assembly back into
the tailgate. Install the screw and
tighten it securely. Reinstall the
lens segment. Turn on the lights to make sure
the new bulb is working.
2.
3.
6.
7.
8.
1.
Lights
Maint enance
Replacing a Rear License Plate
Bulb
337
Page 357 of 415
Open the tailgate.Take the tools out of the storage
compartment.The spare tire is stored under the
f loor between the f irst and second
row of seats. If the f ront seats are
adjusted to the rear-most position,
move the seats forward slightly
and adjust the seat-backs to an
upright position (see page ).
Lift up the center table (see page
).
Turn the jack’s end bracket
counterclockwise to loosen it, then
remove the jack.
Remove the cargo net.
Thetoolsandjackarebehinda
cover in the cargo area on the
driver’s side. Remove the cover by
turning the handle
counterclockwise, then pulling out
the cover.
3.
4.
5.
6.7.
130 110
Changing a Flat T ire
T aking Care of t he Unexpect ed354
COVER
Page 359 of 415
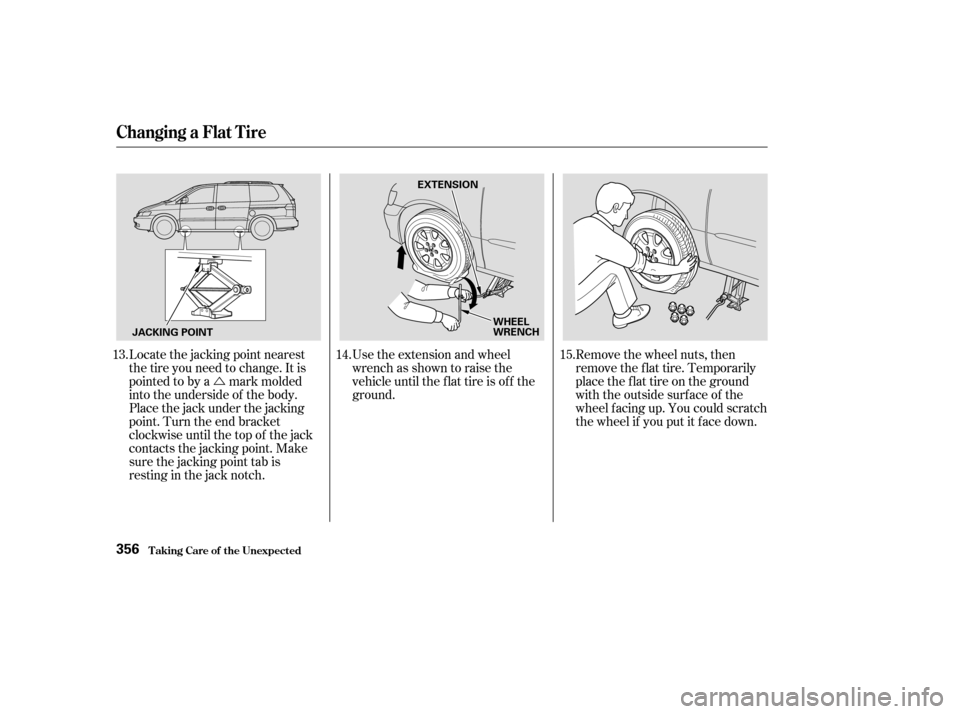
�ÚUse the extension and wheel
wrench as shown to raise the
vehicle until the f lat tire is of f the
ground. Remove the wheel nuts, then
remove the f lat tire. Temporarily
place the f lat tire on the ground
with the outside surface of the
wheel f acing up. You could scratch
the wheel if you put it f ace down.
Locate the jacking point nearest
thetireyouneedtochange.Itis
pointed to by a mark molded
into the underside of the body.
Place the jack under the jacking
point. Turn the end bracket
clockwise until the top of the jack
contacts the jacking point. Make
sure the jacking point tab is
restinginthejacknotch.
13.
14. 15.
Changing a Flat T ire
T aking Care of t he Unexpect ed356
JACKING POINT EXTENSION
WHEEL
WRENCH
Page 364 of 415
.
Store th")
Unclip the hook f rom the seat
back handle on the driver’s seat
and lower the f loor lid and the
carpet.
Make sure to adjust the f ront
seats properly bef ore you start
driving (see page ).
Store the jack in its holder. Turn
the jack’s end bracket clockwise to
lock it in place. Store the tools.
Replace the cover.
Close the tailgate.
Store the plastic screw in the spare
tire well.
Store the wheel cover in the spare
tire well. Make sure it will not get
scratched or damaged.
Storethesparetirebasketinthe
spare tire well.
Place the flat tire face down on the
attachment point. Put the tire
mountingwingboltinthe
attachment point through one of
the f ive wheel nut holes as shown.
Poke holes in the vinyl bag. Secure
the f lat tire by tightening the wing
bolt. 24.
25.
26.
27.
110On LX modelOn EX and EX-L models
Changing a Flat T ire
T aking Care of t he Unexpect ed361
TIRE MOUNTING WING BOLT
ATTACHMENT POINT
Loose items can fly around the
interiorinacrashandcould
seriously injure the occupants.
Store the wheel, jack, and tools
securely before driving.
Page 371 of 415

Using gloves or a large heavy
cloth, turn the radiator cap
counterclockwise, without pushing
down, to the f irst stop. This
releases any remaining pressure in
the cooling system. After the
pressure releases, push down on
the cap and turn it until it comes
off.
Start the engine and set the
temperature control dial to
maximum (climate control to
FULL AUTO at 90°F/32°C). Add
coolant to the radiator up to the
base of the f iller neck. If you do
not have the proper coolant
mixture available, you can add
plain water. Remember to have
the cooling system drained and
ref illed with the proper mixture as
soon as you can.Put the radiator cap back on
tightly. Run the engine and watch
the temperature gauge. If it goes
back to the red mark, the engine
needs repair. (See
on page .)
If the temperature stays normal,
check the coolant level in the
radiator reserve tank. If it has
gone down, add coolant to the
MAX mark. Put the cap back on
tightly.
9.
10. 11.
12.
380
If Your Engine Overheats
T aking Care of t he Unexpect ed
Emergency
Towing
368
Page 382 of 415

�Î�Î
�Î �Î
�Î
�Î �Î
�Î
On Canadian models
1
2
3
4
5
6
7
8
9
10
11
12
13 15 A
10 A
7.5 A
7.5 A
7.5 A 15 A
15 A
7.5 A 10 A
7.5 A 10 A
30 A
7.5 A Fuel Pump
SRS
Heater Control, A/C Clutch
Relay, Cooling Fan Relay
Power Mirror
Daytime Running Light
ECU(PCM),CruiseControl
IG Coil
ACC Relay
Back-up Lights, Instrument
Lights
Turn Signals
Rear Wiper
Front Wiper
Starter Signal Driver’s Side Automatic
Sliding Door
Power Seat Reclining
BSC
Power Seat Sliding
Passenger’s Side Automatic
Sliding Door
Daytime Running Light
Left Rear Window
Front Passenger’s Power
Window
ACC Socket
Inst. Panel Light, License
Light
Interior Light, Radio
Power Door Locks
Clock, Back Up
ABS Motor Check
Driver’s Power Window
Right Rear Window
1
2
3
4
5
6
7
8
9
10
11
12
13
14
15
16 20 A
20 A
10 A
20 A
20 A
10 A
7.5 A 20 A
15 A
15 A
10 A
20 A
7.5 A
7.5 A 20 A
7.5 A
1:
2: EX and EX-L models
Canadian models
No. Amps. Circuits Protected
Circuits Protected
No. Amps.
1
1 1
2
Fuses
T aking Care of t he Unexpect ed379
Driver’s Side INTERIOR FUSE BOX Passenger’s Side
Front Front
: