Page 170 of 415

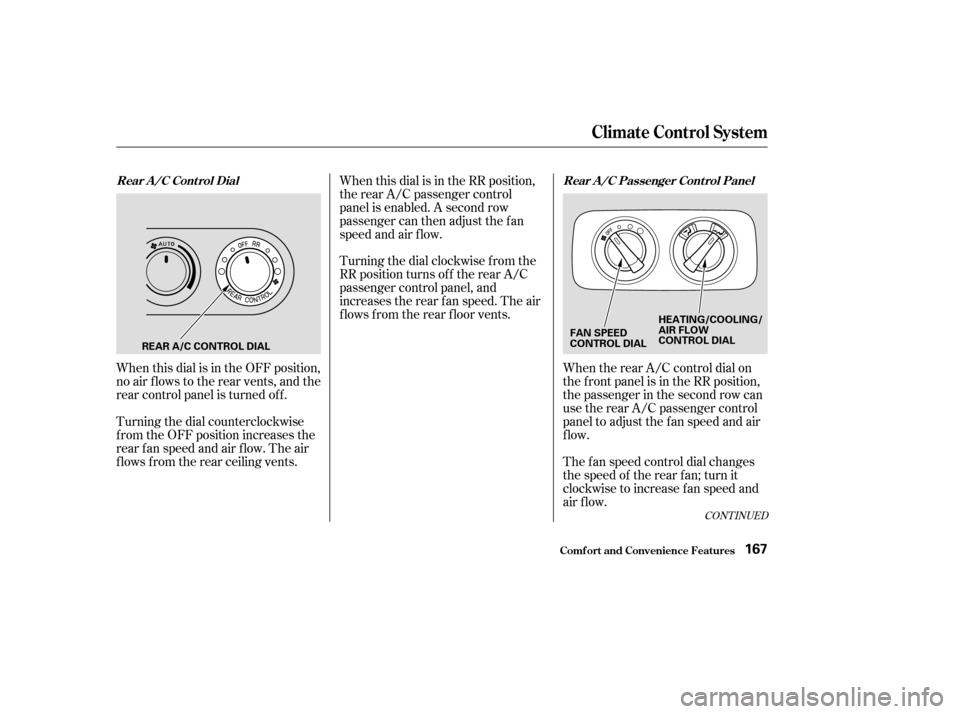
When this dial is in the OFF position,
no air flows to the rear vents, and the
rear control panel is turned of f .
Turning the dial counterclockwise
f rom the OFF position increases the
rear fan speed and air flow. The air
f lows f rom the rear ceiling vents.When this dial is in the RR position,
the rear A/C passenger control
panel is enabled. A second row
passenger can then adjust the fan
speed and air f low.
Turning the dial clockwise f rom the
RR position turns of f the rear A/C
passenger control panel, and
increases the rear f an speed. The air
f lows f rom the rear f loor vents.
When the rear A/C control dial on
the f ront panel is in the RR position,
the passenger in the second row can
use the rear A/C passenger control
panel to adjust the f an speed and air
flow.
The f an speed control dial changes
the speed of the rear f an; turn it
clockwise to increase fan speed and
air flow.
CONT INUED
Climat e Cont rol Syst em
Comf ort and Convenience Feat ures
Rear A/C Control Dial Rear A/C Passenger Control Panel
167
REAR A/C CONTROL DIAL FAN SPEED
CONTROL DIALHEATING/COOLING/
AIR FLOW
CONTROL DIAL
Page 223 of 415
To return f ront panel control to the
front audio system, turn the knob
counterclockwise. The system will
automatically change back to the
f ront system several seconds af ter
you stop pressing the buttons. To operate the rear entertainment
system f rom the f ront panel, you
must first turn the RR CTRL knob
clockwise to enable the panel. The
amber RR LED will come on to show
that the control panel is now enabled.
Comf ort and Convenience Feat ures
Rear Entertainment System
Operating the DVD Player f rom
the Front Control Panel
220
RR CTRL SELECTOR
KNOB
REAR PWR
BUTTON
RR LED
RDM
BUTTON PLAY
BUTTON PAUSE
BUTTONSEEK/SKIP
BAR
RPT
BUTTON
Page 231 of 415

�Û�Ý
An audio CD can be played in either
the main CD player in the f ront panel,
in the DVD/CD player below the
f ront panel, or in the optional CD
changer. This allows the f ront and
rear passengers to listen to dif f erent
CDs.
Select the rear system by turning the
RR CTRL knob clockwise. If the CD
is loaded in the main CD player, or
CD changer, select CD/CHG. If the
CD is loaded in the lower player,
select DVD/AUX.
If theCDisloadedinthemainCD
player or CD changer, ref er to pagesand f or operating
instructions. If the CD is loaded in
the DVD/AUX player, ref er to page . If theCDisloadedinthemainCD
player or optional CD changer, select
it by pressing the CD/CHG button.
If it is loaded in the lower player,
press DVD/AUX.
Pressthe buttontoskiptothe
beginning of the next track. Press
the button to return to the
beginning of current track. Press it
again to go to the beginning of the
previous track.
If the CD changer is selected, use
the and buttons to change
discs.
If theCDisloadedinthemainCD
player or optional CD changer, select
it by pressing the CD/CHG button.
If it is loaded in the lower player,
press DVD/AUX.
Pressthe buttontoskiptothe
beginning of the next track. Press
the button to return to the
beginning of the current track. Press
it again to go to the beginning of the
previous track. To move rapidly within a track, press
andholdeithertheFWDorREW
buttons. When you press FWD, you
will see ‘‘CUE’’ in the display. When
you press REW, you will see ‘‘REV’’
in the display. Release the button
when the system reaches the desired
point.
212 214 220
Rear Entertainment System
Comf ort and Convenience Feat ures
Playing a CD With the Rear
Entertainment System
Playing a CD Wit h t he Front Panel Playing a CD Wit h t he Rear Cont rol
Panel
Playing a CD Wit h t he Remot eCont rol
228
Page 305 of 415
Make sure the engine and radiator
are cool.
Turn the radiator cap counter-
clockwise, without pressing down
on it, until it stops. This relieves
any pressure remaining in the
cooling system.
Remove the radiator cap by
pushing down and turning
counterclockwise.The coolant level should be up to
the base of the f iller neck. Add
coolant if it is low.Put the radiator cap back on.
Tighten it f ully.
Pour coolant into the reserve tank.
Fill it to half way between the MAX
and MIN marks. Put the cap back
on the reserve tank.
Do not add any rust inhibitors or
other additives to your vehicle’s
cooling system. They may not be
compatible with the coolant or
engine components.
Pour the coolant slowly and caref ully
so you do not spill. Clean up any
spills immediately. Spilled coolant
could damage components in the
engine compartment.
3. 4.5.
6.
1.
2.
Cooling Syst em
Maint enance302
RADIATOR CAP RESERVE TANK
Page 306 of 415
CONT INUED
Thecoolingsystemshouldbe
completely drained and ref illed with
new coolant according to the time
and distance recommendations in
the maintenance schedule. Only use
Honda All Season Antif reeze/
Coolant Type 2.
Draining the coolant requires access
to the underside of the vehicle.
Unless you have the tools and
knowledge, you should have this
maintenance done by a skilled
mechanic.Turn the ignition ON (II). Turn
the heater temperature control
dial f ully clockwise or set the
climate control system to
90°F (32°C). Turn the ignition of f .
Openthehood.Makesurethe
engine and radiator are cool to the
touch.
Remove the radiator cap.Loosen the drain plug on the
bottom of the radiator. The
coolant will drain through the
splash guard. Drain the coolant
into an appropriate container.
1.
3.
2.
Replacing Engine Coolant
Cooling Syst em
Maint enance303
DRAIN PLUG
DRAIN BOLT
Page 317 of 415
Loosen the two holding clips by
turning the heads one-quarter turn
counterclockwise with a f lat-tipped
screwdriver. Remove the cover on
the f ront cylinder bank by pulling
it straight up.
Clean off any dirt and oil that have
collected around the ignition coils.Disconnect the wire connector
f rom the ignition coil by pushing
on the lock tab and pulling on the
connector. Pull on the plastic
connector, not the wires.
Use a wrench to remove the
hexagonsocketheadcapbolt
holding the ignition coil. Remove
the ignition coil by pulling it
straight out.
Remove the spark plug with
a f ive-eighths inch (16 mm) spark
plug socket.
5.
6.
4.
2.
3.
Maint enance
Spark Plugs
314
HEXAGON SOCKET HEAD CAP BOLT
HOLDING CLIP
Page 319 of 415
�´
�µ
Install the ignition coil. Reinstall
the hexagon socket head cap bolt.
Push the wire connector onto the
ignition coil. Make sure it locks in
place.
Repeat this procedure f or the
other f ive spark plugs.
Reinstall the cover on the front
cylinder bank while putting its
mounting clip in the hole on the
passenger’s side. Secure the cover
by turning the heads of the two
holding clips one-quarter turn
clockwise with a f lat-tipped
screwdriver.Spark Plug Gap:
Reinstall the engine cover and
tighten the f our bolts securely. NGK:
DENSO:
9.
11.
10.
12.
13.
Spark Plugs
Maint enance
Specif ications:
316
PZFR5F-11
PKJ16CR-L11
0.04 in (1.1 mm)
0
0.1 mm
Page 337 of 415

Remove the socket from the
headlight assembly by turning it
one-quarter turn counterclockwise.
Remove the burned out bulb f rom
thesocketbypushingitinand
turning the bulb counterclockwise
until it unlocks.
Install the new bulb in the socket.
Turn it clockwise to lock it in place.
Insert the socket back into the
headlight assembly. Turn it
clockwise to lock it in place.
Put the inner f ender in place.
Install the two holding clips. Lock
each clip in place by pushing on
the center.Determine which of the two bulbs
is burned out: stop/taillight/side
marker light or turn signal light. Pull the taillight assembly out of
thebodybyslidingitbackward.
Use a Phillips-head screwdriver to
remove the taillight assembly
mounting screw under each cover. Open the tailgate. Release the
covers by inserting a f lat-tip
screwdriver into the slot until the
cover bows slightly. Then pivot
the screwdriver 90° and pull it
straight out of the slot.
Turn on the lights to make sure
the new bulb is working.
1.
2. 3.
4.
4.
5.
6.
7.
8.
9.
Lights
Maint enance
Replacing Rear Bulbs
(in Fenders)
334