Page 137 of 415
To open the sunglasses holder, push
on the f ront edge. It will unlatch and
swing down. To close it, push it until
it latches. Make sure the holder is
closed while you are driving.To use the sun visor, pull it down.
You can also use the sun visor at the
side window. Remove the support
rod f rom the clip and swing the sun
visor toward the side window. In this
position, the sun visor can be
extended by sliding out the
extension.
Some larger styles of sunglasses
may not f it in the holder.
Inst rument s and Cont rols
Sunglasses Holder, Sun Visor
Sunglasses Holder
Sun Visor
134
EXTENSION
SUN VISOR
Page 247 of 415
.
During this period:Avoid full-throttle starts and r")
Help assure your vehicle’s f uture
reliability and perf ormance by paying
extra attention to how you drive
during the f irst 600 miles (1,000 km).
During this period:Avoid full-throttle starts and rapid
acceleration.
Avoidhardbraking.Newbrakes
need to be broken-in by moderate
use f or the f irst 200 miles (300
km). Your Honda is designed to operate
on unleaded gasoline with a pump
octane number of 86 or higher. Use
of a lower octane gasoline can cause
a persistent, heavy metallic rapping
noise in the engine that can lead to
mechanical damage.
Youshouldfollowthesesamere-
commendations with an overhauled
or exchanged engine, or when the
brakes are replaced.
We also recommend that you should
not tow a trailer during the f irst 500
miles (800 km).
We recommend gasolines containing
detergent additives that help prevent
f uel system and engine deposits.
Using gasoline containing lead will
damage your vehicle’s emissions
controls. This contributes to air
pollution.
Do not change the oil until the
recommended time or mileage
intervalshowninthemaintenance
schedule.
Break-in Period, Gasoline
Bef ore Driving
Break-in Period
Gasoline
244
Page 251 of 415
Wipe the dipstick with a clean
cloth or paper towel.
Check the engine oil level every time
you f ill the vehicle with f uel. Wait a
f ew minutes af ter turning the engine
of f bef ore you check the oil.
Remove the dipstick (orange
handle).
To close the hood, lif t it up slightly to
remove the support rod f rom the
hole. Put the support rod back into
its holding clip. Lower the hood to
about a f oot (30 cm) above the
fender,thenletitdrop.
Afterclosingthehood,makesureit
is securely latched.
2.
1.
Service Station Procedures
Bef ore Driving
Oil Check
248
DIPSTICK
Page 256 of 415
�Î
�Î �Î
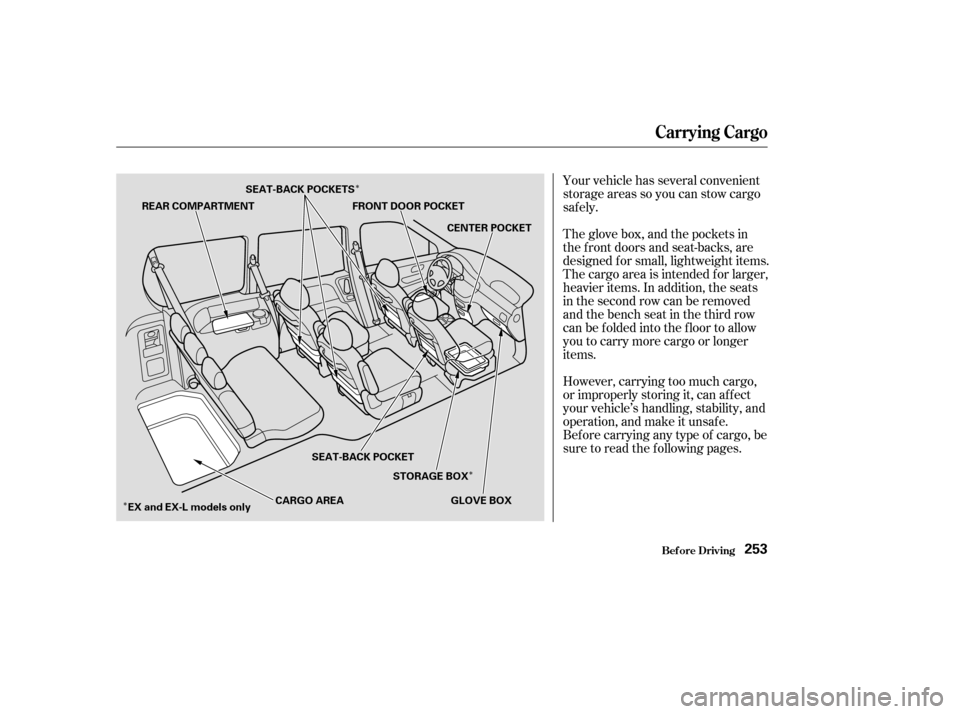
Your vehicle has several convenient
storage areas so you can stow cargo
saf ely.
The glove box, and the pockets in
the f ront doors and seat-backs, are
designed f or small, lightweight items.
The cargo area is intended f or larger,
heavier items. In addition, the seats
in the second row can be removed
andthebenchseatinthethirdrow
can be f olded into the f loor to allow
you to carry more cargo or longer
items.
However, carrying too much cargo,
or improperly storing it, can af f ect
your vehicle’s handling, stability, and
operation, and make it unsaf e.
Bef ore carrying any type of cargo, be
sure to read the f ollowing pages.
Carrying Cargo
Bef ore Driving253
REAR COMPARTMENT
FRONT DOOR POCKET
CENTER POCKET
GLOVE BOX
STORAGE BOX
SEAT-BACK POCKET
EX and EX-L models only CARGO AREA
SEAT-BACK POCKETS
Page 257 of 415

Store or secure all items that could
be thrown around and hurt
someone during a crash.
Be sure items placed on the f loor
behind the f ront seats cannot roll
under the seats and interf ere with
the driver’s ability to operate the
pedals, or with the proper
operation of the seats.
Keep the glove box closed while
driving. If the lid is open, a
passenger could injure their knees
during a crash or sudden stop.
This f igure includes the total weight
of all occupants, cargo, accessories,
and the tongue weight if you are
towing a trailer.
The f inal number is the total weight
of cargo you can carry.
If you are towing a trailer, add the
tongue weight to the number
above. Add up the weight of all occupants.
To f igure out how much cargo you
can carry: When you load luggage, the total
weight of the vehicle, all passengers,
cargo, and trailer tongue load must
not exceed the Gross Vehicle
Weight Rating (GVWR). The load
for the front and rear axles also must
not exceed the Gross Axle Weight
Rating (GAWR). The GVWR and
GAWRareprintedonthetire
information label attached to the
driver’s doorjamb (see page ).
The maximum load f or your vehicle
is 1,158 lbs (525 kg).
Subtract the total f rom 1,158 lbs
(525 kg). 386Carrying Items in the Passenger
Compartment
Load Limit
Carrying Cargo
Bef ore Driving254
Overloading or improper
loading can affect handling and
stability and cause a crash in
which you can be hurt or killed.
Follow all load limits and other
loading guidelines in this
manual.
Page 260 of 415

This section gives you tips on
starting the engine under various
conditions, and how to operate the
automatic transmission. It also
includes important inf ormation on
parking your vehicle, the braking
system, the Traction Control System,
and f acts you need if you are
planning to tow a trailer.........................
Preparing to Drive .258
.......................
Starting the Engine .259
Starting in Cold Weather ....................
at High Altitude .259
..............
Automatic Transmission . 260
.
Shif t Lever Position Indicator . 260
................
Shif t Lever Positions . 261
..............
Engine Speed Limiter . 263
....................
Shif t Lock Release . 263
...........................................
Parking .265
.....................
The Braking System .266
.............
Brake Wear Indicators . 266
...............
Brake System Design . 267
.......................
Anti-lock Brakes .267
Important Saf ety .........................
Reminders .268
........................
ABS Indicator .268
..............
Traction Control System . 269
...............
TCS ON/OFF Switch . 270
............................
TCS Indicator .271
...............
Driving in Bad Weather . 272
...........................
Towing a Trailer .274
Driving
Driving257
Page 264 of 415

�µ
CONT INUED
This position mechani-
cally locks the transmission. Use
Park whenever you are turning of f or
starting the engine. To shif t out of
Park, you must press on the brake
pedal and have your f oot of f the
accelerator pedal. Pull the shif t lever
towards you, then move it out of
Park.
If you have done all of the above and
still cannot move the lever out of
Park, see Shif t Lock Release on page .
You must also pull the shif t lever
towards you to shift into Park. To
avoid transmission damage, come to
a complete stop bef ore shif ting into
Park. The shif t lever must be in Park
bef ore you can remove the key f rom
the ignition switch.
The shift lever has seven positions.
It must be in Park or Neutral to start
the engine. When you are stopped in
D, D , 2, 1, N or R, press f irmly on
the brake pedal, and keep your f oot
of f the accelerator pedal.
263Do this:
Press the brake pedal and
pull the shift lever towards
you.
Pull the shift lever towards
you.
Move the lever.
To shift from:
PtoR
RtoP
NtoR
Dto2 2to1
1to2
2toD
DtoD DtoN
DtoD NtoDRtoN
3
3
3
3
3
Automatic Transmission
Driving
Park (P)
Shif t L ever Positions
261
SHIFT LEVER
Page 265 of 415

�µ
�µ �µ �µ
Use Neutral if you
need to restart a stalled engine, or if
it is necessary to stop brief ly with
the engine idling. Shif t to Park posi-
tion if you need to leave the vehicle
f or any reason. Press on the brake pe-
dal when you are moving the shif t
lever from Neutral to another gear.
To shif t to Reverse
f rom Park, see the explanation under
Park. To shif t to Reverse f rom
Neutral, come to a complete stop and
then shift. Pull the shift lever
towards you before shifting into
Reverse f rom Neutral. Use this position f or
your normal driving. The transmis-
sion automatically selects a suitable
gear f or your speed and acceleration.
You may notice the transmission
shif ting up at higher speeds when
the engine is cold. This helps the
engine warm up f aster. This position is similar
to D, except only the first three
gears are selected. Use D when
towing a trailer in hilly terrain, or to
provide engine braking when going
down a steep hill. D can also keep
the transmission f rom cycling
between third and f ourth gears in
stop-and-go driving.
ForfasteraccelerationwheninD or
D, you can get the transmission to
automatically downshif t by pushing
the accelerator pedal to the floor.
The transmission will shif t down one
or two gears, depending on your
speed.
3
3
3
Automatic Transmission
Driving
Neutral (N)
Reverse (R) Drive (D)Drive (D )3
262