Page 36 of 415

Af ter selecting a proper child seat,
and a good position to install the seat,
there are three main steps in
installing the seat:Make sure the child is properly
strappedinthechildseat
according to the child seat maker’s
instructions. A child who is not
properly secured in a child seat
canbethrownoutof theseatina
crash and be seriously injured.
However, a child seat does not need
to be ‘‘rock solid.’’ In some vehicles
or seating positions, it may be
dif f icult to install a child seat so that
it does not move at all. Some side-to-
side or back-and-f orth movement can
be expected and should not reduce
the child seat’s ef f ectiveness. When you are not using a child seat,
either remove it and store it in a saf e
place, or make sure it is properly
secured. An unsecured child seat can
be thrown around the vehicle during
a crash or sudden stop and injure
someone.
If the child seat is not secure, try
installing it in a dif f erent seating
position, or use a dif f erent style of
child seat that can be f irmly secured
in the desired seating position. To provide security during normal
driving maneuvers as well as during
a collision, we recommend that
parents secure a child seat as f irmly
as possible.
Af ter installing a child
seat, push and pull the seat
f orward and f rom side to side to
verif y that it is secure. All child seats are
designed to be secured to the
vehicle with the lap part of a lap/
shoulder belt. Some child seats
can be secured to the vehicle’s
LATCH anchorage system instead.
A child whose seat is not properly
secured to the vehicle can be
endangered in a crash. See pages , and f or instructions on
howtoproperlysecurechildseats
in this vehicle. 39 48
35
Inst alling a Child Seat Secure t he child in t he child seat .
Storing a Child Seat
Make sure t he child seat is f irmly secured.
Properly secure t he child seat t o
the vehicle.
1.
2. 3.
Protecting Children
Driver and Passenger Saf ety33
Page 112 of 415
There are bucket seats with
armrests for two front passengers,
bucket seats with armrests for two
passengers in the second row, and a
bench seat f or three passengers in
the third row.
For greater cargo capacity, the seats
in the second row can be removed,
andthebenchseatinthethirdrow
can be f olded into the f loor. Passenger Seating
Convert ible Second Row BucketSeat s
Seats
Inst rument s and Cont rols109
Page 118 of 415

The head restraints adjust f or height.
You need both hands to adjust the
restraint.Donotattempttoadjustit
while driving. To raise it, pull upward.
To lower the restraint, push the
release button sideways and push
the restraint down.
Your vehicle is equipped with head
restraints in all seating positions.
The head restraints help protect you
and your passengers f rom whiplash
and other injuries. They are most
ef f ective when you adjust them so
the back of the occupant’s head rests
against the center of the restraint. A
taller person should adjust the
restraint as high as possible.
An armrest is located on each of the
frontseatsandoneachsideof the
second row seats. Pivot it down to
use it. When you remove the bucket
seats in the second row, pivot the
armrests up out of the way.
See page f or important saf ety
inf ormation and a warning about how toproperly position the head restraints. 16
CONT INUED
Head Restraints
Armrests
Seats
Inst rument s and Cont rols115
RELEASE
BUTTON
Page 119 of 415
When the seat on the passenger’s
side is moved to the center, walk
through the passenger’s side to get
into or out of the third row seat.
To get into or out of the third row
seat, walk between the second row
seats.
To remove a head restraint f or
cleaning or repair, pull it up as f ar as
it will go. Push the release button
and pull the restraint out of the seat-
back.
Seats
Inst rument s and Cont rols
T hird Seat A ccess
116
Page 120 of 415
The second row bucket seat on the
passenger’s side can be moved to the
center to provide access to the third
row seat.
Remove the two floor covers
between the bucket seats in the
second row by caref ully prying on
the back edge of the covers with a
f lat-tipped screwdriver.Unlock the seat f rom the f loor by
pulling the lock release lever under
the seat cushion’s f ront edge and
lifting the rear of the seat.
Slide the seat toward the center of
the vehicle.Push the back of the seat down over
the f loor hooks. Make sure the seat
is securely locked in place.
CONT INUED
Moving the Second Row Bucket
Seat
Seats
Inst rument s and Cont rols117
LOCK
RELEASE
LEVER
Page 122 of 415
Unhook the f ront of the seat f rom
the f loor by pulling it back slightly,
then pivoting it upward.
Always remove an unlocked seat
f rom the vehicle bef ore driving. A
seat that is not locked in place could
f ly around and cause injury in a
sudden stop or crash.
Both seats can be removed to give
more cargo capacity.
To remove a seat:
Pull up the seat-back angle
adjustment lever, and fold the seat-
back f orward.
Unlock the seat f rom the f loor by
pulling the lock release lever under
the seat cushion’s f ront edge and
lifting the rear of the seat. To reinstall the seat, hook the f ront
of the seat to the f loor, then push the
back into the locks. Make sure both
the f ront and the back of the seat are
securely latched bef ore driving.
Removing the Bucket Seats in the
Second Row
Seats
Inst rument s and Cont rols119
LOCK RELEASE LEVER
Page 123 of 415
Remove the head restraints by
pushing the release buttons and
pulling the restraints out.
To create more cargo space, you can
f old the third row ‘‘Magic Seat’’ into
the f loor recess.
To fold the seat:
Make sure the head restraint legs
areinsidethecargonetsotheydo
not damage the seat as you fold it. Store the head restraints in the
sidecargonet.Toinstalltheside
cargo net, hook the f our loops on
the net to the tabs on the left side
panel.Unlock the seat-back by pulling
the handle. Push the seat-back
forward.
1. 2.
3.
Folding the T hird Row ‘‘Magic
Seat’’
Seats
Inst rument s and Cont rols120
RELEASE BUTTON
HANDLE
Page 256 of 415
�Î
�Î �Î
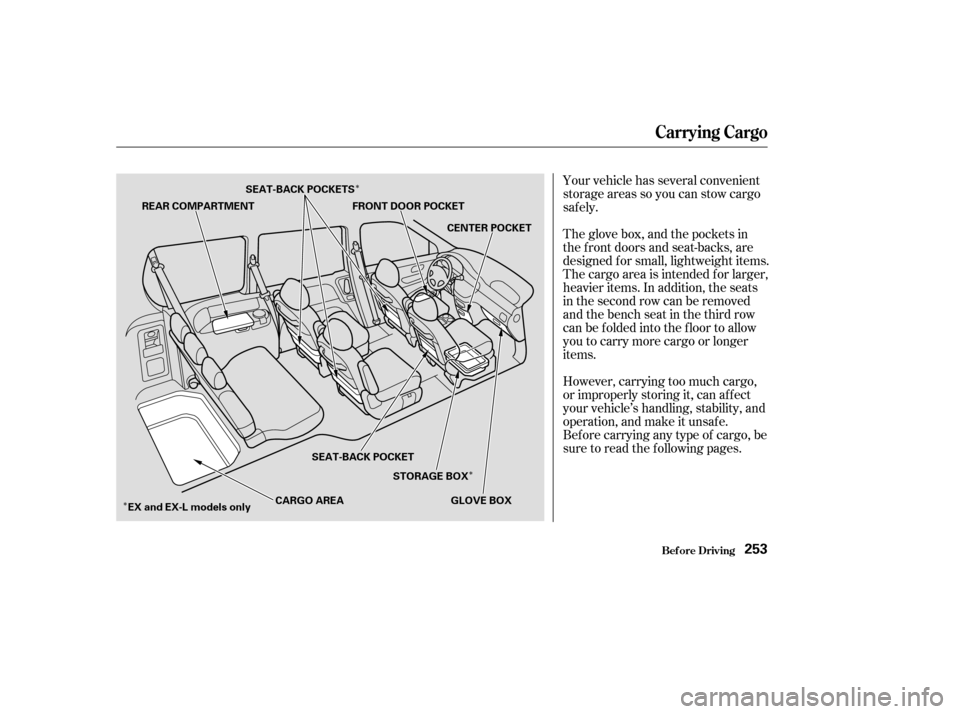
Your vehicle has several convenient
storage areas so you can stow cargo
saf ely.
The glove box, and the pockets in
the f ront doors and seat-backs, are
designed f or small, lightweight items.
The cargo area is intended f or larger,
heavier items. In addition, the seats
in the second row can be removed
andthebenchseatinthethirdrow
can be f olded into the f loor to allow
you to carry more cargo or longer
items.
However, carrying too much cargo,
or improperly storing it, can af f ect
your vehicle’s handling, stability, and
operation, and make it unsaf e.
Bef ore carrying any type of cargo, be
sure to read the f ollowing pages.
Carrying Cargo
Bef ore Driving253
REAR COMPARTMENT
FRONT DOOR POCKET
CENTER POCKET
GLOVE BOX
STORAGE BOX
SEAT-BACK POCKET
EX and EX-L models only CARGO AREA
SEAT-BACK POCKETS