Page 218 of 411

When a disc is not being played,
store it in its case to protect it f rom
dust and other contamination. To
prevent warpage, keep discs out of
direct sunlight and extreme heat.
To clean a disc, use a clean sof t cloth.
Wipe across the disc f rom the center
to the outside edge.
A new disc may be rough on the
inner and outer edges. The small
plastic pieces causing this roughness
can f lake of f and f all on the
recording surf ace of the disc,
causing skipping or other problems.
Remove these pieces by rubbing the
inner and outer edges with the side
of a pencil or pen.Handle a disc by its edges; never
touch either surf ace. Do not place
stabilizer rings or labels on the disc.
These, along with contamination
f rom f inger prints, liquids, and f elt-
tip pens, can cause the disc to not
play properly, or possibly jam in the
drive.
When recording a CD-R or
CD-RW, the recording must be
closedforittobeusedbythe
system. When using CD-R or CD-RW discs,
use only high quality discs labeled
f or audio use.
Never try to insert f oreign objects in
the disc player.
Handle your discs properly to
prevent damage and skipping. Play only standard round discs.
Odd-shaped discs may jam in the
driveorcauseotherproblems.
General Inf ormation
Protecting Discs
Protecting Your Discs
214
Do not use discs with adhesive labels.
The label can curl up and cause the
disc to jam in the unit.
Page 219 of 411
The in-dash disc player/changer has
a sophisticated and delicate
mechanism. If you insert a damaged
disc as indicated in this section, it
maybecomestuckinsideand
damage the audio unit.
Examples of these discs are shown
to the right:Bubbled, wrinkled, labeled, and excessively thick discs
Damaged discs
Poor quality discs
1.
2.
3.
CONT INUED
Additional Inf ormation on
Recommended Discs
Protecting Your Discs
Features
215
Sealed
Warped Burrs
Chipped/
Cracked With Label/
Sticker
With Plastic
Ring
Using Printer
Label Kit
Bubbled/
Wrinkled
Page 220 of 411
Small, irregular shaped discsDiscs with scratches, dirty discs
CD-R or CD-RW may not play due
to the recording conditions.
Scratches and f ingerprints on the
discs may cause the sound to skip. Recommended discs are printed
with the f ollowing logo.
Audio unit may not play the
following formats.
4.
5.
Protecting Your Discs
216
Fingerprints, scratches, etc.
3-inch (8-cm) CD Triangle Shape
Arrow Shape
Can Shape
Page 221 of 411
 or down ( ). Press the top
or bottom of the button and hold it
until the desired volume is reached,
then release it.
The MODE butt")
�Û�Ý�´
�µ �´�µ �´
�µ
The VOL button adjusts the volume
up ( ) or down ( ). Press the top
or bottom of the button and hold it
until the desired volume is reached,
then release it.
The MODE button changes the
mode. Pressing the button
repeatedly selects FM1, FM2, AM,
discoraPCcard(ifadiscoraPC
card is loaded), or an audio unit
connected to the auxiliary input jack
or the USB adapter cable.
If you are listening to the radio, use
the CH button to change stations.
Each time you press the top ( ) of
the button, the system goes to the
next preset station on the band you
are listening to. Press the bottom
( ) to go back to the previous
station.If youpressandholdtheCH
button ( ) or ( ), the system goes
into the seek mode. It finds a station
with a strong signal. If youareplayingadisc,iPodorUSB
f lash memory device, the system
skips to the beginning of the next
track (file in MP3, WMA or AAC
format) each time you press the top
( ) of the CH button. Press the
bottom ( ) to return to the
beginning of the current track/f ile.
Press it twice to return to the
previous track/f ile.
You will see the track/f ile number
and the elapsed time. If the disc has
text data or is compressed in MP3 or
WMA, you can also see any other
inf ormation (track title, f ile name,
f older name, etc.).
Three controls f or the audio system
are mounted in the steering wheel
hub. These let you control basic
f unctions without removing your
hand f rom the wheel.
CONT INUED
On U.S. LX model and EX models
Remote Audio Controls
Features
217
CH BUTTON
MODE BUTTON
VOL BUTTON
Page 222 of 411
�´�µ
�´ �µ
In MP3 or WMA mode, you can use
the seek function to select folders.
Press and hold the top ( ) of the
CH button until you hear a beep to
skip f orward to the f irst f ile of the
next folder. Press the bottom ( ) to
skip backward to the previous f older.
If you are playing a PC card, press
the top ( ) of the CH button to
advance to the next file. Press the
bottom( )togobacktothe
previous f ile.
Your vehicle has the auxiliary input
jack on the f ront panel. The system
will accept auxiliary input f rom
standard audio accessories using a
1/8 inch (3.5 mm) stereo miniplug.
When a compatible audio unit is
connected to the jack, press the CD/
AUX (on vehicles with navigation
system) or AUX (on vehicles without
navigation system) button to select it. Auxiliary Input Jack
Remote Audio Controls, Auxiliary Input Jack
218
On Insight model and EX model with
navigation system On LX model and EX model without
navigation system
Page 223 of 411

If your vehicle’s battery is
disconnected or goes dead, the audio
system disables itself . If this happens,
you will see ‘‘ENTER CODE’’ in the
f requency display next time you turn
on the system. Use the preset bars
(icons on models with navigation
system) to enter the f ive-digit code.
ThecodeisontheAnti-theft
Identification Card included in your
owner’s manual kit. When it is
entered correctly, the radio will start
playing.
The Anti-thef t Identif ication Card
also lists your audio serial number. It
is best to store the card in a saf e
place at home. In addition, you
should write the audio system’s
serial number in this owner’s manual.
If you make a mistake entering the
code, do not start over; complete the
f ive-digit sequence, then enter the
correct code. You have ten tries to
enter the correct code. If you areunsuccessful in ten attempts, you
must then leave the system on for
one hour bef ore trying again.
The system will retain your AM and
FM presets even if power is
disconnected.
We recommend that you register the
security code at Owner Link (owners.
honda.com). If you lose the Anti-
thef t Identif ication Card bef ore
registering the code at Owner Link,
you must obtain the code f rom your
dealer or
. To do this, you will need the
audio system’s serial number. If you
do not have the serial number with
you,askyourdealerorgoto for
inf ormation on how to retrieve it. If you lose the Anti-thef t
Identif ication Card, you must obtain
thecodefromyourdealer.Todothis,
you will need the audio system’s
serial number. If you do not have the
serial number with you, ask your
dealer how to retrieve it.
You need to enter a separate code
f or the navigation system to
reactivate. The Anti-theft Card also
lists the navigation system’s security
code and serial number. Follow the
same procedure to retrieve the serial
number and obtain the code, and
read the navigation system manual
f or details.
https://radio-navicode.honda.
com/
https://
radio-navicode.honda.com/ On models with navigation system
U.S. owners Canadian owners
Radio T hef t Prot ect ion
Features
219
Page 225 of 411

The alarm also activates if a
passenger inside the locked vehicle
turns the ignition switch on.Do not attempt to alter this system
or add other devices to it.
Once the security system is sets,
opening any door, the hatch, or the
hood without using the key or the
remote transmitter, will cause the
alarm to activate. It also activates if
the audio unit is removed f rom the
dashboard or the wiring is cut.
The security system helps to protect
your vehicle and valuables f rom thef t.
The horn sounds and a combination
of headlights, parking lights, side
marker lights and taillights f lashes if
someone attempts to break into your
vehicle or remove the audio unit.
This alarm continues for two
minutes, then the system resets. To
deactivate the system before the two
minutes have elapsed, unlock the
driver’s door with the key or the
remote transmitter.
The security system sets
automatically 15 seconds after you
lock the doors, hood, and the hatch.
For the system to activate, you must
lock the doors and the hatch f rom
the outside with the key, or use
driver’s lock tab, door lock master
switch, or remote transmitter. The
security system indicator on the
instrument panel starts blinking
immediately to show you the system
is setting itself .
To see if the system is set
af ter you exit the vehicle, press the
LOCK button on the remote
transmitter within five seconds. If
the system is set, the horn will beep
once. The security system does not set if
the hood, hatch, or any door is not
f ully closed. If the system will not set,
check the door and hatch open
indicator on the instrument panel
and multi-inf ormation display (see
page ) to see if the doors and
hatch are f ully closed. Since it is not
part of the monitor display, manually
check the hood. 12
On LX and EX models
Security System
Features
221
NOTE:SECURITY SYSTEM INDICATOR
Page 230 of 411
�Ì�Ì�Ì�Ì
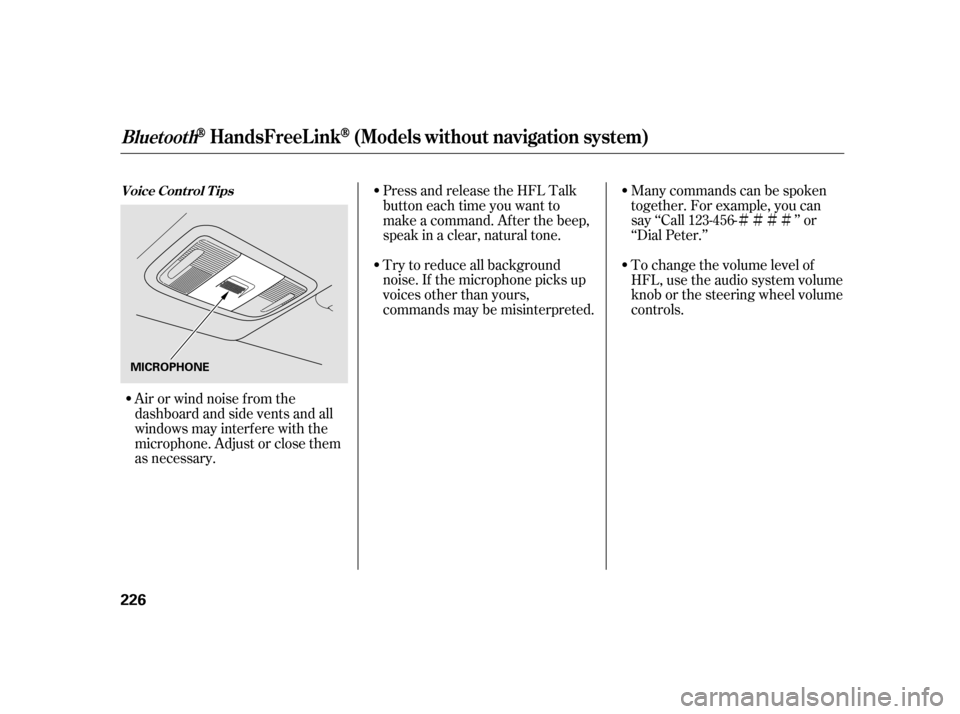
Try to reduce all background
noise. If the microphone picks up
voices other than yours,
commands may be misinterpreted. Many commands can be spoken
together. For example, you can
say ‘‘Call 123-456- ’’ or
‘‘Dial Peter.’’
Press and release the HFL Talk
button each time you want to
make a command. Af ter the beep,
speak in a clear, natural tone.
Airorwindnoisefromthe
dashboard and side vents and all
windows may interfere with the
microphone. Adjust or close them
as necessary. To change the volume level of
HFL, use the audio system volume
knob or the steering wheel volume
controls.
Voice Cont rol T ips
BluetoothHandsFreeL ink(Models wit hout navigat ion syst em)
226
MICROPHONE