Page 67 of 338

This section gives inf ormation about
the controls and displays that
contribute to the daily operation of
your Honda. All the essential
controls are within easy reach............................
Control Locations .64
...............................
Indicator Lights .65
.............................................
Gauges .72
...............................
Speedometer .72 .................................
Tachometer .72
..............
Odometer/Trip Meter . 73
..................................
Fuel Gauge .73
...................
Temperature Gauge . 74
Controls Near the Steering .......................................
Wheel .75
...................................
Headlights .76
............
Daytime Running Lights . 77
....
Instrument Panel Brightness . 77
................................
Turn Signals .77
.....................
Windshield Wipers .78
..................
Windshield Washers . 79
Rear Window Wiper and .....................................
Washer .80
..........................
Hazard Warning .81
.............
Rear Window Def ogger . 81
......
Steering Wheel Adjustment . 82
...............................
Keys and Locks .83
..............................................
Keys .83
....................
Immobilizer System . 84
............................
Ignition Switch .85
......................
Power Door Locks .87
..................................
Rear Doors .88
............................................
Hatch .89
........................................
Tailgate .90
....................................
Glove Box .91 .................................................
Seats .92
.............
Front Seat Adjustments . 92
Driver’s Seat Height ..............................
Adjustment .93
................
Driver’s Seat Armrest . 93
..........................
Head Restraints .94
........................
Rear Seat Access .95
.......
Rear Seat-back Adjustment . 96
..........
Reclining the Front Seats . 97
...............
Folding the Rear Seats . 99
........
Removing the Rear Seats . 101
............................
Power Windows .103
...............................
Rear Windows .105
...........................................
Mirrors .106
..
Adjusting the Power Mirrors . 106
..........................................
Skylight .107
.........................
Beverage Holders .110
...............................
Parking Brake .111
...............................
Ceiling Pocket .112
.......................................
Coin Tray .112
............
Accessory Power Sockets . 113
...............................
Interior Lights .114
..............................
Ceiling Light .114
...................................
Spotlights .114
......................
Cargo Area Light .115
................
Ignition Switch Light . 115
Instruments and Controls
Inst rument s and Cont rols63
Page 69 of 338
�Î
�Î
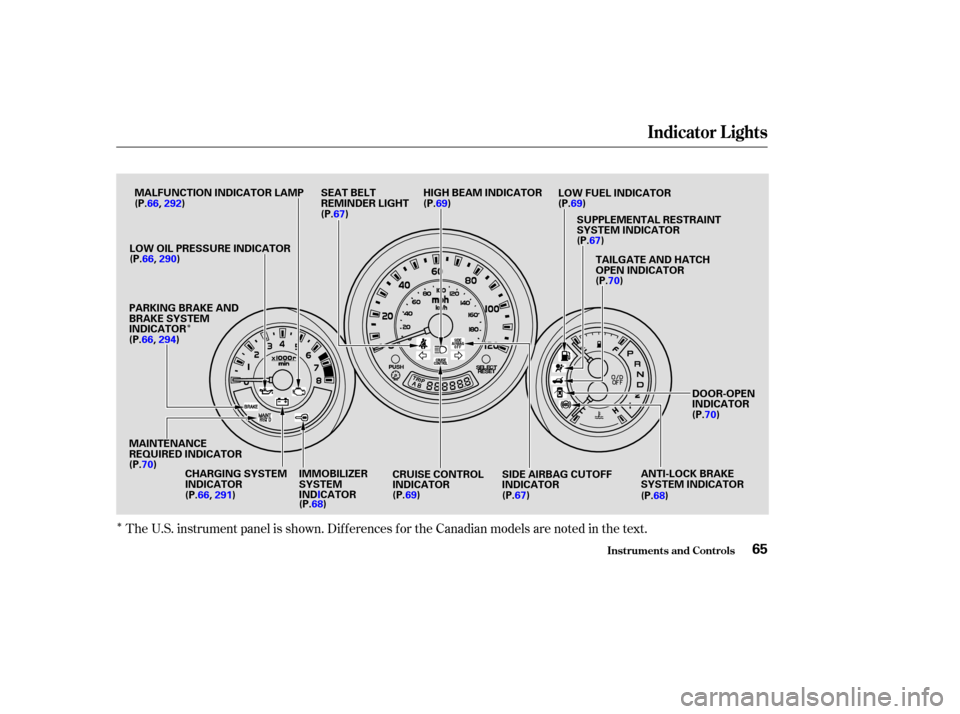
The U.S. instrument panel is shown. Dif f erences f or the Canadian models are noted in the text.
Indicator L ights
Inst rument s and Cont rols65
IMMOBILIZER
SYSTEM
INDICATOR
(P.68)
MAINTENANCE
REQUIRED INDICATOR
(P.70) (P.67)
DOOR-OPEN
INDICATOR
(P.70)
CRUISE CONTROL
INDICATOR (P. 69) SIDE AIRBAG CUTOFF
INDICATOR
(P.67)
LOW OIL PRESSURE INDICATOR
PARKING BRAKE AND
BRAKE SYSTEM
INDICATOR
CHARGING SYSTEM
INDICATOR
(P.66,
290)
(P.66, 291) (P.69) LOW FUEL INDICATOR
HIGH BEAM INDICATOR
SEAT BELT
REMINDER LIGHT
(P.67)TAILGATE AND HATCH
OPEN INDICATOR
(P.70)
SUPPLEMENTAL RESTRAINT
SYSTEM INDICATOR
(P.69)
MALFUNCTION INDICATOR LAMP
ANTI-LOCK BRAKE
SYSTEM INDICATOR
(P.68)
(P.66,
292)
(P.66, 294)
Page 70 of 338

See page .
The instrument panel has many
indicators to give you important
inf ormation about your vehicle.
This light has two f unctions:
This indicator comes on when you
turn the ignition switch ON (II). It
is a reminder to check the parking
brake. Driving with the parking
brake not f ully released can
damage the brakes and tires.
If the indicator remains lit after
you have f ully released the
parking brake while the engine is
running, or if it comes on while
driving, it can indicate a problem
in the brake system. For complete
inf ormation, see page .
The engine can be severely damaged
if this light f lashes or stays on when
the engine is running. For complete
inf ormation, see page .
If this light comes on when the
engine is running, the battery is not
being charged. For complete
inf ormation, see page .
2. 1.
292
290
291 294
Indicator L ights
Inst rument s and Cont rols
Malf unction Indicator
Lamp Parking Brake and
Brake System
Indicator
L ow Oil Pressure
Indicator
Charging System
Indicator
66
U.S. Canada
Page 72 of 338
. It will then go of f if
you have inserted a properly-coded
ignition key. If it is not a properly-
coded key, the")
This indicator comes on f or a f ew
seconds when you turn the ignition
switch ON (II). It will then go of f if
you have inserted a properly-coded
ignition key. If it is not a properly-
coded key, the indicator will blink
and the engine will not start (see
page ).
This indicator also blinks several
times when you turn the ignition
switch f rom ON (II) to ACCESSORY
(I) or LOCK (0).The lef t or right turn signal light
blinks when you signal a lane change
or turn. If the light does not blink or
blinks rapidly, it usually means one
of the turn signal bulbs is burned out
(see page ). Replace the bulb as
soon as possible, since other drivers
cannot see that you are signaling.
WhenyouturnontheHazard
Warning switch, both turn signal
lights blink. All turn signals on the
outside of the vehicle should f lash.
This light normally comes on f or a
f ew seconds when you turn the
ignition switch ON (II), and when
the ignition switch is turned to
START (III). If this light comes on at
any other time, there is a problem in
theABS.If thishappens,takethe
vehicle to your dealer to have it
checked. With the light on, your
vehicle still has normal braking
ability but no anti-lock. For complete
inf ormation, see page .
188 84
259
Only on models equipped with ABS (see
page ) 186
Immobilizer System
Indicator
Turn Signal and Hazard Warning
Indicators
Anti-lock Brake
System (A BS)
Indicator
Indicator L ights
Inst rument s and Cont rols68
Page 73 of 338
 with
the headlight switch of f and the
parking brake set. It should go of f if
y")
Canadian models onlyCanadian models only
On EX model
This indicator lights when you turn
the ignition switch to ON (II) with
the headlight switch of f and the
parking brake set. It should go of f if
youturnontheheadlightsorrelease
the parking brake. If it comes on at
any other time, it means there is a
problem with the DRL. There may
also be a problem with the high
beam headlights. This light comes on with the high
beam headlights. See page for
inf ormation on the headlight
controls.
On Canadian models, this indicator
comes on with reduced brightness
when the Daytime Running Lights
(DRL) are on (see page ).
This light comes on as a reminder
that you must ref uel soon.This light comes on when the
washer f luid level is low. Add washer
f luid when you see this light come on
(see page ).
This lights when you set the cruise
control. See page f or inf ormation
on operating the cruise control. 77
76
153 230
‘‘Daytime Running
Lights’’ Indicator
High Beam Indicator
Cruise Control Indicator Low Fuel IndicatorWasher Level Indicator
Indicator L ights
Inst rument s and Cont rols69
Page 81 of 338
Canadian models only
With the headlight switch off, the
high beam headlights come on with
reduced brightness when you turn
the ignition switch to ON (II) and
release the parking brake. They
remain on until you turn the ignition
of f , even if you set the parking brake.
The headlights revert to normal
operation when you turn them on
with the switch.Signal a turn or lane change with this
lever. Push down on the lever to
signal a lef t turn, and up to signal a
right turn. If you push it up or down
all the way, the turn signal continues
to blink even when you release the
lever. It shuts off automatically as
you complete the turn.
Push the knob in the speedometer
repeatedly to adjust the brightness
of the instrument panel lights. There
are six brightness levels. A segment
display shows the current brightness
level.
CONT INUED
Instrument Panel Brightness
Daytime Running L ights T urn Signals
Controls Near the Steering Wheel
Inst rument s and Cont rols77
TURN SIGNAL LEVER
Page 112 of 338
To remove the skylight:
Turn of f the engine, and set the
parkingbrake.Thenpulldownthe
lever, squeeze both sides of the pivot
while pushing up the red tab in the
lever, and pull the lever assembly
away from the ceiling.Push up the rear of the skylight.
Standing on the tailgate with the
hatch down, hold both sides of the
skylight and pull it toward you to
remove it f rom the vehicle roof .
With the rear seats in their upright
position, store the skylight, f ace
down in its bag in the cargo area.
Secure the bag with four hooks on
the cargo area f loor. Do not store
anything on top of the skylight.
Removing and Storing the
Skylight
Skylight
Inst rument s and Cont rols108
The maximum weight on the tailgate is
440 lbs (200 kg).
Page 115 of 338
To apply the parking brake, pull the
lever up f ully. To release it, pull up
slightly, push the button, and lower
the lever. The parking brake light on
the instrument panel should go out
when the parking brake is f ully
released (see page ).66
Parking Brake
Inst rument s and Cont rols111
PARKING BRAKE LEVER
Driving the vehicle with the parking
brake applied can damage the rear
brakes and axles.
 and
release the parking brake. They
remain on")

