Page 186 of 374
Pressing the Cruise Control Master
Switch turns the system completely
of f and erases the previous cruising
speed f rom memory. To use the
system again, ref er to.
When you push the CANCEL button,
or tap the brake or clutch pedal, the
CRUISE CONTROL light on the
instrument panel will go out and the
vehicle will begin to slow down. You
can use the accelerator pedal in the
normal way.
The system remembers the
previously-set cruising speed. To
return to that speed, accelerate to
above25mph(40km/h),thenpress
the RESUME/accel button. The
CRUISE CONTROL light comes on,
and the vehicle will accelerate to the
same cruising speed as bef ore.
Cruise Control
Comf ort and Convenience Feat ures
Using t he
Cruise Cont rol
182
Page 190 of 374
Shift to Park or Neutral and set
the parking brake. Pull the hood
release handle located under the
lower lef t corner of the dashboard.
The hood will pop up slightly.
Screw the f uel f ill cap back on,
tighten it until it clicks several
times. If you do not properly
tighten the cap, the Malfunction
Indicator Lamp may come on (see
page ).
Push the f uel f ill door closed until
it latches.
Standing in f ront of the vehicle,
put your f ingers between the f ront
edge of the hood and the f ront
grille. The hood latch handle is
above the ‘‘H’’ logo. Push this
handle up until it releases the
hood. Lif t the hood.
1.
2.
5.
6.
327
Service Station Procedures
Bef ore Driving
Opening the Hood
186
HOOD RELEASE HANDLE
LATCH
Page 191 of 374
If you can open the hood without
lifting the hood latch handle, or the
hood latch handle moves stif f ly or
does not spring back as bef ore, the
mechanism should be cleaned and
lubricated (see page ).To close the hood, lif t it up slightly to
remove the support rod f rom the
hole. Put the support rod back into
its holding clip. Lower the hood to
about a f oot (30 cm) above the
fender,thenletitdrop.
After closing the hood, make sure it
is securely latched.
Pull the support rod out of its clip
and insert the end into the hole in
the hood.
3.
266
CONT INUED
Service Station Procedures
Bef ore Driving187
CLIP SUPPORT ROD
Page 195 of 374

Modif ying your vehicle, or installing
some non-Honda accessories, can
make your vehicle unsaf e. Bef ore
you make any modif ications or add
anyaccessories,besuretoreadthe
f ollowing inf ormation.When properly installed, cellular
phones, alarms, two-way radios, and
low-powered audio systems should
not interf ere with your vehicle’s
computer-controlled systems, such
as the SRS and anti-lock brake
system.
Your dealer has Honda accessories
that allow you to personalize your
vehicle. These accessories have
been designed and approved f or your
vehicle, and are covered by warranty.
Non-Honda accessories are usually
designed f or universal applications.
Although aftermarket accessories
may f it on your vehicle, they may not
meet f actory specif ications, and
could adversely af f ect your vehicle’s
handling and stability. (See
‘‘Modif ications’’ on page f or
additional inf ormation.)
If possible, have your dealer inspect
the f inal installation. Have the installer contact your
Honda dealer f or assistance bef ore
installing any electronic accessory. Be sure electronic accessories do
not overload electrical circuits
(see page ). Make sure the accessory does not
obscure any lights, or interf ere
with proper vehicle operation or
perf ormance.
Bef ore installing any accessory: However, if electronic accessories
are improperly installed, or exceed
your vehicle’s electrical system
capacity, they can interf ere with the
operation of your vehicle, or even
cause the airbags to deploy.
192 331
A ccessories
A ccessories and Modif ications
Bef ore Driving191
Improper accessories or
modifications can affect your
vehicle’s handling, stability, and
performance, and cause a
crash in which you can be hurt
or killed.
Follow all instructions in this
owner’s manual regarding
accessories and modifications.
Page 197 of 374
�Î
�Î
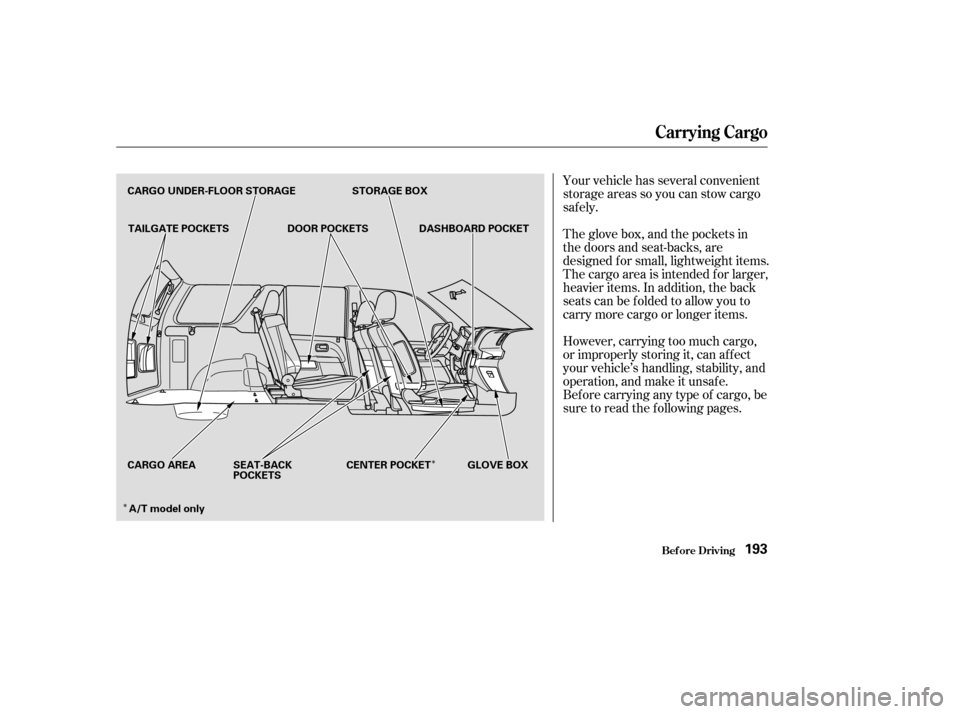
Your vehicle has several convenient
storage areas so you can stow cargo
saf ely.
However, carrying too much cargo,
or improperly storing it, can af f ect
your vehicle’s handling, stability, and
operation, and make it unsaf e.
Bef ore carrying any type of cargo, be
sure to read the f ollowing pages. The glove box, and the pockets in
the doors and seat-backs, are
designed f or small, lightweight items.
The cargo area is intended f or larger,
heavier items. In addition, the back
seats can be folded to allow you to
carry more cargo or longer items.
Carrying Cargo
Bef ore Driving193
CARGO UNDER-FLOOR STORAGE TAILGATE POCKETS DOOR POCKETSSTORAGE BOX
DASHBOARD POCKET
CARGO AREA SEAT-BACK POCKETS CENTER POCKET GLOVE BOX
A/T model only
Page 200 of 374
Store only small, lightweight items in
the pockets on the back of the
tailgate.
To secure cargo, use the f our f loor
hooks in the cargo area. Make sure
all stored items are secured before
driving.
Carrying Cargo
Bef ore Driving
T ailgat e Pocket s
196
TAILGATE POCKETS
TAILGATE POCKETS
Page 203 of 374

Youshoulddothefollowingchecks
and adjustments every day bef ore
you drive your vehicle.Make sure all windows, mirrors,
and outside lights are clean and
unobstructed. Remove f rost, snow,
or ice. Check the adjustment of the seat
(see page ).
Check the adjustment of the
inside and outside mirrors (see
page ).
Check the adjustment of the
steering wheel (see page ).
Fasten your seat belt. Check that
your passengers have f astened
their seat belts (see page ).Turn the ignition switch ON (II).
Check the indicator lights in the
instrument panel.
Start the engine (see page ).
Check the gauges and indicator
lights in the instrument panel (see
page ).
Visually check the tires. If a tire
looks low, use a gauge to check its
pressure.
Check that any items you may be
carrying with you inside are stored
properly or f astened down
securely. Make sure the doors are securely
closed and locked.
Check that the hood, tailgate and
hatch glass are f ully closed.
1.
2.
3.
4. 5.
6.
7.
8.
9.
10.
11.
12.
97
114 83
17 200
65
Driving
Preparing to Drive
199
Page 214 of 374

�µ
Always use the parking brake when
you park your vehicle. The indicator
on the instrument panel shows that
the parking brake is not f ully
released; it does not indicate that the
parking brake is f irmly set. Make
sure the parking brake is set f irmly
or your vehicle may roll if it is
parked on an incline.
If your vehicle has an automatic
transmission, set the parking brake
bef ore you put the transmission in
Park. This keeps the vehicle f rom
moving and putting pressure on the
parking mechanism in the
transmission making it easier to
move the shift lever out of Park
when you want to drive away. If the vehicle is f acing uphill, turn
the f ront wheels away f rom the curb.
If you have a manual transmission,
putitinfirstgear.
If the vehicle is f acing downhill, turn
the f ront wheels toward the curb. If
you have a manual transmission, put
it in reverse gear.
Make sure the parking brake is f ully
released bef ore driving away.
Driving with the parking brake
partially set can overheat or damage
the rear brakes.
Make sure the moonroof and the
windows are closed.
Lock the doors and the tailgate
with the key or the remote
transmitter.
Make sure the hatch glass is
closed securely. Place any packages, valuables, etc.,
in the cargo area or take them
with you. Turn of f the lights.
Never park over dry leaves, tall
grass, or other f lammable
materials. The three way catalytic
converter gets very hot, and could
cause these materials to catch on
fire.
Parking T ips
Driving
Parking
210


.")