Page 114 of 374
The driver’s door armrest has a
master power window control panel.
To open any of the passenger’s win-
dows, push down on the appropriate
switch and hold it until the window
reaches the desired position. To
close the window, pull back on the
window switch. Release the switch
when the window gets to the position
you want.
Your vehicle’s windows are electri-
cally-powered. Turn the ignition
switch to ON (II) to raise or lower
any window.
Each door has a switch that controls
its window. To open the window,
push the switch down and hold it.
Release the switch when you want
the window to stop. Close the
window by pulling back on the
switch and holding it.
Inst rument s and Cont rols
Power Windows
110
DRIVER’S WINDOW SWITCH
MAIN SWITCH
Closing a power window on
someone’s hands or fingers can
cause serious injury.
Make sure your passengers are
away from the windows before
closing them.
Page 118 of 374
Push the appropriate edge of the
adjustment switch to move the
mirrorright,left,up,ordown.
When you f inish, move the
selector switch to the center (off)
position. This turns of f the
adjustment switch so you can’t
move a mirror out of position by
accidentally bumping the switch.
Keeptheinsideandoutsidemirrors
clean and adjusted f or best visibility.
Be sure to adjust the mirrors bef ore
you start driving.
The inside mirror has day and night
positions. The night position reduces
glare f rom headlights behind you.
Flip the tab on the bottom edge of
the mirror to select the day or night
position.
Adjust the outside mirrors with the
adjustment switch on the driver’s
door armrest:
Turn the ignition switch ON (II).
Move the selector switch to L
(driver’s side) or R (passenger’s
side). 3.
4.
1.
2.
Inst rument s and Cont rols
Mirrors
Adjusting the Power Mirrors
114
TAB SELECTOR SWITCH
ADJUSTMENT SWITCH
Page 128 of 374
 comes on when
you remove t")
If you leave any door open with the
keynotintheignitionswitch,the
ceiling light will go of f af ter three
minutes.
The ceiling light (with the switch in
the center position) comes on when
you remove the key f rom the ignition
switch. If you do not open a door, the
light f ades out in about 30 seconds.
The ceiling light (with the switch in
the center position) also comes on
when you unlock the door with the
key, the lock tab on the driver’s door,
the master door lock switch, or the
remote transmitter (see page ).Turn on a spotlight by pushing the
button next to each light. Push the
button again to turn it off. You can
use the spotlights at all times.
The ceiling light has a three-position
switch. In the OFF position, the light
does not come on. In the center
position, the ceiling light comes on
when you open any door. Af ter all
doors are closed tightly, the light
f ades out in about 30 seconds. In the
ON position, the ceiling light stays
on continuously. 90
Inst rument s and Cont rols
Interior Lights
Ceiling L ight
Spotlights
124
ON
OFF DOOR ACTIVATED
Page 129 of 374
The cargo area light has a three-
position switch. In the OFF position,
the light does not come on. In the
center position, the light comes on
when you open the tailgate or the
hatch glass. In the ON position, the
light stays on continuously.The ignition switch light comes on
when you unlock the driver’s door,
and f ades out about 30 seconds af ter
you close the door.
Interior Lights
Inst rument s and Cont rols
Cargo A rea L ight
Ignition Switch L ight
125
ON
OFF IGNITION SWITCH LIGHT
TAILGATE/HATCH GLASS ACTIVATED
Page 189 of 374

Remove the f uel f ill cap slowly.
You may hear a hissing sound as
pressure inside the tank escapes.
Stop f illing the tank af ter the f uel
nozzle automatically clicks of f . Do
not try to ‘‘top of f ’’ the tank, leave
some room f or the f uel to expand
with temperature changes.
Because the f uel f ill cap is on the
driver’s side of the vehicle, park
with that side closest to the
service station pumps.
Open the f uel f ill door by pulling
on the handle located under the
lower lef t corner of the dashboard. Your vehicle has an on-board
ref ueling vapor recovery system to
help keep f uel vapors f rom going
into the atmosphere. If the fuel
nozzle keeps clicking of f even
though the tank is not full, there
maybeaproblemwiththissystem.
Consult your dealer.
1.
2. 3.
4.
CONT INUED
Filling the Fuel Tank
Service Station Procedures
Bef ore Driving185
Pull
FUEL FILL CAP
Gasoline is highly flammable
and explosive. You can be
burned or seriously injured
when handling fuel.Stop the engine and keep
heat, sparks, and flame away.
Handle fuel only outdoors.
Wipe up spills immediately.
Page 190 of 374
Shift to Park or Neutral and set
the parking brake. Pull the hood
release handle located under the
lower lef t corner of the dashboard.
The hood will pop up slightly.
Screw the f uel f ill cap back on,
tighten it until it clicks several
times. If you do not properly
tighten the cap, the Malfunction
Indicator Lamp may come on (see
page ).
Push the f uel f ill door closed until
it latches.
Standing in f ront of the vehicle,
put your f ingers between the f ront
edge of the hood and the f ront
grille. The hood latch handle is
above the ‘‘H’’ logo. Push this
handle up until it releases the
hood. Lif t the hood.
1.
2.
5.
6.
327
Service Station Procedures
Bef ore Driving
Opening the Hood
186
HOOD RELEASE HANDLE
LATCH
Page 196 of 374

Covering the outside edge of a
f ront seat-back, with a non-Honda
seat cover for example, could
prevent the airbag from inflating
properly.If a side airbag
inflates,acupholderorotherhard
object attached on or near the
door could be propelled inside the
vehicle and hurt someone.
Some examples are:
Lowering the vehicle with an
aftermarket suspension kit that
signif icantly reduces ground
clearance can allow the
undercarriage to impact speed
bumps or other raised objects,
which could cause the airbags to
deploy.
Raising the vehicle with an
af termarket suspension kit can
af f ect the handling and stability.
Af termarket wheels, because they
are a universal design, can cause
excessive stress on suspension
components. Larger or smaller wheels and tires
can interf ere with the operation of
your vehicle’s anti-lock brakes and
other systems.
Do not modif y your steering wheel
or any other part of your
Supplemental Restraint System.
Modif ications could make the
system inef f ective.
Any object
attached to or placed on the covers
marked ‘‘SRS AIRBAG,’’ in the
center of the steering wheel and
on top of the dashboard, could
interf ere with the proper operation
of the airbags. Or, if the airbags
inf late, the objects could be
propelled inside the vehicle and
hurt someone.
If you plan to modif y your vehicle,
consult with your Honda dealer.
Removing parts f rom your vehicle,
or replacing components with non-
Honda (af termarket) components
could seriously af f ect your vehicle’s
handling, stability, and reliability.
Only on models equipped with side
airbagsModif ications
Additional Saf ety Precautions
Do not place any object s over t heoutsideedgeof afront seat-back.
Do not at t ach hard object s on or
near a f ront door.
Do not at t ach or place object s on the f ront airbag covers.
A ccessories and Modif ications
Bef ore Driving192
Page 197 of 374
�Î
�Î
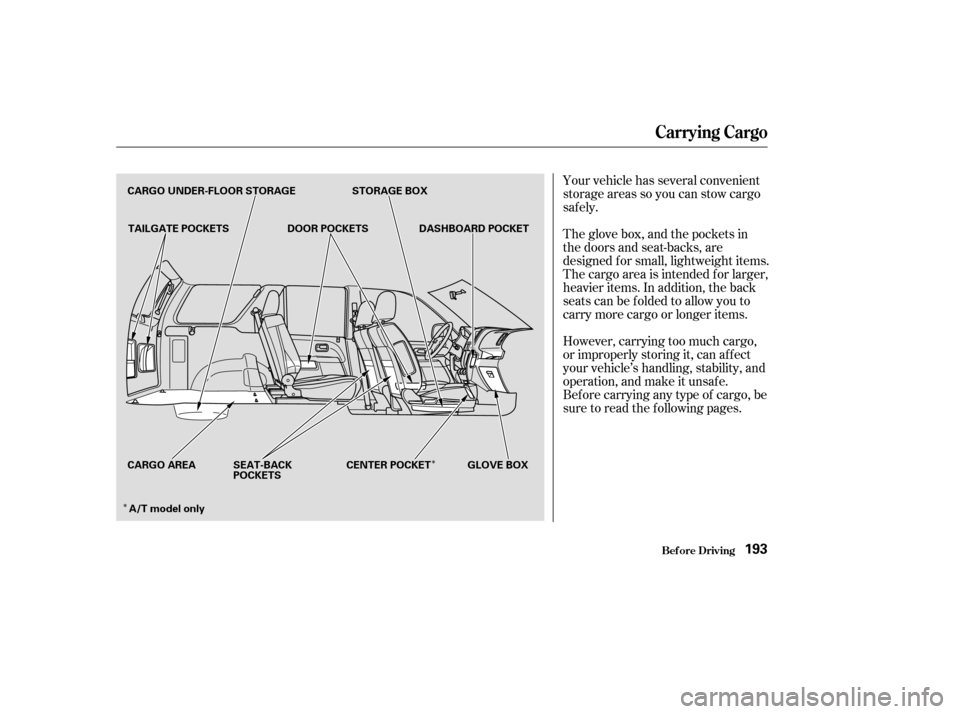
Your vehicle has several convenient
storage areas so you can stow cargo
saf ely.
However, carrying too much cargo,
or improperly storing it, can af f ect
your vehicle’s handling, stability, and
operation, and make it unsaf e.
Bef ore carrying any type of cargo, be
sure to read the f ollowing pages. The glove box, and the pockets in
the doors and seat-backs, are
designed f or small, lightweight items.
The cargo area is intended f or larger,
heavier items. In addition, the back
seats can be folded to allow you to
carry more cargo or longer items.
Carrying Cargo
Bef ore Driving193
CARGO UNDER-FLOOR STORAGE TAILGATE POCKETS DOOR POCKETSSTORAGE BOX
DASHBOARD POCKET
CARGO AREA SEAT-BACK POCKETS CENTER POCKET GLOVE BOX
A/T model only


position. This turns of f the
adjustment switc")