Page 576 of 1139

Front Suspension
Stabilizer Link Removal/lnstallation
1.Raise the front of the vehicle, and support it with
safety stands in the proper location (see page 1-8).
Remove the front wheels.
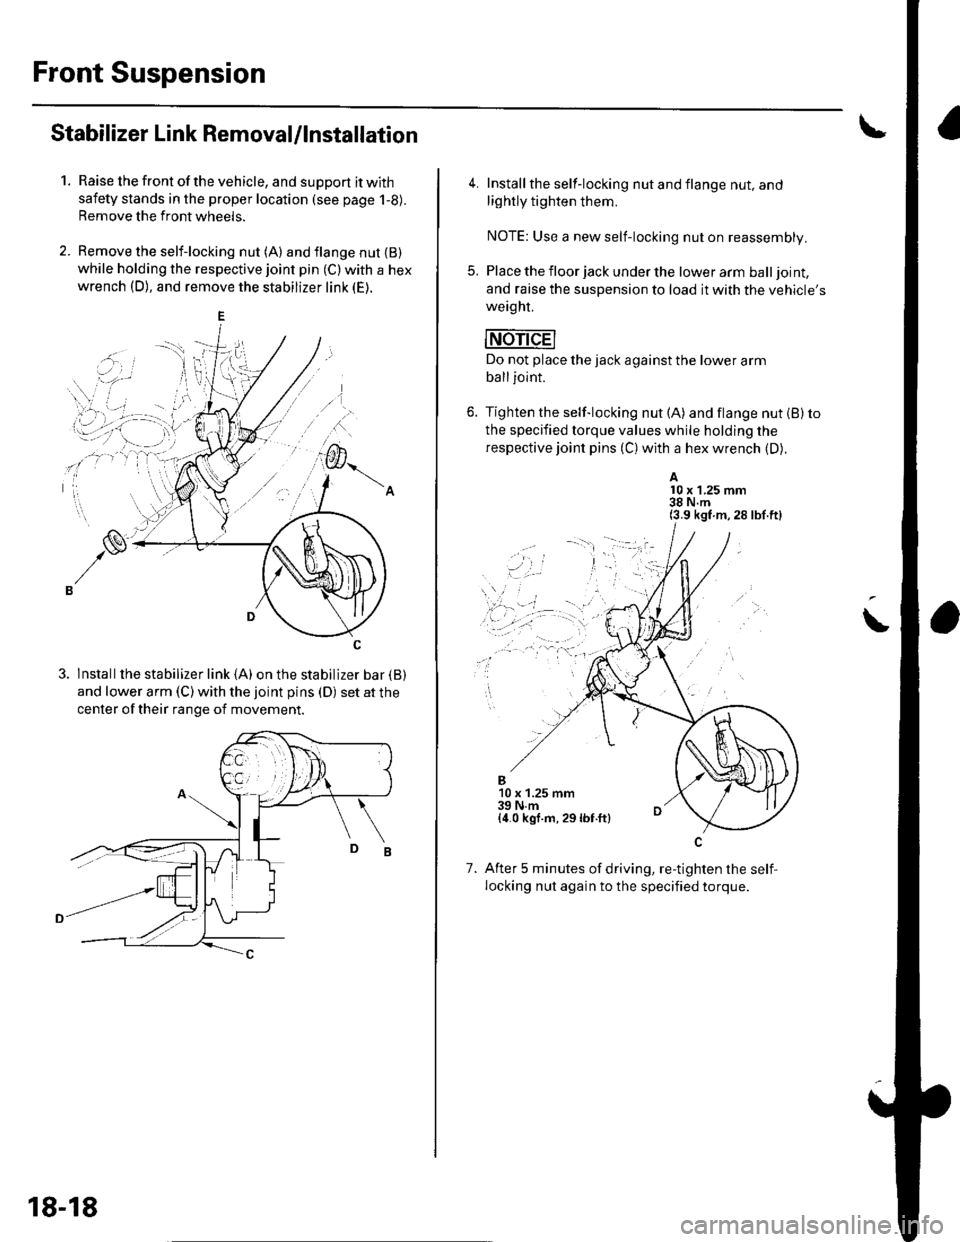
Remove the self-locking nut (A) and flange nut {B)while holding the respective joint pin (C) with a hex
wrench (D), and remove the stabilizer link (E).
3. lnstallthe stabilizer link (A) on the stabilizer bar {B)
and lower arm (C) with the joint pins (D) set at the
center of their range of movement.
18-18
4. Install the self-locking nut and flange nut, and
lightly tighten them.
NOTE: Use a new self-locking nut on reassembly.
5. Place the floor jack under the lower arm balljoint,
and raise the suspension to load it with the vehicle's
weaght.
mri-dEl
Do not place the jack against the lower arm
balljoint.
6. Tighten the self-locking nut (A) and flange nut (B) to
the specified torque values while holding the
respective joint pins (C) with a hex wrench (D).
A10 x 1.25 mm38 N.m(3.9 kgf m,28 lbf.ft)
\
..,
1.
B10 x 1.25 mm39 N.m{4.0 kgf.m, 29lbf.ft}
After 5 minutes of driving, re-tighten the self,
locking nut again to the specified torque.
Page 577 of 1139

Lower Arm Removal/lnstallation
SpecialTools Required
Ball joint remover,2S mm 07|MAC-S100200
1. Raise the front of the vehicle, and support it with
safety stands in the proper location (see page 1-8).
Remove the front wheels.
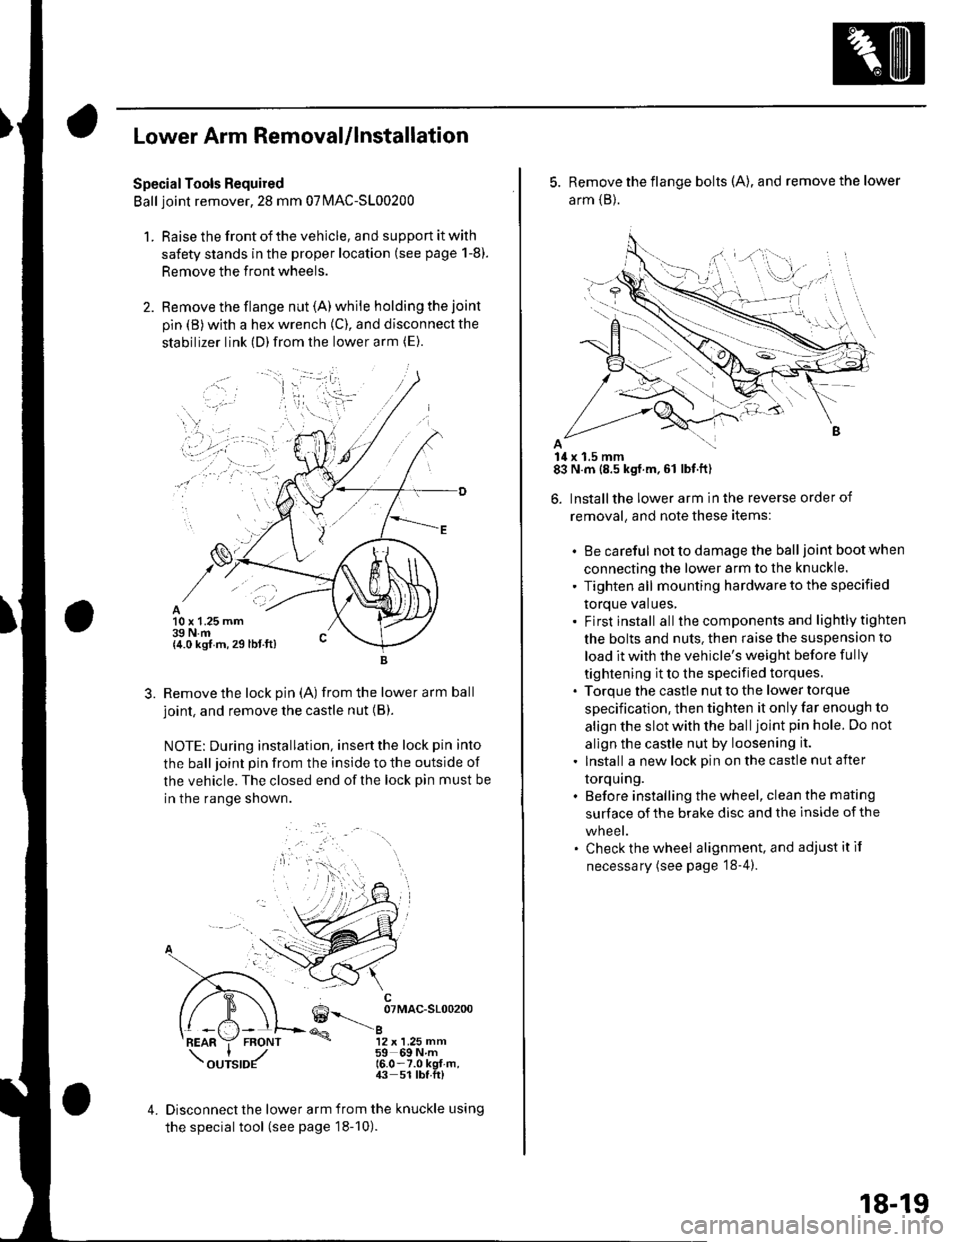
Remove the flange nut (A) while holding the joint
pin {B) with a hex wrench (C), and disconnect the
stabilizer link (D)from the lower arm (E).
10 x 1.25 mm39 N.m{4.0 kgf m, 29 lbt.ft)
3.Remove the lock pin (A) from the lower arm ball
joint, and remove the castle nut (B).
NOTE: During installation, insertthe lock pin into
the ball joint pin from the inside to the outside of
the vehicle. The closed end of the lock pin must be
in the range shown.
6--__ oTMAc-sloo2oo
@a12 x 1.25 mm59 69Nm16.0-7.0 kgt-m,43 51 lbf.ft)
4.Disconnect the lower arm from the knuckle using
the special tool (see page 18-10).
5. Remove the flange bolts (A), and remove the lower
arm {B}.
14 x 1.5 mm83 N.m (8.5 kgf.m,61 lbf.ft)
6. Installthe lower arm in the reverse order of
removal, and note these items:
. Be careful not to damage the ball joint boot when
connecting the lower arm to the knuckle.
' Tighten all mounting hardware to the specified
torque values,. Firstinstall all the components and lightlytighten
the bolts and nuts. then raise the suspension to
load it with the vehicle's weight before fully
tightening it to the specified torques.. Torque the castle nut to the lower torque
specification, then tighten it only far enough to
align the slot with the ball joint pin hole. Do not
allgn the castle nut by loosening it.
. Install a new lock pin on the castle nut after
torquing.. Before installing the wheel, clean the mating
surface of the brake disc and the inside of the
wneet.. Check the wheel alignment, and adjustitif
necessary (see page '18-4).
18-19
Page 578 of 1139
Front Suspension
Damper/Spring Replacement
Exploded View
DAMPER MOUNTINGBEARING
UPPER SPRING MOUNTINGCUSHIONCheck for deteriorationano oamage,
DAMPER SPRINGCheck for lree length.
./ SELF-LOCK|NG NUT/.' 12 x 1.25inm
,,/ 44 N.m {4.5 kgt.m, 33lbf.ftl,/ neDtace.^atae9
-€.- - DAMPER MOUNTING BASE
1, @-:'\--""' check for delormation
lF \-:-./ - ,
E9-
DAMPER UNITCheck for oil leaks,gas leaks, and smoothoperatron.
\
18-20
Page 580 of 1139
Front Suspension
Damper/Spring Replacement (cont'd)
Disassembly/lnspection
1. Compress the damper spring with a commercially
available strut spring compressor (A) according to
the manufacturer's instructions. then remove the
self-locking nut (B)while holding the damper shaft(C) with a hex wrench (D). Do not compress the
spring more than necessary to remove the nut,
Release the pressure from the strut spring
compressor, then disassemble the damper as
shown in the Exploded View.
18-22
4.
Reassemble all the pans, except for the upper
spring seat and spring.
Compress the damper assembly by hand, and
check for smooth operation through a full stroke.
both compression and extension. The damper
should extend smoothly and constantly when
compression is released. lf it does not, the gas is
leaking and the damper should be replaced.
Check for oil leaks, abnormal noises, and binding
during these tests.
\
Page 582 of 1139
Front Suspension
Damper/Spring Replacement (cont'dl
Right side:
9.
Hold the bottom of the damper with your hand, and
compress the spring. Do not compress the spring
excessively.
Installthe 12 mm nut (A) on the damper shaft (B).
Hold the damper shaft with a hex wrench (C), and
tighten the 12 mm nut to the specified torq ue.
(4.5 kgt.m, 33 lbf ft)
Remove the damper assembly from the strut spring
compressor.
10.
18-24
Installation
1. Lower the lower arm, and position the damper
assembly in the body, Turn the damper mounting
base so the "AL" or "AR" mark (A) faces toward
the outside of the vehicle.
B10 x 1.25 mm,14 N.m{4.5 kgt.m,33 lbf.ft)
,1,6
Loosely install the flange nuts (A) onto the top of
the damper.L
Page 583 of 1139

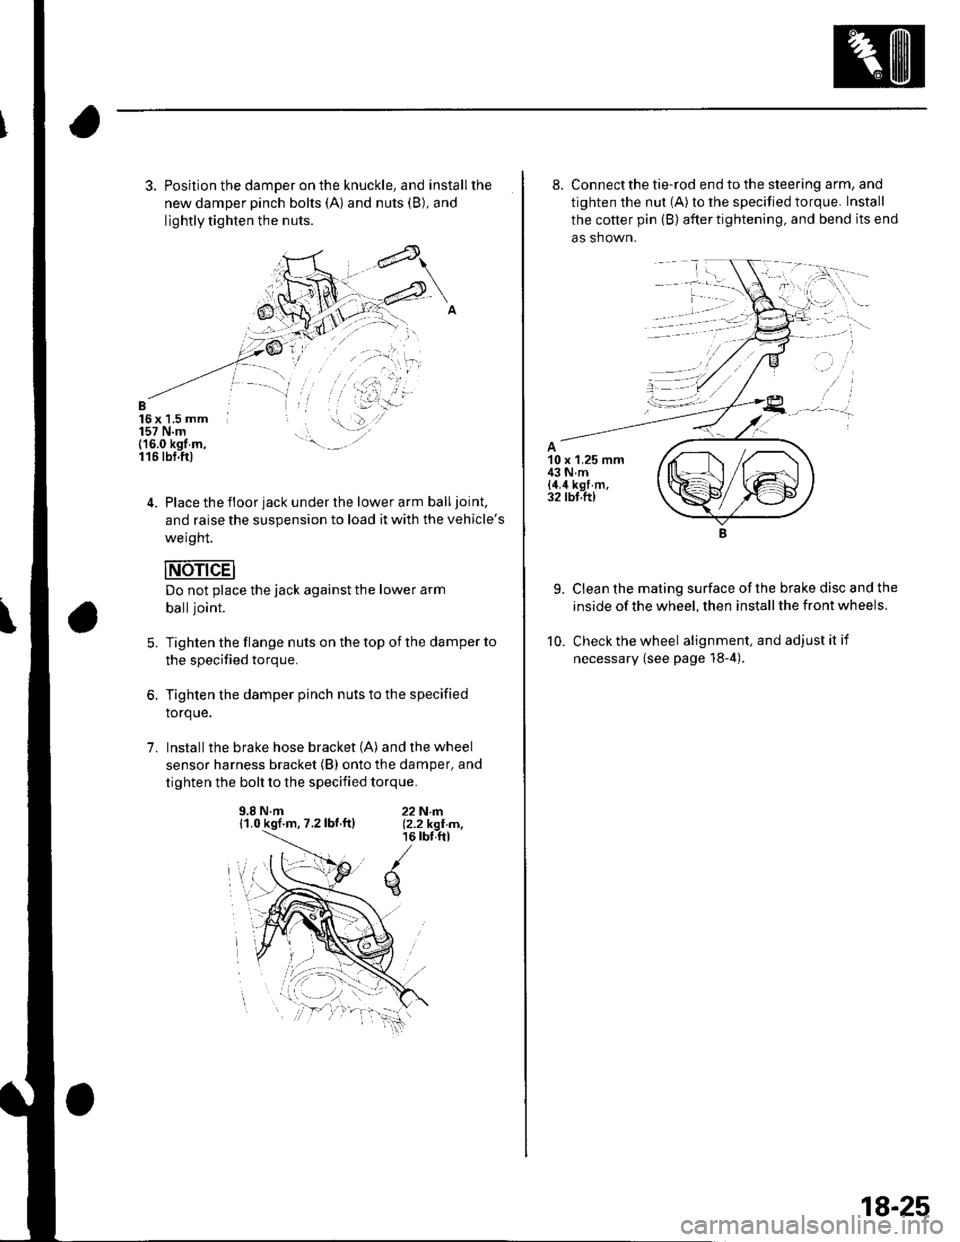
3. Position the damper on the knuckle, and installthe
new damper pinch bolts (A) and nuts (B), and
lightly tighten the nuts.
B16x 1,5 mm157 N.m(16.0 kgt m,116 tbt.ftl
4. Place the floor jack under the lower arm balljoint,
and raise the suspension to load it with the vehicle's
weight.
Do not place the jack against the lower arm
balljoint.
Tighten the flange nuts on the top of the damper to
the specified torque.
Tighten the damper pinch nuts to the specified
torque.
Install the brake hose bracket (A) and the wheel
sensor harness bracket (B) onto the damper, and
tighten the bolt to the specified torque.
5.
1.
9.8 N.m11.0 kgf.m, 7.2lbf.ftl22N|rl.12.2 kgI m,16 rbr,ftl
q
8. Connect the tie-rod end to the steering arm, and
tighten the nut (A) to the specified torque. Install
the cotter pin (B) after tightening, and bend lts end
as shown.
9. Clean the mating surface ofthe brake disc and the
inside of the wheel, then install the front wheels.
10. Check the wheel alignment, and adjustitif
necessary {see page 18-4).
18-25
Page 584 of 1139
Rear Suspension
Hub Bearing Unit Replacement
Exploded View
Check for delormation.
SPLASH GUARDCheck for deformation.
x 1.0 mm9.8 N.m (1.0 kgf.m, ?1 lbf ftl
HUB BEARING UNITCheck for faulty movementand wear.6x1.0mm9,8 N.m{1.0 kgf.m, 7 lbf.ft}
un
Y
HUB CAPReplace.
SPINDLE NUT22 x 1.5 mm181 N.m {18.5 kgt.m, 134lbf.ft}Beplace.-A
TAppy a small amount oI engine oilto the seating surface.
Check for wear and damage.
,, o0'[',/-\'
KNUCKLE
18-26
Page 586 of 1139

Rear Suspension
Hub Bearing Unit Replacement
(cont'd)
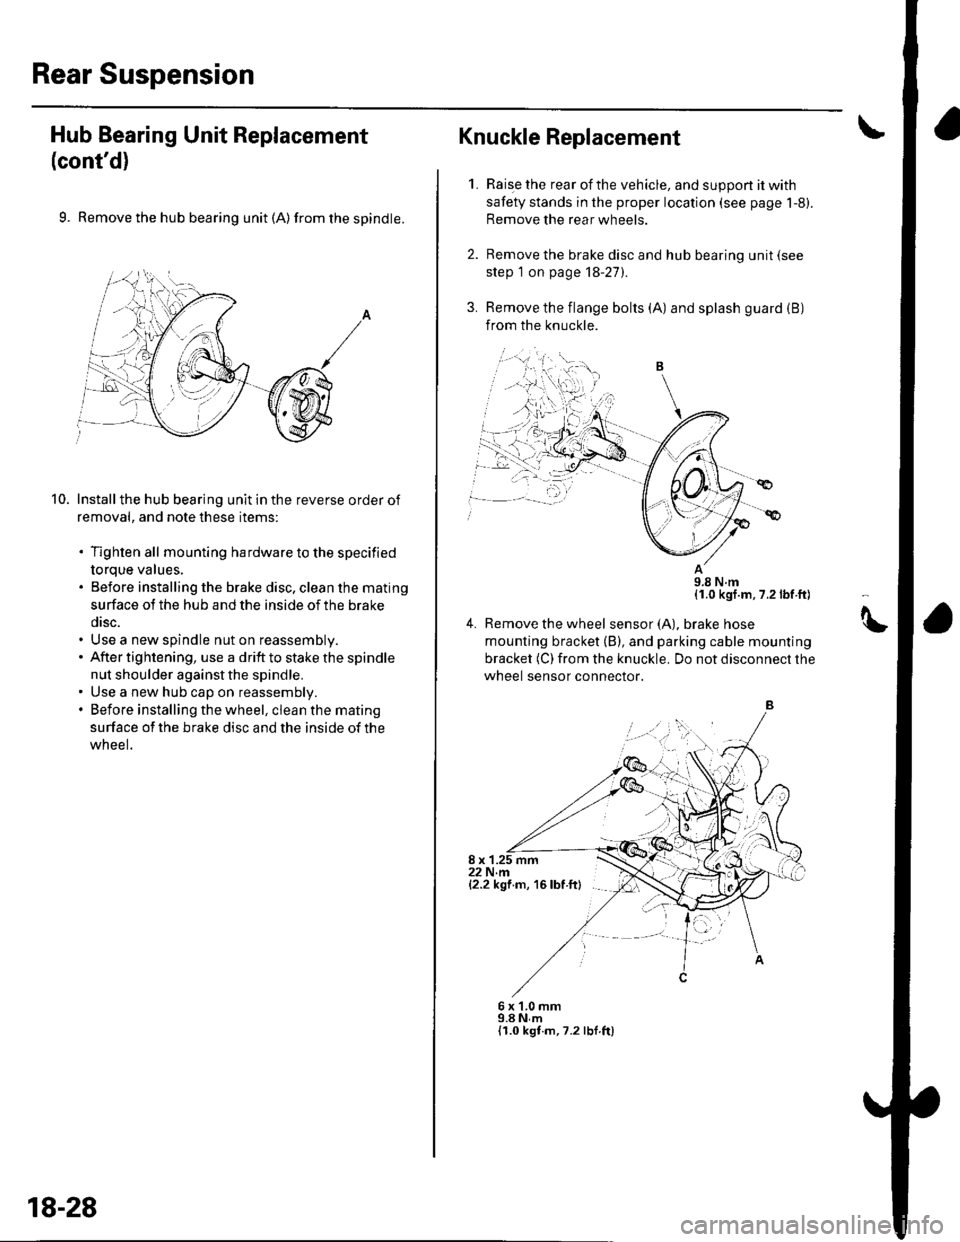
9. Remove the hub bearing unit (A) from the spindle.
Install the hub bearing unit in the reverse order of
removal, and note these items:
. Tighten all mounting hardware to the specified
torque values,. Before installing the brake disc, clean the mating
surface ot the hub and the inside of the brake
disc.. Use a new spindle nut on reassembly.. After tightening, use a drift to stake the spindle
nut shoulder against the spindle.. Use a new hub cap on reassembly.. Before installing the wheel, clean the mating
surface of the brake disc and the inside of the
wneel.
10.
,=,,,
18-28
Raise the rear of the vehicle, and suppon it with
safety stands in the proper location (see page 1-8).
Remove the rear wheels.
Remove the brake disc and hub bearing unit (see
step 1 on page 18-27).
Remove the flange bolts (A) and splash guard (B)
from the knuckle.
11.0 kgf.m, 7.2 lbf ft)
4. Remove the wheel sensor(A), braKe nose
mounting bracket (B), and parking cable mounting
bracket (C) from the knuckle. Do not disconnect the
wheel sensor connector.
8 x 1.25 mm22 N.m{2.2 kgf m, 16 lbf ftl
Knuckle Replacement
1.
6x1.0mm9.8 N,m{I.0 kgt.m,7.2 lbf ft)
tt