Page 123 of 1139
Cylinder Head
1.
2.
Rocker Arms and Shafts Inspection
Remove the rocker arm assembly (see page 6-26).
Measure the diameter of the shaft at the first rocker
location.
3. Zero the gauge (A) to the shaft diameter.
6-28
\
4. Measure the inside diameter ofthe rocker arm, and
check it for an out-of-round condition.
Rocker Arm-to-Shaflt Clearance:
Standard lNew):
lntake: 0.025 0.052 mm(0.0010 0.0020 in.)
Exhaust: 0.018 0.056 mm
(0.0007 0.0022 in.)
Service Limit: 0.08 mm (0.003 in.)
5. Repeat for all rockerarms and both shafts. lfthe
clearance is over the Ilmit. replace the rocker shaft
and all overtolerance rocker arms. lf any VTEC
rocker arm needs replacement, replace the rocker
arms (primary and secondary) as a set.
6. Inspect the rocker arm pistons {A}. Push each
piston manually.
lf it does not move smoothly, replace the rocker
arm set.
NOTE: Apply oil to the pistons when reassembling.
,,,@@
(\.
(
Page 124 of 1139
Gamshaft Inspection
NOTE: Do not rotate the camshaft during inspection.
1. Remove the rocker arm assembly (see page 6-26).
and disassemble it (see page 6-27).
2. Put the rocker shaft holders, camshaft, and
camshaft holders on the cylinder head, then tighten
the bolts to the specified torque.
Specified torque:
I mm bolis:
22 N.m {2.2 kgt m, 16lbf.ft}
6 mm bolts:
12 N.m {1.2 kgf.m,8.7 tbf.ftl
6 mm bolts: @, €0, @
I
I
3. Seat the camshaft by pushing it away from the
camshaft pulley end ofthe cylinder head.
4. Zero the dial indicator against the end of the
camshaft, then push the camshaft back and forth
and read the end play. lf the end play is beyond the
service limit, replace the camshaft head and
recheck. lf it is still beyond the service limit, replace
the cylinder.
Camshaft End Play:
Standard {New}: 0.05 0.20 mm(0.002 0.008 in.l
Service Limit: 0.4 mm (0.02 in.)
(cont'd)
6-29
Page 125 of 1139

Cylinder Head
Camshaft Inspection (cont'dl
1.
9.
Unscrew the camshaft holder bolts two turns at a
time, in a crisscross pattern. Then remove the
camshaft holders from the cylinder head.
Lift the camshafts out of the cylinder head, wipe
them clean. then inspect the lift ramps. Replace the
camshaft if any lobes are pitted, scored, or
excessively worn,
Clean the camshaft journal surfaces in the cylinder
head, then set the camshafts back in place. Place a
plastigage strip across each journal.
Install the camshaft holders, then tighten the bolts
to the specified torque as shown in step 2.
Remove the camshaft holders. Measure the widest
portion of plastigage on each journal.
. lf the camshaft-to-holder clearance is within
limits, go to step 1 1.. lf the camshaft-to-holder clearance is beyond the
service limit and the camshaft has been replaced,
replace the cylinder head.. lf the camshaft-to-holder clearance is beyond the
service limit and the camshaft has not been
replaced, go to step 10.
Camshaft-to-Holder Oil Clearance:
Standard (New):
No. 1 Journal:
No.2,3,4,5 Journals:
Service Limit:
0.030 0.069 mm
{0.001 0.003 in-)
0.060*0.099 mm
{0.002 0.004 in.)
0.15 mm {0.006 in.)
6-30
\-
{\
10. Check the total runout with the camshaft supported
on V-blocks,
.lfthetotal runout of the camshaft is within the
service limit, replace the cylinder head.. lf the total runout is beyond the service limit,
replace the camshaft and recheck the camshaft-
to-holder oil clearance. lf the oil clearance is still
beyond the service limit, replace the cylinder
neao.
Camshaft Total Runout:
Standard (New): 0.03 mm (0.001 in.) max.
Service Limit: 0.04 mm {0.002 in.)
11. Measure cam lobe height.
Cam
PRI: Primary
C/C: Cam Chain
SEC: Secondary
I\,
Lobe Heioht Standard (New
INTAKEEXHAUST
PRI33.925 mm(1.3356 in.)
34.092 mm
\1 .3422 in.l
SEC29.638 mm(1.1668 in.)
Page 127 of 1139

Gylinder Head
Valve Inspection
1.Remove the valves (see page 6-31),
Measure the valve in these areas.
lntake Valve Dimensions
A Standard lNewl: 34.85 35.15 mm
B Standard {Newl:
C Standard lNew):
C Service Limit:
B Standard (New):
C Standard (New):
C Service Limit:
Exhaust Valve Dimensions
A Standard (New): 29.85-30.15 mm
{1.372 1.384 in.l
108.7 - 109.5 mm
14.280- 4.311 in.)
5.475 5.485 mm
10.2156-0.2159 in.)
5.445 mm {0.214 in.l
(1.175- 1.187 in.)
108.3 109.1 mm
(4.264- 4.295 in.l
5.450 5.460 mm(0.2146 0.2150 in.)
5.42 mm (0.213 in.)
2.
.<
6-32
t-
Valve Stem-to-Guide Clearance\
Inspection
1.Remove the valves (see page 6-3'1).
Slide the valve out of its guide about 10 mm. then
measure the guide-to-stem clearance with a dial
indicator while rocking the stem in the direction of
normal thrust (wobble method).. lf the measurement exceedsthe service limit,
recheck it using a new valve.. lf the measurement is nowwithin the service
limit, reassemble using a new valve.. lf the measurementwith a newvalve still
exceeds the service limit, go to step 3.
lntake Valve Stem-to-Guide Clearance:
Standard lNew): 0.06 0.11 mm
{0.002 0.004 in.}
Service Limil: 0.16 mm {0.006 in.)
Exhaust Valve Stem-to-Guide Clearance:
Standard lNewl:0.11 -0.16 mm
10.004 0.006 in.)
Service Limit: 0.22 mm 10.009 in.)
Subtract the O.D. of the valve stem. measured with
a micrometer, from the LD. of the valve guide,
measured with an inside micrometer or ball gauge.
Take the measurements in three places along the
valve stem and three places inside the valve guide.
The difference between the largest guide
measurement and the smallest stem measurement
should not exceed the service limit
lntake Valve Stem-to-Guide Clearance:
Standard (New): 0.030 0.055 mm
{0.0012 0.0022 in.)
Service Limit; 0.08 mm (0.003 in.l
Exhaust Valve Stem-to-Guide Clearance:
Standard {Newl: 0.055 0.080 mm(0.0022-0.003r in.l
Service Limit: 0.11 mm (0.004 in.)
(
3.
4,.
I
Page 130 of 1139

Valve Seat Reconditioning
1. Inspect valve stem-to-guide clearance (see page 6-
32). lf the valve guides are worn, replace them (see
page 6-33) before cutting the valve seats.
2. Renew the valve seats in the cylinder head using a
valve seat cutter.
Carefully cut a 45'seat, removing only enough
material to ensure a smooth and concentric seat.
Bevel the upper and lower edges at the angles
shown in the illustration.
Check the width of the seat and adjust accordingly.
INTAKE:35"EXHAUST:30'
3,
4.
- 45'
, { 67.5'
5. Make one more very light pass with the 45" cutter
to remove any possible burrs caused by the other
cutters.
Valve Seat Width:
Standard (New): 1.25 1.55 mm {0.049 0.061 in.)
Service Limit: 2.00 mm (0.079 in.)
6. After resurfacing the seat, inspect for even valve
seating: Apply Prussian Blue compound (A) to the
valve face. Insert the valve in its original location in
the head, then lift it and snap it closed against the
seat several trmes.
1.The actual valve seating surface (B), as shown by
the blue compound, should be centered on the seat.
. lf it is too high (closer to the valve stem), you
must make a second cut with the 67.5' cutter to
move it down, then one more cut with the 45"
cutter to restore seat width.. lf it is too low (close to the valve edge), you must
make a second cut with the 35'cutter (intake
sidel or the 30" cutter (exhaust side) to move it up,
then make one more cut with the 45" cutter to
restore seat width.
NOTE: The final cut should always be made with
the 45'cutter.
(cont'd)
6-35
Page 143 of 1139

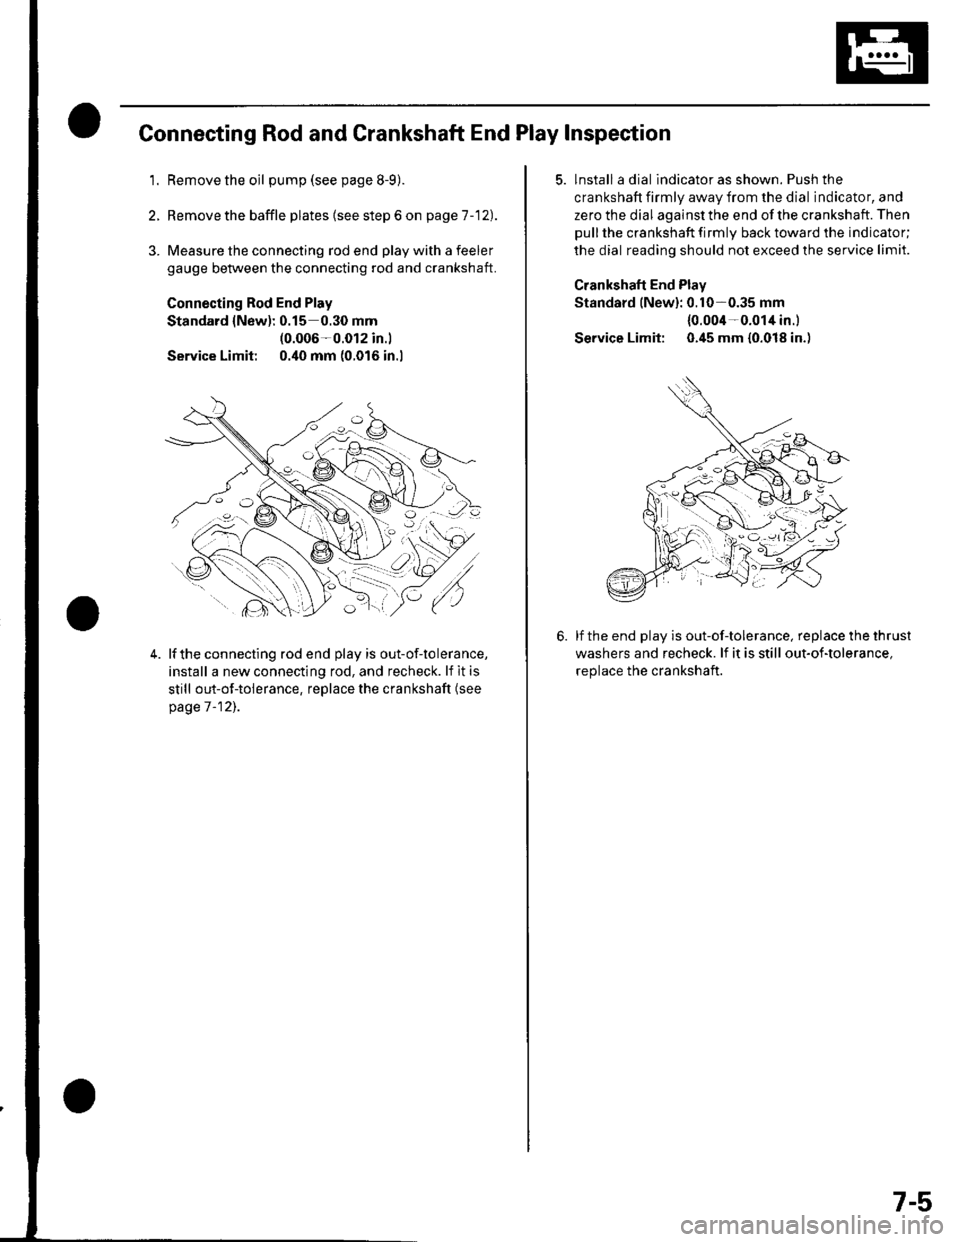
Connecting Rod and Crankshaft End Play Inspection
1.Remove the oil pump (see page 8-9).
Remove the baffle plates (see step 6 on page 1 -12).
3. Measure the connecting rod end play with a feeler
gauge between the connecting rod and crankshaft.
Connecting Rod End Play
Standard {New): 0.15 0.30 mm(0.006-0.012 in.l
Service Limit 0.40 mm (0.016 in.l
4.lf the connecting rod end play is out-of-tolerance,
install a new connecting rod, and recheck. lf it is
still out-of-tolerance, replace the crankshaft (see
page 7 -12],.
5. lnstall a dial indicator as shown. Push the
crankshaft firmly away from the dial indicator, and
zero the dial against the end of the crankshaft. Then
pull the crankshaft firmly back toward the indicator;
the dial reading should not exceed the service limit.
Crankshaft End Plav
Standard lNew): 0.10-0.35 mm
{0.004-0.014 in.l
Service Limit: 0.45 mm {0.018 in.)
lf the end play is out-of-tolerance, replace the thrust
washers and recheck. lf it is still out-of-tolerance,
replace the crankshaft.
7-5
Page 144 of 1139

Engine Block
Crankshaft Main Bearing Replacement
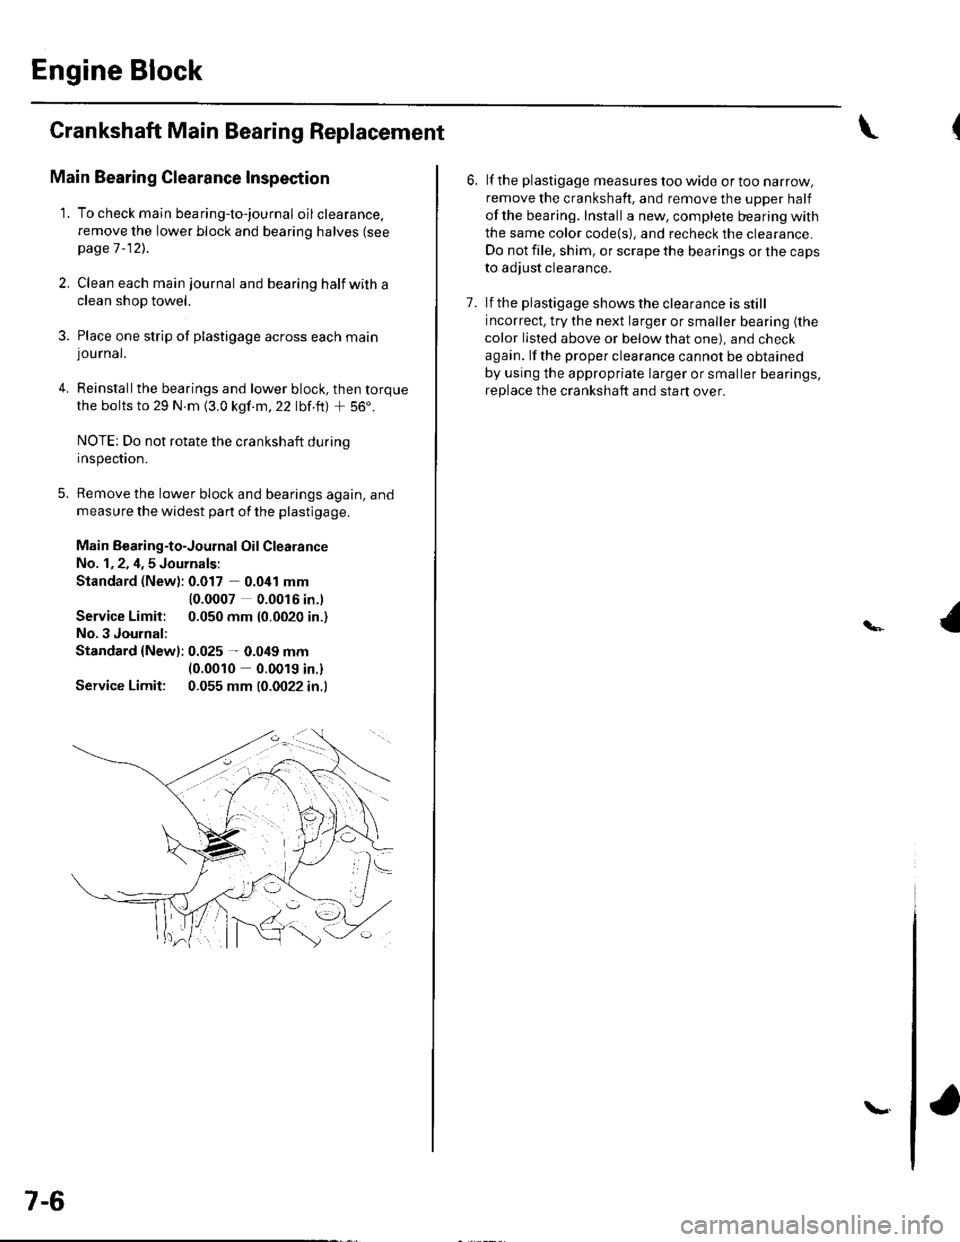
Main Bearing Clearance Inspection
1. To check main bea ring-to-jou rna I oil clearance.
remove the lower block and bearing halves (see
page 1 -12)..
2, Clean each main journal and bearing half witha
clean shop towel.
3. Place one strip of plastigage across each main
lou rnal.
4. Reinstallthe bearings and lower block, then torque
the bolts to 29 N.m {3.0 kgf.m,22 lbf.ft) + 56'.
NOTE: Do not rotate the crankshaft during
Inspeclton.
5. Remove the lower block and bearings again, and
measure the widest part of the plastigage.
Main Bearing-to-Journal Oil Clearance
No. 1,2, 4,5 Journals:
Standard (New): 0.017 0.041 mm
Service Limit:
No.3 Journal:
10.0007 0.0016 in.l
0.050 mm {0.0020 in.)
Standard {Newl: 0.025 - 0.049 mm(0.0010 0.0019 in.)
Service Limit: 0.055 mm (0.0022 in.l
7-6
\.
6. lf the plastigage measures too wide or too narrow,
remove the crankshaft. and remove the upper half
ofthe bearing. Install a new, complete bearing with
the same color code{s), and recheck the clearance.
Do not file, shim, or scrape the bearings or the caps
to adjust clearance.
7. lf the plastigage shows the clearance is still
incorrect, try the next larger or smaller bearing (the
color listed above or below that one), and check
again. lf the proper clearance cannot be obtained
by using the appropriate larger or smaller bearings,
replace the crankshaft and start over.
Page 146 of 1139

Engine Block
Crankshaft Main Bearing
Replacement (cont'd)
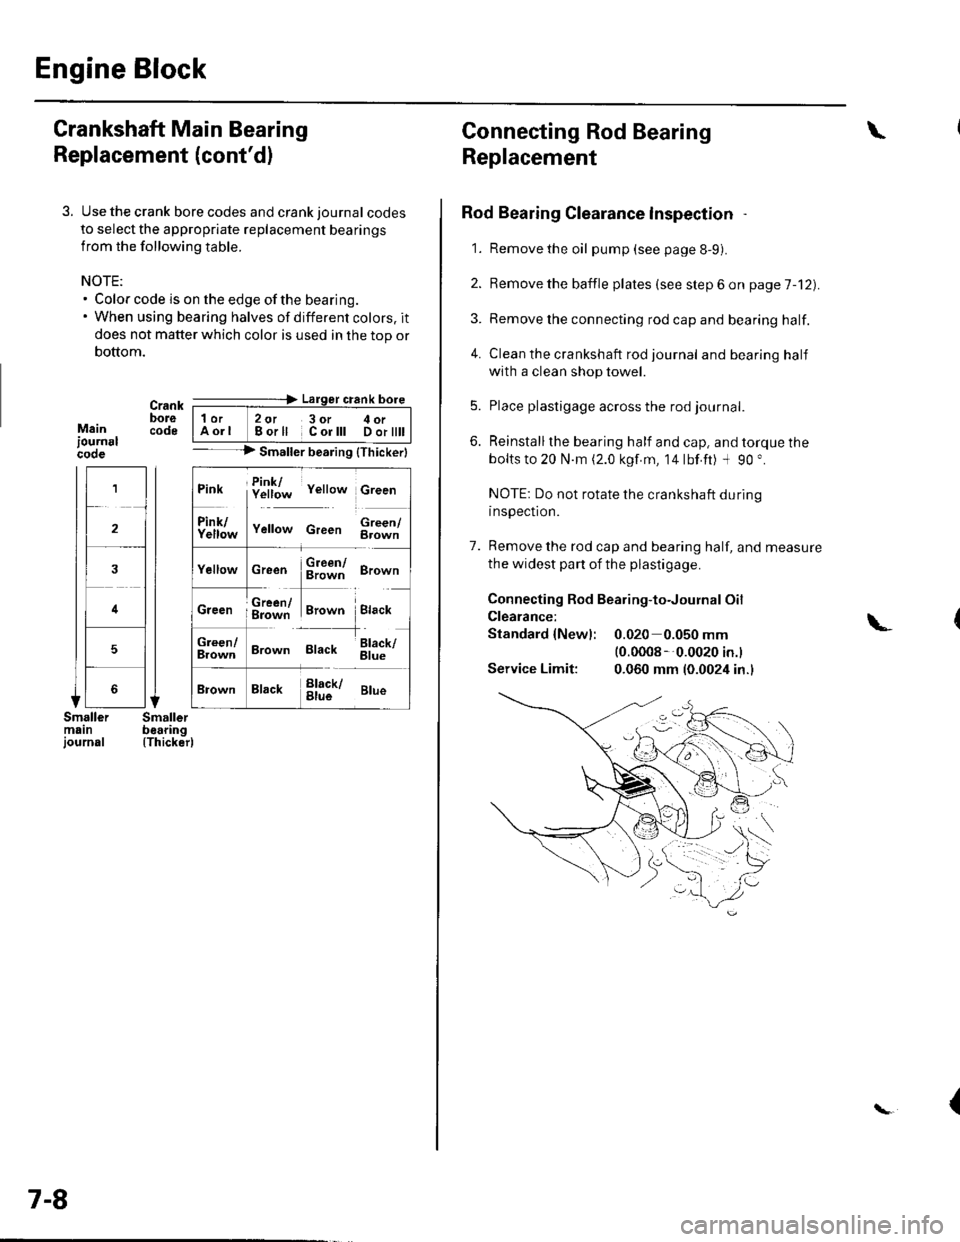
3. Use the crank bore codes and crank journal codes
to select the appropriate replacement bearings
from the following table.
NOTE:. Color code is on the edge of the bearing.. When using bearing halves of different colors. it
does not matter which color is used in the top or
bottom.
Mainiournslcooe
Crank ---=-> Lalger crank bore
bore | 1or 2ot 3or c oi__-lcode IAorl Borll Corlll Dortttt I-- --> Smaller bearing {Thickerl
(Thicker)
1
2
4
5
Pink f!1f;* v"rro* c,""n
ll
f111f;,," v"no* c,""" $;;fl
cr""n $ffi ero-n
ffi#Tr,.*" i.,""*Creen ; g=jiff;i Brown Black
;;lT]*
'---l-'o"*,
Brown Black 6il;
Brack !l;kr ar*
7-8
Connecting Rod Bearing
Replacement
Rod Bearing Clearance lnspection
1. Remove the oil pump (see page 8-9).
2. Bemove the baffle plates (see step 6 on page 7-12).
3. Remove the connecting rod cap and bearing half.
4. Clean the crankshaft rod journal andbearinghalf
with a clean shop towel.
5. Place plastigage across the rod journal.
6. Reinstallthe bearing half and cap, and torque the
bolts to 20 N.m (2.0 kgf.m, 14lbf.ft) -l 90 ".
NOTE: Do not rotate the crankshaft during
inspection.
7. Remove the rod cap and bearing half, and measure
the widest part of the plastigage.
Connecting Rod Bearing-to-Journal Oil
Clearance:
Standard {Newl: 0.020 0.050 mm(0.0008 --0.0020 in.l
Service Limit: 0.060 mm (0.0024 in.)
\
\-
{