2003 HONDA CIVIC ERS
[x] Cancel search: ERSPage 616 of 1139

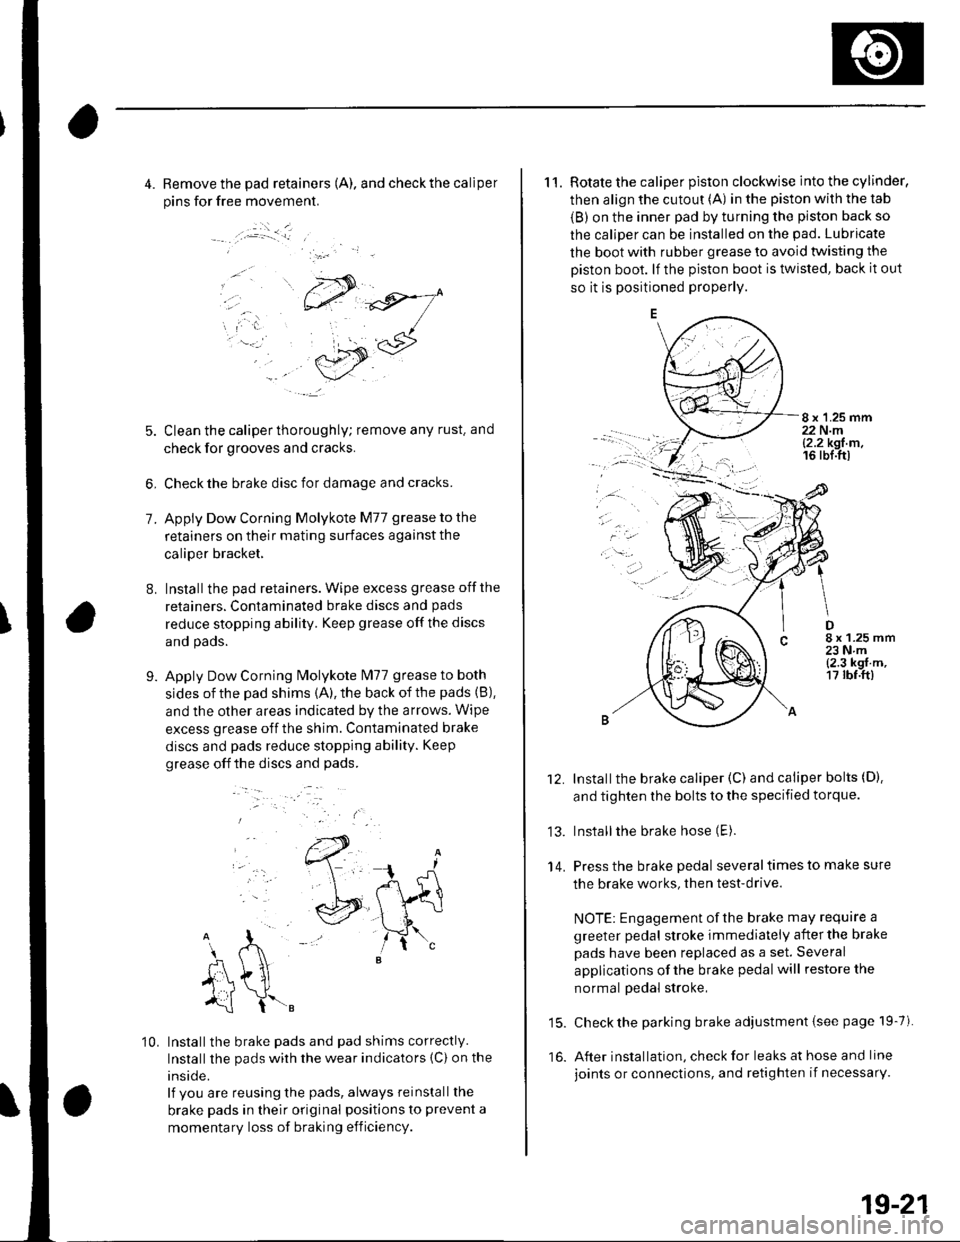
4. Remove the pad retainers (A). and check the caliper
pins for free movement.
:.i _ _l
7.
8.
5. Clean the caliper thoroughly; remove any rust. and
check for grooves and cracks.
6, Check the brake disc for damage and cracks.
Apply Dow Corning Molykote M77 grease to the
retainers on their mating surfaces against the
caliper bracket,
Installthe pad retainers. Wipe excess grease offthe
retainers. Contaminated brake discs and pads
reduce stopping ability. Keep grease off the discs
and pads.
Apply Dow Corning Molykote lvl77 grease to both
sides of the pad shims {A), the back of the pads (B),
and the other areas indicated by the arrows. Wipe
excess grease off the shim. Contaminated brake
discs and pads reduce stopping ability. Keep
grease off the discs and pads.
9.
..-.
10. Installthe brake pads and pad shims correctly.
Installthe pads wirh the wear indicators {C) on the
inside.
lf you are reusing the pads, always reinstall the
brake pads in their original positions to prevent a
momentary loss of braking efficiency.
11. Rotate the caliper piston clockwise into the cylinder,
then align the cutout (A) in the piston with the tab
{B) on the inner pad by turning the piston back so
the caliper can be installed on the pad. Lubricate
the boot with rubber grease to avoid twisting the
Diston boot. lf the piston boot is twisted, back it out
so it is positioned properly.
8 x 1.25 mm22 N.ml2.2 kgt m,16 rbl.ttl
.ar
D8 x 1.25 mm23Nm{2.3 kgf.m,17 rbf.ft)
13.
14.
Installthe brake caliper (C) and caliper bolts (D).
and tighten the bolts to the specified torque.
Installthe brake hose (E).
Press the brake pedal several times to make sure
the brake works, then test-drive.
NOTE: Engagement of the brake may require a
greeter pedal stroke immediately after the brake
pads have been replaced as a set. Several
applications of the brake pedal will restore the
normal pedal stroke,
15. Check the parking brake adjustment {see page 19-7).
16. After installation, check for leaks at hose and line
joints or connections, and retighten if necessarY.
19-21
Page 617 of 1139

Conventional Brake Components
Rear Brake Disc Inspection
Runout
1. Raise the rear of the vehicle, and support it with
safety stands in the proper location (see page 1-8).Remove the rear wheels,
2. Remove the brake pads (see page 19-20).
3. Inspect the disc surface for damage and cracks.
Clean the disc thoroughly, and remove all rust,
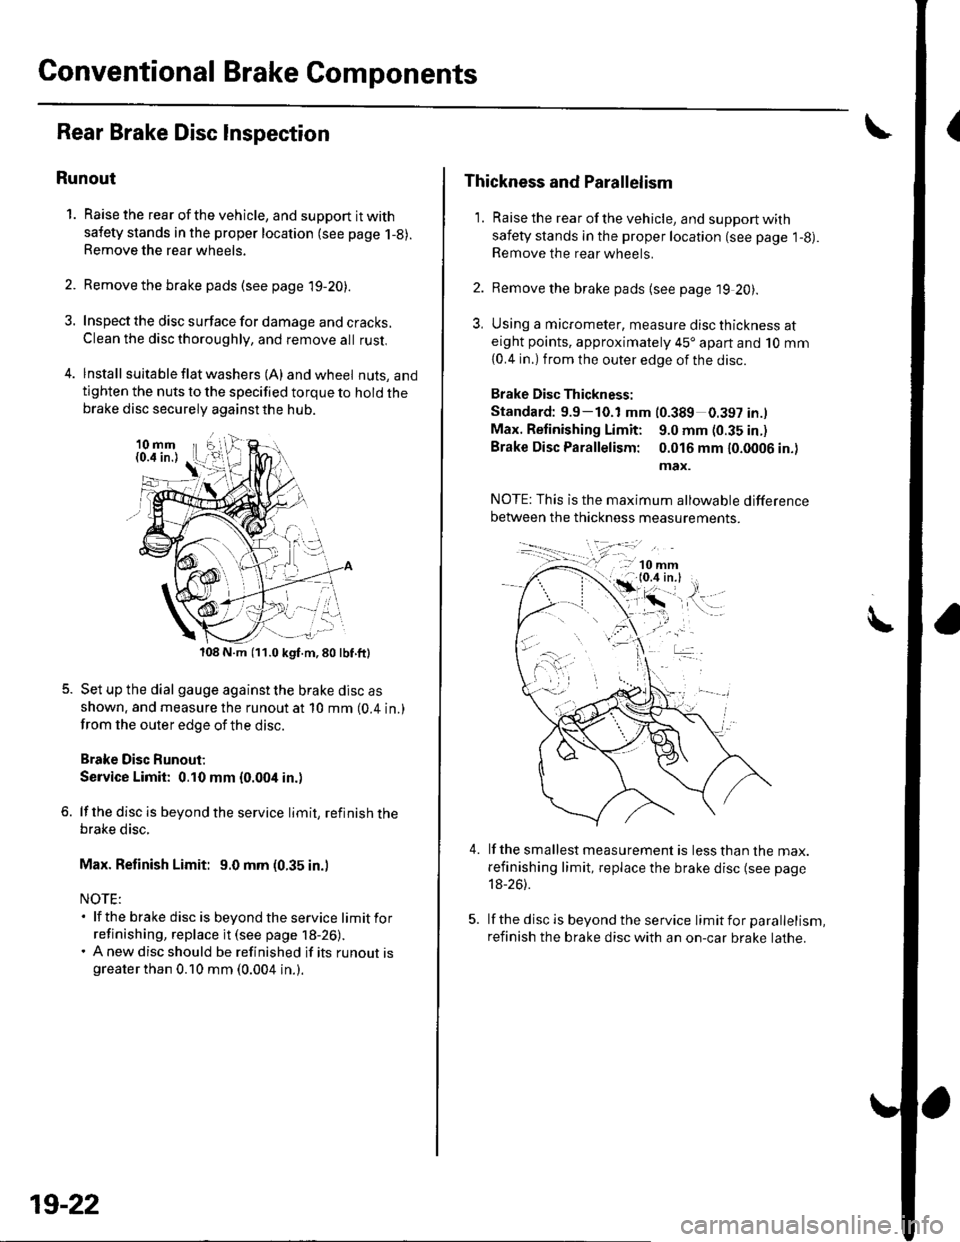
4. lnstall suita ble f lat washers (A) and wheel nuts, andtighten the nuts to the specified torque to hold thebrake disc securely against the hub.
108 N.m (11.0 kgf.m,80lbf.ft)
Set up the dial gauge against the brake disc as
shown. and measure the runout at 10 mm (0.4 in.)
from the outer edge of the disc.
Brake Disc Runout;
Service Limit: 0.10 mm {0.004 in.)
lf the disc is beyond the service limit, refinish thebrake disc.
Max. Refinish Limit: 9.0 mm (0.35 in.)
NOTE:. lf the brake disc is beyondtheservice limitfor
refinishing, replace it (see page 18-26).. A new disc should be refinished if its runout isgreater than 0.10 mm (0.004 in.).
19-22
Thickness and Parallelism
1. Raise the rear of the vehicle, and support with
safety stands in the proper location (see page l-g).Remove the rear wheels.
2. Remove the brake pads {see page 19 20).
3, Using a micrometer, measure disc thickness ateight points, approximately 45'apart and 10 mm
{0.4 in.) from the outer edge of the disc.
Brake Disc Thickness:
Standard: 9.9-10.1 mm (0.389 0.397 in.l
Max. Retinishing Limit: 9.0 mm (0.35 in.)
Brake Disc Parallelism: 0.016 mm 10.0006 in.)
max.
4.lf the smallest measurement is less than the max.
refinishing limit, replace the brake disc (see page
18-26).
lf the disc is beyond the service limit for parallelism,
refinish the brake disc with an on-car brake lathe.
Page 618 of 1139

Rear Brake Caliper Overhaul
Frequent inhalation of brake pad dust, regardless of material composition, could be hazardous to your health.
' Avoid breathing dust particles.
. Never use an air hose or brush to clean brake assemblies. Use an OSHA-approved vacuum cleaner'
Remove, disassemble, inspect, reassemble, and installthe caliper, and note these items:
. Donotspill brake fluid on the vehicle; it may damage the paint; if brake f luid gets on the paint, wash it off
immediately with water.. To prevent dripping. cover disconnected hose joints with rags or shop towels.
. Cleanall partsinbrakefluidandairdry;blowoutall passageswith compressed air'
. Before reassembling, check that all parts are free of dust and other foreign particles
. Replace pans with new ones as specified in the illustration.. Make sure no dirt or other foreign matter contaminates the brake fluid.
. When reusing pads, always reinstallthem in their original positions to prevent loss of b ra king efficie ncy.
. Do not reuse drained brake fluid.
. Use only clean Honda DOT 3 brake fluid. Non-Honda brake fluid can cause corrosion and shorten the life of the
system.. Do not mix different brands ot brake fluid as they may not be compatible.
. Coatthe piston, piston seal groove, and caliper bore with clean brake fluid.
. Make sure no grease or oil gets on the brake discs or pads.
. Replaceall rubber parts with new ones whenever disassembled.
. After installing the caliper, check the brake hose and line for leaks, interference. and twisting.
oG , nonau."rip6r qreas€ lP/N 08c30-aoa4Ml34 N.m (3.5 kgf m,25lbtft)BOLT
WASHERS
BRAKE HOSE
a
l,i,,'IltE" / !!;,ff
olT-J,.o"c.O.RING CUPBeplace. Beplace.
.ARKING NUr lii.'i rz.r rgr.. Gd ffi27Nm{2.8kgtm,
\-"o, V((rA ",1 ;[.,.JF /;;;;---
t H\a \l / t,i*t'*"
?,,.t/*"^.,,.:,"", /"V4#
ADJUSTING BOLT
,/
27Nm{2.8kgf.m,20 tbf.ftr PAD SPRING
A,n Na 7lfl,lif,loffi ',,0,n, ,,:,o" \
--t)(*ff l^7k ''"'t!1'ry#'
INNEBPA'SHIM
/ .r.:._U i*E'( ":;*" *dF ,.2>a>-
fr.x{_>@ fftt **-->**^'"
,,.-"iV ,/q &'"o.,"."""o"^.,
: 10 MM FLANGE BOLTS.:r=,9!q!q}l 55 N m (5.6 lgf-m, 4r lbt ft)
19-23
Page 620 of 1139

Brake Hose Replacement
NOTE:. Do not spill brake fluid on the vehicle; it may damage
the paint; if brake fluid gets on the paint, wash it off
immediately with water.. To prevent dripping, cover disconnected line joints
with rags or shop towels.. Before reassembling, check that all parts are free of
dust and other foreign particles.
. Replace parts with new ones whenever specified to
do so.
1 . Replace the brake hose (A) if the hose is twisted,
cracked, or if it leaks.
Disconnect the brake hose from the brake line (B)
using a 10 mm flare nut wrench {C)
Remove the flange bolt (A), and remove the brake
hose brackets from the damper.
Remove and discard the hose clip (B).
Remove the banjo bolt (C), and remove the brake
hose (D) {rom the caliper.
4.
I x 1.25 mm
6. Installthe brake hose bracket (A)on the damper
with the flange bolt (B) first, then connect the brake
hose (C) to the caliper with the banjo bolt {D) and
new sealing washers (E).
7. lnstallthe hose onto the hose bracket on the bodv
with a new hose clip (A).
10 x 1.0 mm15 N.mi (1.5 kgf.m,
! 1t tbt.ftl
Connect the brake line to the brake hose.
After installing the brake hose, bleed the brake
system (see page l9-8).
Do the following checks:
. Check the brake hose and line joint for leaks, and
tighten if necessary.. Check the brake hoses for interference and
twisting.
9.
10.
19-25
Page 622 of 1139

NOTE:. The parking brake cables must not be bent or
distorted. This will lead to stiff operation and
premature failure.. Refer to the Exploded View as needed during this
proceoure.
1. Release the parking brake lever fully.
2. Remove the rear console (see page 20-57).
Remove the parking brake cable clip (A) from the
brake cable (B).4.
6.
Disconnectthe parking brake cable from the lever
{c).
Remove the parking brake cable mounting
hardware, then remove the cable.
7. lnstallthe new cable in the reverse order of
removal. and note these items:
. Be careful not to bend or distort the cable.. Make sure the parking brake cable clip is fully
seated on the cable housing.. Do the parking brake cable adjuslment (see page
19-7 ).
19-27
Page 653 of 1139

Wheel Sensor Inspection
1.
2.
Inspect the front and rear pulsers for chipped or
damaged teeth.
Measure the air gap between the wheel sensor and
the pulser all the way around while rotating the
pulser. Remove the rear brake disc to measure the
gap on the rear wheel sensor. lf the gap exceeds
1.0 mm (0.04 in.), check for a bent suspension arm.
Standard:
Front; 0.4- 1.0 mm (0.02-0.04 in.)
Rear: 0.2 1.0 mm (0.01 0.04 in.l
Front:
0.4 '1.0 mm10.02 0.0'l in.l
I
t
Bear:
0.2 1.0 mm{0.01 0.04 in.}
Wheel Sensor Replacement
NOTE: Inslall the sensors carefully to avoid twisting the
wtres.
Front:
6 mm BOLT9.8 N.m{1.0 kgf.m,7.2lbf.ftl
6 mm BOLT9.8 N.m{1.0 kgf.m,7.2 lbf.ftl
Rear:
6 mm BOLT9.8 N.m11.0 kgf.m,7.2 lbf.ft)
WHEEL SENSOR
6 mm BOLT9.8 N.m(1.0 kgf'm,7.2 rbr.ft)
19-59
Page 654 of 1139

Body
DoorsComponent Location Index ...........Door Panel Removal/lnstallation .....,..........Door Outer Handle ReplacementDoor Latch ReplacementDoor Glass and RegulatorReplacementDoor Sash Trim Replacement .......................
Door Glass Outer WeatherstripReplacement
Door Weatherstrip Beplacement
Door Glass Adjustment .................................Door Position Adjustment .............................Door Striker Adiustment ................................MirrorsComponent Location Index ...........................Power Mirror Replacement ...........................Mirror Holder Replacement ...........................Rearview Mirror Rep1acement ......................
GlassComponent Location Index ...........................Windshield Replacement
Bear Window Rep1acement ...........................
Ouarter Glass Replacement ..........................MoonroofComponent Location Index ...........................Symptom Troubleshooting Index
Glass Height Adjustment ...............................
Glass ReplacementWind Def lector 8ep1acement ........................Drain Channel Rep1acement ..........................Sunshade Replacement .................................Motor ReplacementFrame and Drain Tube Replacement ............Drain Channel Slider and Cable AssemblyReplacementLimit Switch Adjustment ...............................Closino Force and ODenina Draq Check ......lnterioi TrimComponent Location Index ...........................Trim Removal/lnstallation DoorArea ..........Trim Removal/lnstallation-Rear Side AreaTrim Removal/lnstallation-Cargo Floor AreaTrim Removal/lnstallation-Hatch Area .........Headliner Removal/lnstallation* Carpet Rep1acement .......................................ConsolesConsoles, Front and RearRemova l/lnsta llationFront Console Disassembly/Reassembly .....
20-220,420-620-7
20-920 t0
20- 10
20-1120-1120-1220 13
20-1420-1520-1520-16
20 1120-1920-2520-29
20,3520-3620-3720-3120-3820 3920-4020-4120,42
20 4420-4620,44
20-4920 50
20-51
DashboardInstrument Panel Removal/lnstallation ........Driver's Dashboard Lower CoverRemovat InstallationDriver's Dashboard Under CoverRemova t Insta llation
Oriver's Pocket Removal/lnstallation ............Shift Lever Trim Removal/lnstallation ..........Center Panel Removal/lnstallation ...............Passenger's Dashboard Lower CoverRemova l/lnsta llat ionx Glove Box Removal/lnstallationDashboard Side VentRemoval/lnstallation .................................. 20-64Beverage Holder Removal/lnstallation ........ 20-64Driver'sTray Removal/lnstallation ............... 20-65Passenger's Tray Removal/lnstallation ........ 20 65* Dashboard Removal/lnstallation .................. 20-66Steerinq Hanqer Beam Reolacement ........... 20-68Seats "
Component Location Index ........................... 20-10* Front Seat Removal/lnstallation ................... 20-11* Front Seat Disassembly/Reassembly-Driver's .................................. 20-73* Front Seat Disassembly/Reassembly-Passenger's ........................... 20-74* Front Seat Cover Replacement ..................... 2O-75Rear Seat Removal/1nsta11ation ..................... 20-80Rear Seat-back Latch Replacement .............. 20-81Rear Seat-backStriker Replacement ............ 20-81
20-59
20-59
Rear Seat-back Cover Replacement ............. 20-82Rear Seat Cushion Cover Replacement ....... 20.84BumpersFront Bumper Removal/lnstallation .............Rear Bumoer Removal/lnstallation ...............HoodAdjustmentHood Seal ReplacementHood Insulator Rep1acement .........................Hatch
20-6020,6020 6120-62
20-63
20-63
20,8520-86
20-4720,8820,89
20-5220-5320-5420-55
20-5720-58
Adjustment ................... 20-90Hatch Suppon Strut Replacement ................ 20-91Hatch WeatherstriD Reo1acement ................. 20-92
Fuel Fill DoorAdiustment ................... 20-93Exterior TrimFront Grille Replacement ..............Cowl Covers Replac"rn""t .. . .....................A pillar Corner Trim Replacement ................Roof lMolding Replacement ...........................Rear License Trim ReplacementHatch Spoiler 8ep1acement ...........................Emblem Rep1acement .........................
20-9420-9520-9620-9720,9820-9920-100
Page 655 of 1139

FenderwellFront Inner Fender ReplacementFront Fender Fairing Replacement ...............Fuel Pipe Protector ReplacementRear Air Outlet Rep1acement .........................OpenersComponent Location Index ...........................Hood Opener Cable Replacement ................* Fuel Fill Door Opener CableReplacement
Hood Latch Rep1acement ..............................Fuel Fill Door Opener Replacement ..............Hatch Handle Replacement ...........................Hatch Latch Replacement ..............................Hatch Lock Cylinder Replacement ................FrameSubf rame Replacement ................................. 20-112Frame Stiffener, Brace, and GussetReplacement ............. 20-113r Fremp RFnrir Chrrr ................ 20-114
20-10220-10320-10420-'to4
20-10520-106
20 107
20-10820-10920-1 1020-11020-111