Page 20 of 317

Position the lap part of the belt as
low as possible across your hips,
then pull up on the shoulder part of
the belt so the lap part f its snugly.
This lets your strong pelvic bones
take the force of a crash and reduces
the chance of internal injuries.If necessary, pull up on the belt again
to remove any slack from the
shoulder part, then check that the
belt rests across the center of your
chest and over your shoulder. This
spreads the f orces of a crash over
the strongest bones in your upper
body.
If the seat belt touches or crosses
your neck, or if it crosses your arm
instead of your shoulder, you need to
adjust the seat belt anchor height.
To adjust the height of a f ront seat
belt anchor, squeeze the two release
buttons and slide the anchor up or
down as needed (it has f our
positions).
CONT INUED
Protecting Adults
Driver and Passenger Saf ety17
Improperly positioning the seat
belts can cause serious injury
or death in a crash.
Make sure all seat belts are
properly positioned before
driving.
Page 121 of 317
The band and f requency that the
radio was last tuned to is displayed.
To change bands, press the AM/FM
button. On the FM band, ST will be
displayed if the station is broadcast-
ing in stereo. Stereo reproduction on
AM is not available.
The ignition switch must be in
ACCESSORY (I) or ON (II) to
operate the audio system. Turn the
system on by pushing the PWR/
VOL knob or the AM/FM button.
Adjust the volume by turning the
PWR/VOL knob.
Your Honda’s audio system provides
clear reception on both AM and FM
bands, while the preset buttons allow
you to easily select your f avorite
stations.
The anti-thef t f eature will disable the
system if it is disconnected f rom the
car’s battery. To get the system
working again, you must enter a
code number (see page ).
137
Audio System
Comf ort and Convenience Feat ures
AM/FM/CD Audio System
Operating the Radio
118
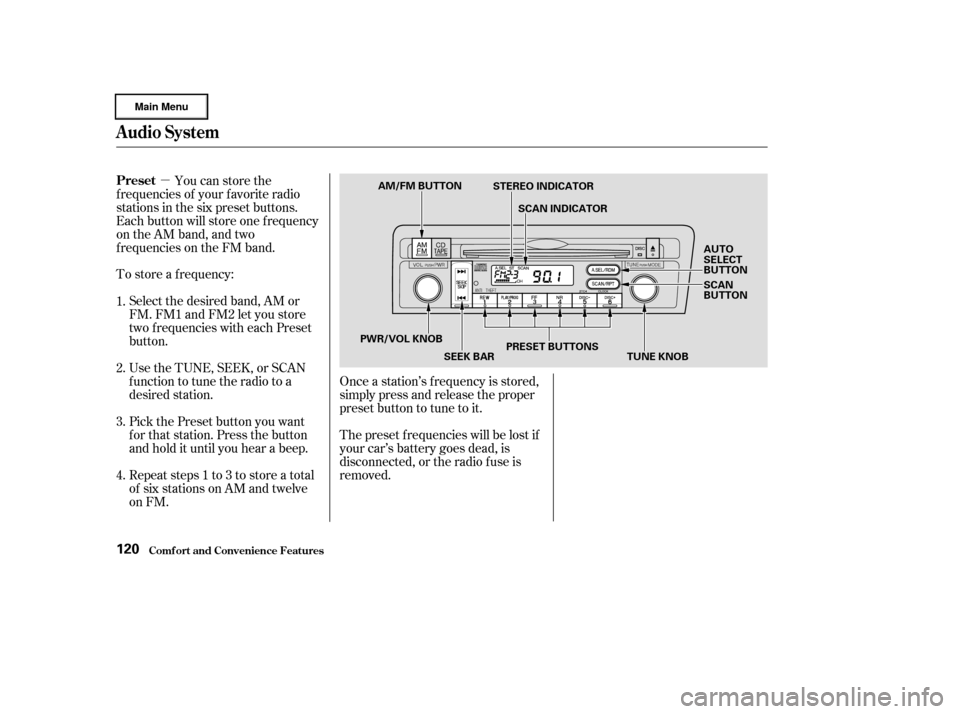
AM/FM BUTTONSTEREO INDICATOR
SCAN INDICATOR
AUTO
SELECT
BUTTONSCAN
BUTTON
PRESET BUTTONS
SEEK BAR
PWR/VOL KNOB
TUNE KNOB
Page 122 of 317

�µ�µ�µ
CONT INUED
You can use any of f ive methods to
f ind radio stations on the selected
band: TUNE, SEEK, SCAN, AUTO
SELECT, and the Preset buttons.
Use the TUNE knob to
tune the radio to a desired f requency.
Turn the TUNE knob to the right to
tune to a higher f requency, or to the
lef t to tune to a lower f requency.
Turn the knob right or lef t until the
display reaches the desired
f requency. The SEEK f unction
searches the band for a station with
a strong signal. To activate it, press
theSEEKbaroneitherthe or side, then release it.
Depending on which side you press,
the system scans upward or down-
ward f rom the current f requency. It
stops when it finds a station with a
strong signal. The SCAN function
samples all the stations with strong
signals on the selected band. To
activate it, press the SCAN button,
then release it. You will see SCAN in
the display. The system will scan up
the band for a station with a strong
signal. When it f inds one, it will stop
and play that station for
approximately f ive seconds. If you do
nothing, the system will then scan
f or the next strong station and play
that f or f ive seconds. When it plays a
station that you want to continue
listening to, press the SCAN button
again.
Audio System
Comf ort and Convenience Feat ures
TUNE SEEK
SCA N
119
Page 123 of 317
�µ
Repeat steps 1 to 3 to store a total
of six stations on AM and twelve
on FM. Pick the Preset button you want
for that station. Press the button
and hold it until you hear a beep. Select the desired band, AM or
FM. FM1 and FM2 let you store
two f requencies with each Preset
button.
To store a f requency:
Once a station’s f requency is stored,
simply press and release the proper
preset button to tune to it.
The preset f requencies will be lost if
your car’s battery goes dead, is
disconnected, or the radio f use is
removed.
You can store the
f requencies of your f avorite radio
stations in the six preset buttons.
Each button will store one f requency
on the AM band, and two
f requencies on the FM band.
UsetheTUNE,SEEK,orSCAN
function to tune the radio to a
desired station.
1.
2.
3.
4.
Audio System
Comf ort and Convenience Feat ures
Preset
120
AM/FM BUTTON
STEREO INDICATOR
SCAN INDICATOR
AUTO
SELECT
BUTTON
SCAN
BUTTON
TUNE KNOB
PRESET BUTTONS
SEEK BAR
PWR/VOL KNOB
Page 124 of 317

�µIf you are
traveling far from home and can no
longer receive the stations you
preset, you can use the Auto Select
feature to find stations in the local
area.
To activate Auto Select, press the
A. SEL button. A. SEL will f lash in
the display, and the system will go
into scan mode f or several seconds.
It automatically scans both bands,
looking f or stations with strong
signals. It stores the f requencies of
six AM stations and twelve FM
stations in the preset buttons. You
can then use the preset buttons to
select those stations. Auto Select does not erase the
f requencies that you preset pre-
viously. When you return home, turn
of f Auto Select by pressing the
A. SEL button. The preset buttons
will then select the f requencies you
originally set.
If you are in a remote area, Auto
Select may not f ind six strong AM
stations or twelve strong FM stations.
If this happens, you will see a ‘‘0’’
displayed when you press any preset
button that does not have a station
stored. If you do not like the stations Auto
Select has stored, you can store
other f requencies in the preset
buttons. Use the TUNE, SEEK, or
SCAN f unction to f ind the desired
f requencies, then store them in the
selected preset buttons as described
previously.
AUTO SELECT
Audio System
Comf ort and Convenience Feat ures121
AM/FM BUTTON
AUTO SELECT INDICATOR
AUTO
SELECT
BUTTON
SCAN
BUTTON
PWR/VOL KNOB SEEK BARPRESET BUTTONS
TUNE KNOB
Page 140 of 317

You will have to store your favorite
stations in the Preset buttons after
the system begins working. Your
original settings were lost when
power was disconnected.
If your car’s battery is disconnected
or goes dead, or the radio f use is
removed, the audio system will
disable itself . If this happens, you
will see ‘‘ ’’ in the f requency
display the next time you turn on the
system. Use the Preset buttons to
enter the f ive-digit code. If it is
entered correctly, the radio will start
playing.
If you make a mistake entering the
code, do not start over or try to
correct your mistake. Complete the
f ive-digit sequence, then enter the
correct code. You have ten tries to
enter the correct code. If you are
unsuccessful in ten attempts, you
must then leave the system on for
one hour bef ore trying again.
Your car’s audio system will disable
itself if it is disconnected f rom
electrical power f or any reason. To
make it work again, the user must
enter a specif ic f ive-digit code in the
Preset buttons. Because there are
hundreds of number combinations
possible f rom f ive digits, making the
system work without knowing the
exact code is nearly impossible.
Youshouldhavereceivedacardthat
lists your audio system’s code
number and serial number. It is best
tostorethiscardinasafeplaceat
home. In addition, you should write
the audio system’s serial number in
this Owner’s Manual. If you should
happen to lose the card, you must
obtain the code number f rom your
Honda dealer. To do this, you will
need the system’s serial number.
CONT INUED
Audio System
Comf ort and Convenience Feat ures
Thef t Protection
137
Page 141 of 317
After you have entered the audio
system’s code number correctly, the
serial number will not be displayed.
When the audio system disables
itself , you can see the eight-digit
audio system serial number on the
display. To display the serial
number:
Turn the ignition switch to
ACCESSORY (I) or ON (II).
Push the PWR/VOL knob to turn
on the audio system while
pressing the Preset 1 and 6
buttons at the same time.
You will see the f irst 4-digit
number on the display f or f ive
seconds, then the next 4-digit
number is shown f or f ive seconds.
You will see 8-digit serial number
in total. This procedure is repeated
once again.
1.
2.
3.
Audio System
Comf ort and Convenience Feat ures
Displaying A udio Syst em’s Serial
Number
138
Page 206 of 317

�´
�µ
CONT INUED
If your car’s battery is disconnected
or goes dead, the audio system will
disableitself.Thenexttimeyouturn
on the radio you will see ‘‘ ’’
in the f requency display. Use the
Preset buttons to enter the five-digit
code (see page ).
When the audio system disables
itself , the clock setting will cancel.
To reset the clock, ref er to the
Digital Clock in the audio system’s
operation.When the coolant stops draining,
tightenthedrainplugatthe
bottom of the radiator.
Put a new washer on the drain bolt,
then reinstall the drain bolt in the
engine block. Tighten it securely.
Tightening torque: Loosen the bleeder bolt on top of
the engine.
Put the tube back in the clips and
put the reserve tank back in place,
making sure its bottom tab is in
the holder. Reinstall and tighten
the mounting bolt securely.
Reinstall the tray, battery, stay,
battery case, and battery plate in
the reverse order of removal.
Reinstall and tighten the bolt and
nut securely.
Reconnect the battery cables to
the terminals. Connect the positive
( ) cable f irst, then the negative
()cable.
Battery posts,
terminals and related accessories
contain lead and lead compounds.
Reinstall the cover.137
12.
13.
11. 10. 9.
15.
14.
Cooling Syst em
Maint enance
WARNING:
Wash hands af ter handling.
203
BLEEDER BOLT
58 lbf·ft (78 N·m , 8.0 kgf·m)