Page 126 of 317

or ON (II). It shows the operation
mode of the radio, CD player, or
optional CD changer/cassette pl")
The display of your audio system
usually shows the time when the
ignition switch is in ACCESSORY (I)
or ON (II). It shows the operation
mode of the radio, CD player, or
optional CD changer/cassette player
when you operate them, and goes
back to the time display after five
seconds. You can use the instrument panel
brightness control knob to adjust the
illumination of the audio system (see
page ). The audio system
illuminates when the parking lights
are on, even if the radio is turned of f .
If an error occurs while operating
the CD player or optional CD
changer, the display will show the
error code and will not switch to the
time display until the error is
corrected (see pages and ).You can set the time only when the
clock is displayed.
To set the hours, press the H (Preset
4) button while pressing the CLOCK
(SCAN/RPT) button. Press and hold
the H button until the hour advances
to the desired time.
To set the minutes, press the M
(Preset 5) button while pressing the
CLOCK (SCAN/RPT) button. Press
andholdtheMbuttonuntilthe
minutes numbers advance to the
desired time.
77
131 132
CONT INUED
A udio System L ighting
Digital Clock
Audio System
Comf ort and Convenience Feat ures123
CLOCK BUTTON
H BUTTON M BUTTON RESET BUTTON
Page 130 of 317
CONT INUED
You operate the CD player with the
same controls used f or the radio.
With the ignition switch in
ACCESSORY (I) or ON (II), insert
the disc into the CD slot. Push the
disc in half way, the drive will pull it
in the rest of the way and begin to
play. The number of the track that is
playing is shown in the display.
You can also play 3-inch (8-cm) discs
without using an adapter ring. Play
only standard round discs. Odd-
shaped CDs may jam in the drive or
cause other problems.
For best results when using CD-R
discs, use only high quality discs
labeled f or audio use. When
recording a CD-R, the recording
must be closed in order f or the disc
to be used by CD players. CD-RW
discs will not work in this unit.
Audio System
Comf ort and Convenience Feat ures
Operating the CD Player
127
CD/TAPE BUTTON
AM/FM BUTTON CD SLOTREPEAT INDICATOR
RANDOM BUTTON
EJECT
BUTTON
PWR/VOL KNOB SEEK/SKIP BAR RANDOM INDICATOR
SCAN/REPEAT BUTTON
Page 131 of 317

�µ�µ
Each time you press and release the side of the SEEK/SKIP bar,
the system skips forward to the
beginning of the next track. Press
the sidetoskipbackwardtothe
beginning of the current track. Press
it again to skip to the beginning of
the previous track. You can use the SEEK/SKIP bar
while a disc is playing to select
passages and change tracks.
To move rapidly within a track, press
andholdtheSEEK/SKIPbar.Press
the side to move f orward. You
will see CUE in the display. Press the side to move backward. You
will see REW displayed. Release the
bar when the system reaches the
point you want. To activate the Repeat
f eature, press and release the RPT
button. You will see RPT in the
display. The system continuously
replays the current track. Press the
RPT button again to turn it off.
This feature,
when activated, plays the tracks on
the CD in random order, rather than
in the order they are recorded on the
CD. To activate Random Play, press
the RDM button. You will see RDM
in the display. The system will then
select and play tracks randomly.
This continues until you deactivate
RandomPlaybypressingtheRDM
button again.
If you eject the disc, but do not
remove it from the slot, the system
will automatically reload the disc
af ter 15 seconds and put the CD
player in pause mode. To begin
playing the disc, press the CD button. Press the eject button to remove the
disc f rom the drive. If you turn the system of f while a CD
is playing, either with the PWR/VOL
knob or by turning off the ignition,
the disc will stay in the drive. When
youturnthesystembackon,theCD
will begin playing where it lef t of f . You can switch to the radio while a
CD is playing by pressing the AM/
FM button. Press the CD button to
return to playing the CD. The CD
will begin playing where it lef t of f . When the system reaches the end of
the disc, it will return to the begin-
ning and play that disc again.
Audio System
Comf ort and Convenience Feat ures
REPEAT
RANDOM PLAY
128
Page 136 of 317
�Î
�Î
CONT INUED
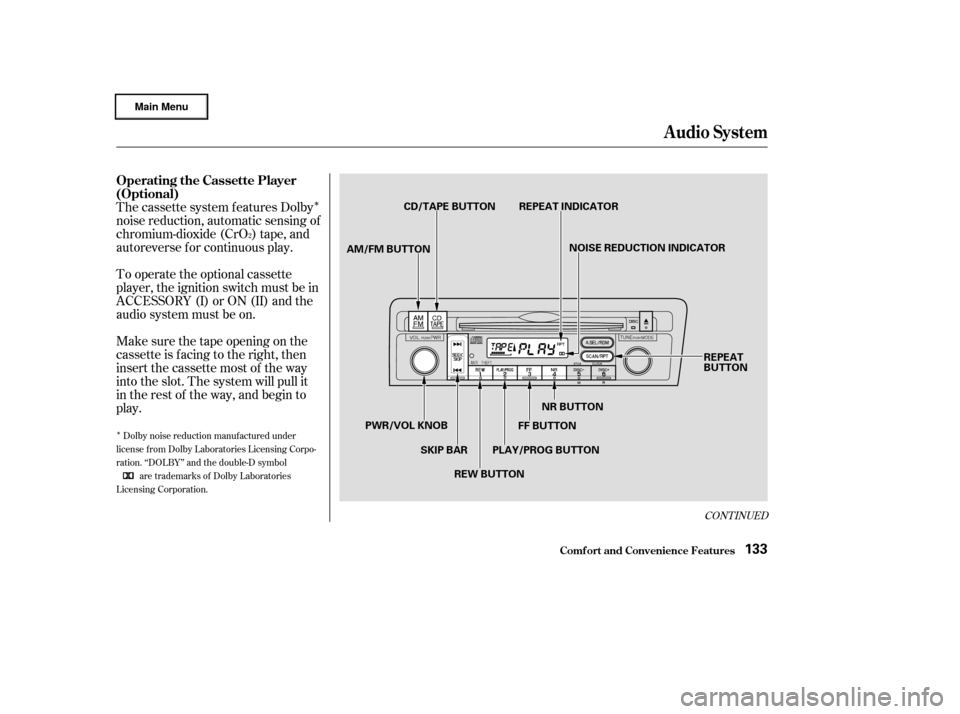
The cassette system f eatures Dolby
noise reduction, automatic sensing of
chromium-dioxide (CrO ) tape, and
autoreverse f or continuous play.
To operate the optional cassette
player, the ignition switch must be in
ACCESSORY (I) or ON (II) and the
audio system must be on.
Make sure the tape opening on the
cassette is facing to the right, then
insert the cassette most of the way
into the slot. The system will pull it
in the rest of the way, and begin to
play.
2
Dolby noise reduction manuf actured under
license from Dolby Laboratories Licensing Corpo-
ration. ‘‘DOLBY’’ and the double-D symbol are trademarks of Dolby Laboratories
Licensing Corporation.
Audio System
Comf ort and Convenience Feat ures
Operating the Cassette Player
(Optional)
133
AM/FM BUTTON CD/TAPE BUTTON
REPEAT INDICATOR
NOISE REDUCTION INDICATOR
PWR/VOL KNOB SKIP BARREW BUTTON PLAY/PROG BUTTONFF BUTTON
NR BUTTON REPEAT
BUTTON
Page 137 of 317

�Û�µ
With a cassette playing, you can use
the FF, REW, SKIP, or REPEAT
f unction to f ind a desired program.
The tape direction indicator will light
to show you which side of the
cassette is playing. The indicates
thesideyouinsertedfacingupward
is now playing. If you want to play
the other side, press the PLAY/
PROG button.
Dolby noise reduction turns on when
you insert a cassette. The indi-
cator will light in the display. If the
tape was not recorded with Dolby
noise reduction, turn it of f by
pressing the NR button.
Noise reduction remains of f until you
turn it on by pressing the button
again.
When the system reaches the end of
the tape, it will automatically reverse
direction and play the other side. If
you want to remove the cassette
f rom the drive, press the EJECT
button on the cassette player. If you turn the system of f while a
tape is playing, either with the PWR/
VOL knob or by turning of f the
ignition, the cassette will remain in
the drive. When you turn the system
back on, the cassette player will be in
pause mode. To begin playing, press
the PLAY/PROG button.
To switch to the radio or CD player
while a tape is playing, press the
AM/FM, or CD/TAPE button. To
change back to the cassette player,
press the CD/TAPE button.
Fast Forward and Re-
wind move the tape rapidly. To re-
wind the tape, push the REW button.
You will see REW in the display. To
fast forward the tape, push the FF
button. You will see FF displayed.
Press the PLAY/PROG button to
take the system out of rewind or fast
f orward. If the system reaches the
end of the tape while in f ast f orward
or rewind, it automatically stops that
f unction, reverses direction, and
begins to play.
Audio System
Comf ort and Convenience Feat ures
T ape Search Functions
FF/REW
134
Page 141 of 317
After you have entered the audio
system’s code number correctly, the
serial number will not be displayed.
When the audio system disables
itself , you can see the eight-digit
audio system serial number on the
display. To display the serial
number:
Turn the ignition switch to
ACCESSORY (I) or ON (II).
Push the PWR/VOL knob to turn
on the audio system while
pressing the Preset 1 and 6
buttons at the same time.
You will see the f irst 4-digit
number on the display f or f ive
seconds, then the next 4-digit
number is shown f or f ive seconds.
You will see 8-digit serial number
in total. This procedure is repeated
once again.
1.
2.
3.
Audio System
Comf ort and Convenience Feat ures
Displaying A udio Syst em’s Serial
Number
138
Page 163 of 317

Make sure all windows, mirrors,
and outside lights are clean and
unobstructed. Remove f rost, snow,
or ice.
Check that the hood and trunk are
f ully closed.Make sure the doors are securely
closed and locked. Check that any items you may be
carrying with you inside are stored
properly or f astened down
securely.
Visually check the tires. If a tire
looks low, use a gauge to check its
pressure. Check the adjustment of the seat
(see page ).
Check the adjustment of the
inside and outside mirrors (see
page ).
Check the adjustment of the
steering wheel (see page ).Turn the ignition switch ON (II).
Check the indicator lights in the
instrument panel.
Start the engine (see page ).
Check the gauges and indicator
lights in the instrument panel (see
page ). Fasten your seat belt. Check that
your passengers have f astened
their seat belts (see page ).
Youshoulddothefollowingchecks
and adjustments every day bef ore
you drive your car.
1.
2.
3. 4.
9.
10.
8. 7. 6. 5. 11.
12. 16
59
94
99 82 161
Preparing to Drive
Driving160
Page 164 of 317

If the engine does not start within
15 seconds, or starts but stalls
right away, repeat step 4 with the
accelerator pedal pressed half-way
down. If the engine starts, release
pressure on the accelerator pedal
so the engine does not race.
If the engine still does not start,
press the accelerator pedal all the
way down and hold it there while
starting in order to clear f looding.
As bef ore, keep the ignition key in
the START (III) position f or no
more than 15 seconds. Return to
step 5 if the engine does not start.
If it starts, lif t your f oot of f the
accelerator pedal so the engine
does not race.
Apply the parking brake.
In cold weather, turn of f all
electrical accessories to reduce
the drain on the battery.
Push the clutch pedal down all the
way. START (III) does not
f unction unless the clutch pedal is
depressed.
Make sure the shif t lever is in
Park. Press on the brake pedal.
Without touching the accelerator
pedal, turn the ignition key to the
START (III) position. If the engine
does not start right away, do not
hold the key in START (III) f or
more than 15 seconds at a time.
Pause f or at least 10 seconds
bef ore trying again.
An engine is harder to start in cold
weather. The thinner air f ound at
high altitude above 8,000 f eet (2,400 meters) adds to the problem.
Use the f ollowing procedure:
Turn of f all electrical accessories
to reduce the drain on the battery.
Push the accelerator pedal half-
way to the f loor and hold it there
while starting the engine. Do not
hold the ignition key in START
(III) f or more than 15 seconds.
When the engine starts, release
the accelerator pedal gradually as
the engine speeds up and smooths
out.
If the engine fails to start in step 2,
push the accelerator pedal to the
f loor and hold it there while you
try to start the engine for no more
than 15 seconds. If the engine
does not start, return to step 2.
1.
2.
3.
4.
5.
6.
1.
2.
3.
Manual Transmission:
Automatic Transmission (CVT):
Starting the Engine
Driving
Starting in Cold Weather at High
A ltitude (A bove 8,000 f eet/
2,400 meters)
161
 or ON (II), insert
the disc into the CD slot. Push the
disc in half way, the")