Page 58 of 317
These labels are in the locations
shown. They warn you of potential
hazards that could cause serious
injury. Read these labels caref ully.
If a label comes of f or becomes hard
to read, contact your Honda dealer
f or a replacement.
CONT INUED
U.S. modelsCanadian models
U.S. models only
Saf ety L abels
Driver and Passenger Saf ety55
RADIATOR CAP SUN VISOR
DASHBOARD
Page 152 of 317
Remove the dipstick again and
check the level. It should be
between the upper and lower
marks.Look at the coolant level in the
radiator reserve tank. Make sure it is
between the MAX and MIN lines. If
it is below the MIN line, see
on page f or
inf ormation on adding the proper
coolant.
If it is near or below the lower mark,
see
on page . Refer to
on page f or inf ormation
on checking other items in your
Honda.
4. 195 199193
A dding
Engine Coolant
A dding Oil Owner Maintenance
Checks
Engine Coolant Check
Service Station Procedures
Bef ore Driving149
UPPER MARK
LOWER MARK RESERVE TANK MAX
MIN
Page 196 of 317
�µ�µ�µ �µ
�µ
�µ �µ
Engine oil level Check every
time you fill the fuel tank. See
page .
Engine coolant level Check the
radiator reserve tank every time
you f ill the f uel tank. See page .
Windshield washer f luid Check
the level in the reservoir monthly.
If weather conditions cause you to
use the washers f requently, check
the reservoir each time you stop
f or f uel. See page .
Youshouldcheckthefollowing
items at the specif ied intervals. If
you are unsure of how to perf orm
any check, turn to the page given.
Lights Check the operation of
the headlights, parking lights,
taillights, high-mount brake light,
turn signals, brake lights, and
license plate lights monthly. See
page . Tires Check the tire pressure
monthly. Examine the tread f or
wear and foreign objects. See page.
Brakes Check the f luid level
monthly. See page . Automatic transmission (CVT)
Check the f luid level monthly. See
page . 148
149
205 209
206 225
232
Owner Maintenance Checks
Maint enance193
Page 197 of 317
Fluid Locations
Maint enance194
ENGINE OIL DIPSTICK
(Orange loop)ENGINE OIL
FILL CAP BRAKE FLUID
(Gray cap)
CLUTCH FLUID
(Manual
Transmission only)
(Gray cap)
WASHER FLUID
(Blue cap)
ENGINE
COOLANT
RESERVOIR
CONTINUOUSLY VARIABLE TRANSMISSION (CVT)
FLUID DIPSTICK (Yellow loop)
RADIATOR CAP
Page 202 of 317

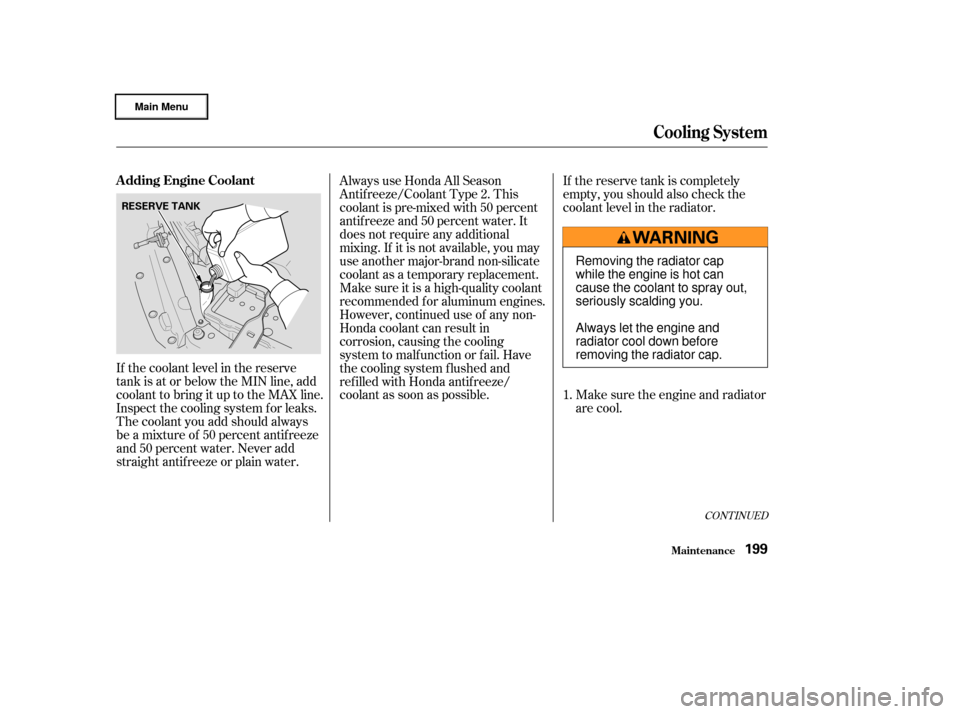
If the coolant level in the reserve
tank is at or below the MIN line, add
coolant to bring it up to the MAX line.
Inspect the cooling system f or leaks.
The coolant you add should always
be a mixture of 50 percent antif reeze
and 50 percent water. Never add
straight antif reeze or plain water.If the reserve tank is completely
empty, you should also check the
coolant level in the radiator.
Make sure the engine and radiator
are cool.
Always use Honda All Season
Antif reeze/Coolant Type 2. This
coolant is pre-mixed with 50 percent
antif reeze and 50 percent water. It
does not require any additional
mixing. If it is not available, you may
use another major-brand non-silicate
coolant as a temporary replacement.
Make sure it is a high-quality coolant
recommended f or aluminum engines.
However, continued use of any non-
Honda coolant can result in
corrosion, causing the cooling
system to malf unction or f ail. Have
the cooling system f lushed and
ref illed with Honda antif reeze/
coolant as soon as possible.
1.
CONT INUED
A dding Engine Coolant
Cooling Syst em
Maint enance199
RESERVE TANK
Removing the radiator cap
while the engine is hot can
cause the coolant to spray out,
seriously scalding you.
Always let the engine and
radiator cool down before
removing the radiator cap.
Page 203 of 317
Remove the radiator cap by
pushing down and turning
counterclockwise. Turn the radiator cap counter-
clockwise, without pressing down
on it, until it stops. This relieves
any pressure remaining in the
cooling system.The coolant level should be up to
the base of the f iller neck. Add
coolant if it is low.Put the radiator cap back on.
Tighten it f ully.
Pour coolant into the reserve tank.
Fill it to half way between the MAX
and MIN marks. Put the cap back
on the reserve tank.
Do not add any rust inhibitors or
other additives to your car’s cooling
system. They may not be compatible
with the coolant or engine compo-
nents.
Pour the coolant slowly and caref ully
so you do not spill. Clean up any
spills immediately. Spilled coolant
could damage components in the
engine compartment.
2.
3.
4.5.
6.
Cooling Syst em
Maint enance200
RADIATOR CAP
RESERVE TANK
Page 204 of 317
CONT INUED
Remove the radiator cap. Turn the ignition ON (II). Turn
the temperature control dial to
maximum heat. Turn of f the
ignition. Open the hood. Make
sure the engine and radiator are
cool to the touch.
Draining the coolant requires access
to the underside of the car. Unless
you have the tools and knowledge,
you should have this maintenance
done by a skilled mechanic. Thecoolingsystemshouldbe
completely drained and ref illed with
new coolant according to the time
and distance recommendations in
the maintenance schedule. Only use
Honda All Season Antif reeze/
Coolant Type 2.
Loosen the drain plug on the
bottom of the radiator. The
coolant will drain through the
splash guard. Drain the coolant
into an appropriate container.
1.
3.
2.
Replacing Engine Coolant
Cooling Syst em
Maint enance201
DRAIN PLUG
Page 206 of 317

�´
�µ
CONT INUED
If your car’s battery is disconnected
or goes dead, the audio system will
disableitself.Thenexttimeyouturn
on the radio you will see ‘‘ ’’
in the f requency display. Use the
Preset buttons to enter the five-digit
code (see page ).
When the audio system disables
itself , the clock setting will cancel.
To reset the clock, ref er to the
Digital Clock in the audio system’s
operation.When the coolant stops draining,
tightenthedrainplugatthe
bottom of the radiator.
Put a new washer on the drain bolt,
then reinstall the drain bolt in the
engine block. Tighten it securely.
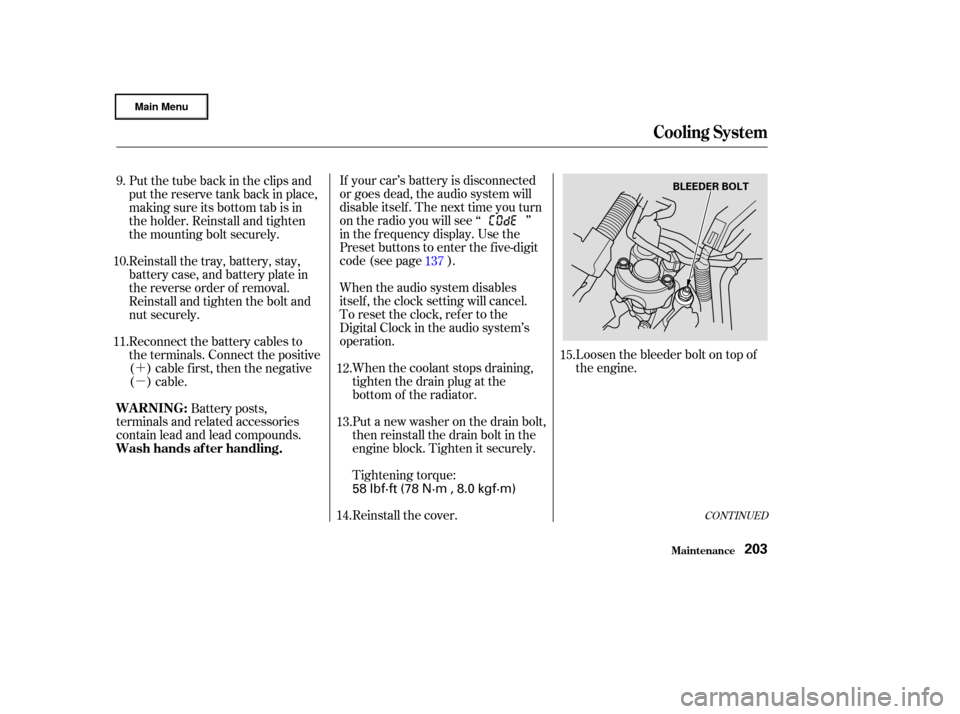
Tightening torque: Loosen the bleeder bolt on top of
the engine.
Put the tube back in the clips and
put the reserve tank back in place,
making sure its bottom tab is in
the holder. Reinstall and tighten
the mounting bolt securely.
Reinstall the tray, battery, stay,
battery case, and battery plate in
the reverse order of removal.
Reinstall and tighten the bolt and
nut securely.
Reconnect the battery cables to
the terminals. Connect the positive
( ) cable f irst, then the negative
()cable.
Battery posts,
terminals and related accessories
contain lead and lead compounds.
Reinstall the cover.137
12.
13.
11. 10. 9.
15.
14.
Cooling Syst em
Maint enance
WARNING:
Wash hands af ter handling.
203
BLEEDER BOLT
58 lbf·ft (78 N·m , 8.0 kgf·m)