Page 117 of 302

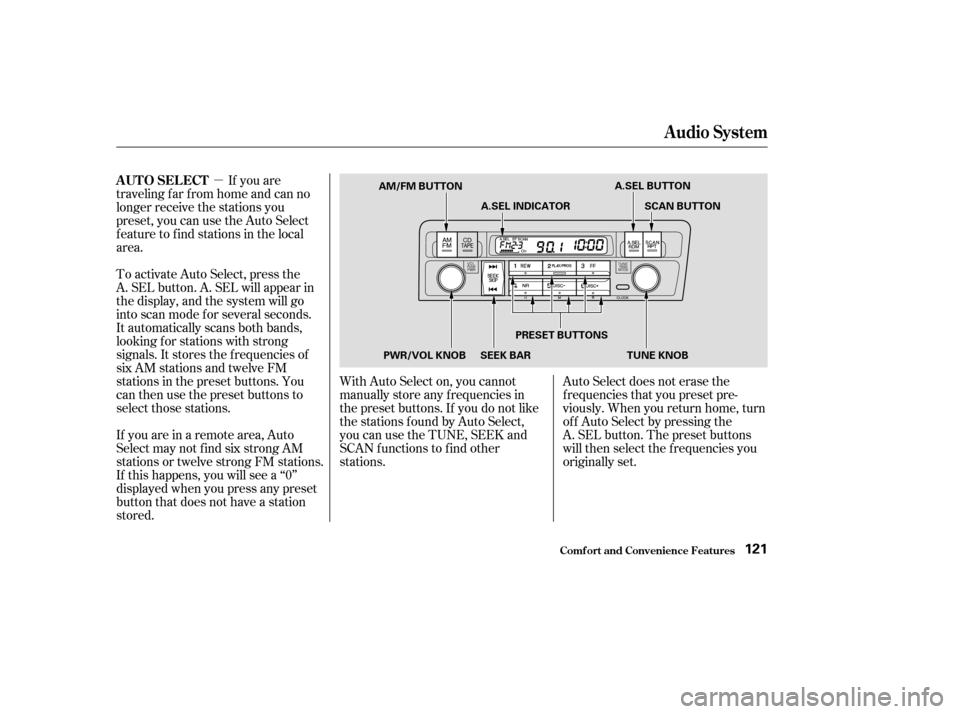
�µIf you are
traveling far from home and can no
longer receive the stations you
preset, you can use the Auto Select
feature to find stations in the local
area.
To activate Auto Select, press the
A. SEL button. A. SEL will appear in
the display, and the system will go
into scan mode f or several seconds.
It automatically scans both bands,
looking f or stations with strong
signals. It stores the f requencies of
six AM stations and twelve FM
stations in the preset buttons. You
can then use the preset buttons to
select those stations.
If you are in a remote area, Auto
Select may not f ind six strong AM
stations or twelve strong FM stations.
If this happens, you will see a ‘‘0’’
displayed when you press any preset
button that does not have a station
stored. Auto Select does not erase the
f requencies that you preset pre-
viously. When you return home, turn
of f Auto Select by pressing the
A. SEL button. The preset buttons
will then select the f requencies you
originally set.
With Auto Select on, you cannot
manually store any f requencies in
the preset buttons. If you do not like
the stations found by Auto Select,
you can use the TUNE, SEEK and
SCAN f unctions to f ind other
stations.
Audio System
Comf ort and Convenience Feat ures
AUTO SELECT
121
A.SEL BUTTON
AM/FM BUTTON
PWR/VOL KNOB SEEK BAR PRESET BUTTONS
TUNE KNOBSCAN BUTTON
A.SEL INDICATOR
�����—�����—�����y�
�������������y���
�(���%�������y���
�����y
Page 127 of 302

�µ�µ�µ
CONT INUED
Use the TUNE knob to
tune the radio to a desired f requency.
Turn the knob clockwise to tune to a
higher f requency, or
counterclockwise to tune to a lower
f requency.
You can use any of f ive methods to
f ind radio stations on the selected
band: TUNE, SEEK, SCAN, AUTO
SELECT, and the preset buttons.
To change the f requency rapidly,
press and hold the top or bottom of
theSEEKbar.Releasethebarwhen
the display reaches the desired
f requency. Depending on which part
of the bar you press, the system
scans upward or downward f rom the
current f requency. The SEEK f unction
searches the band for a station with
a strong signal. To activate it, press
and release the top or bottom of the
SEEK bar. Depending on which part
of the bar you press, the system
scans upward or downward f rom the
current f requency. It stops when it
finds a station with a strong signal. The SCAN function
samples all the stations with strong
signals on the selected band. To
activate it, press the SCAN button,
then release it. The system will scan
up the band for a station with a
strong signal. When it f inds one, it
will stop and play that station f or
approximately f ive seconds. If you do
nothing, the system will then scan
f or the next strong station and play
that f or f ive seconds. When it plays a
station that you want to continue
listening to, press the SCAN button
again.
Audio System
Comf ort and Convenience Feat ures
TUNE SEEK SCA N
131
�����—�����—�����y�
�������������y���
�(���%�������y���
�����y
Page 129 of 302

�µIf you are
traveling far from home and can no
longer receive the stations you
preset, you can use the Auto Select
feature to find stations in the local
area.
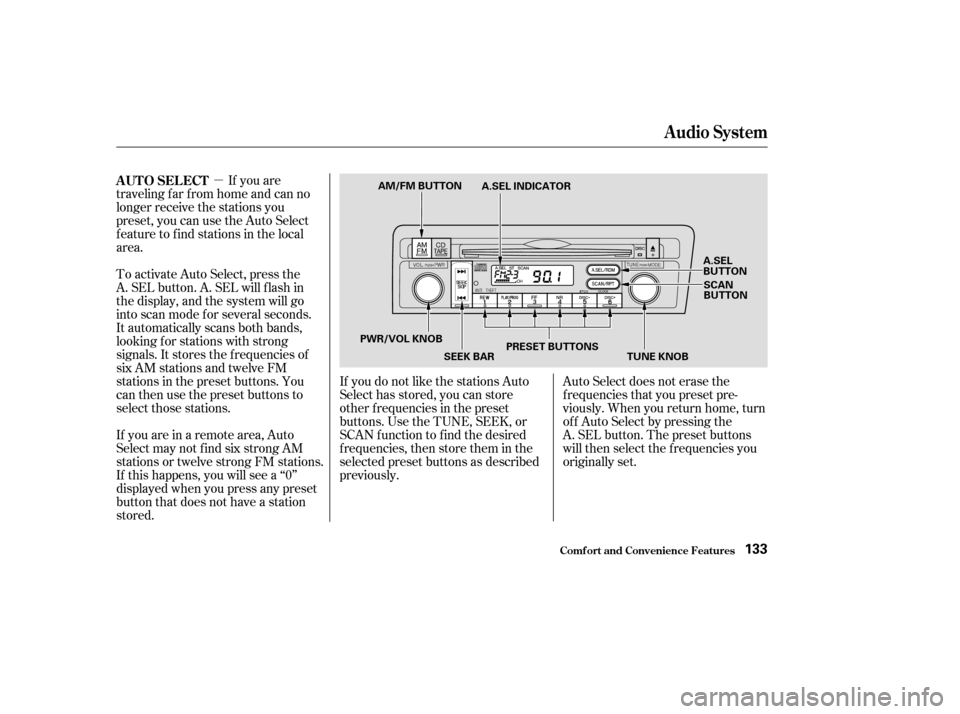
To activate Auto Select, press the
A. SEL button. A. SEL will f lash in
the display, and the system will go
into scan mode f or several seconds.
It automatically scans both bands,
looking f or stations with strong
signals. It stores the f requencies of
six AM stations and twelve FM
stations in the preset buttons. You
can then use the preset buttons to
select those stations. Auto Select does not erase the
f requencies that you preset pre-
viously. When you return home, turn
of f Auto Select by pressing the
A. SEL button. The preset buttons
will then select the f requencies you
originally set.
If you are in a remote area, Auto
Select may not f ind six strong AM
stations or twelve strong FM stations.
If this happens, you will see a ‘‘0’’
displayed when you press any preset
button that does not have a station
stored. If you do not like the stations Auto
Select has stored, you can store
other f requencies in the preset
buttons. Use the TUNE, SEEK, or
SCAN f unction to f ind the desired
f requencies, then store them in the
selected preset buttons as described
previously.
AUTO SELECT
Audio System
Comf ort and Convenience Feat ures133
A.SEL
BUTTON
SCAN
BUTTON
TUNE KNOB
AM/FM BUTTON
PWR/VOL KNOB SEEK BARPRESET BUTTONS
A.SEL INDICATOR
�����—�����—�����y�
�������������y���
�(���%�������y���
�����y
Page 194 of 302

�µ�µ�µ �µ
�µ
�µ
�µ
Engine oil level Check every
time you fill the fuel tank. See
page .
Engine coolant level Check the
radiator reserve tank every time
you f ill the f uel tank. See page .
Windshield washer f luid Check
the level in the reservoir monthly.
If weather conditions cause you to
use the washers f requently, check
the reservoir each time you stop
f or f uel. See page .
Youshouldcheckthefollowing
items at the specif ied intervals. If
you are unsure of how to perf orm
any check, turn to the page given.
Lights Check the operation of
the headlights, parking lights,
taillights, high-mount brake light,
turn signals, brake lights, and
license plate lights monthly. See
page .
Tires Check the tire pressure
monthly. Examine the tread f or
wear and foreign objects. See page
.
Automatic transmission Check
the f luid level monthly. See page .
Brakes Check the f luid level
monthly. See page . 160
161
213
214 217 232
239
Owner Maintenance Checks
Maint enance201
�����—�����—�����y�
�������������y���
�(���%�������y���������y
Page 232 of 302
Check the operation of your car’s
exterior lights at least once a month.
A burned out bulb can create an
unsaf e condition by reducing your
car’s visibility and the ability to
signal your intentions to other
drivers.
CONT INUED
Lights
Maint enance239
HEADLIGHT
PARKING LIGHT
TURN SIGNAL/SIDE MARKER LIGHT
�����—�����—�����y�
�������������y���
�(���%�������y���������y
Page 233 of 302
Check the f ollowing:
If you f ind any bulbs are burned out,
replace them as soon as possible.
Refer to the chart on page to
determine what type of replacement
bulb is needed.Headlights (low and high beam)
Parking lights
Taillights
Brake lights
High-mount brake light
Turn signals
Back-up lights
Hazard light f unction
License plate light
Side marker lights
Daytime running lights
(Canadian models)
289
Lights
Maint enance240
SIDE MARKER LIGHT TURN SIGNAL LIGHT
STOP/TAILLIGHT BACK-UP LIGHT LICENSE PLATE
LIGHTSHIGH-MOUNT
BRAKE LIGHT
�����—�����—�����y�
���������
���y���
�(���%�������y���������y
Page 235 of 302

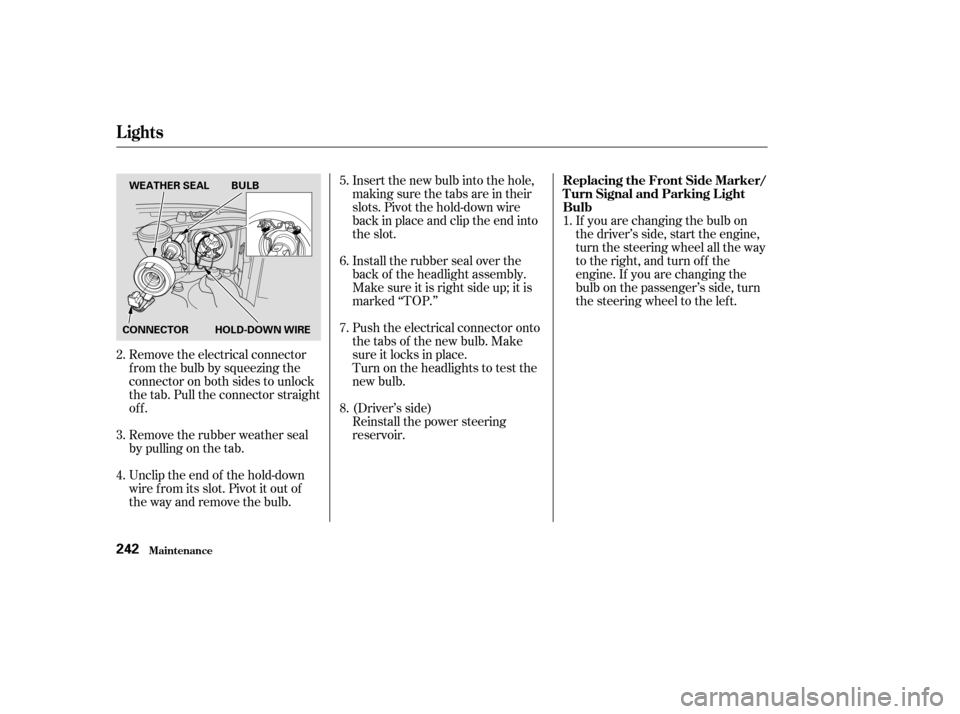
If you are changing the bulb on
the driver’s side, start the engine,
turn the steering wheel all the way
to the right, and turn off the
engine. If you are changing the
bulb on the passenger’s side, turn
the steering wheel to the left.
Reinstall the power steering
reservoir.
(Driver’s side)
Push the electrical connector onto
the tabs of the new bulb. Make
sure it locks in place.
Turn on the headlights to test the
new bulb.
Insert the new bulb into the hole,
making sure the tabs are in their
slots. Pivot the hold-down wire
back in place and clip the end into
the slot.
Install the rubber seal over the
back of the headlight assembly.
Make sure it is right side up; it is
marked ‘‘TOP.’’
Unclip the end of the hold-down
wire f rom its slot. Pivot it out of
the way and remove the bulb.
Remove the rubber weather seal
by pulling on the tab.
Remove the electrical connector
f rom the bulb by squeezing the
connector on both sides to unlock
the tab. Pull the connector straight
off.
3. 4. 5. 6. 7. 8.
1.
2. Replacing the Front Side Marker/
Turn Signal and Parking L ightBulb
Lights
Maint enance242
WEATHER SEAL BULB
CONNECTOR HOLD-DOWN WIRE
�����—�����—�����y�
�������������y���
�(���%�������y���������y
Page 237 of 302
Open the trunk. Determine which of the two bulbsis burned out: stop/taillight/side
marker light or turn signal light.Pull the bulb straight out of its
socket.
Push the new bulb straight into
the socket until it bottoms.
Reinstall the socket into the light
assembly by turning it clockwise
until it locks.
Testthelightstomakesurethe
new bulb is working.
Remove the socket by turning it
one-quarter turn counterclockwise. Reinstall the trunk lining. Make
sure it is installed under the edge
of the trunk seal.
Remove the screw in the center of
the fastener on the side of the
trunk lining. Pull the lining back. Put the f astener into the hole on
the side of the trunk lining.
Reinstall the screw.
1.
2. 3.4. 5. 6. 7. 8.
Replacing Rear Bulbs
(in Fenders)
Lights
Maint enance244
FASTENER
�����—�����—�����y�
�������������y���
�(���%�������y���������y