Page 81 of 395
�µ
�µ
�µ In this position,
you can operate the audio system
and the accessory power socket.
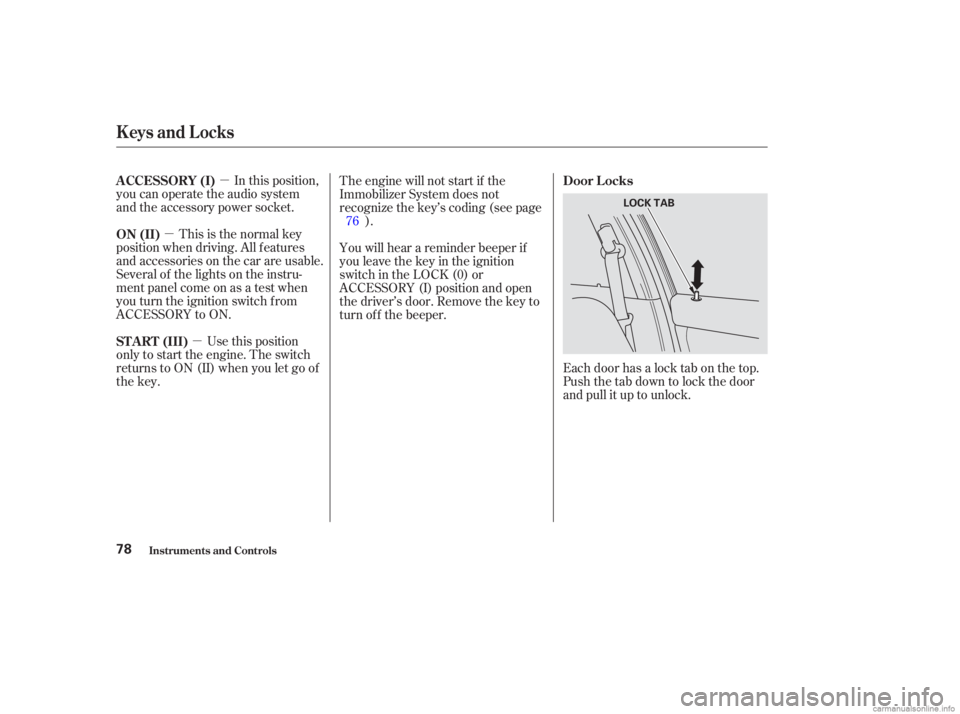
Each door has a lock tab on the top.
Push the tab down to lock the door
and pull it up to unlock.
This is the normal key
position when driving. All f eatures
and accessories on the car are usable.
Several of the lights on the instru-
ment panel come on as a test when
you turn the ignition switch f rom
ACCESSORY to ON.
Use this position
only to start the engine. The switch
returns to ON (II) when you let go of
the key. You will hear a reminder beeper if
you leave the key in the ignition
switch in the LOCK (0) or
ACCESSORY (I) position and open
thedriver’sdoor.Removethekeyto
turn of f the beeper. The engine will not start if the
Immobilizer System does not
recognize the key’s coding (see page
).
76
A CCESSORY (I)
Door L ocks
ON (II)
ST A RT (III)
Keys and Locks
Inst rument s and Cont rols78
LOCK TAB
Page 83 of 395
 If you f orget and leave the key in the
ignition switch, Lockout Prevention
will not allow you to lock the driver’s
door. With the driver’s door open
andthekeyintheignition,both
master door lock s")
If you f orget and leave the key in the
ignition switch, Lockout Prevention
will not allow you to lock the driver’s
door. With the driver’s door open
andthekeyintheignition,both
master door lock switches are
disabled. However, if the driver’s
door is not open, the master door
lock switches are not disabled.
Pushing the switch down on the
open passenger’s door will lock all
doors. If you try to lock an open
driver’s door by pushing in the lock
tab, the tabs on all doors pop out.
Pushinginthelocktabonthe
passenger’s door only locks that door.When you push the LOCK button a
second time within 5 seconds after
you have locked the doors, you will
hear a beep to verify that the doors
are locked and the security system
has set.
When you push the UNLOCK button
once, only the driver’s door unlocks.
The remaining doors unlock when
you push the button a second time.
The parking lights, side marker
lights, and taillights f lash twice.
You can lock and unlock your car
with the remote transmitter. When
you push the LOCK button, all doors
lock. The parking lights, side marker
lights, and taillights f lash once. You can open and close all power
windows from outside the car with
the key. With the remote transmitter,
you can open the windows. Ref er to
Power Windows on page .
99
On all models except U.S. DX
L ockout Prevent ion
Remote Transmitter
Keys and Locks
Inst rument s and Cont rols80
PANIC
BUTTON
TRUNK
RELEASE
BUTTON UNLOCK/
WINDOW-
OPEN
BUTTON
LOCK
BUTTON
Page 84 of 395
CONT INUED
The ceiling light (if the ceiling light
switch is in the center position) will
come on when you press the
UNLOCK button. If you do not open
any door, the light stays on f or about
30 seconds, then f ades out. If you
relock the doors with the remote
transmitter before 30 seconds have
elapsed, the light will go of f
immediately.
You cannot lock the doors with the
remote transmitter if any door is not
f ully closed or the key is in the
ignition switch.To open the trunk, push the Trunk
Release button f or approximately
one second.
The trunk will not open if the key is
in the ignition switch.
If you unlock the doors with the
remote transmitter, but do not open
any of the doors within 30 seconds,
the doors automatically relock and
the security system sets.On all models except U.S. and Canada
DX
Keys and Locks
Inst rument s and Cont rols81
Page 85 of 395
When the remote transmitter’s
battery begins to get weak, it may
take several pushes on the button to
lock or unlock the doors, and the
LED will not light. Replace the
battery as soon as possible.
Battery type: CR1616To replace the battery:
Separate the transmitter by prying
its middle seam with your
f ingernail. Remove the screw at the base of
the transmitter with a small
Phillips-head screwdriver.
To cancel Panic mode bef ore 30
seconds, press any button on the
remote transmitter. You can also
turn the ignition switch to ON (II). Panic mode allows you to remotely
activate your car’s horn and exterior
lights to attract attention. The horn
sounds and the exterior lights f lash
f or about 30 seconds. To activate
panic mode, press and hold the
PANIC button f or about two seconds.
1.
2.On all models except U.S. and CanadaDX Replacing the Battery
Panic Mode
Keys and Locks
Inst rument s and Cont rols82
SCREW
Page 92 of 395
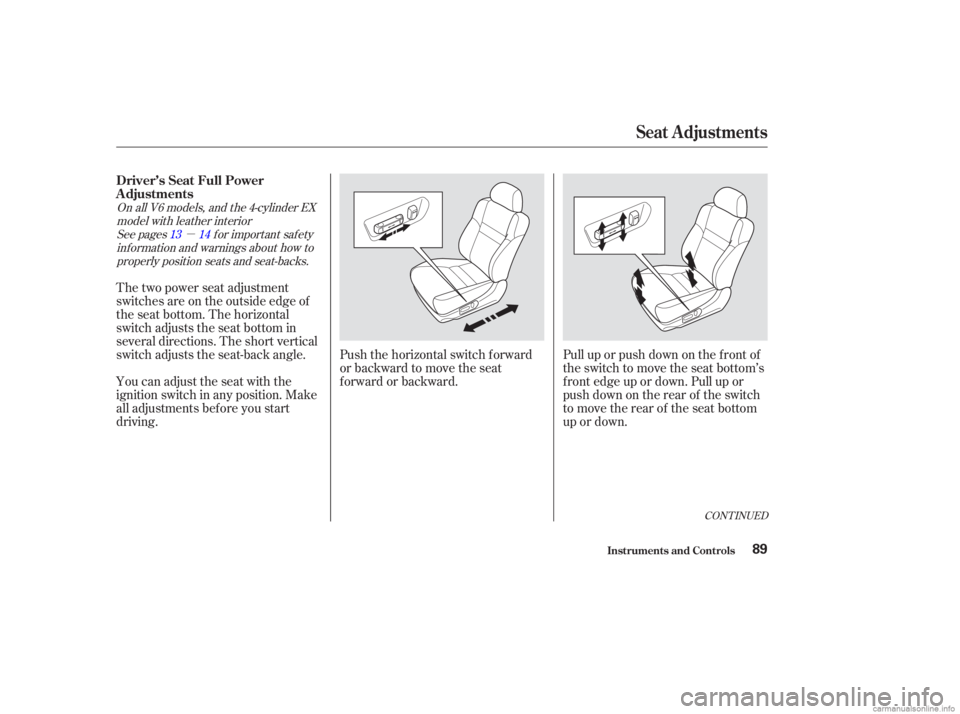
�µ
Pull up or push down on the f ront of
the switch to move the seat bottom’s
f ront edge up or down. Pull up or
push down on the rear of the switch
to move the rear of the seat bottom
up or down.
Push the horizontal switch forward
or backward to move the seat
forward or backward.
You can adjust the seat with the
ignition switch in any position. Make
all adjustments bef ore you start
driving. The two power seat adjustment
switches are on the outside edge of
the seat bottom. The horizontal
switch adjusts the seat bottom in
several directions. The short vertical
switch adjusts the seat-back angle.
See pages f or important saf ety
inf ormation and warnings about how toproperly position seats and seat-backs. 13 14
On all V6 models, and the 4-cylinder EX
model with leather interior
CONT INUED
Driver’s Seat Full Power
Adjustments
Seat A djustments
Inst rument s and Cont rols89
Page 98 of 395
 The HI or LO indicator lights and
remains lit until you turn it of f by
pushing the opposite side of the
switch lightly. The indicator will turn
off.
In HI, the heater turns of f when the
seat gets wa")
The HI or LO indicator lights and
remains lit until you turn it of f by
pushing the opposite side of the
switch lightly. The indicator will turn
off.
In HI, the heater turns of f when the
seat gets warm, and turns back on
after the seat’s temperature drops. It
continues to cycle as long as you
leave it set on HI. The HI indicator
remains lit as a reminder that you
have the heater on.
In LO, the heater runs continuously.
It does not cycle with temperature
changes.Do not use the seat heaters, even
on the LO setting, if the engine is
lef t idling f or an extended period.
They can weaken the battery,
causing hard starting. Use the HI setting only to heat the
seats quickly. Select the LO
setting when the seats f eel warm.
The HI setting draws large
amounts of current f rom the
battery.
Follow these precautions whenever
you use the seat heaters:
Both f ront seats are equipped with
seat heaters. Because of the sensors
f or the side airbag system, there is
no heater in the passenger’s seat-
back.The ignition switch must be
ON (II) to use the heaters. Push the
f ront of the switch, HI, to rapidly
heat up the seat. After the seat
reaches a comf ortable temperature,
select LO by pushing the back of the
switch. This will keep the seat warm.
On EX-V6 models and EX models with leather interior
Inst rument s and Cont rols
Seat Heaters
95
Page 99 of 395
The driver’s door armrest has a
master power window control panel.
To open any of the passenger’s win-
dows, push down on the appropriate
switch and hold it until the window
reaches the desired position. To
close the window, pull back on the
window switch. Release the switch
when the window gets to the position
you want.
Your car’s windows are electrically-
powered. Turn the ignition switch to
ON(II)toraiseorloweranywindow.
Each door has a switch that controls
its window. To open the window,
push the switch down and hold it.
Release the switch when you want
the window to stop. Close the
window by pushing the switch up
and holding it.
Inst rument s and Cont rols
Power Windows
96
DRIVER’S WINDOW
SWITCH
MAIN SWITCH
Closing a power window on
someone’s hands or fingers can
cause serious injury.
Make sure your passengers are
away from the windows before
closing them.
Page 101 of 395
If your car’s battery is disconnected
or goes dead, or the driver’s window
f use is removed, the AUTO f unction
will be disabled. The power window
system needs to be reset af ter
reconnecting the battery or installing
the f use. You should do the f ollowing.Start the engine. Push down on
the driver’s window switch until
the window is f ully open.
Pull back on the driver’s window
switch to close the window
completely, then hold the switch
f or a second or two more. The power window system has a key-
of f delay f unction. The windows will
stilloperateforuptotenminutes
after you turn off the ignition.
Opening either f ront door cancels
the delay function. You must turn
the ignition switch ON (II) again
bef ore you can raise or lower the
windows.
If the power windows do not operate
properly af ter resetting, have your
car checked by a Honda dealer. 1.
2.
Power Windows
Inst rument s and Cont rols98
 CONT INUED
The ceiling light (if the ceiling light
switch is in the center position) will
come on when you press the
UNLOCK button. If you do not open
any door, the light stays on f or about
30 second")
 When the remote transmitter’s
battery begins to get weak, it may
take several pushes on the button to
lock or unlock the doors, and the
LED will not light. Replace the
battery as soon as possible.
B")
 The driver’s door armrest has a
master power window control panel.
To open any of the passenger’s win-
dows, push down on the appropriate
switch and hold it until the window
reaches the desired po")
 If your car’s battery is disconnected
or goes dead, or the driver’s window
f use is removed, the AUTO f unction
will be disabled. The power window
system needs to be reset af ter
reconnecting the")