Page 65 of 380

If you leave the lights on with the
ignition switch in ACCESSORY (I)
or LOCK (0), you will hear a
reminder chime when you open the
driver’s door.
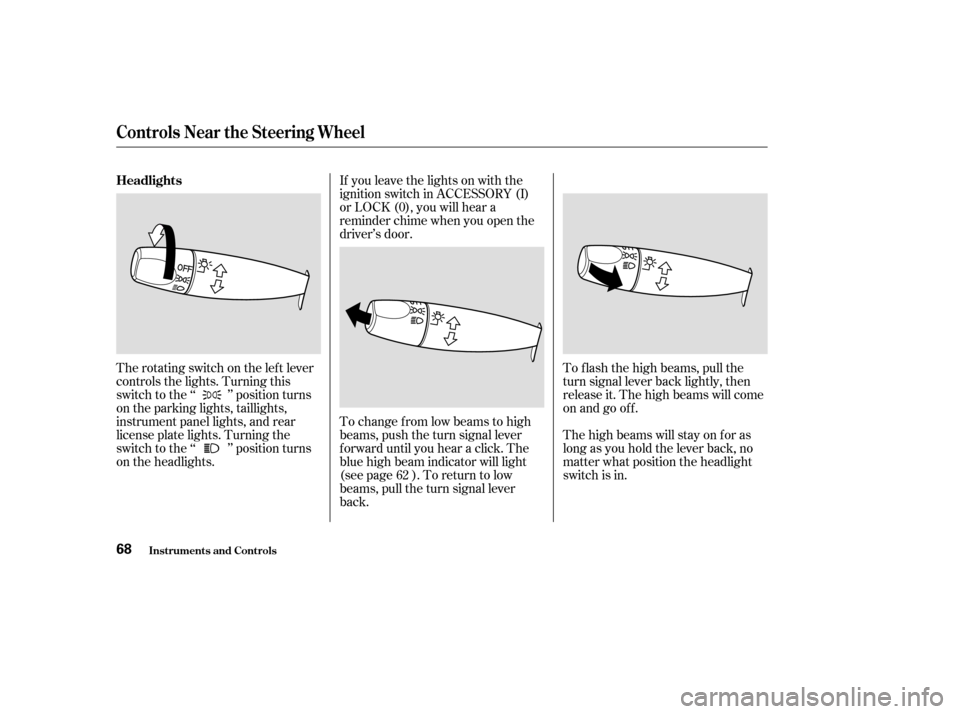
To change f rom low beams to high
beams, push the turn signal lever
f orward until you hear a click. The
blue high beam indicator will light
(see page ). To return to low
beams, pull the turn signal lever
back.To f lash the high beams, pull the
turn signal lever back lightly, then
release it. The high beams will come
on and go of f .
The high beams will stay on f or as
long as you hold the lever back, no
matter what position the headlight
switch is in.
The rotating switch on the lef t lever
controls the lights. Turning this
switch to the ‘‘ ’’ position turns
on the parking lights, taillights,
instrument panel lights, and rear
license plate lights. Turning the
switch to the ‘‘ ’’ position turns
on the headlights.
62
Controls Near the Steering Wheel
Inst rument s and Cont rols
Headlights
68
�����—�����—�����y���
�����������y���
�(�����������y�������
�y
Page 169 of 380

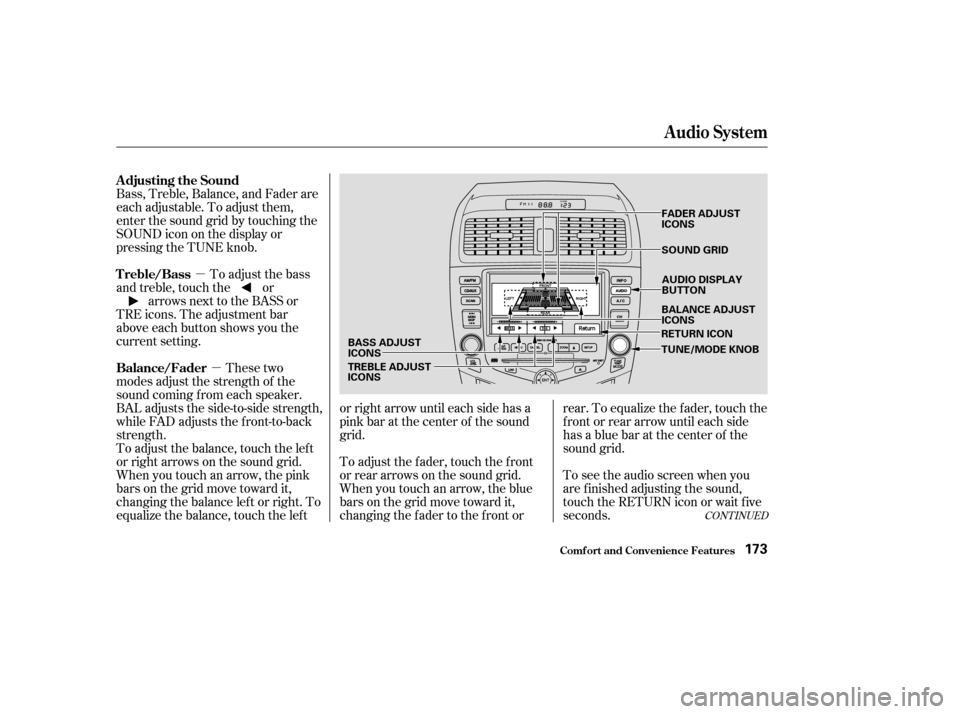
�µ�µTo adjust the bass
and treble, touch the or arrows next to the BASS or
TRE icons. The adjustment bar
above each button shows you the
current setting.
These two
modes adjust the strength of the
sound coming f rom each speaker.
BAL adjusts the side-to-side strength,
while FAD adjusts the f ront-to-back
strength.
To see the audio screen when you
are f inished adjusting the sound,
touch the RETURN icon or wait five
seconds.
To adjust the balance, touch the left
or right arrows on the sound grid.
When you touch an arrow, the pink
bars on the grid move toward it,
changing the balance left or right. To
equalize the balance, touch the lef t or right arrow until each side has a
pink bar at the center of the sound
grid.
To adjust the fader, touch the front
or rear arrows on the sound grid.
When you touch an arrow, the blue
bars on the grid move toward it,
changing the f ader to the f ront orrear. To equalize the f ader, touch the
f ront or rear arrow until each side
has a blue bar at the center of the
sound grid.
Bass, Treble, Balance, and Fader are
each adjustable. To adjust them,
enter the sound grid by touching the
SOUNDicononthedisplayor
pressing the TUNE knob.
CONT INUED
Adjusting the Sound
Treble/Bass
Balance/Fader
Audio System
Comf ort and Convenience Feat ures173
TUNE/MODE KNOB
AUDIO DISPLAY
BUTTON
SOUND GRID
BASS ADJUSTICONS
TREBLE ADJUSTICONS FADER ADJUSTICONS
BALANCE ADJUST ICONS
RETURN ICON
�����—�����—�����y������
��������y���
�(�����������y���
�����y
Page 234 of 380
Your car has a trailer lighting
connector in the trunk. Ref er to the
drawing in this page f or the wiring
color code and purpose of each pin.
If you use a converter, you can get
the connector and pins that mate
with the connector in your car f rom
your Honda dealer.
Since lighting and wiring vary in
trailer type and brand, you should
also have a qualif ied mechanic install
a suitable connector between the car
and the trailer.
T railer L ights
Towing a Trailer
Driving240
GROUND
(BLACK)BACK-UP LIGHT
(GREEN/BLACK) LEFT TURN SIGNAL
(GREEN/BLUE)
RIGHT TURN SIGNAL
(GREEN/YELLOW) BRAKE LIGHT
(WHITE/BLACK)TAILLIGHT
(RED/BLACK)
�����—�����—�����y���������������y���
�(�����������y���������y
Page 259 of 380
4-cylinder Models
Maint enance
Fluid Locations
266
BRAKE FLUID
(Gray cap)
ENGINE OIL DIPSTICK
(Orange handle)
WASHER FLUID
(Blue cap)
POWER STEERING
FLUID (Red cap)
RADIATOR CAPCLUTCH FLUID
(5-speed Manual
Transmission only)
(Light gray cap)
ENGINE OIL
FILL CAP
AUTOMATIC
TRANSMISSION
FLUID DIPSTICK
(Yellow loop)
COOLANT
RESERVOIR
�����—�����—�����y��������
������y���
�(�����������y���������y
Page 260 of 380
6-cylinder Models
Fluid Locations
Maint enance267
ENGINE OIL FILL CAPBRAKE FLUID
(Gray cap)
AUTOMATIC
TRANSMISSION
FLUID DIPSTICK
(Yellow loop)
COOLANT
RESERVOIR
RADIATOR CAP
POWER STEERING
FLUID (Red cap)
WASHER FLUID
(Blue cap) ENGINE OIL DIPSTICK
(Orange loop)
�����—�����—�����y��������
������y���
�(�����������y���������y