Page 274 of 429

This section also includes
Maintenance Schedules f or normal
driving and severe driving conditions,
a Maintenance Record, and instruc-
tions f or simple maintenance tasks
you may want to take care of
yourself .
If you have the skills and tools to per-
f orm more complex maintenance
tasks on your Honda, you may want
to purchase the Service Manual. See
page f or inf ormation on how to
obtain a copy, or see your Honda
dealer. This section explains the importance
of keeping your car well maintained
andwhyyoushouldfollowbasic
maintenance saf ety precautions.......................
Maintenance Saf ety .272
.
Important Safety Precautions . 273
.................
Maintenance Schedule . 274
Maintenance Schedule ..................
(4-cylinder Models) . 276 ...
Required Maintenance Record . 281
Maintenance Schedule ..................
(6-cylinder Models) . 284
...
Required Maintenance Record . 289
.......
Owner Maintenance Checks . 291
..............................
Fluid Locations .292
......................................
Engine Oil .294
..................................
Adding Oil .294
....................
Recommended Oil .294
..............................
Synthetic Oil .295
....................................
Additives .296
.....
Changing the Oil and Filter . 296
.............................
Cooling System .299
............
Adding Engine Coolant . 299
.......
Replacing Engine Coolant . 301
....................
Windshield Washers .306
.......................
Transmission Fluid .307
..........
Automatic Transmission . 307
5-speed Manual .........................
Transmission .310
6-speed Manual .........................
Transmission .311
................
Brake and Clutch Fluid . 313
............................
Brake System .313
...........................
Clutch System .314
..............................
Power Steering .315 .....................
Air Cleaner Element .316
....................................
Hood Latch .318
Spark Plugs ..................
(4-cylinder Models) . 318
Spark Plugs ..................
(6-cylinder Models) . 321
...........................................
Battery .324
.................................
Wiper Blades .327
..............
Air Conditioning System . 329
..................
Dust and Pollen Filter . 330
.......................................
Drive Belt .332
....................................
Timing Belt .332
...............................................
Tires .333
......................................
Inf lation .333
..................................
Inspection .335
..............................
Maintenance .335
.............................
Tire Rotation .336
...
Replacing Tires and Wheels . 336
......................
Wheels and Tires .337
..........................
Winter Driving .338
.............................
Snow Tires .338
............................
Tire Chains .338
.............................................
Lights .340
.....................
Headlight Aiming .342
........................
Replacing Bulbs .342
...........................
Storing Your Car .354
413
Maintenance
Maint enance271
Page 343 of 429
Check the operation of your car’s
exterior lights at least once a month.
A burned out bulb can create an
unsaf e condition by reducing your
car’s visibility and the ability to
signal your intentions to other
drivers.
Lights
Maint enance340
LOW BEAM HEADLIGHT
HIGH BEAM HEADLIGHT
TURN SIGNAL/PARKING/SIDE MARKER LIGHT
Page 344 of 429
Check the f ollowing:Headlights (low and high beam)
Parking lights
Taillights
Brake lights
High-mount brake light
Turn signals
Back-up lights
Hazard light f unction
License plate lights
Side marker lights
Daytime running lights
(Canadian models)
If you f ind any bulbs are burned out,
replace them as soon as possible.
Refer to the chart on pages and to determine what type of
replacement bulb is needed. 397
399
Lights
Maint enance341
TURN SIGNAL LIGHT
BACK-UP LIGHT
STOP/TAILLIGHT/
SIDE MARKER LIGHT LICENSE PLATE LIGHTS
HIGH-MOUNT BRAKE LIGHT
Page 345 of 429

Theheadlightswereproperlyaimed
when your car was new. If you
regularly carry heavy items in the
trunk or pull a trailer, readjustment
may be required. Adjustment of the
headlights should be perf ormed by a
Honda technician or other qualif ied
mechanic.Your car has two bulbs on each side,
four in total. Make sure you are
replacing the bulb that is burned out.
Your car uses halogen headlight
bulbs. When replacing a bulb, handle
it by its plastic case and protect the
glass from contact with your skin or
hard objects. If you touch the glass,
clean it with denatured alcohol and a
clean cloth.
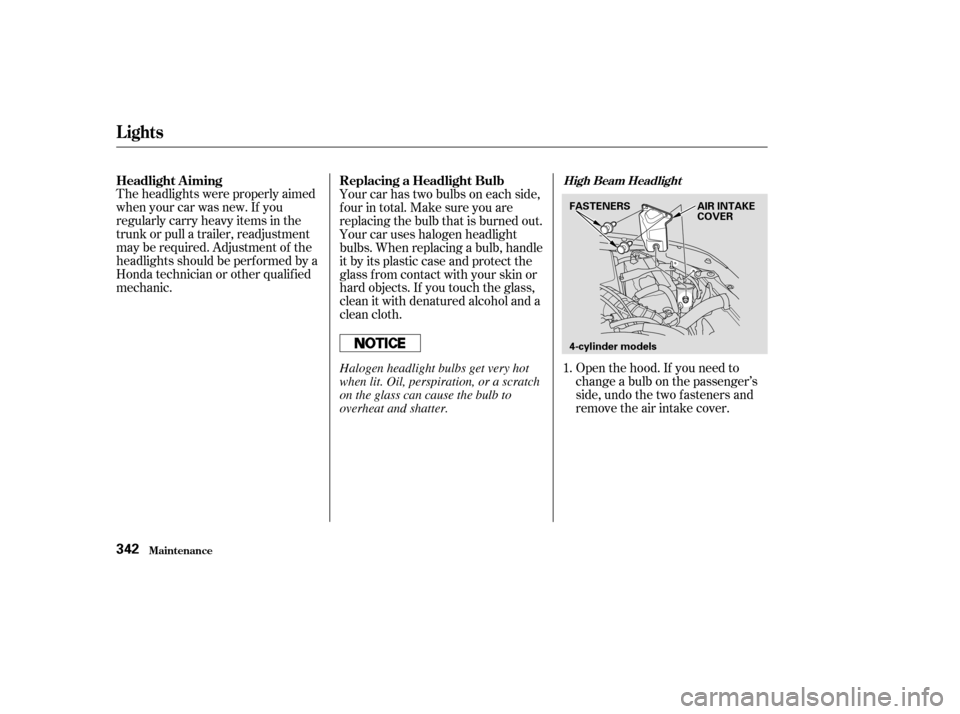
Open the hood. If you need to
change a bulb on the passenger’s
side, undo the two f asteners and
remove the air intake cover.
1.
Headlight A iming
Replacing a Headlight Bulb
Lights
Maint enance
High Beam Headlight
342
4-cylinder models FASTENERSAIR INTAKE
COVER
Halogen headlight bulbs get very hot
when lit. Oil, perspiration, or a scratch
on the glass can cause the bulb to
overheat and shatter.
Page 347 of 429
Use a f lat-tipped screwdriver to
remove the two holding clips f rom
the inner f ender.
Pull the inner f ender cover away
f rom the f ender and bumper.
If you are changing the bulb on
the passenger’s side, start the
engine, turn the steering wheel all
the way to the left, and turn off the
engine. If you are changing the
bulb on the driver’s side, turn the
steering wheel to the right.
Turn on the headlights to test the
new bulb.
(Passenger’s side)
Reinstall the air intake cover.
Reinstall the two fasteners and
secure them by pushing on the
heads until they lock.
3.
1. 2.
6.
7.
Lights
Maint enance
L ow Beam Headlight
344
HOLDING CLIPS
Page 348 of 429
Insert the new bulb into the hole
and turn it one-quarter turn clock-
wise to lock it in place.
Push the electrical connector back
onto the bulb. Make sure it is on
all the way.
Turn on the headlights to test the
new bulb.
Reinstall the air intake duct
securely.
Put the inner f ender cover in place.
Install the two holding clips. Lock
each one in place by pushing on
the center.
Remove the electrical connector
f rom the bulb by squeezing the
connector to unlock the tab, then
slide the connector of f the bulb.
Remove the bulb by turning it
approximately one-quarter turn
counterclockwise.
If you need to change the low
beam headlight bulb on the driver’s
side, remove the air intake duct.
You can reach the air intake duct
fromthebacksideof theinner
f ender.
6. 5. 7.
8.
9.
10.
11.
4.
On EX-V6 model with manual
transmission
On EX-V6 model with manual transmission
Maint enance
Lights
345
AIR INTAKE DUCT
EX-V6 with M/T
Page 349 of 429
If you are changing the bulb on
the passenger’s side, start the
engine, turn the steering wheel all
the way to the left, and turn off the
engine. If you are changing the
bulb on the driver’s side, turn the
steering wheel to the right.Use a f lat-tipped screwdriver to
remove the two holding clips f rom
the inner f ender.Pull the inner f ender cover away
f rom the f ender and bumper.
Remove the socket from the
headlight assembly by turning it
one-quarter turn counterclockwise.
1.
3.
2.
4.
Maint enance
Lights
Replacing a Front T urn Signal/
Parking/Side Marker Light Bulb
346
HOLDING CLIPS
Page 350 of 429
Insert the socket back into the
headlight assembly. Turn it
clockwise to lock it in place. Install the new bulb in the socket.
Turn it clockwise to lock it in place. Remove the burned out bulb f rom
thesocketbypushingitinand
turning the bulb counterclockwise
until it unlocks.
Put the inner f ender cover in place.
Install the holding clips. Lock each
oneinplacebypushingonthe
center. Turn on the lights to make sure
the new bulb is working.
5.
6.
7.
8.
9.
Lights
Maint enance347