2003 GMC SIERRA DENALI door lock
[x] Cancel search: door lockPage 143 of 428

Climate Controls
Dual Automatic Climate Control
System
Your vehicle may have the optional dual automatic
climate control system. With this system you can control
the heating, cooling and ventilation for your vehicle.
If your vehicle is equipped with the dual automatic
climate control system, memory seats, and memory
mirrors, you can store and recall the climate control
settings for temperature, air delivery mode, and
fan speed for two different drivers. The personal choice
settings recalled are determined by the transmitter
used to enter the vehicle. After the button with the
unlock symbol on a remote keyless entry transmitter
is pressed, the climate control will adjust to the last
settings of the identified driver. The settings can also be
changed by pressing one of the memory buttons
(1 or 2) located on the driver’s door. When adjustments
are made, the new settings are automatically saved
for that driver.
A 8fj? v (Fan): Press this button to increase or
decrease the fan speed.
0 (Off): Press this button to turn off the entire climate
control system. Outside air will still enter the vehicle, and
will be directed to the floor. This direction can be changed
by pressing the mode button. The temperature can also
be adjusted using either temperature knob. Press the up
or down arrows on the fan switch, the defrost button, the
AUTO button, or the air conditioning button to turn the
system on when it is
off.
,% 4d (Mode): Press this button to manually select the air
delivery mode to the floor, panel, or windshield outlets.
This system will stay in the selected mode until the mode
button is pressed again, or the AUTO button, defrost
button, or the off button is pressed. Air delivery mode can
be adjusted while the system is off. A five second status
display will indicate the current mode.
3-1 8
Page 172 of 428

Personalization Button
You can program certain features to a preferred setting
for up to two people. Press the personalization button
to scroll through the following personalization features.
All of the personalization options may not be available
on your vehicle. only the options available will be
displayed on your DIC.
If your vehicle is not equipped with the DIC steering
wheel buttons you will not have any of these
personalization options except for DISPLAY LANGUAGE. See DISPLAY LANGUAGE later in this
section for more information.
ALARM WARNING TYPE
AUTOMATIC LOCKING
0 AUTOMATIC UNLOCKING
SEAT POSITION RECALL
PERIMETER LIGHTING
REMOTE LOCK FEEDBACK
REMOTE UNLOCK FEEDBACK
HEADLAMPS ON AT EXIT
CURB VIEW ASSIST
EASY EXIT SEAT
DISPLAY UNITS (E/M)
DISPLAY LANGUAGE The driver’s
preferences are recalled by pressing the
unlock button on the remote keyless entry transmitter or
by pressing the appropriate memory button
1 or 2
located on the driver’s door.
Alarm Warning Type
Press the personalization button until ALARM
WARNING TYPE appears in the display. To select your
personalization for alarm warning type, press the
select button while ALARM WARNING TYPE is
displayed on the DIC. Pressing the select button will
scroll through the following choices:
ALARM WARNING: BOTH
(default): The headlamps
will flash and the horn will chirp when the alarm is
active.
ALARM WARNING:
OFF: There will be no alarm
warning on activation.
ALARM WARNING: HORN: The horn will chirp when
the alarm is active.
ALARM WARNING: LAMPS: The headlamps will flash
when the alarm is active.
Choose one of the four options and press the
personalization button while it is displayed on the DIC to
select it and move on to the next feature. For more
information on alarm warning type, see
Content
Theft-Deterrent
on page 2- 13.
3-47
Page 173 of 428
Automatic Locking
Press the personalization button until AUTOMATIC
LOCKING appears in the display. To select your
personalization for automatic locking, press the select
button while AUTOMATIC LOCKING is displayed on the
DIC. Pressing the select button will scroll through the
following choices:
LOCK DOORS OUT
OF PARK (default): The doors
will lock when the vehicle is shifted out of PARK (P).
LOCK DOORS MANUALLY: The doors will not
be locked automatically.
LOCK DOORS WITH SPEED: The doors will lock
when the vehicle speed is above
8 mph (13 km/h) for
three seconds.
Choose one of the three options and press the
personalization button while it is displayed on the DIC to
select it and move on to the next feature. For more
information on automatic door locks see
Programmable
Automatic Doors Locks.
Automatic Unlocking
Press the personalization button until AUTOMATIC
UNLOCKING appears in the display. To select
your personalization for automatic unlocking, press the
select button while AUTOMATIC UNLOCKING is
displayed on the DIC. Pressing the select button will
scroll through the following choices:
UNLOCK ALL IN PARK (default): All of the doors will
unlock when the vehicle is shifted into PARK (P).
UNLOCK ALL AT KEY OUT:
All of the doors will
unlock when the key is taken out of the ignition.
UNLOCK DOORS MANUALLY: The doors will not be
unlocked automatically.
UNLOCK DRIVER IN PARK: The driver’s door will be
unlocked when the vehicle is shifted in PARK (P).
Choose one
of the four options and press the
personalization button while it is displayed on the DIC to
select it and move on to the next feature. For more
information on automatic door locks see
Programmable
Automatic Door Locks.
3-48
Page 174 of 428
Seat Position Recall Perimeter Lighting
Press the personalization button until SEAT POSITION
RECALL appears on the display. To select your
personalization for seat position recall, press the select
button while SEAT POSITION RECALL is displayed
on the DIC. Pressing the select button will scroll through
the following choices:
SEAT POSITION RECALL
OFF (default): The memory
seat position you saved will only be recalled when the
memory button
1 or 2 is pressed on the driver’s
door panel.
SEAT POSITION RECALL AT KEY IN: The memory
seat position you saved will be recalled when you
put the key in the ignition.
SEAT POSITION RECALL ON REMOTE: The memory
seat position you saved will be recalled when you
unlock the vehicle with the remote keyless entry
transmitter.
Choose one of the three options and press the
personalization button while it is displayed on the DIC to
select it and move on to the next feature. For more
information on seat position recall see
Memory Seat on
page 2-42.
Press the personalization button until PERIMETER
LIGHTING appears in the display. To select your
personalization for perimeter lighting, press the select
button while PERIMETER LIGHTING is displayed on the
DIC. Pressing the select button will scroll through the
following choices:
PERIMETER LIGHTING ON
(default): The headlamps
and back-up lamps will come on for
40 seconds, if it
is dark enough outside, when you unlock the vehicle
with the remote keyless entry transmitter.
PERIMETER LIGHTING
OFF: The perimeter lights will
not come on when you unlock the vehicle with the
remote keyless entry transmitter.
Choose on
of the two options and press the
personalization button while it is displayed on the DIC to
select it and move on to the next feature.
3-49
Page 277 of 428
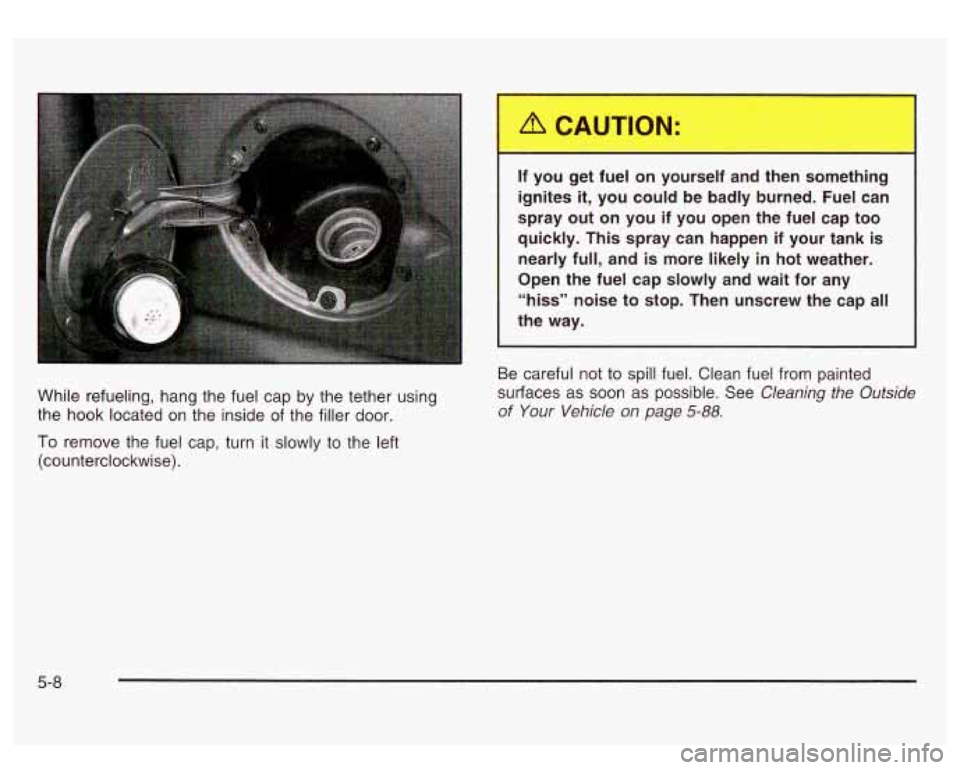
While refueling, hang the fuel cap by the tether using
the hook located on the inside of the filler door.
To remove the fuel cap, turn it slowly to the left
(counterclockwise).
- -
If you get fuel on yourself and then something
ignites
it, you could be badly burned. Fuel can
spray out on you if you open the
fuel cap too
quickly. This spray can happen if your tank
is
nearly full, and is more likely in hot weather.
Open the fuel cap slowly and wait for any
“hiss” noise to stop. Then unscrew the cap all
the way.
Be careful not to spill fuel. Clean fuel from painted
surfaces as
soon as possible. See Cleaning the Outside
of Your Vehicle on page 5-88.
5-8
Page 365 of 428
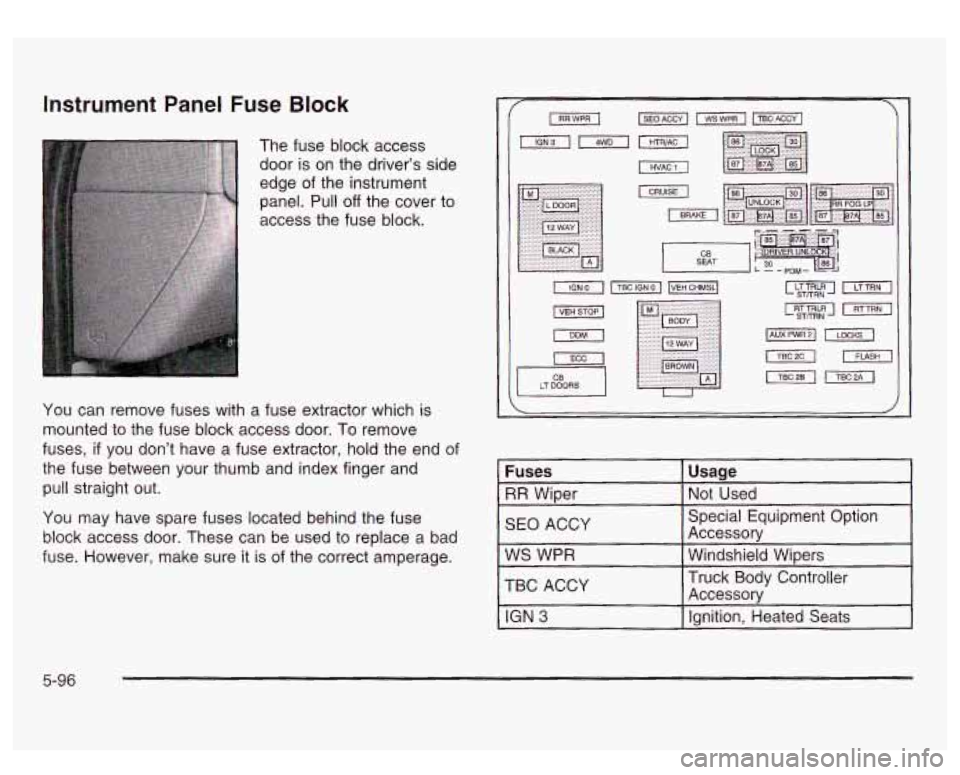
Instrument Panel Fuse Block
The fuse block access
door is on the driver's side
edge of the instrument
panel. Pull
off the cover to
access the fuse block.
You can remove fuses with a fuse extractor which
is
mounted to the fuse block access door. To remove
fuses,
if you don't have a fuse extractor, hold the end of
the fuse between your thumb and index finger and
pull straight out.
You may have spare fuses located behind the fuse
block access door. These can be used to replace
a bad
fuse. However, make sure it is of the correct amperage.
II
LT DOORS U
Fuses
SEO ACCY Not
Used
RR Wiper
Usage
TBC
ACCY Windshield Wipers
WS
WPR Accessory
Special Equipment Option
Ignition, Heated Seats
IGN 3
Accessory Truck Body Controller
5-96
Page 367 of 428
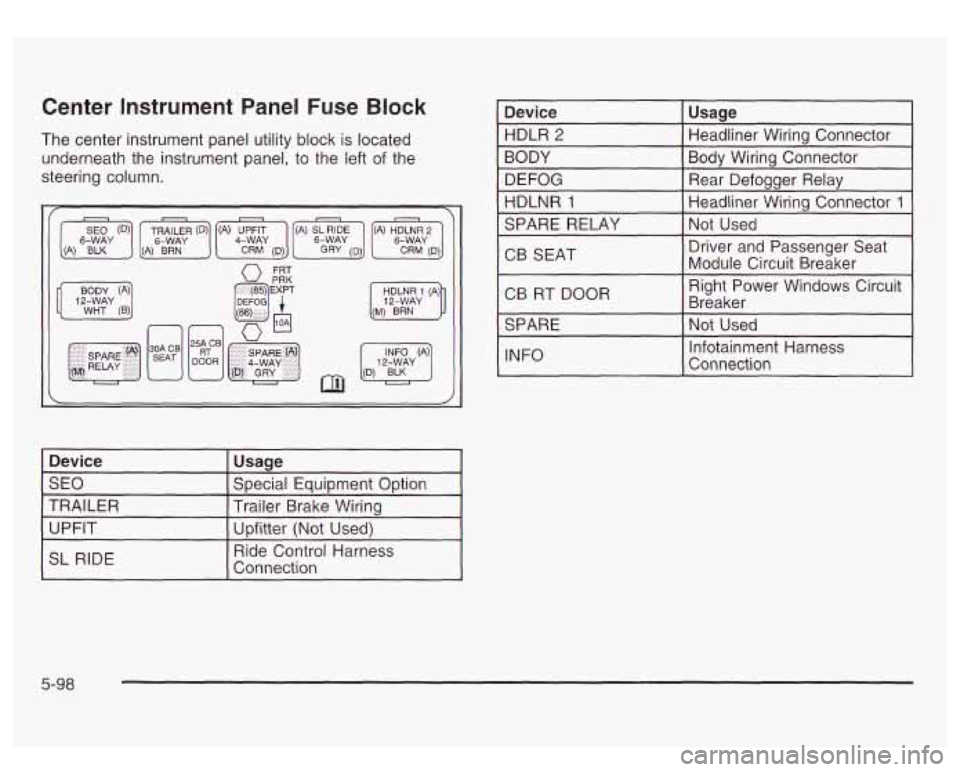
Center Instrument Panel Fuse Block
The center instrument panel utility block is located
underneath the instrument panel, to the left of the
steering column.
Device Special Equipment ODtion
SEO Usage
TRAILER Upfitter (Not Used)
UPFIT Trailer
Brake Wiring
1 SL RIDE I
Ride Control Harness
Connection
I Device I Usage I
HDLR 2
Bodv Wiring Connector
BODY Headliner Wiring
connector-
DEFOG Headliner Wiring Connector
1 HDLNR 1
Rear Defogger Relay
I SPARE RELAY I Not Used I
CB SEAT Driver
and Passenger Seat
Module Circuit Breaker
I CB RT DOOR I
Right Power Windows Circuit
Breaker
I
I SPARE I Not Used I
I INFO I
~-
Infotainment Harness
Connection
1
5-98
Page 386 of 428
At Least Twice a Year
Restraint System Check
Make sure the safety belt reminder light and all your
belts, buckles, latch plates, retractors and anchorages
are working properly. Look for any other loose or
damaged safety belt system parts.
If you see anything
that might keep a safety belt system from doing its
job, have it repaired. Have any torn or frayed safety belts
replaced.
Also look for any opened or broken air bag coverings,
and have them repaired or replaced. (The air bag
system does not need regular maintenance.)
Wiper Blade Check
Inspect wiper blades for wear or cracking. Replace
blade inserts that appear worn or damaged or that
streak or miss areas of the windshield.
Also see
Cleaning the Outside of Your Vehicle on page 5-88.
Spare Tire Check
At least twice a year, after the monthly inflation check of
the spare tire determines that the spare is inflated to
the correct tire inflation pressure, make sure that
the spare tire is stored securely. Push, pull, and then try
to rotate or turn the tire. If it moves, use the wheel
wrenchhatchet to tighten the cable. See
Changing a Flat
Tire on page 5-69.
Weatherstrip
Silicone grease on
longer, seal better,
Lubrication
weatherstrips will make them last
and not stick or squeak. Apply
silicone grease with a clean cloth. During very -cold,
damp weather more frequent application may be
required. See
Part D: Recommended Fluids and
lubricants on page
6- 16.
Automatic Transmission Check
Check the transmission fluid level; add if needed. See
Automatic Transmission Fluid on page 5-27. A fluid loss
may indicate a problem. Check the system and repair
if needed.
At Least Once a Year
Key Lock Cylinders Service
Lubricate the key lock cylinders with the lubricant
specified in Part D.
Body Lubrication Service
Lubricate all body door hinges, hood latch assembly,
secondary latch, pivots, spring anchor, release
pawl, tailgate hinge, tailgate linkage, tailgate handle
pivot points, latch bolt, fuel door hinge, locks and folding
seat hardware. Part
D tells you what to use. More
frequent lubrication may be required when exposed to a
corrosive environment.
6-1 1