2003 GMC SIERRA DENALI audio
[x] Cancel search: audioPage 197 of 428

Playing a Cassette Tape
Your tape player is built to work best with tapes that are
up
to 30 to 45 minutes long on each side. Tapes
longer than that are so thin they may not work well in
this player. The longer side with the tape visible should
face
to the right. If the ignition is on, but the radio is
off, the tape can be inserted and will begin playing. A
tape symbol is shown on the display whenever a tape is
inserted. If you hear nothing but a garbled sound, the
tape may not be in squarely. Press the eject symbol
to
remove the tape and start over.
While the tape is playing, use the VOL, AUDIO and
SEEK controls just as you do for the radio. The display
will show TAPE and an arrow showing which side of
the tape is playing.
If you want to insert a tape while the ignition is
off, first
press the eject symbol or DISP.
If an error appears on the display, see “Cassette Tape
Messages” later in this section.
1 PREV (Previous): Your tape must have at least three
seconds of silence between each selection for previous
to work. Press this pushbutton to go to the previous
selection on the tape
if the current selection has been
playing for less than three seconds. If pressed when the
current selection has been playing from 3
to 13 seconds,
it will go
to the beginning of the previous selection or
the beginning
of the current selection, depending upon
the position on the tape. If pressed when the current
selection has been playing for more than 13 seconds, it
will go
to the beginning of the current selection.
SEEK and a negative number will appear on the display
while the cassette player is in the previous mode.
Pressing this pushbutton multiple times will increase the
number of selections to be searched back, up to
-9.
2 NEXT: Your tape must have at least three seconds of
silence between each selection for next
to work.
Press this pushbutton
to go to the next selection on the
tape.
If you press the pushbutton more than once,
the player will continue moving forward through the tape.
SEEK and a positive number will appear on the
display.
3 REV (Reverse): Press this pushbutton to reverse the
tape rapidly. Press it again
to return to playing speed.
The radio will play while the tape reverses. The
station frequency and REV will appear on the display.
You may select stations during reverse operation
by using the TUNE and SEEK.
3-72
Page 201 of 428
Compact Disc Messages
If the disc comes out, it could be for one of the following
reasons:
You’re driving on a very rough road. When the road
It’s very hot. When the temperature returns to
becomes smoother the disc should play.
normal, the disc should play.
The disc is dirty, scratched, wet or upside down.
The air is very humid. If so, wait about an hour and
try again.
If the CD is not playing correctly, for any other reason,
try a known good CD.
If any error occurs repeatedly or
if an error can’t be
corrected, contact your dealer.
Rear Seat Audio (RSA)
This feature allows rear seat passengers to listen to any
of the audio sources: radio, cassette tapes, CDs,
DVDs,
XM (if your vehicle is equipped with XMTM
Satellite Radio Service), or DAB (if your vehicle is
equipped with DAB) depending on your vehicles options.
However, the rear seat passengers can only control
the music sources that the front seat passengers are not
listening to. For example, rear seat passengers may
listen
to a cassette tape through headphones while the
driver listens
to the radio through the front speakers.
The rear seat passengers have control of the volume for
each set of headphones. The front seat audio controls
always override the
RSA controls.
3-76
Page 202 of 428
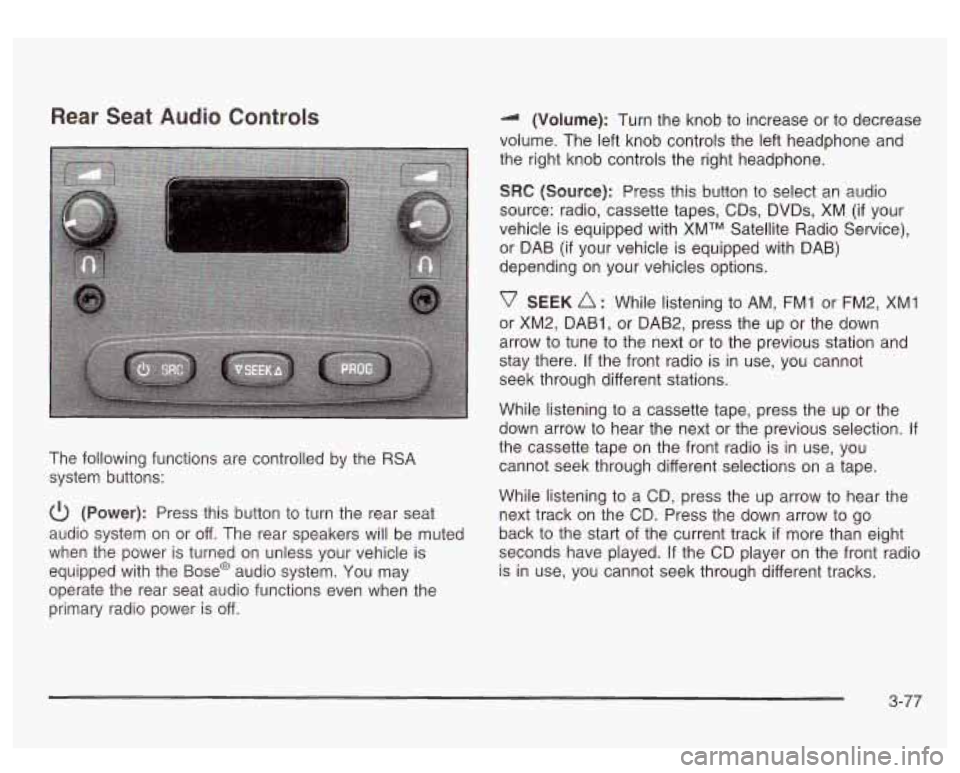
Rear Seat Audio Controls
The following functions are controlled by the RSA
system buttons:
(Power): Press this button to turn the rear seat
audio system on or off. The rear speakers will be muted
when the power is turned on unless your vehicle is
equipped with the
Base@ audio system. You may
operate the rear seat audio functions even when the
primary radio power is off. (Volume): Turn
the knob to increase or to decrease
volume. The left knob controls the left headphone and
the right knob controls the right headphone.
SRC (Source): Press this button to select an audio
source: radio, cassette tapes, CDs, DVDs, XM
(if your
vehicle is equipped with XMTM Satellite Radio Service),
or DAB (if your vehicle is equipped with DAB)
depending on your vehicles options.
v SEEK A : While listening to AM, FM1 or FM2, XMI
or XM2, DAB1, or DAB2, press the up or the down
arrow to tune to the next or to the previous station and
stay there.
If the front radio is in use, you cannot
seek through different stations.
While listening to a cassette tape, press the up or the
down arrow to hear the next or the previous selection.
If
the cassette tape on the front radio is in use, you
cannot seek through different selections on a tape.
While listening to a CD, press the up arrow to hear the
next track
on the CD. Press the down arrow to go
back to the start of the current track
if more than eight
seconds have played.
If the CD player on the front radio
is in use, you cannot seek through different tracks.
3-77
Page 206 of 428
Theft-Deterrent Feature
THEFTLOCK@ is designed to discourage theft of your
radio. The feature works automatically by learning
a portion of the Vehicle Identification Number (VIN).
If
the radio is moved to a different vehicle, it will not
operate and LOCKED will be displayed.
When the radio and vehicle are turned
off, the blinking
red light indicates that THEFTLOCK@ is armed.
With THEFTLOCK@ activated, your radio will not operate
if stolen.
Audio Steering Wheel Controls
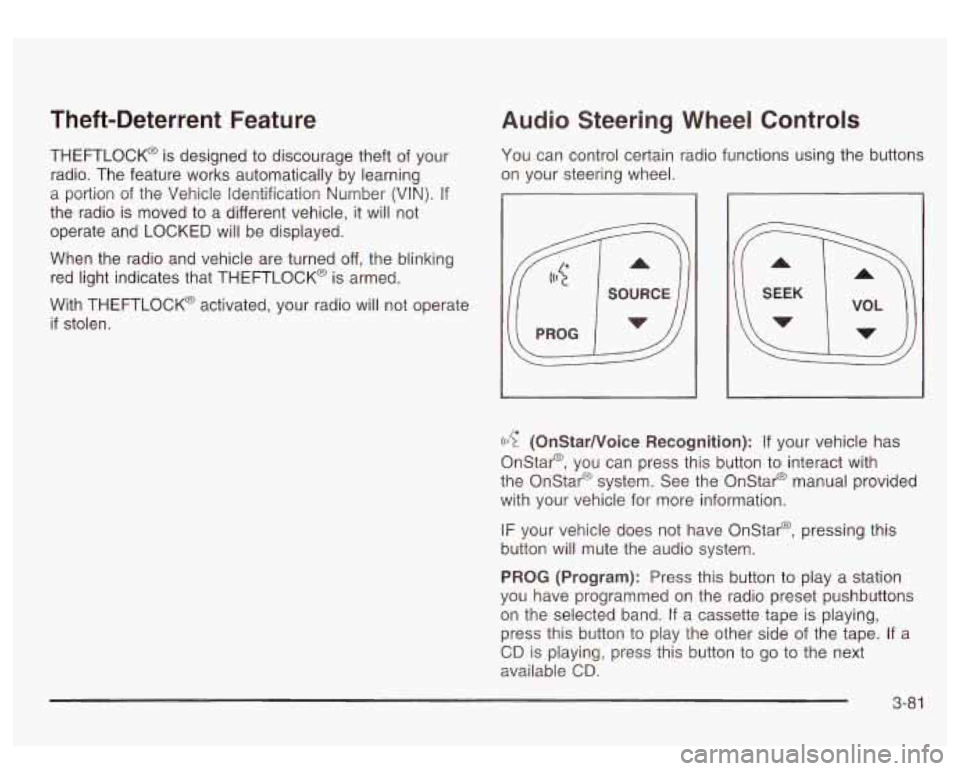
You can control certain radio functions using the buttons
on your steering wheel.
((17 (OnStarNoice Recognition): If your vehicle has
Onstar@, you can press this button to interact with
the Onstar@ system. See the Onstar@ manual provided
with your vehicle for more information.
IF your vehicle does not have Onstar@, pressing this
button will mute the audio system.
PROG (Program): Press this button to play a station
you have programmed on the radio preset pushbuttons
on the selected band.
If a cassette tape is playing,
press this button to play the other side of the tape. If a
CD is playing, press this button to go to the next
available
CD.
3-8 1
Page 312 of 428
Vehicle Storage
If you’re not going to drive your vehicle for 25 days
or more, remove the black, negative
(-) cable from the
battery. This will help keep your battery from
runnir
-- down.
Batte
s have acid that ca )urn I and gas
that can explode. You can be badly hurt if you
aren’t careful. See “Jump Starting” next for
tips on working around a battery without getting hurt.
Contact your dealer
to learn how to prepare your
vehicle for longer storage periods.
Also, for your audio system, see Theft-Deterrent
Feature on page
3-8 1.
Jump Starting
If your battery (or batteries) has run down, you may
want
to use another vehicle and some jumper cables to
start your vehicle. Be sure to follow the steps below
to do it safely. Batteries can hurt you.
They can be dangerous
because:
They contain acid that can burn you.
0 They contain gas that can explode or
0 They contain enough electricity to ignite.
burn you.
If you don’t follow these steps exactly, some or
all of these things can
hurt you.
Notice: Ignoring these steps could result in costly
damage to your vehicle that wouldn’t be covered
by your warranty.
Trying to start your vehicle by pushing or
pulling it
won’t work, and it could damage your vehicle.
1. Check the other vehicle. It must have a 12-volt
battery with a negative ground system.
5-43
Page 372 of 428
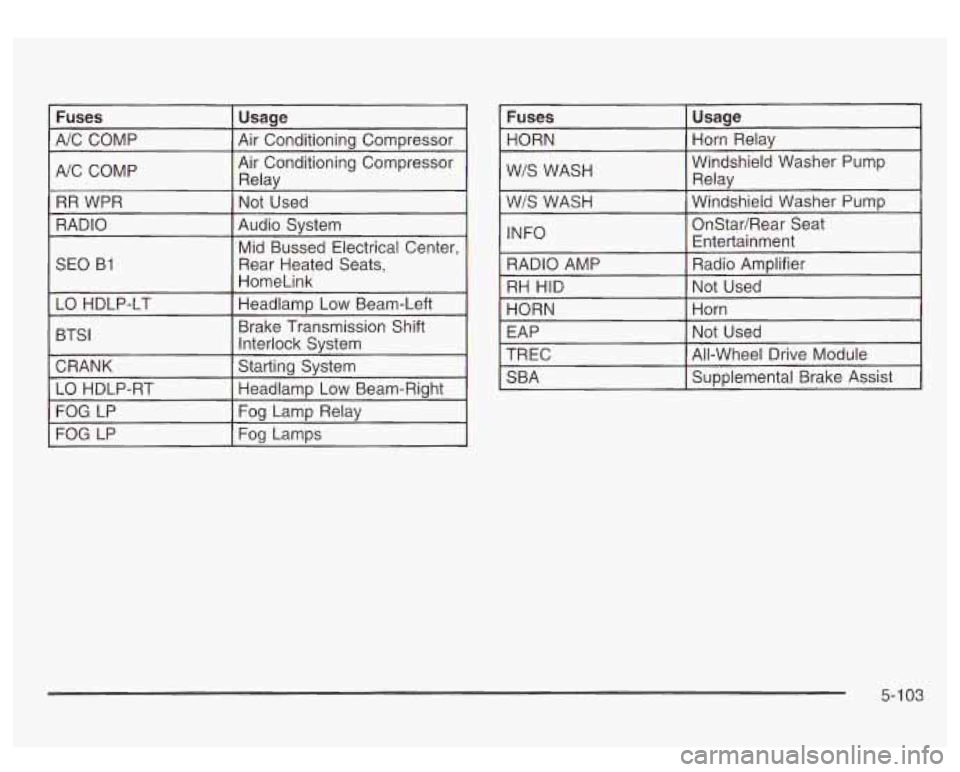
I NC COMP Air
Conditioning Compressor 1 Relav I
RR WPR
Audio Svstem
RADIO
Not Used
I Mid Bussed Electrical Center,
SEO B1
WIS WASH Windshield Washer
Pump I Relav I I
WIS WASH 1 Windshield Washer Pump i
INFO
5-1 03
Page 385 of 428
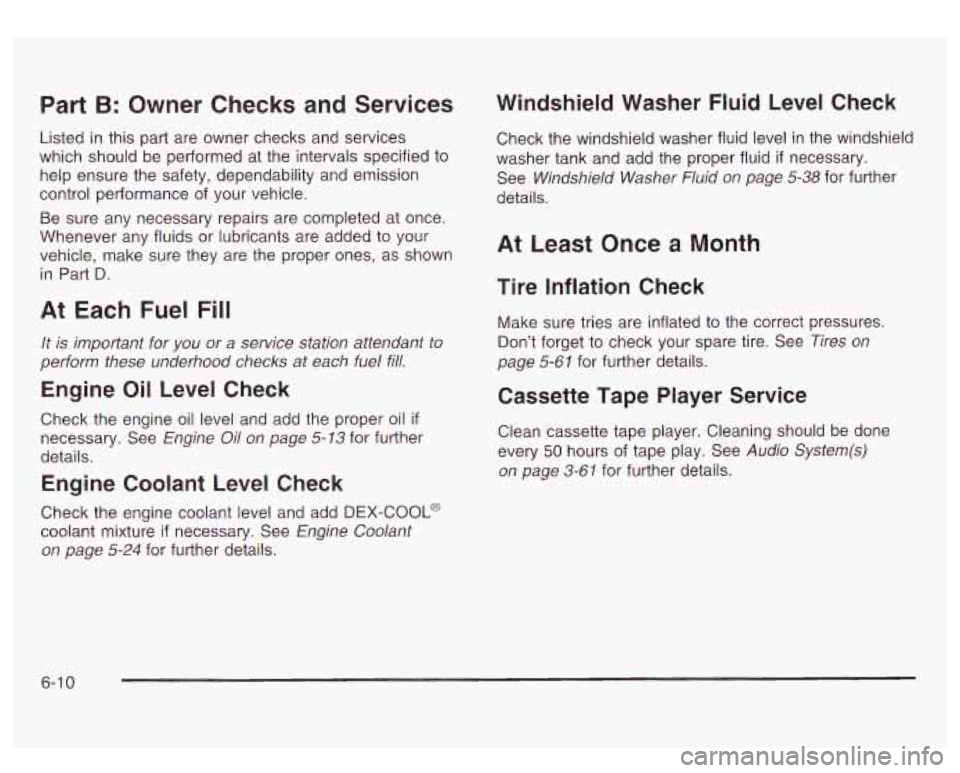
Part B: Owner Checks and Services
Listed in this part are owner checks and services
which should be performed at the intervals specified to
help ensure the safety, dependability and emission
control performance of your vehicle.
Be sure any necessary repairs are completed at once.
Whenever any fluids or lubricants are added to your
vehicle, make sure they are the proper ones, as shown
in Part
D.
At Each Fuel Fill
It is important for you or a service station attendant to
perform these underhood checks at each fuel fill.
Engine Oil Level Check
Check the engine oil level and add the proper oil if
necessary. See Engine Oil on page 5-13 for further
details.
Engine Coolant Level Check Windshield Washer Fluid Level Check
Check
the windshield washer fluid level in the windshield
washer tank and add the proper fluid
if necessary.
See
Windshield Washer Fluid on page 5-38 for further
details.
At Least Once a Month
Tire Inflation Check
Make sure tries are inflated to the correct pressures.
Don’t forget to check your spare tire. See
Tires on
page 5-61
for further details.
Cassette Tape Player Service
Clean cassette tape player. Cleaning should be done
every
50 hours of tape play. See Audio System(s)
on page 3-61
for further details.
Check the engine coolant level and add
DEX-COOL@
coolant mixture if necessary. See Engine Coolant
on page
5-24 for further details.
6-1 0
Page 410 of 428
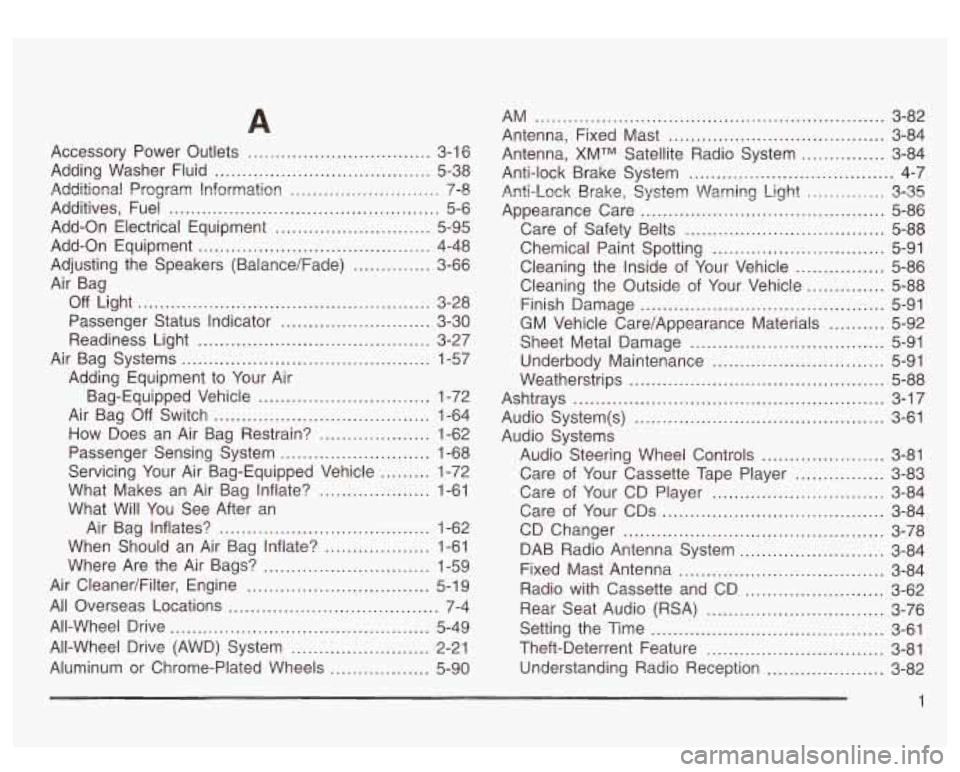
Accessory Power Outlets ................................. 3-16
Adding Washer Fluid
....................................... 5-38
Additional Program Information
........................... 7-8
Additives, Fuel ................................................. 5-6
Add-on Electrical Equipment
............................ 5-95
Add-on Equipment .......................................... 4-48
Off Light ..................................................... 3-28
Passenger Status Indicator
........................... 3-30
Readiness Light
.......................................... 3-27
Air Bag Systems
............................................. 1-57
Bag-Equipped Vehicle
............................... 1-72
Passenger Sensing System
........................... 1-68
Adjusting the Speakers
(Balance/Fade)
.............. 3-66
Air Bag
Adding Equipment to Your Air
Air Bag
Off Switch ....................................... 1-64
How Does an Air Bag Restrain?
.................... 1-62
Servicing Your Air Bag-Equipped Vehicle
......... 1-72
What Makes an
Air Bag inflate? .................... 1-61
What Will You See After an
Air Bag Inflates?
...................................... 1-62
When Should an Air Bag Inflate?
................... 1-61
Where Are the Air Bags?
.............................. 1-59
Air Cleaner/FiIter, Engine
................................. 5-1 9
All Overseas Locations ...................................... 7-4
All-Wheel Drive
............................................... 5-49
All-Wheel Drive (AWD) System
......................... 2-21
Aluminum or Chrome-Plated Wheels
.................. 5-90
AM ............................................................ 3-82
Antenna, Fixed Mast
....................................... 3-84
Anti-lock Brake System
..................................... 4-7
Appearance Care
............................................ 5-86
Care of Safety Belts
.................................... 5-88
Antenna,
XMTM Satellite
Radio System ............... 3-84
Anti-Lock Brake, System Warning
Light .............. 3-35
Chemical Paint Spotting
............................... 5-91
Cleaning the Inside of Your Vehicle
................ 5-86
Cleaning the Outside of Your Vehicle
.............. 5-88
Finish Damage
............................................ 5-91
GM Vehicle Care/Appearance Materials .......... 5-92
Sheet Metal Damage
................................... 5-91
Underbody Maintenance
............................... 5-91
Weatherstrips
.............................................. 5-88
Ashtrays
........................................................ 3-17
Audio System(s)
............................................. 3-61
Audio Systems
Audio Steering Wheel Controls
...................... 3-81
Care of Your Cassette Tape Player
................ 3-83
Care of Your CD Player
............................... 3-84
Care of Your CDs
........................................ 3-84
CD Changer
............................................... 3-78
DAB Radio Antenna System
.......................... 3-84
Fixed Mast Antenna
..................................... 3-84
Radio with Cassette and CD
......................... 3-62
Rear Seat Audio (RSA)
................................ 3-76
Setting the Time
.......................................... 3-61
Theft-Deterrent Feature
................................ 3-81
Understanding Radio Reception
..................... 3-82
1