2003 FORD SUPER DUTY tires
[x] Cancel search: tiresPage 126 of 256
•GAWR (Gross Axle Weight Rating):Carrying capacity for each axle
system. The GAWR is specific to each vehicle and is listed on the
SafetyCertification Label on the driver’s door pillar.
•GCW (Gross Combined Weight):The combined weight of the
towing vehicle (including occupants and cargo) and the loaded trailer.
•GCWR (Gross Combined Weight Rating):Maximum allowable
combined weight of towing vehicle (including occupants and cargo)
and the loaded trailer.
•Maximum Trailer Weight Rating:Maximum weight of a trailer the
vehicle is permitted to tow. The maximum trailer weight rating is
determined bysubtracting the vehicle curb weight for each
engine/transmission combination, anyrequired option weight for trailer
towing and the weight of the driver from the GCWR for the towing
vehicle.
•Maximum Trailer Weight:Maximum weight of a trailer the loaded
vehicle, including occupants and cargo, is permitted to tow. It is
determined bysubtracting the weight of the loaded trailer towing
vehicle from the GCWR for the towing vehicle.
•Trailer Weight Range:Specified range of trailer weight from zero to
the maximum trailer weight rating.
Remember to figure in the tongue load of your loaded trailer when
figuring the total weight.
The SafetyCertification Label, located on the driver’s door pillar, lists
vehicle weight rating limitations. Before adding anyadditional equipment,
refer to these limitations.
Always ensure that the weight of occupants, cargo and equipment is
within the weight limitations, including both gross vehicle weight and
front and rear gross axle weight rating limits.
Note:Do not exceed the GVWR or the GAWR specified on the
certification label.
Exceeding anyvehicle weight rating limitation could result in
serious damage to the vehicle, loss of vehicle control, vehicle
rollover, and/or personal injury.
Do not use replacement tires with lower load carrying capacities than the
originals because theymaylower the vehicle’s GVWR and GAWR
limitations. Replacement tires with a higher limit than the originals do
not increase the GVWR and GAWR limitations.
Driving
126
Page 127 of 256
Special loading instructions for owners of pickup trucks and
utility-type vehicles
For important information regarding safe operation of this type
of vehicle, see thePreparing to drive your vehiclesection in
this chapter.
Loaded vehicles mayhandle differentlythan unloaded vehicles.
Extra precautions, such as slower speeds and increased stopping
distance, should be taken when driving a heavilyloaded vehicle.
Your vehicle can haul more cargo and people than most passenger cars.
Depending upon the type and placement of the load, hauling cargo and
people mayraise the center of gravityof the vehicle.
Calculating the load your vehicle can carry/tow
1. Use the appropriate maximum GCWR chart (in theTrailer Towing
section in this chapter) for your type of engine and rear axle ratio.
2. Weigh your vehicle without cargo. To obtain correct weights, take your
vehicle to a shipping companyor an inspection station for trucks.
3. Subtract your loaded weight from the maximum GCWR in the chart.
This is the maximum trailer weight your vehicle can tow. It must be
below the maximum trailer weight shown in the chart.
TRAILER TOWING
Your vehicle maytow a Conventional/Class IV trailer or fifth wheel trailer
provided the maximum trailer weight is less than or equal to the
maximum trailer weight listed for your engine and rear axle ratio on the
following charts.
2nd unit bodies are not included in maximum trailer weight ratings. The
weight of the additional “body” must be subtracted from the maximum
trailer weight.
Your vehicle’s load capacityis designated byweight, not byvolume, so
you cannot necessarily use all available space when loading a vehicle.
Towing a trailer places an additional load on your vehicle’s engine,
transmission, axle, brakes, tires and suspension. Inspect these
components carefullyprior to and after anytowing operation. The
following trailer towing charts applyto vehicles equipped with gasoline
engines; for Diesel engines, refer to the7.3 Liter Power Stroke Direct
Injection Turbo Diesel Supplement.
Driving
127
Page 150 of 256
•Tires have their maximum inflation pressure and associated load rating
imprinted on the tire sidewall. This pressure mayor maynot be the
same as that shown as recommended on the vehicle. The vehicle
operator mayhave to adjust the tire inflation pressure to
accommodate the snowplow and payload. Consult your dealer or
equipment installer for help with proper inflation pressures.
•Federal and some local regulations require additional exterior lamps
for snowplow-equipped vehicles. Consult your dealer for additional
information.
•After installing a snowplow to the vehicle, ensure the vehicle’s front
toe alignment and front ride height are within specification (reset if
required). These specifications are located in the vehicle’s Workshop
Manual.
Note:Do not exceed the GVWR or the GAWR specified on the
certification label.
Removing snowplow
After removing a snowplow from the vehicle, ensure the vehicle’s front toe
alignment and front ride height are within specification (reset if required).
Snowplowing with your air bag-equipped vehicle
Your vehicle is equipped with a driver and passenger air bag
Supplemental Restraint System (SRS) The SRS is designed to activate in
certain frontal and offset frontal collisions when the vehicle sustains
sufficient longitudinal deceleration.
Careless or high speed driving while plowing snow which results in
sufficient vehicle decelerations can deploythe air bag. Such driving also
increases the risk of accidents.
All occupants of the vehicle, including the driver, should always
properlywear their safetybelts, even when an air bag (SRS) is
provided.
Never remove or defeat the “tripping mechanisms” designed into the
snow removal equipment byits manufacturer. Doing so maycause
damage to the vehicle and the snow removal equipment as well as
possible air bag deployment.
Do not attempt to service, repair, or modifythe Air Bag
Supplemental Restraint System or its fuses. See your Ford or
Lincoln Mercurydealer.
Driving
150
Page 151 of 256
Additional equipment such as snowplow equipment mayeffect
the performance of the air bag sensors increasing the risk of
injury. Please refer to the Body Builders Lay out Book for instructions
about the appropriate installation of additional equipment.
Engine temperature while plowing
When driving with a snowplow, your engine may run at a higher
temperature than normal because the attached snowplow blade will
restrict airflow to the radiator.
If you are driving more than 24 km (15 miles) at temperatures above
freezing, angle the plow blade either full left or full right to provide
maximum airflow to the radiator.
If you are driving less than 24 km (15 miles) at speeds up to 64 km/h
(40 mph) in cold weather, you will not need to worry about blade
position to provide maximum airflow.
4WD operation while plowing
•Shift transfer case to 4x4 LOW (4WD Low) when plowing in small
areas at speeds below 8 km/h (5 mph).
•Shift transfer case to 4x4 HIGH (4WD High) when plowing larger
areas or light snow at higher speeds. Do not exceed 24 km/h
(15 mph).
•Do not shift the transmission from a forward gear to R (Reverse) until
the engine is at idle and the wheels are stopped.
•If the vehicle is stuck, shift the transmission in a steadymotion
between forward and reverse gears. Do not rock the vehicle for more
than a few minutes. The transmission and tires maybe damaged or
the engine can overheat.
It is the owner’s responsibility to avoid engine overheating which
can cause damage.
Refer toTransmission temperature gaugein theInstrument cluster
chapter for transmission fluid temperature information.
Do not spin the wheels at over 35 mph (55 km/h). The tires may
fail and injure a passenger or bystander.
Driving
151
Page 159 of 256
Fuse/Relay
LocationFuse Amp
RatingPassenger Compartment Fuse Panel
Description
302 — Powertrain (EEC) relay
303 — Injector driver module relay(Diesel engine
only)
304 — Not used
305 — Trailer tow batterycharge relay
306 — Delayed accessory relay
307 — Starter relay
* Mini Fuses ** Maxi Fuses ***Circuit Breaker
CHANGING A FLAT TIRE
If you get a flat tire while driving:
•do not brake heavily.
•graduallydecrease the vehicle’s speed.
•hold the steering wheel firmly.
•slowlymove to a safe place on the side of the road.
The use of tire sealants is not recommended and may
compromise the integrityof your tires. The use of tire sealants
may also affect your tire pressure monitoring system (if equipped).
Spare tire information
Your vehicle maybe equipped with a spare tire that can be used as
either a spare or a regular tire. The spare tire is not equipped with wheel
trim. The wheel trim from the original wheel/tire maybe used on the
spare.
If your vehicle is equipped with 4WD, a spare tire of a different
size than the road tires should not be used. Use of such a tire
could result in damage to driveline components and an increased risk
of loss of vehicle control, vehicle rollover, personal injuryor death.
If your vehicle is equipped with a tire pressure monitoring
system, refer to Tire Pressure Monitoring System (if equipped)
in the Maintenance and specifications section for important information
before changing your tires. If the tire pressure monitoring system
becomes damaged, it will no longer function.
Roadside Emergencies
159
Page 164 of 256
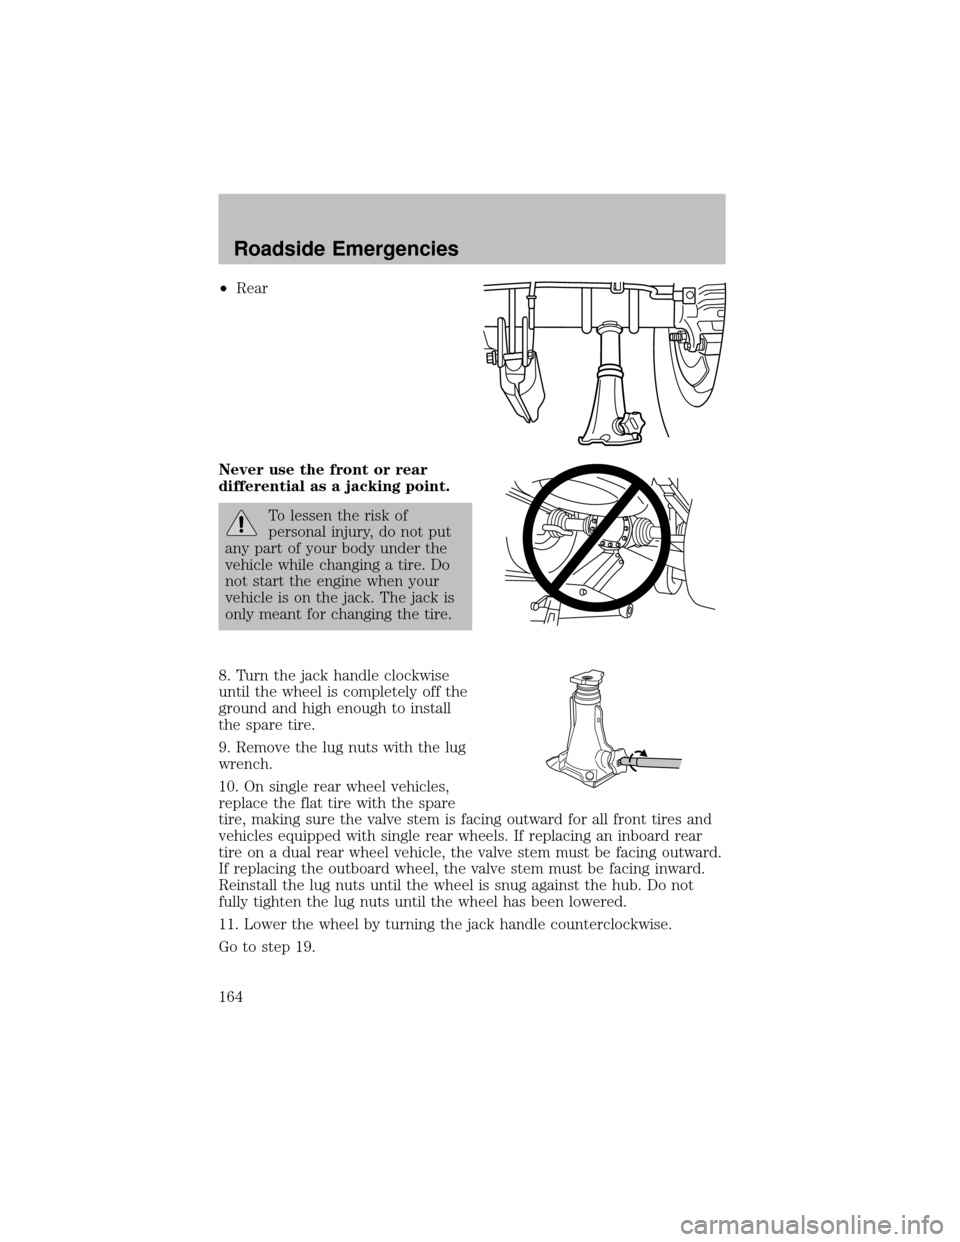
•Rear
Never use the front or rear
differential as a jacking point.
To lessen the risk of
personal injury, do not put
anypart of your bodyunder the
vehicle while changing a tire. Do
not start the engine when your
vehicle is on the jack. The jack is
onlymeant for changing the tire.
8. Turn the jack handle clockwise
until the wheel is completelyoff the
ground and high enough to install
the spare tire.
9. Remove the lug nuts with the lug
wrench.
10. On single rear wheel vehicles,
replace the flat tire with the spare
tire, making sure the valve stem is facing outward for all front tires and
vehicles equipped with single rear wheels. If replacing an inboard rear
tire on a dual rear wheel vehicle, the valve stem must be facing outward.
If replacing the outboard wheel, the valve stem must be facing inward.
Reinstall the lug nuts until the wheel is snug against the hub. Do not
fullytighten the lug nuts until the wheel has been lowered.
11. Lower the wheel byturning the jack handle counterclockwise.
Go to step 19.
Roadside Emergencies
164
Page 212 of 256

•Revving the engine before turning it off mayreduce fuel economy.
•Using the air conditioner or defroster mayreduce fuel economy.
•You maywant to turn off the speed control in hillyterrain if
unnecessaryshifting between third and fourth gear occurs.
Unnecessaryshifting of this type could result in reduced fuel
economy.
•Warming up a vehicle on cold mornings is not required and may
reduce fuel economy.
•Resting your foot on the brake pedal while driving may reduce fuel
economy.
•Combine errands and minimize stop-and-go driving.
Maintenance
•Keep tires properlyinflated and use onlyrecommended size.
•Operating a vehicle with the wheels out of alignment will reduce fuel
economy.
•Use recommended engine oil. Refer toLubricant specificationsin
this chapter.
•Perform all regularlyscheduled maintenance items. Follow the
recommended maintenance schedule and owner maintenance checks
found in your vehicle scheduled maintenance guide.
Conditions
•Heavilyloading a vehicle or towing a trailer mayreduce fuel economy
at anyspeed.
•Carrying unnecessaryweight mayreduce fuel economy(approximately
0.4 km/L [1 mpg] is lost for every180 kg [400 lb] of weight carried).
•Adding certain accessories to your vehicle (for example bug
deflectors, rollbars/light bars, running boards, ski/luggage racks) may
reduce fuel economy.
•Using fuel blended with alcohol maylower fuel economy.
•Fuel economymaydecrease with lower temperatures during the first
12–16 km (8–10 miles) of driving.
•Driving on flat terrain offers improved fuel economyas compared to
driving on hillyterrain.
•Transmissions give their best fuel economywhen operated in the top
cruise gear and with steadypressure on the gas pedal.
Maintenance and Specifications
212
Page 221 of 256
Note:Do not start your engine with the air cleaner removed and do not
remove it while the engine is running.
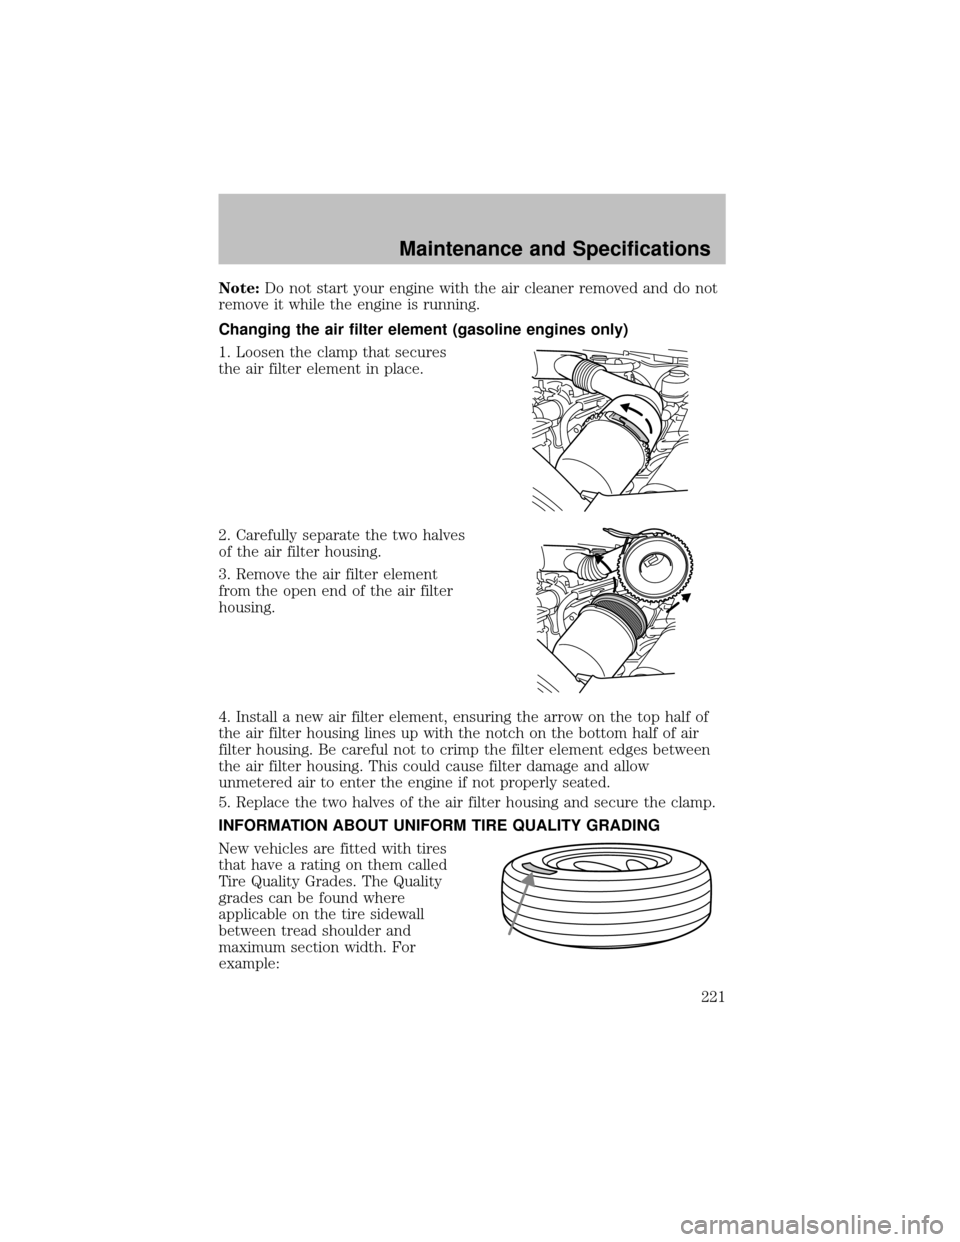
Changing the air filter element (gasoline engines only)
1. Loosen the clamp that secures
the air filter element in place.
2. Carefullyseparate the two halves
of the air filter housing.
3. Remove the air filter element
from the open end of the air filter
housing.
4. Install a new air filter element, ensuring the arrow on the top half of
the air filter housing lines up with the notch on the bottom half of air
filter housing. Be careful not to crimp the filter element edges between
the air filter housing. This could cause filter damage and allow
unmetered air to enter the engine if not properlyseated.
5. Replace the two halves of the air filter housing and secure the clamp.
INFORMATION ABOUT UNIFORM TIRE QUALITY GRADING
New vehicles are fitted with tires
that have a rating on them called
Tire QualityGrades. The Quality
grades can be found where
applicable on the tire sidewall
between tread shoulder and
maximum section width. For
example:
Maintenance and Specifications
221