Page 1190 of 4378
9. Remove the LH and the RH timing chain tensioner arm from the dowel pins.
10. Remove the timing chains and the crankshaft sprocket.
11. Remove the timing chain guides. 1. Remove the bolts.
2. Remove the LH timing chain guide.
3. Remove the bolts.
4. Remove the RH timing chain guide. �K�l�j . 4 �b�a
132003 Mustang Workshop Manual
17. 11. 2011file:///C:/Ford/2000 - 2004/tsocache/SHEF_4464/S3B~us~en~ ...
Page 1192 of 4378
1.
CAUTION: The timing chain procedures must be followed exactly or damage to the
valve and pistons will result.
Compress the tensioner plunger, using an edge of a vise.
2. While holding the ratchet mechanism, push the ratchet arm back into the tensioner housing.
3. Install a paper clip into the hole in the tensioner housing to hold the ratchet assembly and plunger in during installation.
4. If the copper links are not visible, mark one link on one end and one link on the other end, and use as timing marks. �K�l�j . 6 �b�a
132003 Mustang Workshop Manual
17. 11. 2011file:///C:/Ford/2000 - 2004/tsocache/SHEF_4464/S3B~us~en~ ...
Page 1194 of 4378
9. Install the crankshaft sprocket, making sure the flange faces forward.
10. Install the timing chain guide. 1. Position the LH timing chain guide.
2. Install and tighten the LH bolts.
3. Position the RH timing chain guide.
4. Install and tighten the RH bolts.
11. Install the timing chains. �zInstall the LH (inner) timing chain on the crankshaft sprocket, aligning the copper link with
the dot on the crankshaft sprocket.
�z Install the LH (inner) timing chain on the camshaft sprocket, aligning the copper link with
the dot on the camshaft sprocket.
�z Install the RH (outer) timing chain on the crankshaft sprocket, aligning the copper link
with the dot on the crankshaft sprocket.
�z Install the RH (outer) timing chain on the camshaft sprocket, aligning the copper link with
the dot on the camshaft sprocket. �K�l�j . 8 �b�a
132003 Mustang Workshop Manual
17. 11. 2011file:///C:/Ford/2000 - 2004/tsocache/SHEF_4464/S3B~us~en~ ...
Page 1195 of 4378
12. Make sure that the copper (marked) chain links are lined up with the dots on the crankshaft
sprocket and the camshaft sprockets.
13. NOTE: The LH timing chain tensioner arm has a bump near the dowel hole, for identification.
Position the LH and the RH timing chain tensioner arm on the dowel pins. �K�l�j . 9 �b�a
132003 Mustang Workshop Manual
17. 11. 2011file:///C:/Ford/2000 - 2004/tsocache/SHEF_4464/S3B~us~en~ ...
Page 1196 of 4378
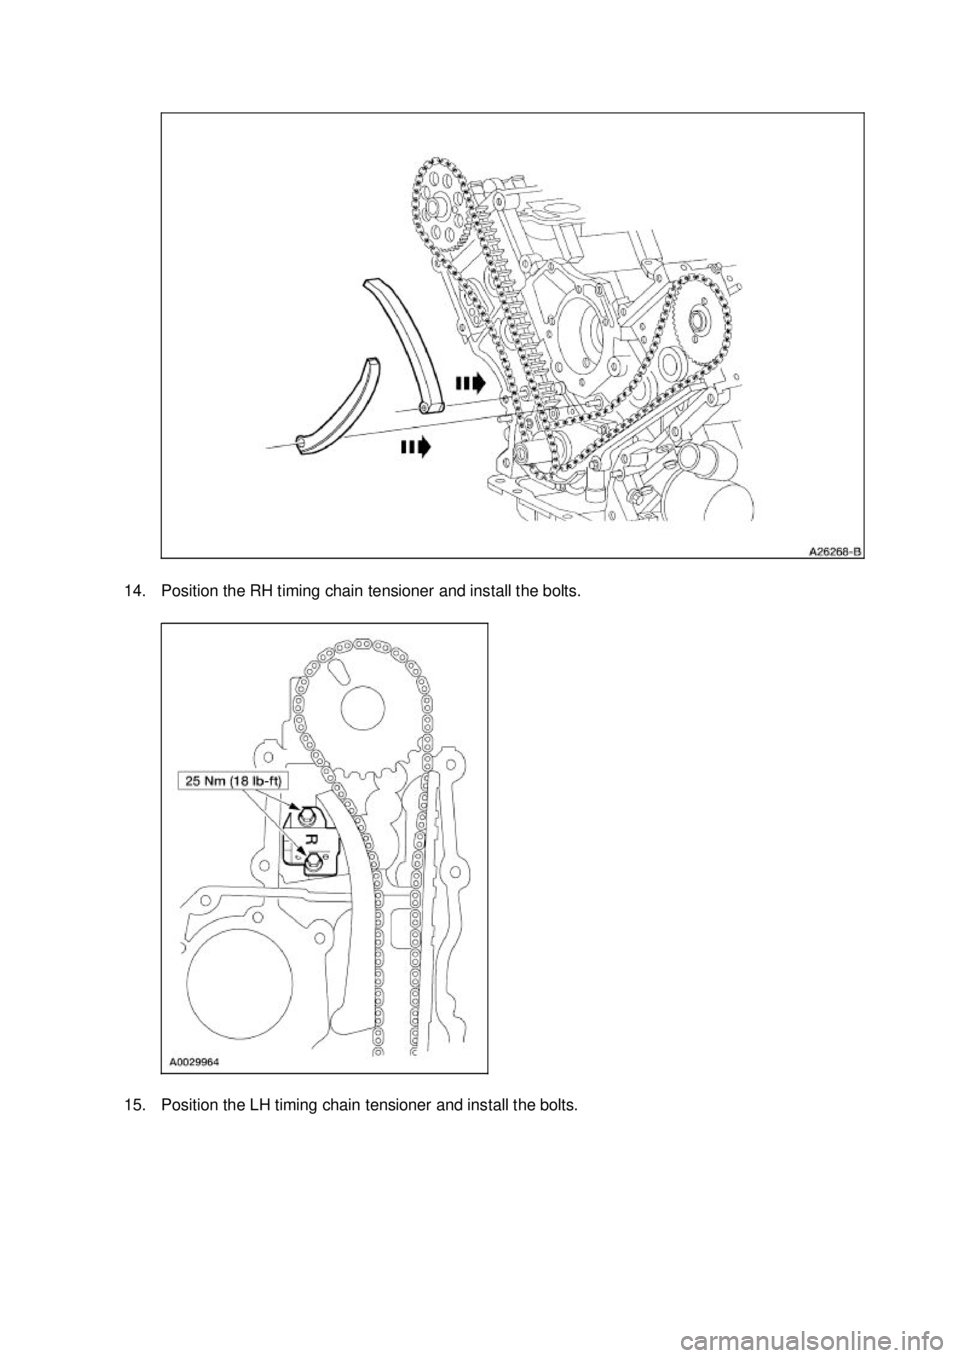
14. Position the RH timing chain tensioner and install the bolts.
15. Position the LH timing chain tensioner and install the bolts. �K�l�j . 10 �b�a
132003 Mustang Workshop Manual
17. 11. 2011file:///C:/Ford/2000 - 2004/tsocache/SHEF_4464/S3B~us~en~ ...
Page 1197 of 4378
16. Remove the paper clip from the RH and the LH timing chain tensioners.
17.
NOTE: Rotate the camshaft to the base circle of the camshaft lobe before installing the roller
followers.
NOTE: Keep all the roller followers in order when installing.
Using the special tool, install the 16 roller followers.
18. Install the eight spark plugs. �K�l�j . 11 �b�a
132003 Mustang Workshop Manual
17. 11. 2011file:///C:/Ford/2000 - 2004/tsocache/SHEF_4464/S3B~us~en~ ...
Page 1206 of 4378
IN-
VEHICLE REPAIR
Camshaft
Removal and Installation 1. Remove the timing chains. For additional information, refer to Timing Drive Components in this
section.
2. Remove the roller followers. For additional information, refer to Camshaft Roller Follower in this
section.
3. Remove the bolts and camshaft bearing caps.
4. Remove the camshaft.
5. NOTE: Tighten the camshaft bearing cap bolts in the sequence shown.
To install, reverse the removal procedure.
SECTION 303-
01B: Engine — 4.6L (2V) 2003 Mustang Workshop Manual �K�l�j . 1 �b�a
22003 Mustang Workshop Manual
17. 11. 2011file:///C:/Ford/2000 - 2004/tsocache/SHEF_4464/S3B~us~en~ ...
Page 1256 of 4378
50. Position the crankshaft with the keyway at the 12 o'clock position.
51. Remove the RH and LH timing chain tensioning system from both timing chains.
1. Remove the bolts.
2. Remove the timing chain tensioners.
3. Remove the timing chain tensioner arms.
52. Remove the LH and RH timing chains and the crankshaft sprocket. �zRemove the RH timing chain from camshaft sprocket.
�z Remove the RH timing chain from the crankshaft sprocket.
�z Remove the LH timing chain from the camshaft sprocket.
�z Remove the LH timing chain and crankshaft sprocket. �K�l�j . 16 �b�a
212003 Mustang Workshop Manual
17. 11. 2011file:///C:/Ford/2000 - 2004/tsocache/SHEF_4464/S3B~us~en~ ...


 chain links are lined up with the dots on the crankshaft
sprocket and the camshaft sprockets.
13. NOTE: The LH timing chain tensioner arm has a bump near the")