Page 963 of 4378
2. Install the intake manifold gaskets.
3.
NOTE: If the lower intake manifold is not secured within four minutes, the sealant must be
removed and the sealing area cleaned with metal surface cleaner. Allow to dry until there is no
sign of wetness, or four minutes, whichever is longer. Failure to follow this procedure can cause
future oil leakage.
Position the lower intake manifold. 1. Apply a bead of silicone gasket and sealant to the lower intake manifold mounting at the points indicated.
2. Position the lower intake manifold. �K�l�j . 5 �b�a
92003 Mustang Workshop Manual
17. 11. 2011file:///C:/Ford/2000 - 2004/tsocache/SHEF_4464/S3B~us~en~ ...
Page 982 of 4378
2.
NOTE: If the engine front cover is not secured within four minutes, the sealant must be removed
and the sealing area cleaned with metal surface cleaner. Allow to dry until there is no sign of
wetness, or four minutes, whichever is longer. Failure to follow this procedure can cause future
oil leakage.
Apply a small amount of silicone gasket and sealant as shown.
3. NOTE: If the engine front cover is not secured within four minutes, the sealant must be removed
and the sealing area cleaned with metal surface cleaner. Allow to dry until there is no sign of
wetness, or four minutes, whichever is longer. Failure to follow this procedure can cause future
oil leakage.
Install the engine front cover gasket and apply silicone gasket and sealant as shown.
4. Install the engine front cover and bolts.
5. Install the water pump. Install the nuts and bolts. �K�l�j . 5 �b�a
92003 Mustang Workshop Manual
17. 11. 2011file:///C:/Ford/2000 - 2004/tsocache/SHEF_4464/S3B~us~en~ ...
Page 1031 of 4378
24. Remove the oil pan.
Installation 1. NOTE: If the oil pan is not secured within four minutes, the sealant must be removed and the
sealing area cleaned with metal surface cleaner. Allow to dry until there is no sign of wetness,
or four minutes, whichever is longer. Failure to follow this procedure can cause future oil
leakage.
Clean and apply sealant to the oil pan sealing areas shown and install the oil pan rear seal. 1. Apply silicone gasket and sealant to the rear main bearing cap.
2. Install the oil pan rear seal.
3. Clean the oil pan mating surfaces with metal surface cleaner an apply silicone gasket and sealant to the oil pan mating surface. �K�l�j . 6 �b�a
122003 Mustang Workshop Manual
17. 11. 2011file:///C:/Ford/2000 - 2004/tsocache/SHEF_4464/S3B~us~en~ ...
Page 1096 of 4378
11.
CAUTION: The crankshaft journals must be protected from damage when installing
the crankshaft.
Position the crankshaft.
CAUTION: The main bearings are precision selective fit. Inspect the bearing clearance.
For additional information, refer to Section 303 - 00 .
12. NOTE: If the rear main bearing cap is not secured within four minutes, the sealant must be
removed and the sealing area cleaned with metal surface cleaner. Allow to dry until there is no
sign of wetness, or four minutes, whichever is longer. Failure to follow this procedure can cause
future oil leakage.
Clean the rear main bearing cap sealing area with metal surface cleaner. Apply silicone gasket
and sealant to the rear main bearing cap- to-cylinder block parting line. �K�l�j . 5 �b�a
282003 Mustang Workshop Manual
17. 11. 2011file:///C:/Ford/2000 - 2004/tsocache/SHEF_4464/S3B~us~en~ ...
Page 1105 of 4378
40. Install the crankshaft pulley bolt.
41. Install the camshaft synchronizer. For additional information, refer to
Section 303 - 14 .
42. Install the water pump pulley and the retaining bolts.
43. NOTE: If the oil pan is not secured within four minutes, the sealant must be removed and the
sealing area cleaned with metal surface cleaner. Allow to dry until there is no sign of wetness,
or four minutes, whichever is longer. Failure to follow this procedure can cause future oil
leakage.
Clean and apply the sealant to the oil pan sealing areas shown and install the oil pan rear seal.
1. Apply silicone gasket and sealant to the rear main bearing cap.
2. Install the oil pan rear seal.
3. Clean the oil pan mating surfaces with metal surface cleaner and apply silicone gasket and sealant to the oil pan mating surface. �K�l�j . 14 �b�a
282003 Mustang Workshop Manual
17. 11. 2011file:///C:/Ford/2000 - 2004/tsocache/SHEF_4464/S3B~us~en~ ...
Page 1109 of 4378

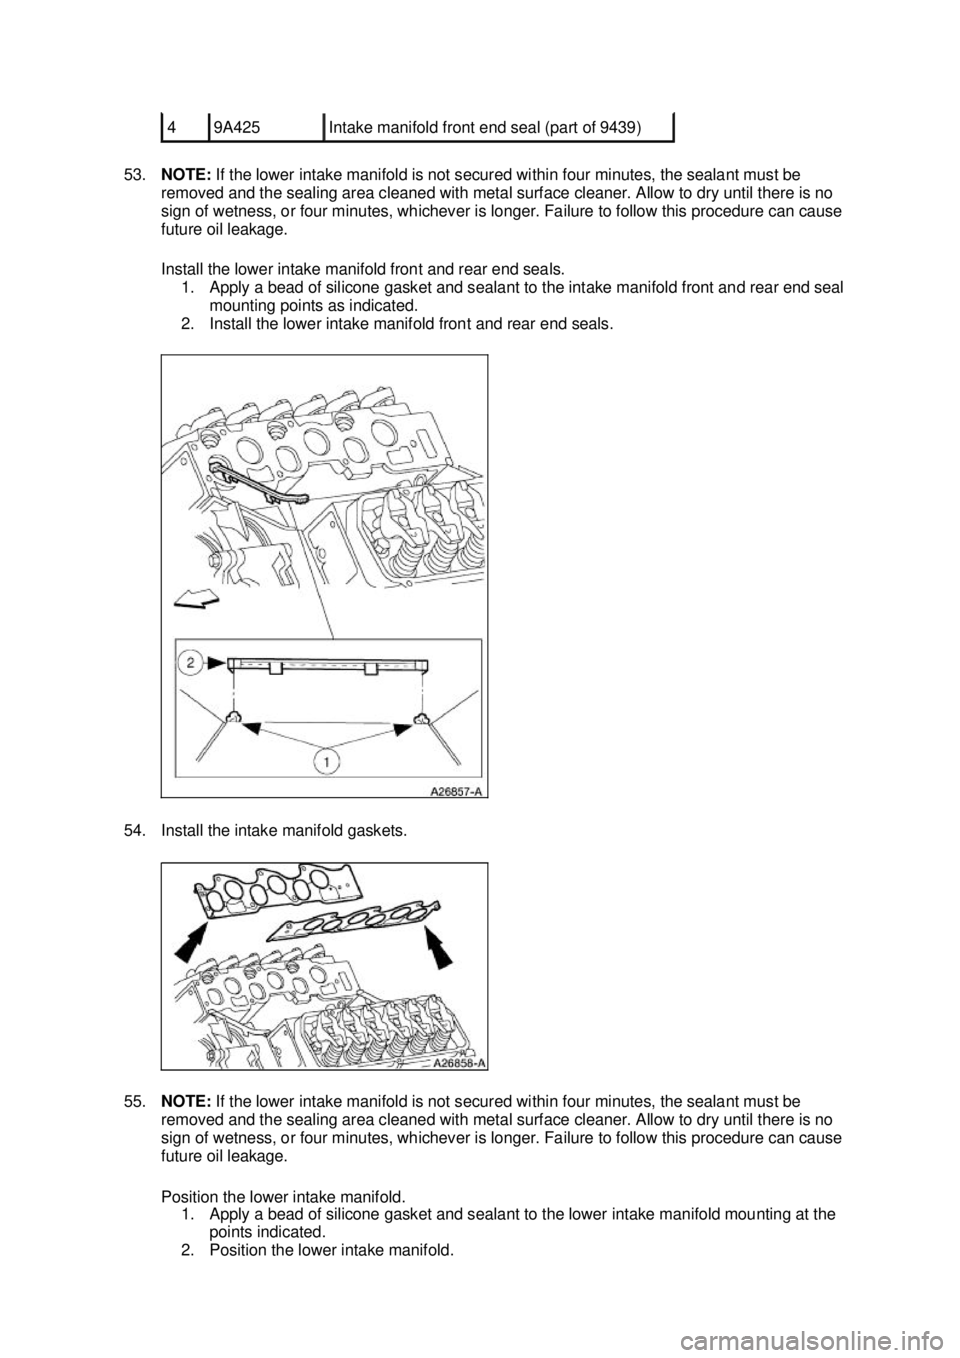
53.
NOTE: If the lower intake manifold is not secured within four minutes, the sealant must be
removed and the sealing area cleaned with metal surface cleaner. Allow to dry until there is no
sign of wetness, or four minutes, whichever is longer. Failure to follow this procedure can cause
future oil leakage.
Install the lower intake manifold front and rear end seals. 1. Apply a bead of silicone gasket and sealant to the intake manifold front and rear end seal mounting points as indicated.
2. Install the lower intake manifold front and rear end seals.
54. Install the intake manifold gaskets.
55. NOTE: If the lower intake manifold is not secured within four minutes, the sealant must be
removed and the sealing area cleaned with metal surface cleaner. Allow to dry until there is no
sign of wetness, or four minutes, whichever is longer. Failure to follow this procedure can cause
future oil leakage.
Position the lower intake manifold. 1. Apply a bead of silicone gasket and sealant to the lower intake manifold mounting at the
points indicated.
2. Position the lower intake manifold. 4 9A425 Intake manifold front end seal (part of 9439) �K�l�j . 18 �b�a
282003 Mustang Workshop Manual
17. 11. 2011file:///C:/Ford/2000 - 2004/tsocache/SHEF_4464/S3B~us~en~ ...
Page 1223 of 4378

Installation
1. CAUTION: Do not use metal scrapers, wire brushes, power abrasive discs or other
abrasive means to clean the sealing surfaces. These tools cause scratches and gouges
which make leak paths. Use a plastic scraping tool to remove all traces of old sealant.
Clean and inspect the mating surfaces.
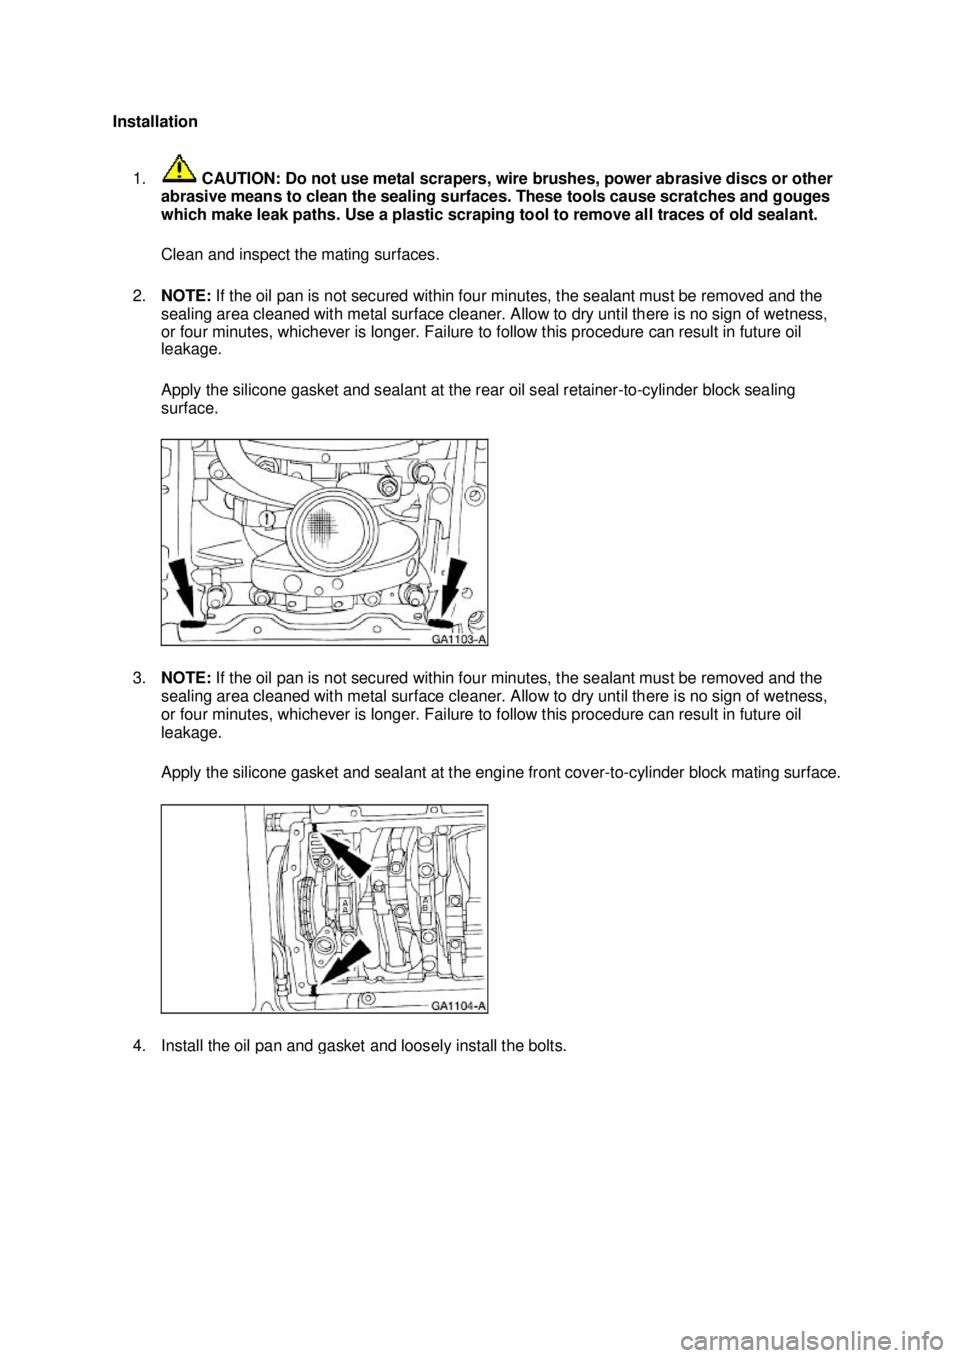
2. NOTE: If the oil pan is not secured within four minutes, the sealant must be removed and the
sealing area cleaned with metal surface cleaner. Allow to dry until there is no sign of wetness,
or four minutes, whichever is longer. Failure to follow this procedure can result in future oil
leakage.
Apply the silicone gasket and sealant at the rear oil seal retainer- to-cylinder block sealing
surface.
3. NOTE: If the oil pan is not secured within four minutes, the sealant must be removed and the
sealing area cleaned with metal surface cleaner. Allow to dry until there is no sign of wetness,
or four minutes, whichever is longer. Failure to follow this procedure can result in future oil
leakage.
Apply the silicone gasket and sealant at the engine front cover- to-cylinder block mating surface. 4. Install the oil pan and gasket and loosely install the bolts. �K�l�j . 5 �b�a
92003 Mustang Workshop Manual
17. 11. 2011file:///C:/Ford/2000 - 2004/tsocache/SHEF_4464/S3B~us~en~ ...
Page 1316 of 4378
Install the oil pump screen cover and tube.
26. NOTE: If not secured within four minutes, sealant must be removed and sealing area cleaned
with metal surface cleaner. Allow to dry until there are no signs of wetness, or four minutes,
whichever is longer. Failure to follow this procedure can cause future oil leakage.
If the retainer plate was removed, apply a 4 mm (0.16 in) bead of silicone gasket and sealant
around the rear oil seal retainer sealing surface.
27. Install the rear main seal retainer plate. Tighten the bolts in the sequence shown. �zTighten bolts 1- 6 to 10 Nm (89 lb- in).
�z Hand- tighten bolts 7 and 8.
�z Tighten bolts 7 and 8 to 20 Nm (15 lb- ft).
�z Tighten bolts 7 and 8 an additional 60 degrees.
28. Install the oil pan and gasket and loosely install the bolts. �K�l�j . 12 �b�a
362003 Mustang Workshop Manual
17. 11. 2011file:///C:/Ford/2000 - 2004/tsocache/SHEF_4464/S3B~us~en~ ...