Page 189 of 256
•Do not spray a hot engine with cold water to
avoid cracking the engine block or other engine
components.
•Spray Motorcraft Engine Shampoo and Degreaser
(ZC-20) on all parts that require cleaning and
pressure rinse clean.
•Cover the highlighted areas to prevent water
damage when cleaning the engine.
•3.8L OHV V6 engine
•4.6L SOHC V8 engine
•Never wash or rinse the engine while it is
running; water in the running engine may cause
internal damage.
Cleaning
189
Page 195 of 256
2. Turn off the engine and remove the key.
3. Block the wheels to prevent the vehicle from
moving unexpectedly.
•Manual transmission:
1. Set the parking brake.
2. Depress the clutch and place the gearshift in 1
(First).
3. Turn off the engine and remove the key.
4. Block the wheels to prevent the vehicle from
moving unexpectedly.
Working with the engine on
•Automatic transmission:
1. Set the parking brake and ensure the gearshift is
securely latched in P (Park).
2. Block the wheels to prevent the vehicle from
moving unexpectedly.
Note:Do not start your engine with the air cleaner
removed and do not remove it while the engine is
running.
•Manual transmission:
1. Set the parking brake, depress the clutch and
place the gearshift in neutral.
2. Block the wheels to prevent the vehicle from
moving unexpectedly.
Note:Do not start your engine with the air cleaner
removed and do not remove it while the engine is
running.
The cooling fan is automatic and may come
on at any time. Always disconnect the
negative terminal of the battery before working
near the fan.
Maintenance and Specifications
195
Page 201 of 256
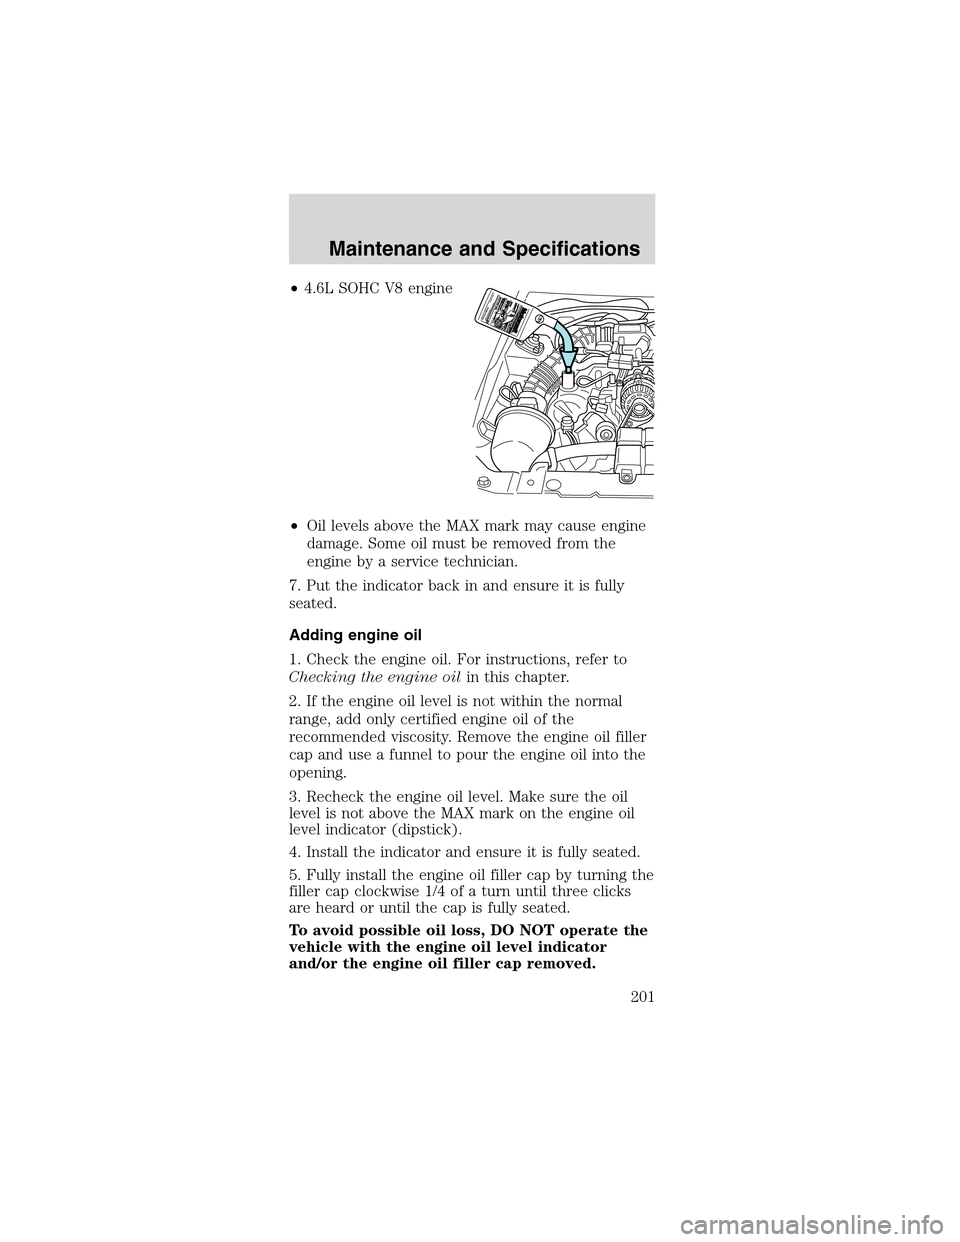
•4.6LSOHCV8 engine
•Oil levels above the MAX mark may cause engine
damage. Some oil must be removed from the
engine by a service technician.
7. Put the indicator back in and ensure it is fully
seated.
Adding engine oil
1. Check the engine oil. For instructions, refer to
Checking the engine oilin this chapter.
2. If the engine oil level is not within the normal
range, add only certified engine oil of the
recommended viscosity. Remove the engine oil filler
cap and use a funnel to pour the engine oil into the
opening.
3. Recheck the engine oil level. Make sure the oil
level is not above the MAX mark on the engine oil
level indicator (dipstick).
4. Install the indicator and ensure it is fully seated.
5. Fully install the engine oil filler cap by turning the
filler cap clockwise 1/4 of a turn until three clicks
are heard or until the cap is fully seated.
To avoid possible oil loss, DO NOT operate the
vehicle with the engine oil level indicator
and/or the engine oil filler cap removed.
Maintenance and Specifications
201
Page 205 of 256

3. Run the engine until it reaches normal operating
temperature.
4. Allow the engine to idle for at least one minute.
5. Turn the A/C on and allow the engine to idle for
at least one minute.
6. Drive the vehicle to complete the relearning
process.
•The vehicle may need to be driven 16 km (10
miles) or more to relearn the idle and fuel trim
strategy.
•If you do not allow the engine to relearn its
idle trim, the idle quality of your vehicle may
be adversely affected until the idle trim is
eventually relearned.
When the battery is disconnected or a new battery
installed, the transmission must relearn its adaptive
strategy. As a result of this, the transmission may
shift firmly. This operation is considered normal and
will not affect function or durability of the
transmission. Over time the adaptive learning
process will fully update transmission operation to
its optimum shift feel.
If the battery has been disconnected or a new
battery has been installed, the clock and the preset
radio stations must be reset once the battery is
reconnected.
•Always dispose of
automotive batteries
in a responsible
manner. Follow your
local authorized
standards for
disposal. Call your
local authorized
recycling center to find out more about recycling
automotive batteries.
LEAD
RETURN
RECYCLE
Maintenance and Specifications
205
Page 209 of 256
water as soon as possible. Water alone (without
engine coolant) can cause engine damage from
corrosion, overheating or freezing.
•Do not use alcohol, methanol or brine or any
engine coolants mixed with alcohol or
methanol antifreeze (coolant).Alcohol and
other liquids can cause engine damage from
overheating or freezing.
•Do not add extra inhibitors or additives to
the coolant.These can be harmful and
compromise the corrosion protection of the
engine coolant.
•Do not mix with recycled coolant unless from
a Ford-approved recycling process (seeUse of
Recycled Engine Coolantsection).
To reduce the risk of personal injury, make
sure the engine is cool before unscrewing
the coolant pressure relief cap. The cooling system
is under pressure; steam and hot liquid can come
out forcefully when the cap is loosened slightly.
If you must remove the pressure relief cap or
radiator cap (depending upon engine application),
follow these steps to avoid personal injury:
1. Before you remove the cap, turn the engine off
and let it cool.
2. When the engine is cool, wrap a thick cloth
around the cap. Slowly turn cap counterclockwise
until pressure begins to release.
3. Step back while the pressure releases.
4. When you are sure that all the pressure has been
released, use the cloth to turn it counterclockwise
and remove the cap.
Engine coolant refill procedure-3.8L V6 engine
Note:Use the following procedure when refilling the
cooling system of a vehicle equipped with a 3.8L V6
engine. Failure to follow this warning may result in
damage to the engine and engine cooling system.
Maintenance and Specifications
209
Page 216 of 256
Usethe following guidelines to avoid static build-up
when filling an ungrounded fuel container:
•Place approved fuel container on the ground.
•DO NOT fill a fuel container while it is in the
vehicle (including the cargo area).
•Keep the fuel pump nozzle in contact with the
fuel container while filling.
•DO NOT use a device that would hold the fuel
pump handle in the fill position.
Fuel Filler Cap
Your fuel tank filler cap has an indexed design with
a 1/8 turn on/off feature.
When fueling your vehicle:
1. Turn the engine off.
2. Carefully turn the filler cap counterclockwise 1/8
of a turn until it stops.
3. Pull to remove the cap from the fuel filler pipe.
4. To install the cap, align the tabs on the cap with
the notches on the filler pipe.
5. Turn the filler cap clockwise 1/8 of a turn until it
stops.
“Check Fuel Cap”illuminates when the ignition is
turned to the ON position to ensure your bulb is
working. When this light turns on, check the fuel
filler cap. Continuing to operate the vehicle with the
Check Fuel Cap light on, can activate the Service
Engine Soon warning. When the fuel filler cap is
properly re-installed, the light(s) will turn off after a
period of normal driving.It may take a long
period of time for the system to detect an
improperly installed fuel filler cap.
If you must replace the fuel filler cap, replace
it with a fuel filler cap that is designed for
your vehicle. The customer warranty may be
void for any damage to the fuel tank or fuel
system if the correct genuine Ford or
Motorcraft fuel filler cap is not used.
Maintenance and Specifications
216
Page 241 of 256
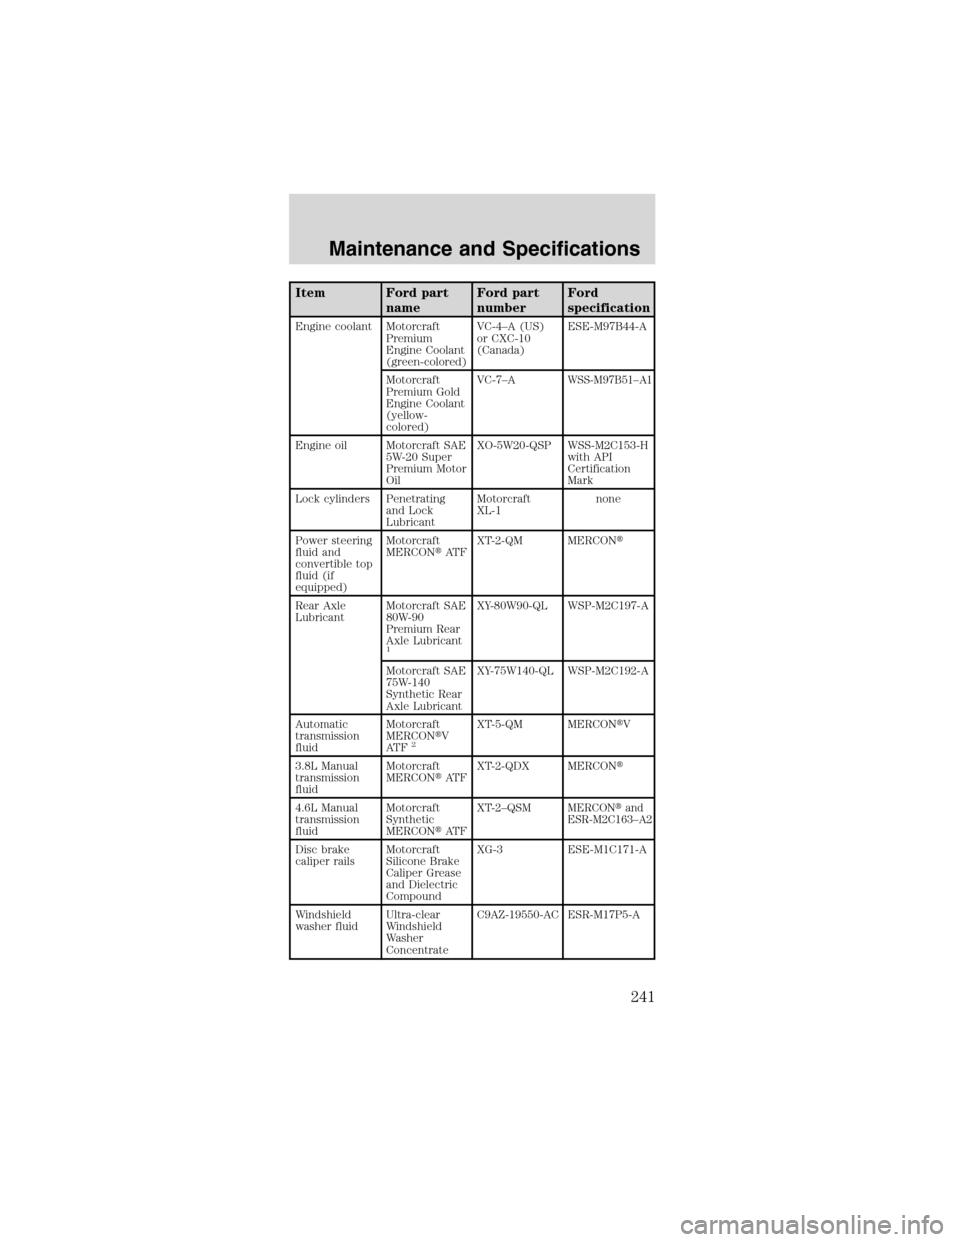
Item Ford part
nameFord part
numberFord
specification
Engine coolant Motorcraft
Premium
Engine Coolant
(green-colored)VC-4–A(US)
or CXC-10
(Canada)ESE-M97B44-A
Motorcraft
Premium Gold
Engine Coolant
(yellow-
colored)VC-7–A
WSS-M97B51–A1
Engine oil Motorcraft SAE
5W-20 Super
Premium Motor
OilXO-5W20-QSP WSS-M2C153-H
with API
Certification
Mark
Lock cylinders Penetrating
and Lock
LubricantMotorcraft
XL-1none
Power steering
fluid and
convertible top
fluid (if
equipped)Motorcraft
MERCON�AT FXT-2-QM MERCON�
Rear Axle
LubricantMotorcraft SAE
80W-90
Premium Rear
Axle Lubricant
1
XY-80W90-QL WSP-M2C197-A
Motorcraft SAE
75W-140
Synthetic Rear
Axle LubricantXY-75W140-QL WSP-M2C192-A
Automatic
transmission
fluidMotorcraft
MERCON�V
AT F
2
XT-5-QM MERCON�V
3.8L Manual
transmission
fluidMotorcraft
MERCON�AT FXT-2-QDX MERCON�
4.6L Manual
transmission
fluidMotorcraft
Synthetic
MERCON�AT FXT-2–QSM
MERCON�and
ESR-M2C163–A2
Disc brake
caliper railsMotorcraft
Silicone Brake
Caliper Grease
and Dielectric
CompoundXG-3 ESE-M1C171-A
Windshield
washer fluidUltra-clear
Windshield
Washer
ConcentrateC9AZ-19550-AC ESR-M17P5-A
Maintenance and Specifications
241
Page 244 of 256
Vehicle identification number (VIN)
The vehicle
identification number is
attached to a metal tag
and is located on the
driver side instrument
panel. (Please note
that in the graphic
XXXX is representative
of your vehicle
identification number.)
Engine number
The engine number (the last eight numbers of the
vehicle identification number) is stamped on the
engine block and transmission.
XXXXXXXXXXXXXXXXX
Maintenance and Specifications
244