Page 38 of 272
Replacing the interior bulbs
Check the operation of the bulbs frequently. To replace any of the
interior bulbs, see a dealer or qualified technician.
Using the right bulbs
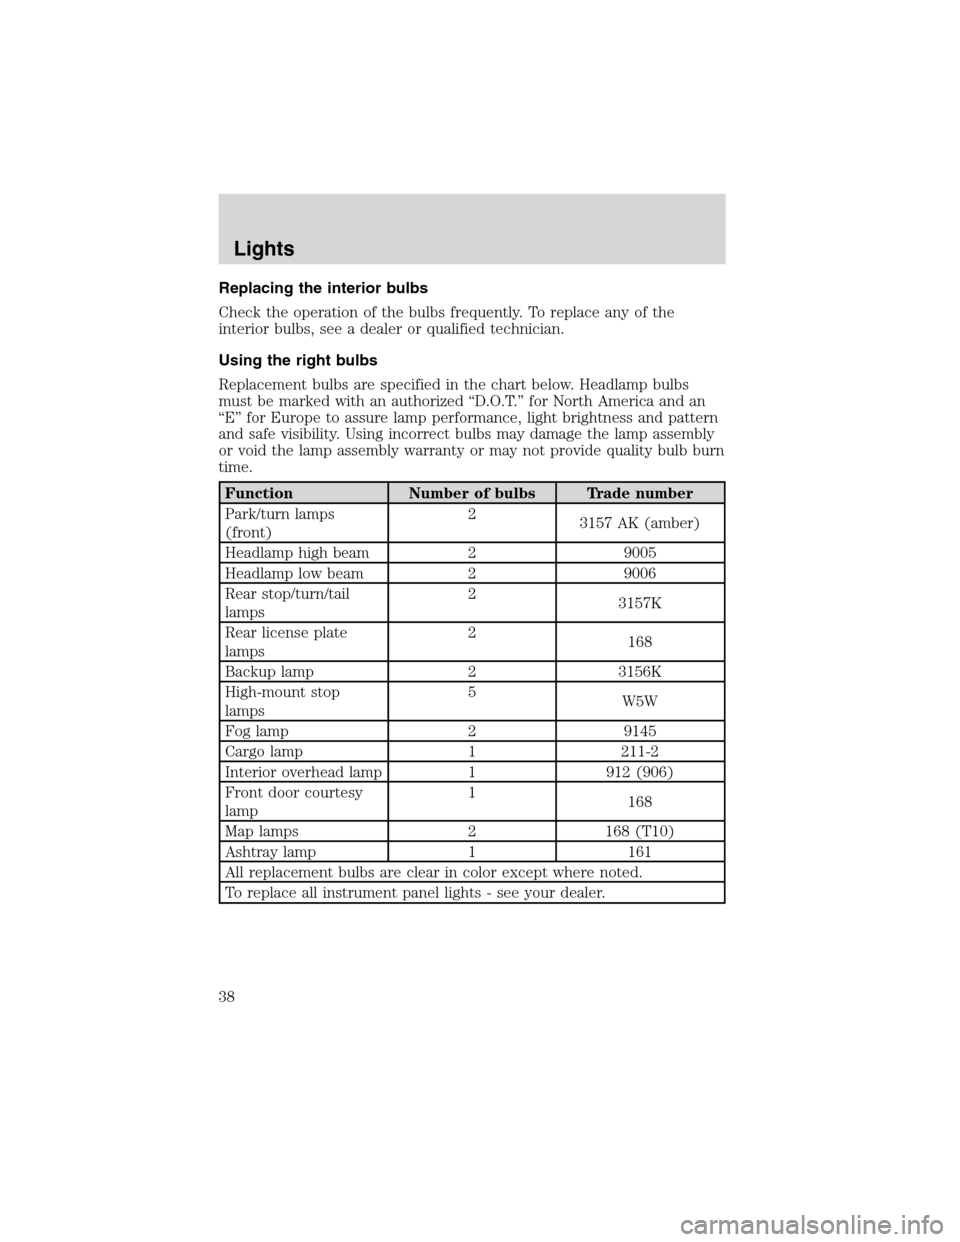
Replacement bulbs are specified in the chart below. Headlamp bulbs
must be marked with an authorized“D.O.T.”for North America and an
“E”for Europe to assure lamp performance, light brightness and pattern
and safe visibility. Using incorrect bulbs may damage the lamp assembly
or void the lamp assembly warranty or may not provide quality bulb burn
time.
Function Number of bulbs Trade number
Park/turn lamps
(front)2
3157 AK (amber)
Headlamp high beam 2 9005
Headlamp low beam 2 9006
Rear stop/turn/tail
lamps2
3157K
Rear license plate
lamps2
168
Backup lamp 2 3156K
High-mount stop
lamps5
W5W
Fog lamp 2 9145
Cargo lamp 1 211-2
Interior overhead lamp 1 912 (906)
Front door courtesy
lamp1
168
Map lamps 2 168 (T10)
Ashtray lamp 1 161
All replacement bulbs are clear in color except where noted.
To replace all instrument panel lights - see your dealer.
Lights
38
Page 86 of 272
engine. If a problem occurs, turn the ignition off, remove all objects on
the key chain away from the coded key and restart the engine.
Theft indicator
The theft indicator is located on top of the instrument panel.
•When the ignition is in the OFF position, the indicator will flash once
every 2 seconds to indicate the SecuriLock�system is functioning as
a theft deterrent.
•When the ignition is in the RUN position, the indicator will glow for 3
seconds to indicate normal system functionality.
If a problem occurs with the SecuriLock�system, the indicator will flash
rapidly or glow steadily when the ignition is in the RUN position. If this
occurs, the vehicle should be taken to an authorized dealer for service.
Automatic arming
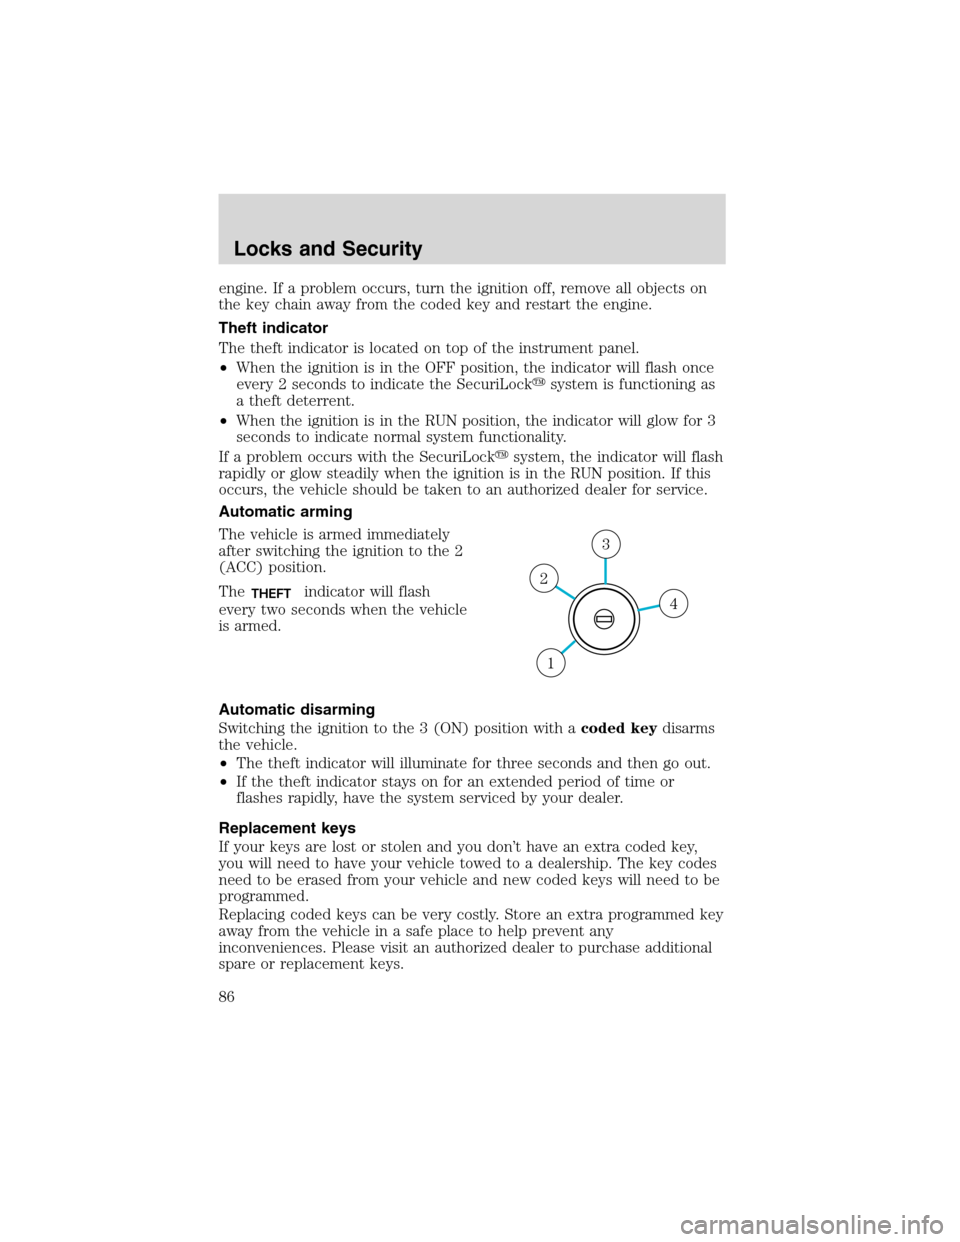
The vehicle is armed immediately
after switching the ignition to the 2
(ACC) position.
The
THEFTindicator will flash
every two seconds when the vehicle
is armed.
Automatic disarming
Switching the ignition to the 3 (ON) position with acoded keydisarms
the vehicle.
•The theft indicator will illuminate for three seconds and then go out.
•If the theft indicator stays on for an extended period of time or
flashes rapidly, have the system serviced by your dealer.
Replacement keys
If your keys are lost or stolen and you don’t have an extra coded key,
you will need to have your vehicle towed to a dealership. The key codes
need to be erased from your vehicle and new coded keys will need to be
programmed.
Replacing coded keys can be very costly. Store an extra programmed key
away from the vehicle in a safe place to help prevent any
inconveniences. Please visit an authorized dealer to purchase additional
spare or replacement keys.4
3
2
1
Locks and Security
86
Page 141 of 272

indicator light in the instrument cluster remains on while the engine is
running, have the system serviced immediately.
Pressing the control once will disable the AdvanceTrac�stability
enhancement and the engine power reduction portion of the traction
enhancement feature; the brake portion of the traction enhancement
feature will still function normally. Pressing and holding the control for
more than five seconds will disable the AdvanceTrac�stability
enhancementandtraction enhancement feature. If the vehicle is stuck
in snow or mud or when driving in deep sand, switching off the
AdvanceTrac�system may be beneficial so the wheels are allowed to
spin. If your vehicle seems to lose engine power while driving in deep
sand or very deep snow, switching off the AdvanceTrac�stability
enhancement feature will restore full engine power and will enhance
momentum through the obstacle.
Some drivers may notice a slight movement of the brake pedal when the
AdvanceTrac�performs a system self-check. During AdvanceTrac�
operation you may experience the following:
•A rumble or grinding noise
•A slight deceleration of the vehicle
•The AdvanceTrac�indicator light will flash
•If your foot is on the brake pedal, you will feel a vibration in the
pedal.
•If the driving condition is severe and your foot is not on the brake, the
brake pedal will move to apply higher brake forces. You may also hear
a whoosh of air from under the instrument panel during this severe
condition.
All these conditions are normal during AdvanceTrac�operation.
Do not alter or modify your vehicle’s suspension or steering; the
resulting changes to the vehicle’s handling can adversely affect
the AdvanceTrac�system. Also, do not install a stereo
loudspeaker near the rear console or either rear seat. The
speaker vibrations can adversely affect the AdvanceTrac�
sensors located in this area.
Aggressive driving in any road conditions can cause you to lose
control of your vehicle increasing the risk of severe personal
injury or property damage. The occurrence of an AdvanceTrac�event
is an indication that at least some of the tires have exceeded their
ability to grip the road; this may lead to an increased risk of loss of
vehicle control, vehicle rollover, personal injury and death. If you
experience a severe road event, SLOW DOWN.
Driving
141
Page 149 of 272
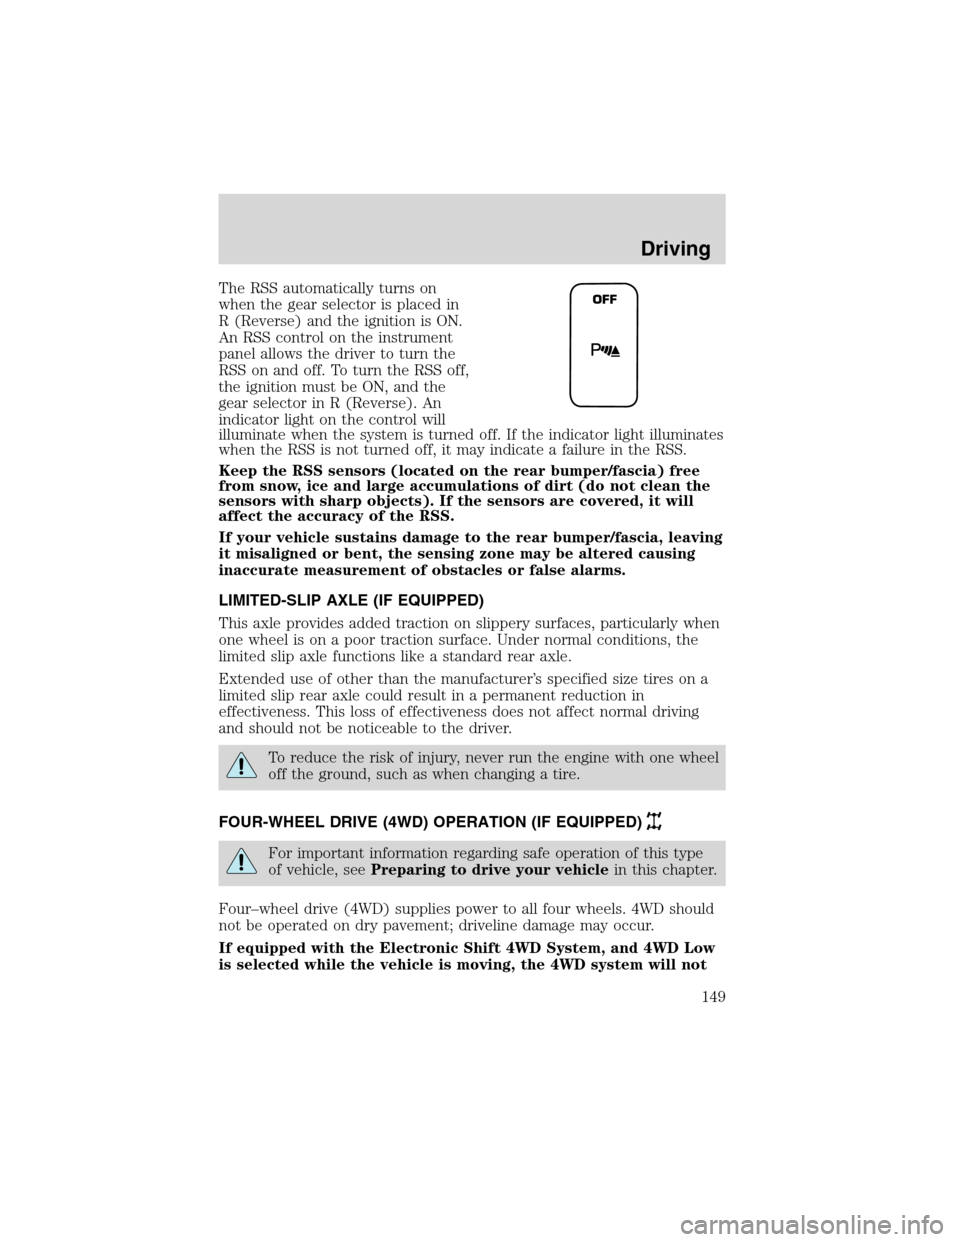
The RSS automatically turns on
when the gear selector is placed in
R (Reverse) and the ignition is ON.
An RSS control on the instrument
panel allows the driver to turn the
RSS on and off. To turn the RSS off,
the ignition must be ON, and the
gear selector in R (Reverse). An
indicator light on the control will
illuminate when the system is turned off. If the indicator light illuminates
when the RSS is not turned off, it may indicate a failure in the RSS.
Keep the RSS sensors (located on the rear bumper/fascia) free
from snow, ice and large accumulations of dirt (do not clean the
sensors with sharp objects). If the sensors are covered, it will
affect the accuracy of the RSS.
If your vehicle sustains damage to the rear bumper/fascia, leaving
it misaligned or bent, the sensing zone may be altered causing
inaccurate measurement of obstacles or false alarms.
LIMITED-SLIP AXLE (IF EQUIPPED)
This axle provides added traction on slippery surfaces, particularly when
one wheel is on a poor traction surface. Under normal conditions, the
limited slip axle functions like a standard rear axle.
Extended use of other than the manufacturer’s specified size tires on a
limited slip rear axle could result in a permanent reduction in
effectiveness. This loss of effectiveness does not affect normal driving
and should not be noticeable to the driver.
To reduce the risk of injury, never run the engine with one wheel
off the ground, such as when changing a tire.
FOUR-WHEEL DRIVE (4WD) OPERATION (IF EQUIPPED)
For important information regarding safe operation of this type
of vehicle, seePreparing to drive your vehiclein this chapter.
Four–wheel drive (4WD) supplies power to all four wheels. 4WD should
not be operated on dry pavement; driveline damage may occur.
If equipped with the Electronic Shift 4WD System, and 4WD Low
is selected while the vehicle is moving, the 4WD system will not
OFF
Driving
149
Page 180 of 272
Passenger compartment fuse panel
The fuse panel is located below the
instrument panel on the driver’s
side.
To remove a fuse use the fuse puller tool provided on the fuse panel box.
161621 26
27
28
29
30 22
23
24
25 17
18
19
20 7
8
9
10
11
12
13
14
15 2
3
4
5
Roadside Emergencies
180
Page 181 of 272
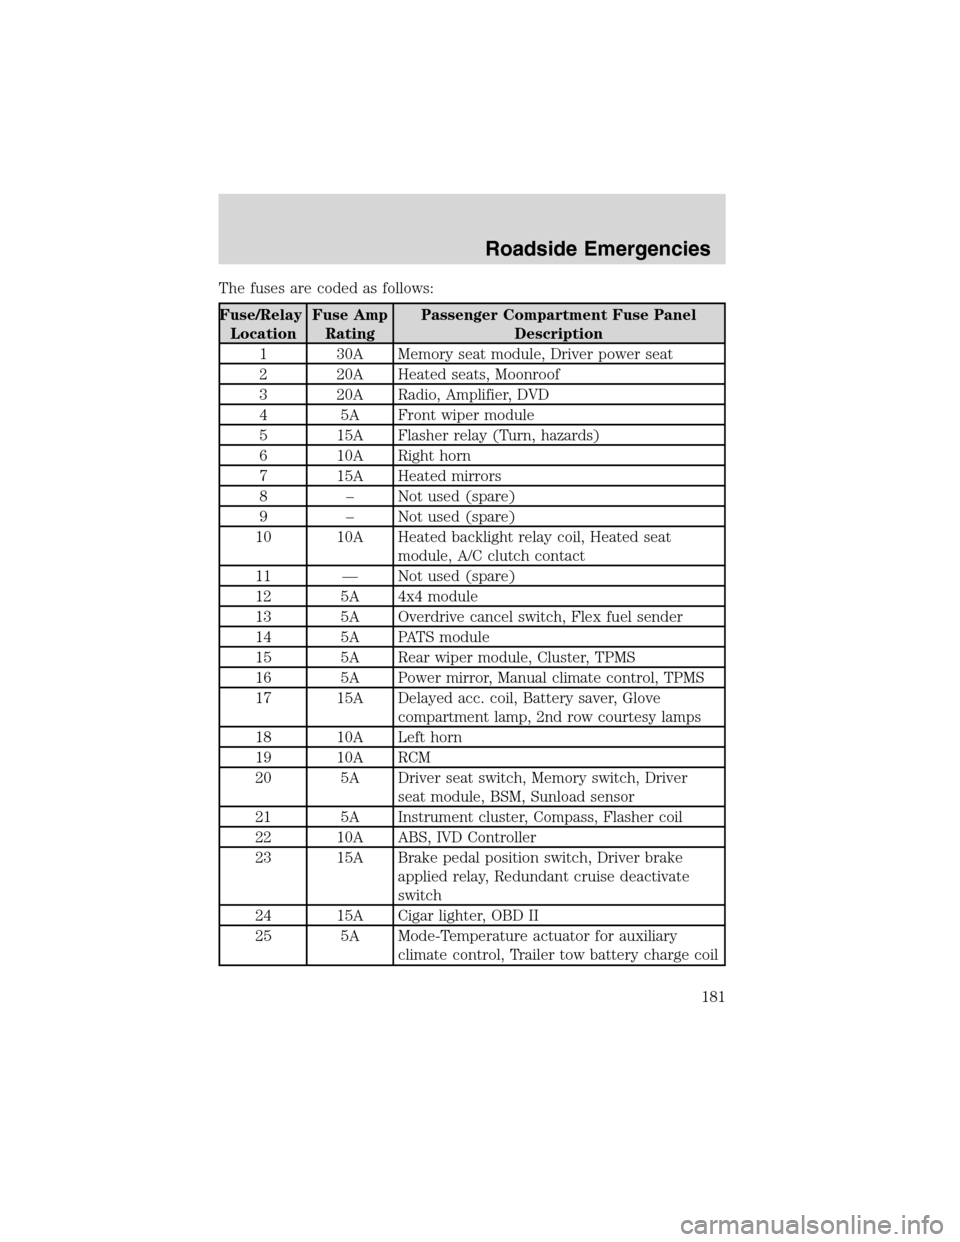
The fuses are coded as follows:
Fuse/Relay
LocationFuse Amp
RatingPassenger Compartment Fuse Panel
Description
1 30A Memory seat module, Driver power seat
2 20A Heated seats, Moonroof
3 20A Radio, Amplifier, DVD
4 5A Front wiper module
5 15A Flasher relay (Turn, hazards)
6 10A Right horn
7 15A Heated mirrors
8–Not used (spare)
9–Not used (spare)
10 10A Heated backlight relay coil, Heated seat
module, A/C clutch contact
11—Not used (spare)
12 5A 4x4 module
13 5A Overdrive cancel switch, Flex fuel sender
14 5A PATS module
15 5A Rear wiper module, Cluster, TPMS
16 5A Power mirror, Manual climate control, TPMS
17 15A Delayed acc. coil, Battery saver, Glove
compartment lamp, 2nd row courtesy lamps
18 10A Left horn
19 10A RCM
20 5A Driver seat switch, Memory switch, Driver
seat module, BSM, Sunload sensor
21 5A Instrument cluster, Compass, Flasher coil
22 10A ABS, IVD Controller
23 15A Brake pedal position switch, Driver brake
applied relay, Redundant cruise deactivate
switch
24 15A Cigar lighter, OBD II
25 5A Mode-Temperature actuator for auxiliary
climate control, Trailer tow battery charge coil
Roadside Emergencies
181
Page 213 of 272
•If tar or grease spots are present, use Ford Extra Strength Tar and
Road Oil Removal (B7A-19520–AA).
WINDOWS AND WIPER BLADES
The windshield, rear window and wiper blades should be cleaned
regularly. If the wiper does not wipe properly, substances on the
windshield, rear window or the wiper blades may be the cause. These
may include hot wax treatments used by commercial car washes, tree
sap, or other organic contamination. To clean these items, please follow
these tips:
•The windshield or rear window may be cleaned with a non-abrasive
cleaner such as Motorcraft Ultra Clear Spray Glass Cleaner (ZC-23),
available from your dealer.
•Do not use abrasives, as they may cause scratches.
•Do not use fuel, kerosene, or paint thinner to clean any parts.
•Wiper blades can be cleaned with isopropyl (rubbing) alcohol or
windshield washer solution. Be sure to replace wiper blades when they
appear worn or do not function properly.
INSTRUMENT PANEL AND CLUSTER LENS
Clean the instrument panel with a damp cloth, then dry with a dry cloth.
•Avoid cleaners or polish that increase the gloss of the upper portion of
the instrument panel. The dull finish in this area helps protect the
driver from undesirable windshield reflection.
Do not use chemical solvents or strong detergents when cleaning
the steering wheel or instrument panel to avoid contamination of
the air bag system.
•Be certain to wash or wipe your hands clean if you have been in
contact with certain products such as insect repellent and suntan
lotion in order to avoid possible damage to the painted surfaces.
INTERIOR TRIM
•Clean the interior trim areas with a damp cloth, then dry by wiping
with a dry, soft, clean cloth.
•Do not use household or glass cleaners as these may damage the
finish.
INTERIOR
For fabric, carpets, cloth seats and safety belts:
•Remove dust and loose dirt with a vacuum cleaner.
Cleaning
213
Page 217 of 272
OPENING THE HOOD
1. Inside the vehicle, pull the hood
release handle located under the
bottom left corner of the instrument
panel.
Maintenance and Specifications
217