2003 FORD EXPEDITION heater
[x] Cancel search: heaterPage 113 of 320
Compass zone adjustment
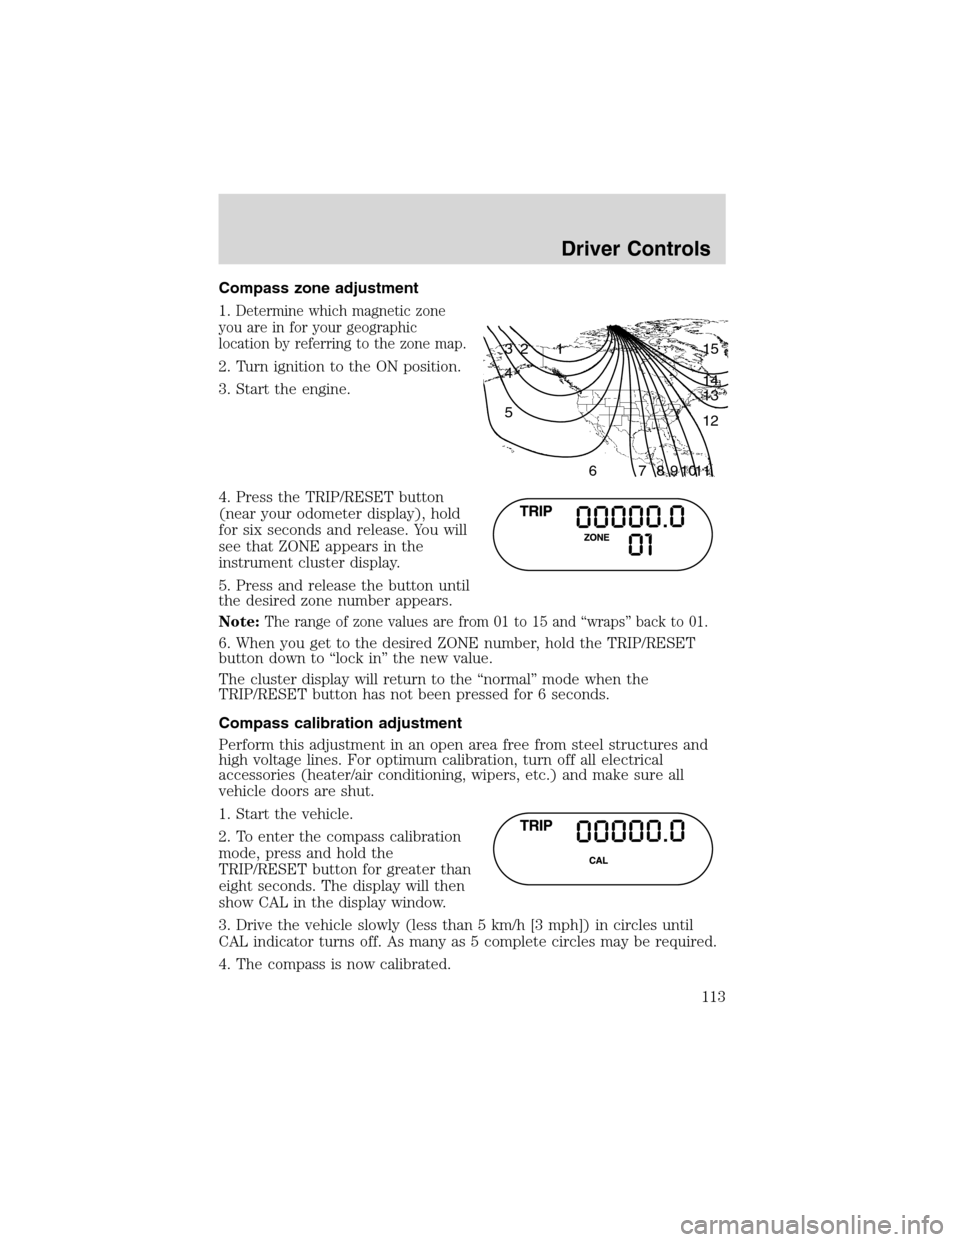
1.
Determine which magnetic zone
you are in for your geographic
location by referring to the zone map.
2. Turn ignition to the ON position.
3. Start the engine.
4. Press the TRIP/RESET button
(near your odometer display), hold
for six seconds and release. You will
see that ZONE appears in the
instrument cluster display.
5. Press and release the button until
the desired zone number appears.
Note:
The range of zone values are from 01 to 15 and“wraps”back to 01.
6. When you get to the desired ZONE number, hold the TRIP/RESET
button down to“lock in”the new value.
The cluster display will return to the“normal”mode when the
TRIP/RESET button has not been pressed for 6 seconds.
Compass calibration adjustment
Perform this adjustment in an open area free from steel structures and
high voltage lines. For optimum calibration, turn off all electrical
accessories (heater/air conditioning, wipers, etc.) and make sure all
vehicle doors are shut.
1. Start the vehicle.
2. To enter the compass calibration
mode, press and hold the
TRIP/RESET button for greater than
eight seconds. The display will then
show CAL in the display window.
3. Drive the vehicle slowly (less than 5 km/h [3 mph]) in circles until
CAL indicator turns off. As many as 5 complete circles may be required.
4. The compass is now calibrated.
1 2 3
4
5
6 7 8 9 101112 13 14 15
Driver Controls
113
Page 115 of 320
Usually, when something affects the compass readings, the compass will
correct itself after a few days of operating your vehicle in normal
conditions. If the compass still appears to be inaccurate, a manual
calibration may be necessary. Refer toCompass zone/calibration
adjustment.
Most geographic areas (zones) have a magnetic north compass point that
varies slightly from the northerly direction on maps. This variation is four
degrees between adjacent zones and will become noticeable as the
vehicle crosses multiple zones. A correct zone setting will eliminate this
error. Refer toCompass zone/calibration adjustment.
Compass zone/calibration adjustment
For optimum calibration, turn off all electrical accessories (heater/air
conditioning, wipers, etc.) and make sure all vehicle doors are shut.
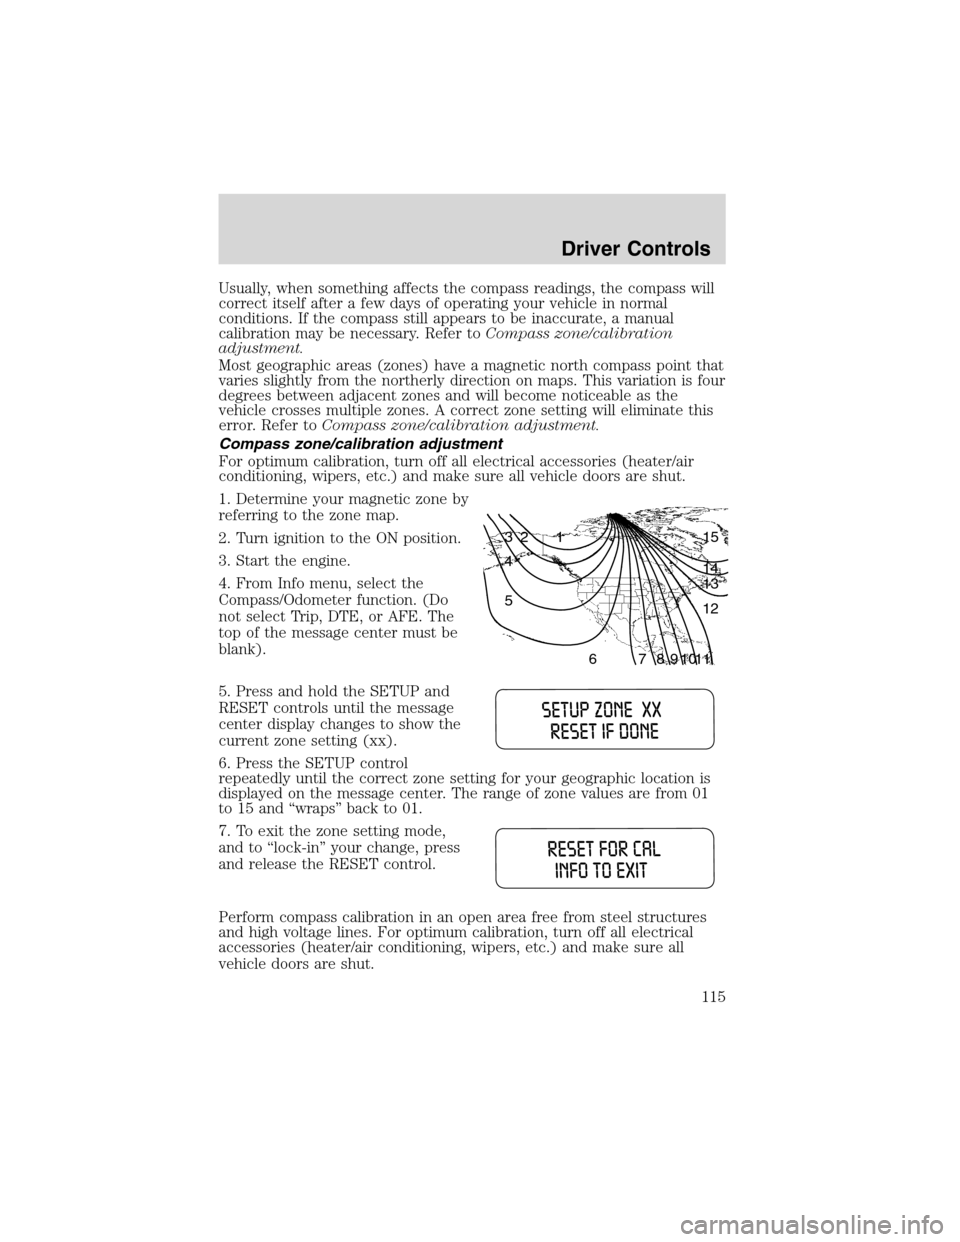
1. Determine your magnetic zone by
referring to the zone map.
2. Turn ignition to the ON position.
3. Start the engine.
4. From Info menu, select the
Compass/Odometer function. (Do
not select Trip, DTE, or AFE. The
top of the message center must be
blank).
5. Press and hold the SETUP and
RESET controls until the message
center display changes to show the
current zone setting (xx).
6. Press the SETUP control
repeatedly until the correct zone setting for your geographic location is
displayed on the message center. The range of zone values are from 01
to 15 and“wraps”back to 01.
7. To exit the zone setting mode,
and to‘‘lock-in’’your change, press
and release the RESET control.
Perform compass calibration in an open area free from steel structures
and high voltage lines. For optimum calibration, turn off all electrical
accessories (heater/air conditioning, wipers, etc.) and make sure all
vehicle doors are shut.
1 2 3
4
5
6 7 8 9 101112 13 14 15
Driver Controls
115
Page 194 of 320
3. If the temperature is below -12°C (10°F) and the engine does not
start in 15 seconds on the first try, turn the key OFF and wait 10
seconds and try again. If the engine does not start in two attempts, press
the accelerator pedal all the way to floor and hold. Turn the key to
START position.
4. When the engine starts, release the key, then release the accelerator
pedal gradually as the engine speeds up.
5. After idling for a few seconds, apply the brake, shift into gear and
drive.
Using the engine block heater (if equipped)
Use of an engine block heater is strongly recommended if you live in a
region where temperatures reach -23°C (-10°F) or below. For best
results, plug the heater in at least three hours before starting the vehicle.
The heater can be plugged in the night before starting the vehicle.
To prevent electrical shock, do not use your heater with
ungrounded electrical systems or two-pronged (cheater)
adapters.
Guarding against exhaust fumes
Carbon monoxide is present in exhaust fumes. Take precautions to avoid
its dangerous effects.
If you smell exhaust fumes inside your vehicle, have your dealer
inspect your vehicle immediately. Do not drive if you smell
exhaust fumes.
WARNING:Engine exhaust, some of its constituents, and
certain vehicle components contain or emit chemicals known to
the State of California to cause cancer and birth defects or other
reproductive harm. In addition, certain fluids contained in vehicles and
certain products of component wear contain or emit chemicals known
to the State of California to cause cancer and birth defects or other
reproductive harm.
Important ventilating information
If the engine is idling while the vehicle is stopped for a long period of
time, open the windows at least 2.5 cm (one inch) or adjust the heating
or air conditioning to bring in fresh air.
Driving
194
Page 203 of 320
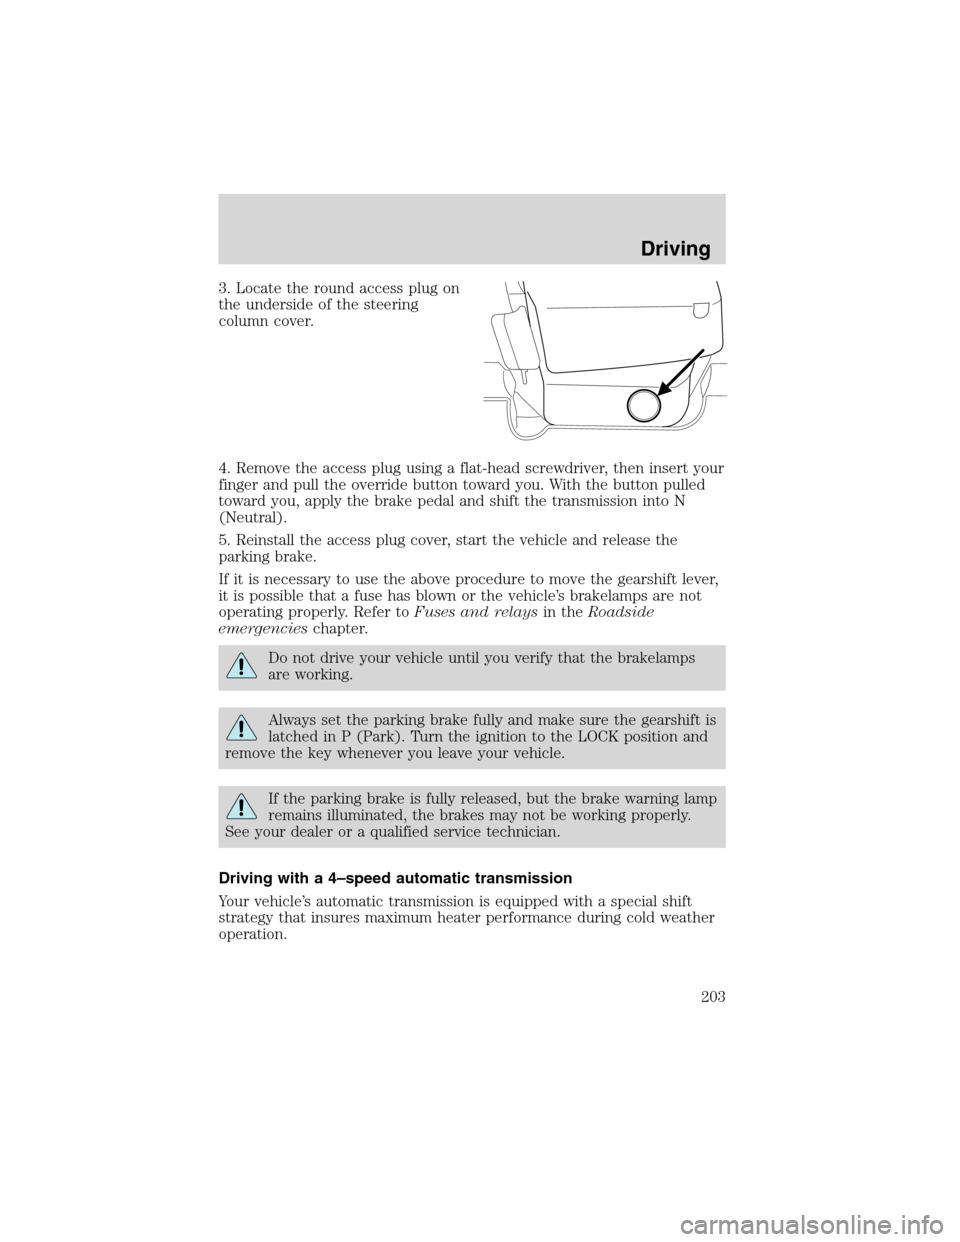
3. Locate the round access plug on
the underside of the steering
column cover.
4. Remove the access plug using a flat-head screwdriver, then insert your
finger and pull the override button toward you. With the button pulled
toward you, apply the brake pedal and shift the transmission into N
(Neutral).
5. Reinstall the access plug cover, start the vehicle and release the
parking brake.
If it is necessary to use the above procedure to move the gearshift lever,
it is possible that a fuse has blown or the vehicle’s brakelamps are not
operating properly. Refer toFuses and relaysin theRoadside
emergencieschapter.
Do not drive your vehicle until you verify that the brakelamps
are working.
Always set the parking brake fully and make sure the gearshift is
latched in P (Park). Turn the ignition to the LOCK position and
remove the key whenever you leave your vehicle.
If the parking brake is fully released, but the brake warning lamp
remains illuminated, the brakes may not be working properly.
See your dealer or a qualified service technician.
Driving with a 4–speed automatic transmission
Your vehicle’s automatic transmission is equipped with a special shift
strategy that insures maximum heater performance during cold weather
operation.
Driving
203
Page 242 of 320
Preparing your vehicle
When the battery is disconnected or a new battery is installed, the
transmission must relearn its shift strategy. As a result, the transmission
may have firm and/or soft shifts. This operation is considered normal and
will not affect function or durability of the transmission. Over time, the
adaptive learning process will fully update transmission operation.
1.Use only a 12–volt supply to start your vehicle.
2. Do not disconnect the battery of the disabled vehicle as this could
damage the vehicle’s electrical system.
3. Park the booster vehicle close to the hood of the disabled vehicle
making sure the two vehiclesdo nottouch. Set the parking brake on
both vehicles and stay clear of the engine cooling fan and other moving
parts.
4. Check all battery terminals and remove any excessive corrosion before
you attach the battery cables. Ensure that vent caps are tight and level.
5. Turn the heater fan on in both vehicles to protect any electrical
surges. Turn all other accessories off.
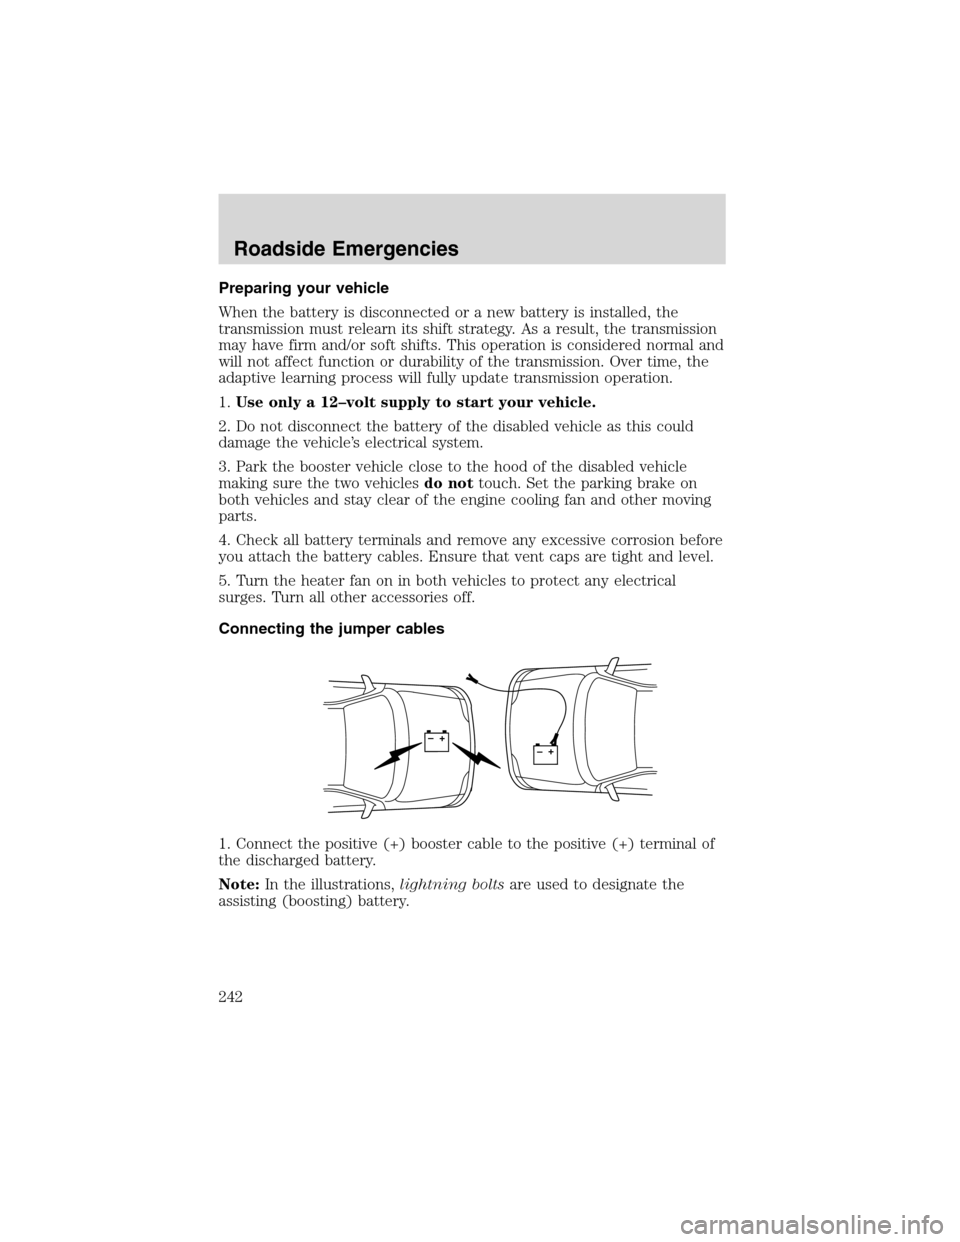
Connecting the jumper cables
1. Connect the positive (+) booster cable to the positive (+) terminal of
the discharged battery.
Note:In the illustrations,lightning boltsare used to designate the
assisting (boosting) battery.
+–+–
Roadside Emergencies
242
Page 309 of 320
FORD ACCESSORIES FOR YOUR VEHICLE
A wide selection of genuine Ford accessories are available for your
vehicle through your local authorized Ford, Lincoln, Mercury or Ford of
Canada dealer. These quality accessories have been specifically
engineered to fulfill your automotive needs; they are custom designed to
complement the style and aerodynamic appearance of your vehicle. In
addition, each accessory is made from high quality materials and meets
or exceeds Ford’s rigorous engineering and safety specifications. Ford
Motor Company will repair or replace any properly dealer-installed Ford
accessory found to be defective in factory-supplied materials or
workmanship during the warranty period, as well as any component
damaged by the defective accessory. The accessory will be warranted for
whichever provides you the greatest benefit:
•12 months or 20 000 km (12 000 miles) (whichever occurs first), or
•the remainder of your new vehicle limited warranty.
This means that genuine Ford accessories purchased along with your
new vehicle and installed by the dealer are covered for the full length of
your New Vehicle’s Limited Warranty—3 years or 60 000 km (36 000
miles) (whichever occurs first). Contact your dealer for details and a
copy of the warranty.
Not all accessories are available for all models.
Vehicle Security
Wheel protector locks
Vehicle security systems
Comfort and convenience
Battery warmer
Cargo organizers
Cargo trays
Carpeted cargo mat
Chrome running boards
Dash trim (wood grain)
Door edge edge guards
Engine block heaters
Rear seat entertainment system–DVD
Remote Start System
Accessories
309
Page 313 of 320
A
ABS (see Brakes) .....................195
Accessory delay ........................100
Air bag supplemental
restraint system ........168–169, 173
and child safety seats ............170
description ......................169, 173
disposal ....................................176
driver air bag ..................171, 174
indicator light ...........12, 172, 176
operation .........................171, 174
passenger air bag ...........171, 174
Air cleaner filter .......293–294, 300
Air conditioning ..........................72
auxiliary heater and air
conditioner ................................78
manual heating and air
conditioning system .................69
Air suspension
warning light .............................14
Antifreeze
(see Engine coolant) ................274
Anti-lock brake system
(see Brakes) ......................195–196
Armrests ....................................142
Audio system
(see Radio) ................19, 27, 37–38
Automatic transmission
driving an automatic
overdrive .................................203
fluid, adding ............................291
fluid, checking ........................291
fluid, refill capacities ..............300
fluid, specification ..................305
Auxiliary power point .................97Axle
lubricant
specifications ..................303, 305
refill capacities ........................300
B
Battery .......................................272
acid, treating emergencies .....272
charging system warning
light ............................................12
jumping a disabled battery ....241
maintenance-free ....................272
replacement, specifications ...300
servicing ..................................272
voltage gauge ............................16
BeltMinder .................................164
Brakes ........................................195
anti-lock ...........................195–196
anti-lock brake system
(ABS) warning light .........11, 196
brake warning light ..................11
fluid, checking and adding ....290
fluid, refill capacities ..............300
fluid, specifications .........303, 305
lubricant
specifications ..................303, 305
parking ....................................196
pedals (see Power
adjustable foot pedals) ..102, 125
shift interlock ..................202, 206
Break-in period .............................6
Bulbs ............................................86
C
Capacities for refilling fluids ....300
CD-6 disc .....................................38
CD-single premium ...............19, 27
Certification Label ....................307
Index
313
Page 315 of 320
cleaning ...................................260
coolant .....................................274
fail-safe coolant ......................279
idle speed control ...................272
lubrication
specifications ..................303, 305
refill capacities ........................300
service points ..................267–268
starting after a collision .........228
Engine block heater .................194
Engine oil ..................................269
change oil soon warning,
message center .......................269
checking and adding ..............269
dipstick ....................................269
filter, specifications ........271, 300
recommendations ...................271
refill capacities ........................300
specifications ..................303, 305
Exhaust fumes ..........................194
F
Fail safe cooling ........................279
Floor mats .................................126
Fluid capacities .........................300
Foglamps .....................................81
Four-Wheel Drive
vehicles ................................14, 208
control trac .............................208
description ..............................209
driving off road .......................211
electronic shift ........................210
indicator light .........................208
preparing to drive
your vehicle ............................198
Fuel ............................................280
calculating fuel
economy ..........................116, 285
cap ...........................................282capacity ...................................300
choosing the right fuel ...........283
comparisons with EPA
fuel economy estimates .........288
detergent in fuel .....................284
filling your vehicle
with fuel ..................280, 282, 285
filter, specifications ........284, 300
fuel pump shut-off switch .....228
gauge .........................................17
improving fuel economy ........285
low fuel warning light ..............12
octane rating ...................283, 305
quality ......................................284
running out of fuel .................284
safety information relating
to automotive fuels ................280
Fuses ..................................230–231
G
Garage door opener ..................108
Gas cap (see Fuel cap) ............282
Gas mileage
(see Fuel economy) .................285
Gauges .........................................15
battery voltage gauge ...............16
engine coolant temperature
gauge .........................................15
engine oil pressure gauge ........16
fuel gauge ..................................17
odometer ...................................17
speedometer .............................17
tachometer ................................18
trip odometer ............................18
GAWR (Gross Axle
Weight Rating) ..........................219
calculating ...............................221
definition .................................219
driving with a heavy load ......219
location ....................................219
Index
315