Page 10 of 184
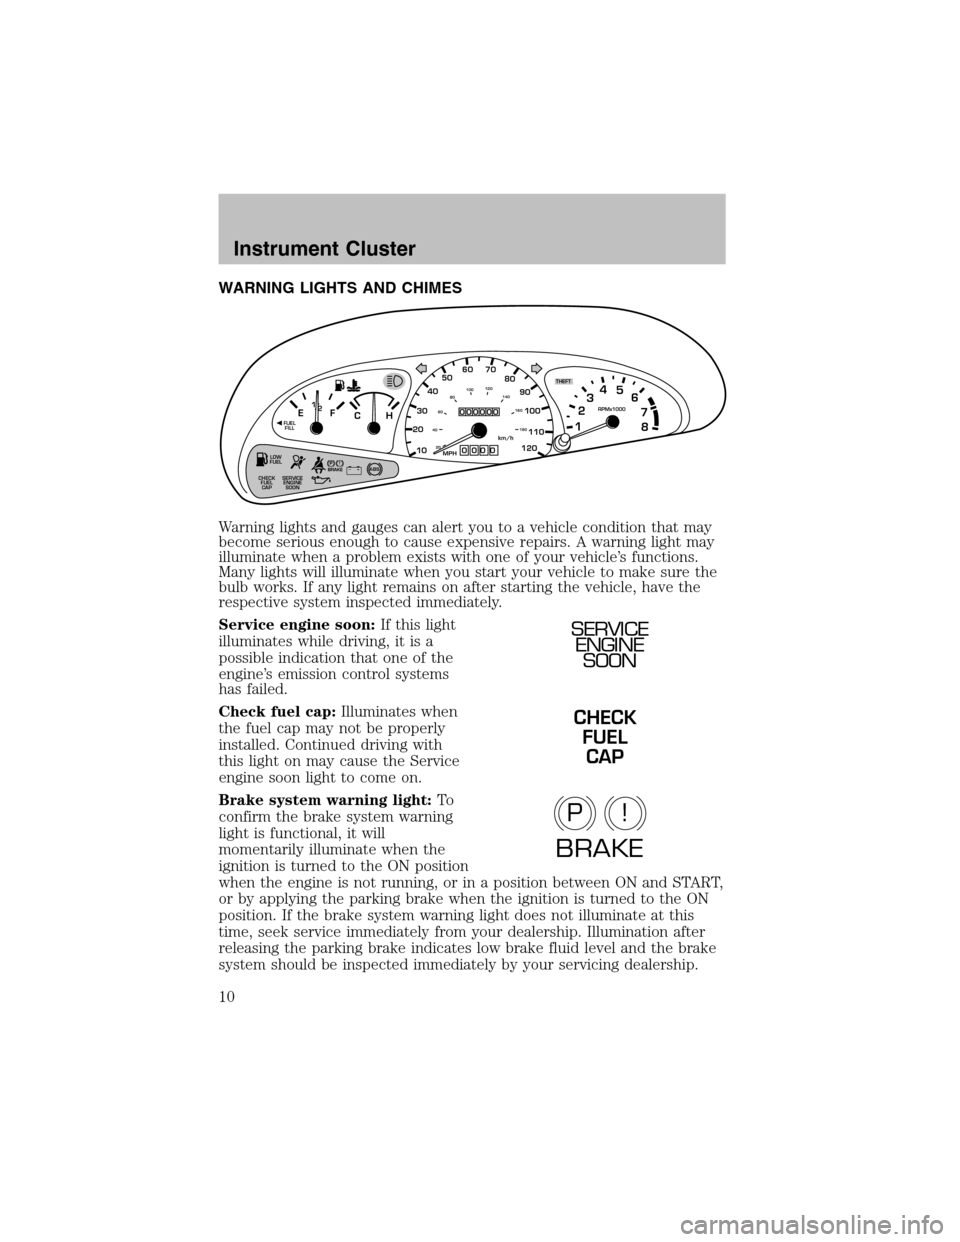
WARNING LIGHTS AND CHIMES
Warning lights and gauges can alert you to a vehicle condition that may
become serious enough to cause expensive repairs. A warning light may
illuminate when a problem exists with one of your vehicle’s functions.
Many lights will illuminate when you start your vehicle to make sure the
bulb works. If any light remains on after starting the vehicle, have the
respective system inspected immediately.
Service engine soon:If this light
illuminates while driving, it is a
possible indication that one of the
engine’s emission control systems
has failed.
Check fuel cap:Illuminates when
the fuel cap may not be properly
installed. Continued driving with
this light on may cause the Service
engine soon light to come on.
Brake system warning light:To
confirmthe brake systemwarning
light is functional, it will
momentarily illuminate when the
ignition is turned to the ON position
when the engine is not running, or in a position between ON and START,
or by applying the parking brake when the ignition is turned to the ON
position. If the brake systemwarning light does not illuminate at this
time, seek service immediately from your dealership. Illumination after
releasing the parking brake indicates low brake fluid level and the brake
system should be inspected immediately by your servicing dealership.
!
THEFT
LOW
FUEL
SERVICE
ENGINE
SOON CHECK
FUEL
CAP
PBRAKEABS+ –MPH
205060 70FUEL
FILLEF
CH1
2 /RPMx1000
1234
5
6
7
8
304080
90
100
110
120
10
20 406080100120
140
160
180km/h
0
000000
00 0
SERVICE
ENGINE
SOON
CHECK
FUEL
CAP
P!
BRAKE
Instrument Cluster
10
Page 11 of 184
Driving a vehicle with the brake systemwarning light on is
dangerous. A significant decrease in braking performance may
occur. It will take you longer to stop the vehicle. Have the vehicle
checked by your dealer immediately.
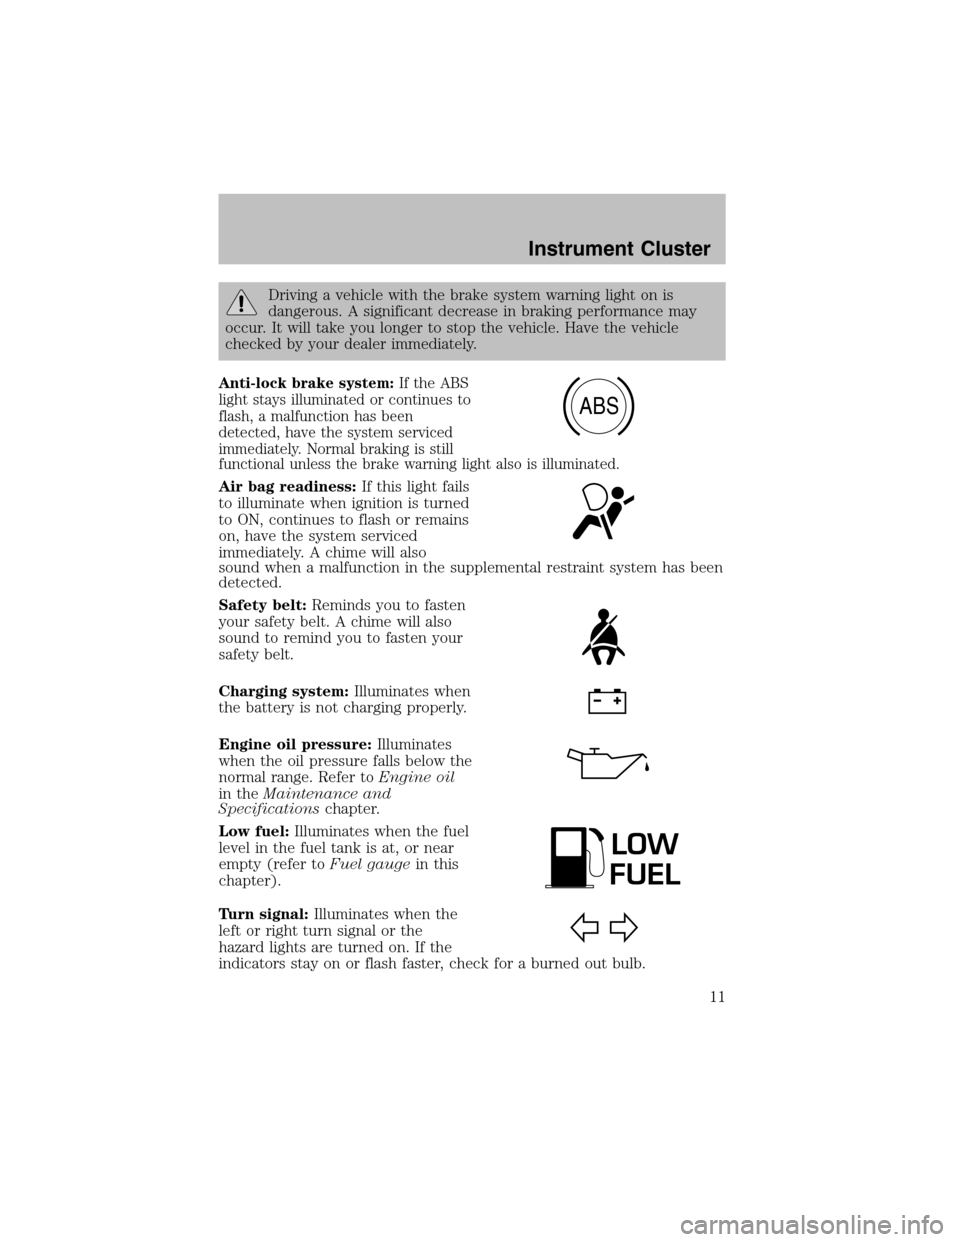
Anti-lock brake system:If the ABS
light stays illuminated or continues to
flash, a malfunction has been
detected, have the systemserviced
immediately. Normal braking is still
functional unless the brake warning light also is illuminated.
Air bag readiness:If this light fails
to illuminate when ignition is turned
to ON, continues to flash or remains
on, have the systemserviced
immediately. A chime will also
sound when a malfunction in the supplemental restraint system has been
detected.
Safety belt:Reminds you to fasten
your safety belt. A chime will also
sound to remind you to fasten your
safety belt.
Charging system:Illuminates when
the battery is not charging properly.
Engine oil pressure:Illuminates
when the oil pressure falls below the
normal range. Refer toEngine oil
in theMaintenance and
Specificationschapter.
Low fuel:Illuminates when the fuel
level in the fuel tank is at, or near
empty (refer toFuel gaugein this
chapter).
Turn signal:Illuminates when the
left or right turn signal or the
hazard lights are turned on. If the
indicators stay on or flash faster, check for a burned out bulb.
ABS
LOW
FUEL
Instrument Cluster
11
Page 12 of 184
High beams:Illuminates when the
high beamheadlamps are turned on.
Key-in-ignition warning chime:Sounds when the key is left in the
ignition in the OFF/LOCK or ACC position and the driver’s door is
opened.
Headlamps on warning chime:Sounds when the headlamps or parking
lamps are on, the ignition is off (and the key is not in the ignition) and
the driver’s door is opened.
GAUGES
Speedometer:Indicates the
current vehicle speed.
Engine coolant temperature
gauge:Indicates engine coolant
temperature. At normal operating
temperature, the needle will be in the
normal range (between “H” and “C”).
If it enters the red section, the engine
is overheating. Stop the vehicle as
soon as safely possible, switch off the engine and let the engine cool.
THEFT
LOW
FUEL
SERVICE
ENGINE
SOON CHECK
FUEL
CAP
ABS+ –MPH
205060 70FUEL
FILLEF
CH1
2 /RPMx1000
1234
5
6
7
8
304080
90
100
110
120
10
20 406080100120
140
160
180km/h
0
000000
000! PBRAKE
Instrument Cluster
12
Page 13 of 184
Never remove the coolant reservoir cap while the engine is
running or hot.
Fuel gauge:Indicates
approximately how much fuel is left
in the fuel tank (when the ignition
is in the ON position).
Odometer:Registers the total
kilometers (miles) of the vehicle.
Trip odometer:Registers the
kilometers (miles) of individual
journeys.
Tachometer:Indicates the engine
speed in revolutions per minute.
Driving with your tachometer
pointer continuously at the top of
the scale may damage the engine.
Instrument Cluster
13
Page 14 of 184
AM/FM STEREO/CASSETTE
Volume/power control
Press the control to turn the audio
systemon or off.
Turn control to raise or lower
volume.
If the volume is set above a certain level and the ignition is turned off,
the volume will come back on at a “nominal” listening level when the
ignition switch is turned back on. If you wish to maintain your preset
volume level, turn the audio system off with the power control before
switching off the ignition.
OFFR.DEFA/C
MAX
A/C HI
LO
TUNE SEEK
SCANAM
FM
1SIDE 1-223456
EJREW
FF
TAPE H
M
+
BAL
FADE
BASS
TREBDOLBY B NRVOL
PUSH ON
VOL
PUSH ON
VOL
PUSH ON
Entertainment Systems
14
Page 19 of 184
Dolby�noise reduction
Dolby�noise reduction operates
only in tape mode. Dolby�noise
reduction reduces the amount of
hiss and static during tape playback.
Press thecontrol to activate (and deactivate) Dolby�noise reduction.
Dolby�noise reduction manufactured under license from Dolby�
Laboratories Licensing Corporation. “Dolby�” and the double-D symbol
are registered trademarks of Dolby�Laboratories Licensing Corporation.
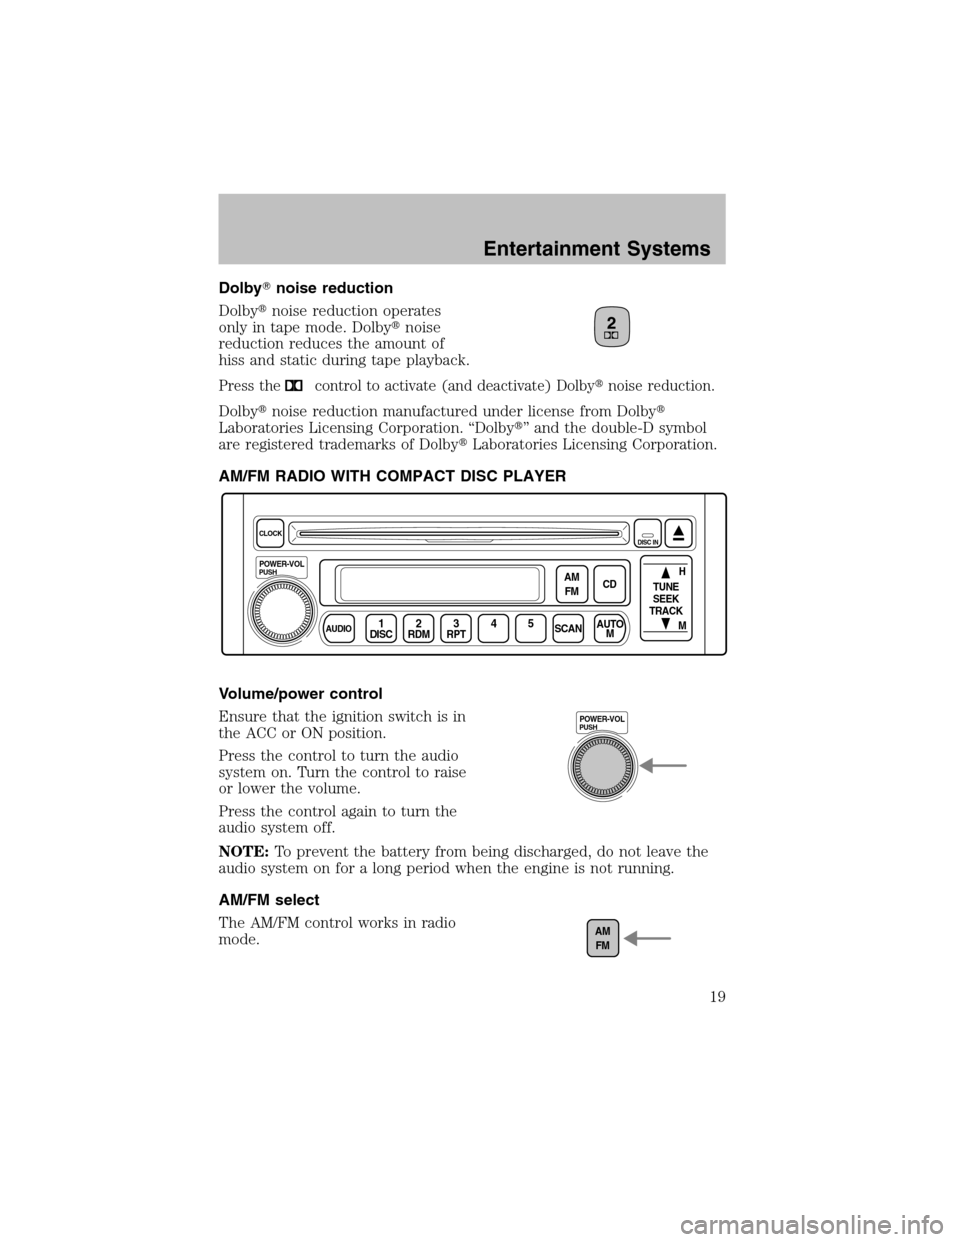
AM/FM RADIO WITH COMPACT DISC PLAYER
Volume/power control
Ensure that the ignition switch is in
the ACC or ON position.
Press the control to turn the audio
systemon. Turn the control to raise
or lower the volume.
Press the control again to turn the
audio systemoff.
NOTE:To prevent the battery frombeing discharged, do not leave the
audio systemon for a long period when the engine is not running.
AM/FM select
The AM/FM control works in radio
mode.
CLOCK
PUSH
POWER-VOL
AUDIODISC1RDM2RPTSCANAUTO
M AM
FMCDH
M TUNE
SEEK
TRACK345
DISC IN
PUSHPOWER-VOL
AM
FM
Entertainment Systems
19
Page 25 of 184
Eject function
Press the control to stop and eject a
CD.
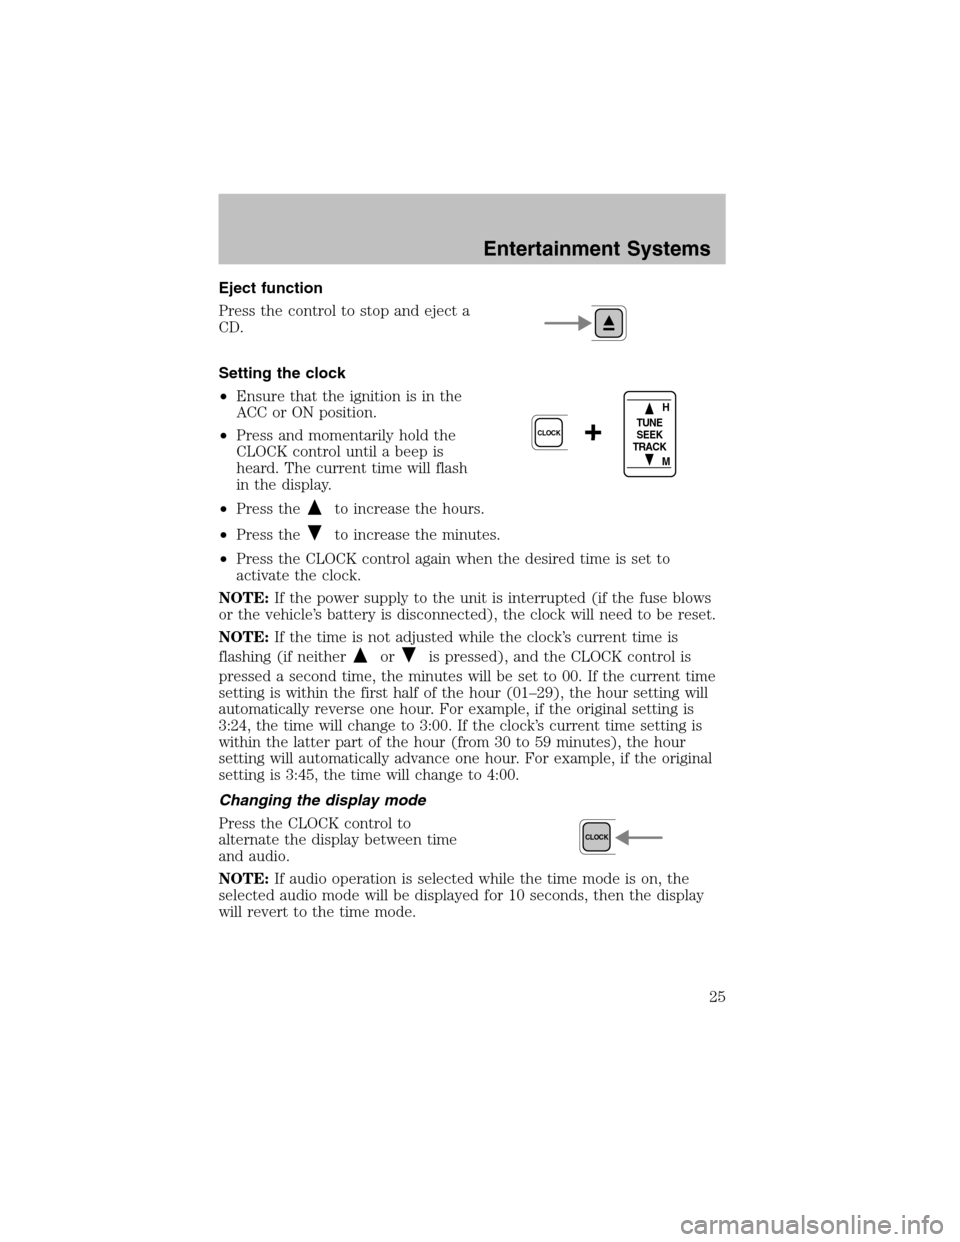
Setting the clock
•Ensure that the ignition is in the
ACC or ON position.
•Press and momentarily hold the
CLOCK control until a beep is
heard. The current time will flash
in the display.
•Press the
to increase the hours.
•Press the
to increase the minutes.
•Press the CLOCK control again when the desired time is set to
activate the clock.
NOTE:If the power supply to the unit is interrupted (if the fuse blows
or the vehicle’s battery is disconnected), the clock will need to be reset.
NOTE:If the time is not adjusted while the clock’s current time is
flashing (if neither
oris pressed), and the CLOCK control is
pressed a second time, the minutes will be set to 00. If the current time
setting is within the first half of the hour (01–29), the hour setting will
automatically reverse one hour. For example, if the original setting is
3:24, the time will change to 3:00. If the clock’s current time setting is
within the latter part of the hour (from30 to 59 minutes), the hour
setting will automatically advance one hour. For example, if the original
setting is 3:45, the time will change to 4:00.
Changing the display mode
Press the CLOCK control to
alternate the display between time
and audio.
NOTE:If audio operation is selected while the time mode is on, the
selected audio mode will be displayed for 10 seconds, then the display
will revert to the time mode.
+CLOCK
H
M TUNE
SEEK
TRACK
CLOCK
Entertainment Systems
25
Page 32 of 184
•Do not put objects under the front seat which may interfere with the
airflow to the rear seats.
•Remove any snow, ice or leaves from the air intake area (at the
bottomof the windshield and underneath the hood).
•Do not place objects over the defroster outlets. These objects can
block airflow and reduce visibility through your windshield. Avoid
placing small objects on top of the instrument panel. These objects
may fall down into the defroster outlets and block airflow, in addition
to, damaging the climate control system.
To aid in side window defogging/demisting in cold weather conditions:
1. Select the position that distributes air through the Panel and Floor.
2. Set the temperature control to full heat.
3. Set the fan speed to full fan.
4. Direct the outer panel vents towards the side windows.
5. To increase airflow to the outer panel vents, close the central panel
vents.
Do not place objects on top of the instrument panel as these
objects may become projectiles in a collision or sudden stop.
REAR WINDOW DEFROSTER
Clears the rear window of thin ice and fog. To operate:
1. Turn the ignition to the ON position.
2. Press and release the control
once to turn on. The light will be lit
while the rear window defroster is
on.
3. Press and release the control
again to turn off.
The defroster will automatically turn off after 15 minutes.
R.DEF
Climate Controls
32