2003 FORD ESCORT brake
[x] Cancel search: brakePage 97 of 184

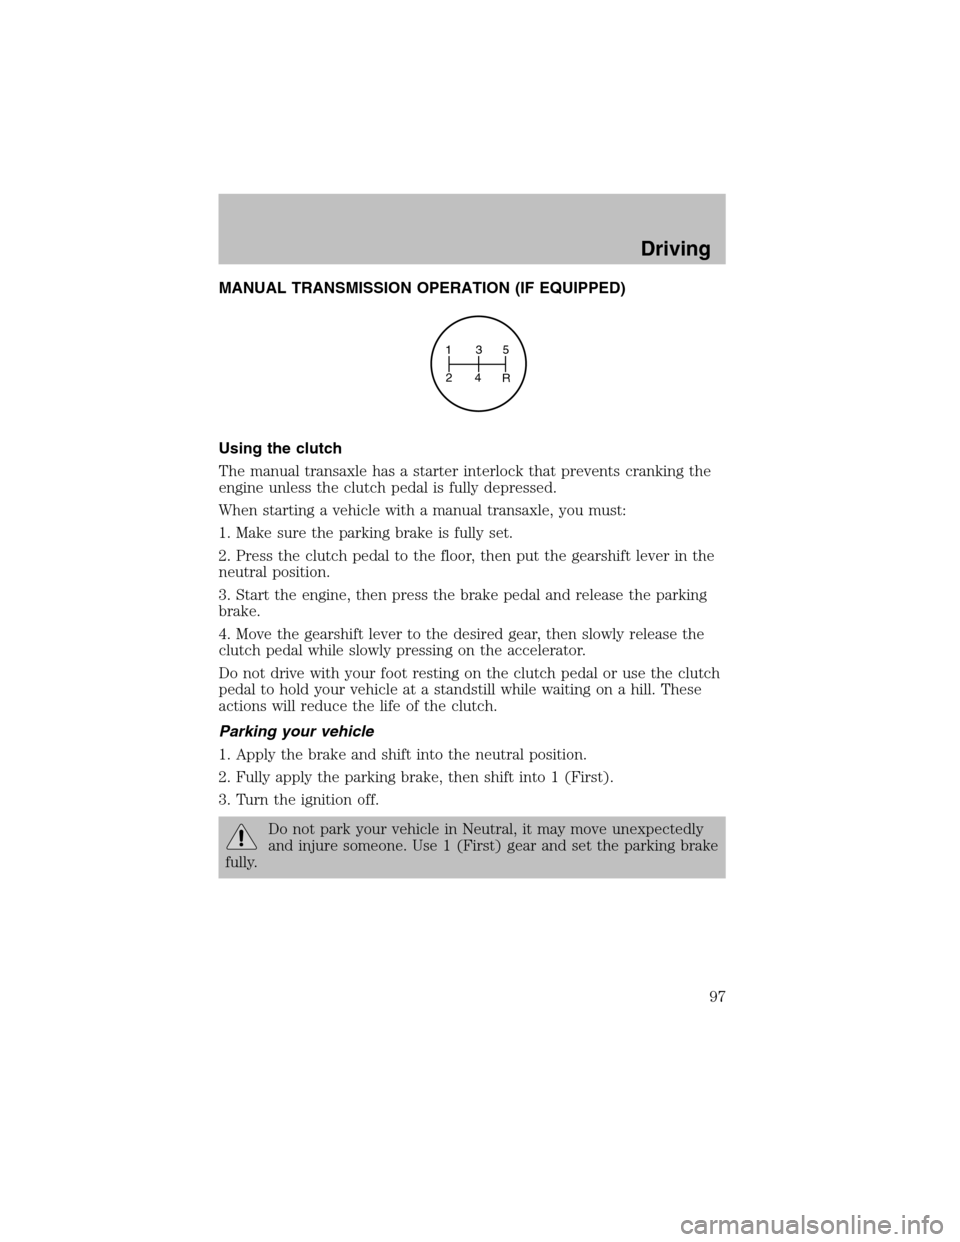
MANUAL TRANSMISSION OPERATION (IF EQUIPPED)
Using the clutch
The manual transaxle has a starter interlock that prevents cranking the
engine unless the clutch pedal is fully depressed.
When starting a vehicle with a manual transaxle, you must:
1. Make sure the parking brake is fully set.
2. Press the clutch pedal to the floor, then put the gearshift lever in the
neutral position.
3. Start the engine, then press the brake pedal and release the parking
brake.
4. Move the gearshift lever to the desired gear, then slowly release the
clutch pedal while slowly pressing on the accelerator.
Do not drive with your foot resting on the clutch pedal or use the clutch
pedal to hold your vehicle at a standstill while waiting on a hill. These
actions will reduce the life of the clutch.
Parking your vehicle
1. Apply the brake and shift into the neutral position.
2. Fully apply the parking brake, then shift into 1 (First).
3. Turn the ignition off.
Do not park your vehicle in Neutral, it may move unexpectedly
and injure someone. Use 1 (First) gear and set the parking brake
fully.
135
24
R
Driving
97
Page 98 of 184

Recommended shift speeds
Upshift according to the following charts for best fuel economy:
Upshifts when accelerating (recommended for best fuel economy)
1-2 21 km/h (13 mph)
2-3 40 km/h (25 mph)
3-4 53 km/h (33 mph)
4-5 70 km/h (44 mph)
Upshifts when cruising (recommended for best fuel economy)
1-2 18 km/h (11 mph)
2-3 32 km/h (20 mph)
3-4 46 km/h (29 mph)
4-5 61 km/h (38 mph)
Reverse
1. Make sure that your vehicle is at a complete stop before you shift into
R (Reverse). Failure to do so may damage the transaxle.
2. Move the gearshift lever into the neutral position and wait at least
three seconds before shifting into R (Reverse).
•The gearshift lever can only be moved into R (Reverse) by moving it
fromleft of 3 (Third) and 4 (Fourth) before shifting into R (Reverse).
This is a lockout feature that protects the transaxle fromaccidentally
being shifted into R (Reverse) from5 (Overdrive).
DRIVING THROUGH WATER
Do not drive quickly through standing water, especially if the depth is
unknown. Traction or brake capability may be limited and if the ignition
system gets wet, your engine may stall. Water may also enter your
engine’s air intake and severely damage your engine.
If driving through deep or standing water is unavoidable, proceed very
slowly. Never drive through water that is higher than the bottomof the
hubs (for trucks) or the bottomof the wheel rims (for cars).
Once through the water, always try the brakes. Wet brakes do not stop the
vehicle as effectively as dry brakes. Drying can be improved by moving
your vehicle slowly while applying light pressure on the brake pedal.
Driving through deep water where the transmission vent tube is
submerged may allow water into the transmission and cause
internal transmission damage. Have the fluid checked and, if
water is found, replace the fluid.
Driving
98
Page 100 of 184

Do not exceed the GVWR or the GAWR specified on the
certification label.
Do not use replacement tires with lower load carrying capacities than the
originals because they may lower the vehicle’s GVWR and GAWR
limitations. Replacement tires with a higher limit than the originals do
not increase the GVWR and GAWR limitations.
The Safety Certification Label, found on the driver’s door pillar, lists
several important vehicle weight rating limitations. Before adding any
additional equipment, refer to these limitations. If you are adding weight
to the front of your vehicle, (potentially including weight added to the
cab), the weight added should not exceed the front axle reserve capacity
(FARC). Additional frontal weight may be added to the front axle reserve
capacity provided you limit your payload in other ways (i.e. restrict the
number of occupants or amount of cargo carried).
Always ensure that the weight of occupants, cargo and equipment being
carried is within the weight limitations that have been established for
your vehicle including both gross vehicle weight and front and rear gross
axle weight rating limits. Under no circumstance should these limitations
be exceeded.
Exceeding any vehicle weight rating limitation could result in
serious damage to the vehicle loss of vehicle control, vehicle
rollover, and/or personal injury.
TRAILER T OWING
Your vehicle is capable of towing a trailer up to 454 kg (1,000 lbs.) gross
trailer weight with a maximum tongue load of 45 kg (100 lbs.). Do not
tow a trailer until your vehicle has been driven at least 800 km(500
miles).
Towing a trailer places an additional load on your vehicle’s engine,
transaxle, brakes, tires and suspension. Inspect these components
carefully after towing.
Do not exceed the GVWR or the GAWR specified on the
certification label.
Driving
100
Page 101 of 184

Towing trailers beyond the maximum recommended gross trailer
weight exceeds the limit of the vehicle and could result in
engine damage, transaxle damage, structural damage, increased risk of
loss of vehicle control, vehicle rollover and/or serious personal injury.
Preparing to tow
Use the proper equipment for towing a trailer and make sure it is
properly attached to your vehicle. See your dealer or a reliable trailer
dealer if you require assistance.
Hitches
Do not use hitches that clamp onto the vehicle bumper. Use a load
carrying hitch. You must distribute the load in your trailer so that
10–15% of the total weight of the trailer is on the tongue.
Safety chains
Always connect the trailer’s safety chains to the frame or hook retainers
of the vehicle hitch. To connect the trailer’s safety chains, cross the
chains under the trailer tongue and allow slack for turning corners.
If you use a rental trailer, follow the instructions that the rental agency
gives to you.
Do not attach safety chains to the bumper.
Trailer brakes
Electric brakes and manual, automatic or surge-type trailer brakes are
safe if installed properly and adjusted to the manufacturer’s
specifications. The trailer brakes must meet local and Federal
regulations.
Do not connect a trailer’s hydraulic brake systemdirectly to your
vehicle’s brake system. Your vehicle may not have enough
braking power and your chances of having a collision greatly increase.
The braking systemof the tow vehicle is rated for operation at the
GVWR not GCWR.
Trailer lamps
Trailer lamps are required on most towed vehicles. Make sure your trailer
lamps conform to local and Federal regulations. See your dealer or trailer
rental agency for proper instructions and equipment for hooking up trailer
lamps.
Driving
101
Page 102 of 184

Driving while you tow
When towing a trailer:
•Turn off the speed control. The speed control may shut off
automatically when you are towing on long, steep grades.
•Consult your local motor vehicle speed regulations for towing a trailer.
•To eliminate excessive shifting, use a lower gear. This will also assist
in transaxle cooling.
•Anticipate stops and brake gradually.
•Do not exceed the GCWR rating or transaxle damage may occur.
Servicing after towing
If you tow a trailer for long distances, your vehicle will require more
frequent service intervals. Refer to your scheduled maintenance guide for
more information.
Trailer towing tips
•Practice turning, stopping and backing up before starting on a trip to
get the feel of the vehicle trailer combination. When turning, make
wider turns so the trailer wheels will clear curbs and other obstacles.
•Allow more distance for stopping with a trailer attached.
•If you are driving down a long or steep hill, shift to a lower gear. Do
not apply the brakes continuously, as they may overheat and become
less effective.
•The trailer tongue weight should be 10–15% of the loaded trailer
weight.
•After you have traveled 80 km(50 miles), thoroughly check your
hitch, electrical connections and trailer wheel lug nuts.
•To aid in engine/transmission cooling and A/C efficiency during hot
weather while stopped in traffic, place the gearshift lever in P (Park).
•Vehicles with trailers should not be parked on a grade. If you must
park on a grade, place wheel chocks under the trailer’s wheels.
TOWING BEHIND ANOT HER VEHICLE
If your vehicle has an automatic transaxle, it cannot be flat-towed with
all wheels on the ground; front wheel dollies must be used.
If your vehicle has an manual transaxle, your vehicle can be flat-towed
with all wheels on the ground.
Driving
102
Page 108 of 184

Fuse/Relay
LocationFuse Amp
RatingPassenger Compartment Fuse
Panel Description
WIPER 20A Wiper/Washer, Blower motor relay
STOP 20A Stop lamps, Brake pressure switch
TAIL 15A Exterior lamps, Instrument
illumination
SUN ROOF 15A Power moonroof
ASC 10A Speed control
P. WINDOW 30A CB Power windows
CIGAR 20A Cigar lighter
AIR BAG 10A Air bags
FOG 10A Fog lamps, DRL
AUDIO 15A Premium sound amplifier, CD
changer
FUEL INJ. 10A H02S, Evaporative emission purge
flow sensor
BLOWER 30A CB Blower motor relay
Power distribution box
The power distribution box is located in the engine compartment. The
power distribution box contains high-current fuses that protect your
vehicle’s main electrical systems from overloads.
Always disconnect the battery before servicing high current
fuses.
Always replace the cover to the power distribution box before
reconnecting the battery or refilling fluid reservoirs
If the battery has been disconnected and reconnected, refer to the
Batterysection of theMaintenance and specificationschapter.
Roadside Emergencies
108
Page 109 of 184

The high-current fuses are coded as follows.
Fuse/Relay
LocationFuse Amp
RatingPower Distribution Box
Description
FUEL INJ. 30A* Air bags, Constant control relay
module (PCM relay), Generator
DEFOG 30A* Rear window defrost
MAIN 100A* Overall circuit protection
BTN 40A* Hazard, Stop, Door lock, Tail,
Roomand Horn fuses of the I/P
fuse panel
ABS 60A* Anti-lock Brake System(ABS)
main relay
COOLING FAN 40A* Constant control relay module
(cooling fan)
OBD-II 10A* Data Link Connector (DLC),
Instrument cluster
FUEL PUMP 20A** Constant control relay module
(fuel pump)
HEAD RH 10A** Headlamps
HEAD LH 10A** Headlamps
* Fuse Link Cartridge **Fuse
USE THE DESIGNATED FUSES ONLY
FUEL INJ
30A
DEFOG
30A
MAIN
100A
COOLING FAN
40A (ABS)
60A BTN
40A
HEADLAMP
RELAY
FUEL PUMP 20AOBD-II 10A
HEAD RH 10A HEAD LH 10A
Roadside Emergencies
109
Page 110 of 184

Relays
Relays are located in the power distribution box and should be replaced
by qualified technicians.
CHANGING THE TIRES
If you get a flat tire while driving, do not apply the brake heavily.
Instead, gradually decrease your speed. Hold the steering wheel firmly
and slowly move to a safe place on the side of the road.
The use of tire sealants is not recommended and may
compromise the integrity of your tires.
Temporary spare tire information
The temporary spare tire for your vehicle is labeled as such. It is smaller
than a regular tire and is designed for emergency use only. Replace the
temporary spare tire with a full-size tire as soon as possible.
If you use the temporary spare tire continuously or do not follow
these precautions, the tire could fail, causing you to lose control
of the vehicle, possibly injuring yourself or others.
When driving with the temporary spare tiredo not:
•use more than one temporary spare tire at a time
•exceed 80 km/h (50 mph)
•load the vehicle beyond maximum vehicle load rating listed on the
Safety Compliance Label
•tow a trailer
•use tire chains
•drive through an automatic car wash, because of the vehicle’s reduced
ground clearance
•try to repair the temporary spare tire or remove it from its wheel
•use the wheel for any other type of vehicle
Use of a temporary spare tire at any one wheel location can lead to
impairment of the following:
•handling, stability and braking performance
•comfort and noise
•ground clearance and parking at curbs
•Winter driving capability
Roadside Emergencies
110