2003 DODGE RAM child seat
[x] Cancel search: child seatPage 634 of 2895
(2) Engage the hooks on the upper retractor
bracket into the slots in the lower inner B-pillar
above the retractor mounting hole.
(3) Install and tighten the screw that secures the
lower retractor bracket to the lower inner B-pillar
below the retractor mounting hole. Tighten the screw
to 40 N´m (29 ft. lbs.).
(4) Reconnect the yellow seat belt tensioner pigtail
wire connector to the body wire harness take out and
connector for the tensioner.
(5) Engage the seat belt tensioner pigtail wire
retainer into the hole in the inner B-pillar sheet
metal.
(6) Position the seat belt web guide to its mount-
ing location on the inner B-pillar near the belt line.
(7) Install and tighten the screw that secures the
seat belt web guide to the inner B-pillar. Tighten the
screw to 2 N´m (20 in. lbs.).
(8) Reinstall the upper and lower trim onto the
inner B-pillar. (Refer to 23 - BODY/INTERIOR/B-
PILLAR UPPER TRIM - INSTALLATION) and
(Refer to 23 - BODY/INTERIOR/B-PILLAR LOWER
TRIM - INSTALLATION).
(9) Position the seat belt turning loop onto the
height adjuster on the upper inner B-pillar.
(10) Install and tighten the screw that secures the
seat belt turning loop to the height adjuster. Tighten
the screw to 40 N´m (29 ft. lbs.).
(11) Engage the lower snap features of the new
trim cover over the front outboard seat belt turning
loop and, using hand pressure, press firmly and
evenly on the top of the trim cover until it snaps into
place.
(12) Position the lower seat belt anchor to the floor
panel near the base of the inner B-pillar.
(13) Install and tighten the screw that secures the
lower seat belt anchor to the floor panel near the
base of the inner B-pillar. Tighten the screw to 40
N´m (29 ft. lbs.).
(14) Do not reconnect the battery negative cable at
this time. The supplemental restraint system verifi-
cation test procedure should be performed following
service of any supplemental restraint system compo-
nent. (Refer to 8 - ELECTRICAL/RESTRAINTS -
STANDARD PROCEDURE - VERIFICATION TEST).
(15) Move the front seat back to its rearward posi-
tion.
FRONT OUTBOARD SEAT
BELT BUCKLE
REMOVAL
A traveling front outboard seat belt buckle is
located on the inboard side of each front outboard
seat section (40 percent) used on all models. The seatbelt buckle on the driver's side front seat for all mod-
els also includes a seat belt switch. (Refer to 8 -
ELECTRICAL/RESTRAINTS/SEAT BELT SWITCH -
DESCRIPTION).
WARNING: DURING AND FOLLOWING ANY SEAT
BELT OR CHILD RESTRAINT ANCHOR SERVICE,
CAREFULLY INSPECT ALL SEAT BELTS, BUCKLES,
MOUNTING HARDWARE, RETRACTORS, TETHER
STRAPS, AND ANCHORS FOR PROPER INSTALLA-
TION, OPERATION, OR DAMAGE. REPLACE ANY
BELT THAT IS CUT, FRAYED, OR TORN.
STRAIGHTEN ANY BELT THAT IS TWISTED.
TIGHTEN ANY LOOSE FASTENERS. REPLACE ANY
BELT THAT HAS A DAMAGED OR INOPERATIVE
BUCKLE OR RETRACTOR. REPLACE ANY BELT
THAT HAS A BENT OR DAMAGED LATCH PLATE
OR ANCHOR PLATE. REPLACE ANY CHILD
RESTRAINT ANCHOR OR THE UNIT TO WHICH THE
ANCHOR IS INTEGRAL THAT HAS BEEN BENT OR
DAMAGED. NEVER ATTEMPT TO REPAIR A SEAT
BELT OR CHILD RESTRAINT COMPONENT.
ALWAYS REPLACE DAMAGED OR FAULTY SEAT
BELT AND CHILD RESTRAINT COMPONENTS WITH
THE CORRECT, NEW AND UNUSED REPLACEMENT
PARTS LISTED IN THE DAIMLERCHRYSLER MOPAR
PARTS CATALOG.
(1) Move the right or left front outboard seat sec-
tion (40 percent) to its most rearward position and
tilt the seat back forward for easiest access to the
front outboard seat belt buckle lower anchor.
(2) For easiest access to the front outboard seat
belt buckle lower anchor on standard cab models,
also move the outboard seat section (40 percent)
opposite the side from which the buckle is to be
removed to its most forward position and tilt the seat
back forward.
(3) On standard cab models only, remove the stow-
age tray from the rear floor panel behind the seat.
(Refer to 23 - BODY/INTERIOR/REAR FLOOR
STOWAGE TRAY - REMOVAL).
(4) From behind the front seat on the driver side
only, disconnect the seat belt switch pigtail wire con-
nector from the seat wire harness take out and con-
nector for the switch located below the inboard edge
of the driver side inboard seat track just forward of
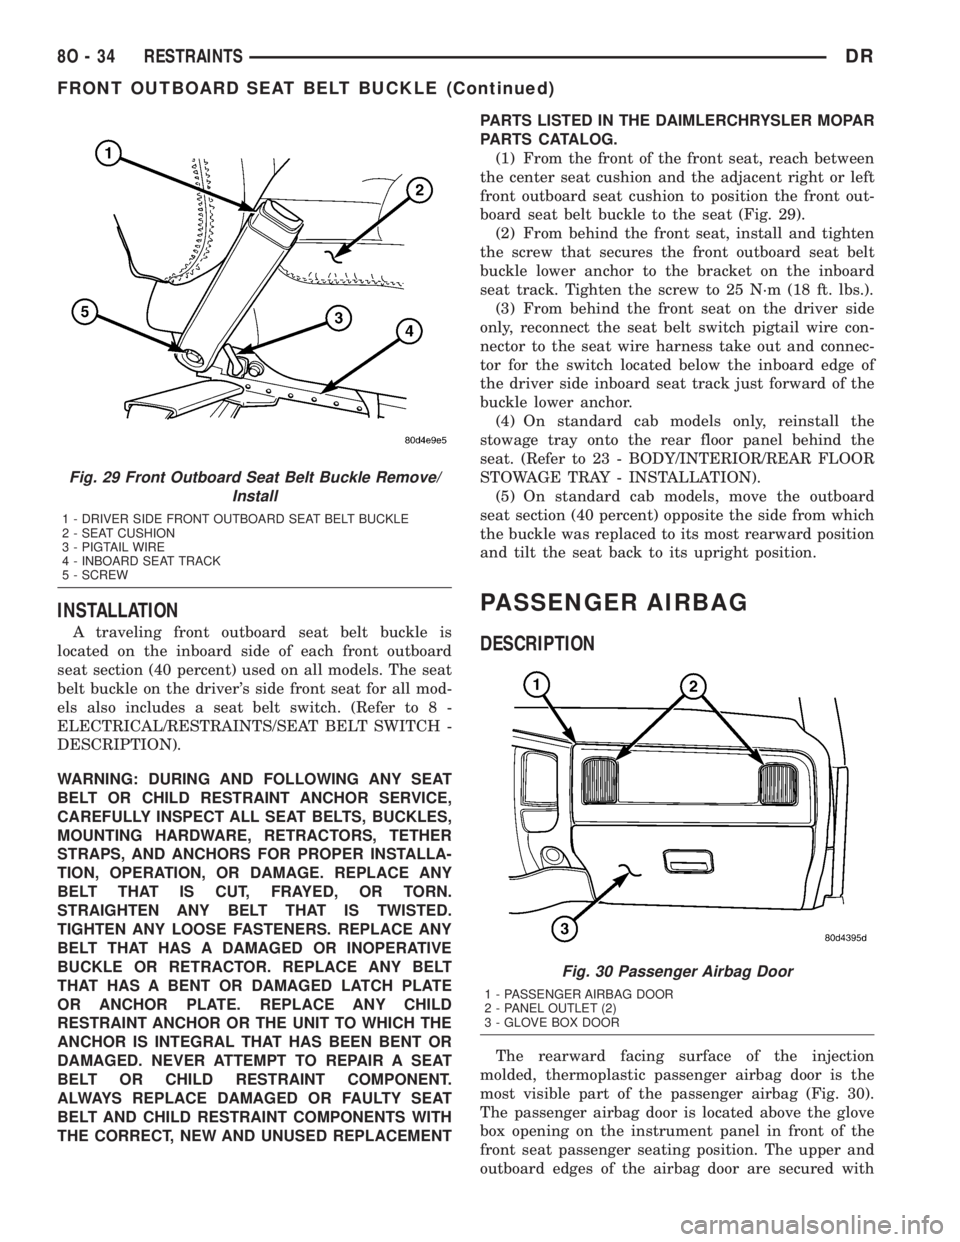
the buckle lower anchor (Fig. 29).
(5) From behind the front seat, remove the screw
that secures the front outboard seat belt buckle lower
anchor to the bracket on the inboard seat track.
(6) From the front of the front seat, reach between
the center seat cushion and the adjacent right or left
front outboard seat cushion to access and remove the
front outboard seat belt buckle from the seat.
DRRESTRAINTS 8O - 33
FRONT OUTBOARD SEAT BELT & RETRACTOR (Continued)
Page 635 of 2895
INSTALLATION
A traveling front outboard seat belt buckle is
located on the inboard side of each front outboard
seat section (40 percent) used on all models. The seat
belt buckle on the driver's side front seat for all mod-
els also includes a seat belt switch. (Refer to 8 -
ELECTRICAL/RESTRAINTS/SEAT BELT SWITCH -
DESCRIPTION).
WARNING: DURING AND FOLLOWING ANY SEAT
BELT OR CHILD RESTRAINT ANCHOR SERVICE,
CAREFULLY INSPECT ALL SEAT BELTS, BUCKLES,
MOUNTING HARDWARE, RETRACTORS, TETHER
STRAPS, AND ANCHORS FOR PROPER INSTALLA-
TION, OPERATION, OR DAMAGE. REPLACE ANY
BELT THAT IS CUT, FRAYED, OR TORN.
STRAIGHTEN ANY BELT THAT IS TWISTED.
TIGHTEN ANY LOOSE FASTENERS. REPLACE ANY
BELT THAT HAS A DAMAGED OR INOPERATIVE
BUCKLE OR RETRACTOR. REPLACE ANY BELT
THAT HAS A BENT OR DAMAGED LATCH PLATE
OR ANCHOR PLATE. REPLACE ANY CHILD
RESTRAINT ANCHOR OR THE UNIT TO WHICH THE
ANCHOR IS INTEGRAL THAT HAS BEEN BENT OR
DAMAGED. NEVER ATTEMPT TO REPAIR A SEAT
BELT OR CHILD RESTRAINT COMPONENT.
ALWAYS REPLACE DAMAGED OR FAULTY SEAT
BELT AND CHILD RESTRAINT COMPONENTS WITH
THE CORRECT, NEW AND UNUSED REPLACEMENTPARTS LISTED IN THE DAIMLERCHRYSLER MOPAR
PARTS CATALOG.
(1) From the front of the front seat, reach between
the center seat cushion and the adjacent right or left
front outboard seat cushion to position the front out-
board seat belt buckle to the seat (Fig. 29).
(2) From behind the front seat, install and tighten
the screw that secures the front outboard seat belt
buckle lower anchor to the bracket on the inboard
seat track. Tighten the screw to 25 N´m (18 ft. lbs.).
(3) From behind the front seat on the driver side
only, reconnect the seat belt switch pigtail wire con-
nector to the seat wire harness take out and connec-
tor for the switch located below the inboard edge of
the driver side inboard seat track just forward of the
buckle lower anchor.
(4) On standard cab models only, reinstall the
stowage tray onto the rear floor panel behind the
seat. (Refer to 23 - BODY/INTERIOR/REAR FLOOR
STOWAGE TRAY - INSTALLATION).
(5) On standard cab models, move the outboard
seat section (40 percent) opposite the side from which
the buckle was replaced to its most rearward position
and tilt the seat back to its upright position.
PASSENGER AIRBAG
DESCRIPTION
The rearward facing surface of the injection
molded, thermoplastic passenger airbag door is the
most visible part of the passenger airbag (Fig. 30).
The passenger airbag door is located above the glove
box opening on the instrument panel in front of the
front seat passenger seating position. The upper and
outboard edges of the airbag door are secured with
Fig. 29 Front Outboard Seat Belt Buckle Remove/
Install
1 - DRIVER SIDE FRONT OUTBOARD SEAT BELT BUCKLE
2 - SEAT CUSHION
3 - PIGTAIL WIRE
4 - INBOARD SEAT TRACK
5 - SCREW
Fig. 30 Passenger Airbag Door
1 - PASSENGER AIRBAG DOOR
2 - PANEL OUTLET (2)
3 - GLOVE BOX DOOR
8O - 34 RESTRAINTSDR
FRONT OUTBOARD SEAT BELT BUCKLE (Continued)
Page 641 of 2895
REAR SEAT BELT BUCKLE - REMOVAL - CEN-
TER ANCHOR & RIGHT OUTBOARD).
WARNING: DURING AND FOLLOWING ANY SEAT
BELT OR CHILD RESTRAINT ANCHOR SERVICE,
CAREFULLY INSPECT ALL SEAT BELTS, BUCKLES,
MOUNTING HARDWARE, RETRACTORS, TETHER
STRAPS, AND ANCHORS FOR PROPER INSTALLA-
TION, OPERATION, OR DAMAGE. REPLACE ANY
BELT THAT IS CUT, FRAYED, OR TORN.
STRAIGHTEN ANY BELT THAT IS TWISTED.
TIGHTEN ANY LOOSE FASTENERS. REPLACE ANY
BELT THAT HAS A DAMAGED OR INOPERATIVE
BUCKLE OR RETRACTOR. REPLACE ANY BELT
THAT HAS A BENT OR DAMAGED LATCH PLATE
OR ANCHOR PLATE. REPLACE ANY CHILD
RESTRAINT ANCHOR OR THE UNIT TO WHICH THE
ANCHOR IS INTEGRAL THAT HAS BEEN BENT OR
DAMAGED. NEVER ATTEMPT TO REPAIR A SEAT
BELT OR CHILD RESTRAINT COMPONENT.
ALWAYS REPLACE DAMAGED OR FAULTY SEAT
BELT AND CHILD RESTRAINT COMPONENTS WITH
THE CORRECT, NEW AND UNUSED REPLACEMENT
PARTS LISTED IN THE DAIMLERCHRYSLER MOPAR
PARTS CATALOG.
(1) Reach between the rear seat cushion and the
rear seat back to access and unbuckle the center seat
belt lower anchor latch plate from the unique black,
keyed lower anchor buckle. Use an ignition key or a
small screwdriver to depress the small white release
button on the anchor buckle.
(2) Remove the rear seat from the vehicle. On
models with the optional 60/40 split rear bench, only
the 60 percent section (right side) of the rear seat
must be removed. (Refer to 23 - BODY/SEATS/SEAT
- REAR - REMOVAL).
(3) Lift upward on the forward edge of the rear
center seat belt bezel at the top of the cab back panel
to release the snap features that secure the bezel to
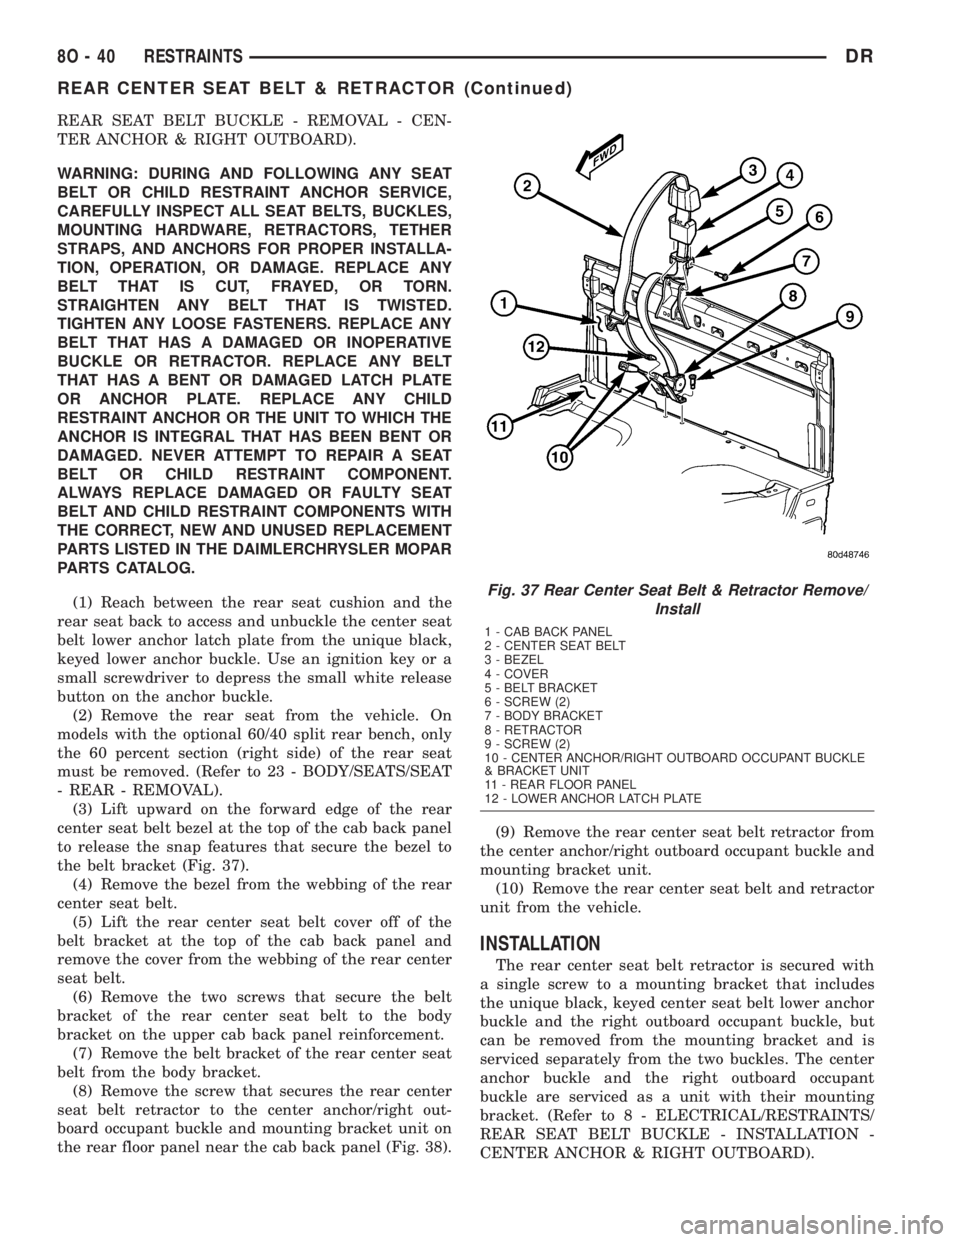
the belt bracket (Fig. 37).
(4) Remove the bezel from the webbing of the rear
center seat belt.
(5) Lift the rear center seat belt cover off of the
belt bracket at the top of the cab back panel and
remove the cover from the webbing of the rear center
seat belt.
(6) Remove the two screws that secure the belt
bracket of the rear center seat belt to the body
bracket on the upper cab back panel reinforcement.
(7) Remove the belt bracket of the rear center seat
belt from the body bracket.
(8) Remove the screw that secures the rear center
seat belt retractor to the center anchor/right out-
board occupant buckle and mounting bracket unit on
the rear floor panel near the cab back panel (Fig. 38).(9) Remove the rear center seat belt retractor from
the center anchor/right outboard occupant buckle and
mounting bracket unit.
(10) Remove the rear center seat belt and retractor
unit from the vehicle.
INSTALLATION
The rear center seat belt retractor is secured with
a single screw to a mounting bracket that includes
the unique black, keyed center seat belt lower anchor
buckle and the right outboard occupant buckle, but
can be removed from the mounting bracket and is
serviced separately from the two buckles. The center
anchor buckle and the right outboard occupant
buckle are serviced as a unit with their mounting
bracket. (Refer to 8 - ELECTRICAL/RESTRAINTS/
REAR SEAT BELT BUCKLE - INSTALLATION -
CENTER ANCHOR & RIGHT OUTBOARD).
Fig. 37 Rear Center Seat Belt & Retractor Remove/
Install
1 - CAB BACK PANEL
2 - CENTER SEAT BELT
3 - BEZEL
4 - COVER
5 - BELT BRACKET
6 - SCREW (2)
7 - BODY BRACKET
8 - RETRACTOR
9 - SCREW (2)
10 - CENTER ANCHOR/RIGHT OUTBOARD OCCUPANT BUCKLE
& BRACKET UNIT
11 - REAR FLOOR PANEL
12 - LOWER ANCHOR LATCH PLATE
8O - 40 RESTRAINTSDR
REAR CENTER SEAT BELT & RETRACTOR (Continued)
Page 642 of 2895
WARNING: DURING AND FOLLOWING ANY SEAT
BELT OR CHILD RESTRAINT ANCHOR SERVICE,
CAREFULLY INSPECT ALL SEAT BELTS, BUCKLES,
MOUNTING HARDWARE, RETRACTORS, TETHER
STRAPS, AND ANCHORS FOR PROPER INSTALLA-
TION, OPERATION, OR DAMAGE. REPLACE ANY
BELT THAT IS CUT, FRAYED, OR TORN.
STRAIGHTEN ANY BELT THAT IS TWISTED.
TIGHTEN ANY LOOSE FASTENERS. REPLACE ANY
BELT THAT HAS A DAMAGED OR INOPERATIVE
BUCKLE OR RETRACTOR. REPLACE ANY BELT
THAT HAS A BENT OR DAMAGED LATCH PLATE
OR ANCHOR PLATE. REPLACE ANY CHILD
RESTRAINT ANCHOR OR THE UNIT TO WHICH THE
ANCHOR IS INTEGRAL THAT HAS BEEN BENT OR
DAMAGED. NEVER ATTEMPT TO REPAIR A SEAT
BELT OR CHILD RESTRAINT COMPONENT.
ALWAYS REPLACE DAMAGED OR FAULTY SEAT
BELT AND CHILD RESTRAINT COMPONENTS WITH
THE CORRECT, NEW AND UNUSED REPLACEMENT
PARTS LISTED IN THE DAIMLERCHRYSLER MOPAR
PARTS CATALOG.(1) Position the rear center seat belt and retractor
unit onto the center anchor/right outboard occupant
buckle and mounting bracket unit on the rear floor
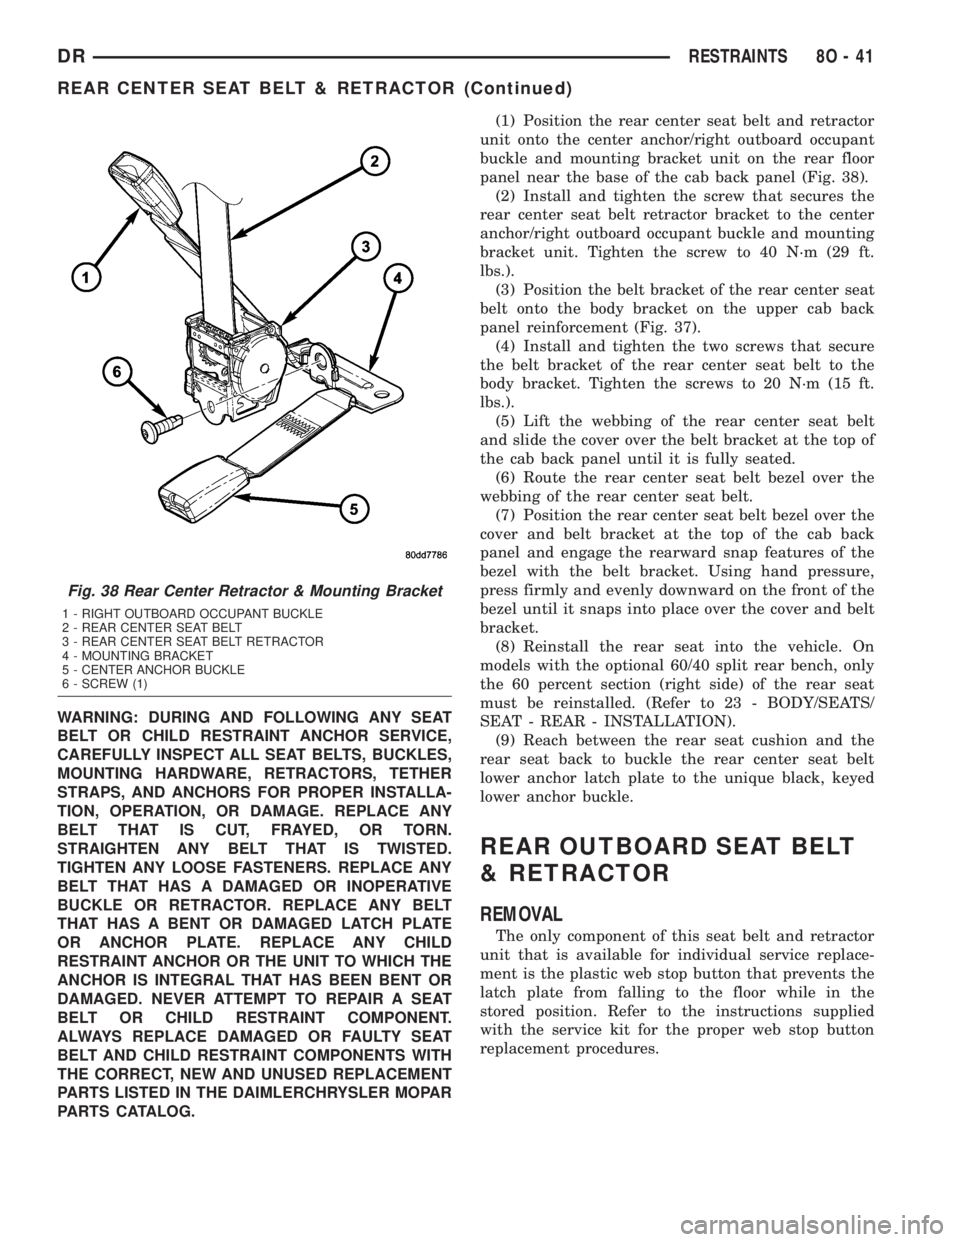
panel near the base of the cab back panel (Fig. 38).
(2) Install and tighten the screw that secures the
rear center seat belt retractor bracket to the center
anchor/right outboard occupant buckle and mounting
bracket unit. Tighten the screw to 40 N´m (29 ft.
lbs.).
(3) Position the belt bracket of the rear center seat
belt onto the body bracket on the upper cab back
panel reinforcement (Fig. 37).
(4) Install and tighten the two screws that secure
the belt bracket of the rear center seat belt to the
body bracket. Tighten the screws to 20 N´m (15 ft.
lbs.).
(5) Lift the webbing of the rear center seat belt
and slide the cover over the belt bracket at the top of
the cab back panel until it is fully seated.
(6) Route the rear center seat belt bezel over the
webbing of the rear center seat belt.
(7) Position the rear center seat belt bezel over the
cover and belt bracket at the top of the cab back
panel and engage the rearward snap features of the
bezel with the belt bracket. Using hand pressure,
press firmly and evenly downward on the front of the
bezel until it snaps into place over the cover and belt
bracket.
(8) Reinstall the rear seat into the vehicle. On
models with the optional 60/40 split rear bench, only
the 60 percent section (right side) of the rear seat
must be reinstalled. (Refer to 23 - BODY/SEATS/
SEAT - REAR - INSTALLATION).
(9) Reach between the rear seat cushion and the
rear seat back to buckle the rear center seat belt
lower anchor latch plate to the unique black, keyed
lower anchor buckle.
REAR OUTBOARD SEAT BELT
& RETRACTOR
REMOVAL
The only component of this seat belt and retractor
unit that is available for individual service replace-
ment is the plastic web stop button that prevents the
latch plate from falling to the floor while in the
stored position. Refer to the instructions supplied
with the service kit for the proper web stop button
replacement procedures.
Fig. 38 Rear Center Retractor & Mounting Bracket
1 - RIGHT OUTBOARD OCCUPANT BUCKLE
2 - REAR CENTER SEAT BELT
3 - REAR CENTER SEAT BELT RETRACTOR
4 - MOUNTING BRACKET
5 - CENTER ANCHOR BUCKLE
6 - SCREW (1)
DRRESTRAINTS 8O - 41
REAR CENTER SEAT BELT & RETRACTOR (Continued)
Page 643 of 2895
WARNING: DURING AND FOLLOWING ANY SEAT
BELT OR CHILD RESTRAINT ANCHOR SERVICE,
CAREFULLY INSPECT ALL SEAT BELTS, BUCKLES,
MOUNTING HARDWARE, RETRACTORS, TETHER
STRAPS, AND ANCHORS FOR PROPER INSTALLA-
TION, OPERATION, OR DAMAGE. REPLACE ANY
BELT THAT IS CUT, FRAYED, OR TORN.
STRAIGHTEN ANY BELT THAT IS TWISTED.
TIGHTEN ANY LOOSE FASTENERS. REPLACE ANY
BELT THAT HAS A DAMAGED OR INOPERATIVE
BUCKLE OR RETRACTOR. REPLACE ANY BELT
THAT HAS A BENT OR DAMAGED LATCH PLATE
OR ANCHOR PLATE. REPLACE ANY CHILD
RESTRAINT ANCHOR OR THE UNIT TO WHICH THE
ANCHOR IS INTEGRAL THAT HAS BEEN BENT OR
DAMAGED. NEVER ATTEMPT TO REPAIR A SEAT
BELT OR CHILD RESTRAINT COMPONENT.
ALWAYS REPLACE DAMAGED OR FAULTY SEAT
BELT AND CHILD RESTRAINT COMPONENTS WITH
THE CORRECT, NEW AND UNUSED REPLACEMENT
PARTS LISTED IN THE DAIMLERCHRYSLER MOPAR
PARTS CATALOG.
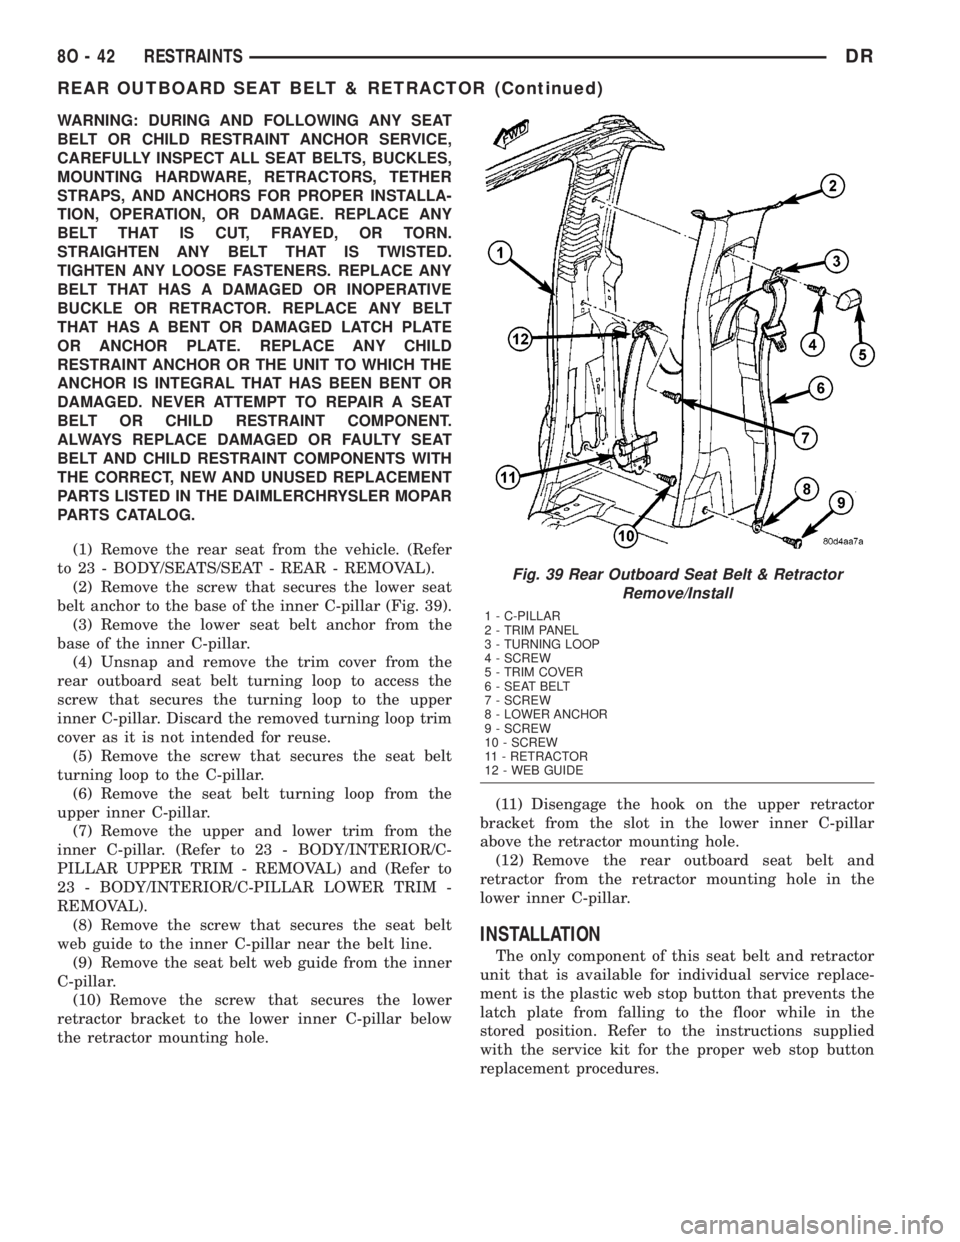
(1) Remove the rear seat from the vehicle. (Refer
to 23 - BODY/SEATS/SEAT - REAR - REMOVAL).
(2) Remove the screw that secures the lower seat
belt anchor to the base of the inner C-pillar (Fig. 39).
(3) Remove the lower seat belt anchor from the
base of the inner C-pillar.
(4) Unsnap and remove the trim cover from the
rear outboard seat belt turning loop to access the
screw that secures the turning loop to the upper
inner C-pillar. Discard the removed turning loop trim
cover as it is not intended for reuse.
(5) Remove the screw that secures the seat belt
turning loop to the C-pillar.
(6) Remove the seat belt turning loop from the
upper inner C-pillar.
(7) Remove the upper and lower trim from the
inner C-pillar. (Refer to 23 - BODY/INTERIOR/C-
PILLAR UPPER TRIM - REMOVAL) and (Refer to
23 - BODY/INTERIOR/C-PILLAR LOWER TRIM -
REMOVAL).
(8) Remove the screw that secures the seat belt
web guide to the inner C-pillar near the belt line.
(9) Remove the seat belt web guide from the inner
C-pillar.
(10) Remove the screw that secures the lower
retractor bracket to the lower inner C-pillar below
the retractor mounting hole.(11) Disengage the hook on the upper retractor
bracket from the slot in the lower inner C-pillar
above the retractor mounting hole.
(12) Remove the rear outboard seat belt and
retractor from the retractor mounting hole in the
lower inner C-pillar.
INSTALLATION
The only component of this seat belt and retractor
unit that is available for individual service replace-
ment is the plastic web stop button that prevents the
latch plate from falling to the floor while in the
stored position. Refer to the instructions supplied
with the service kit for the proper web stop button
replacement procedures.
Fig. 39 Rear Outboard Seat Belt & Retractor
Remove/Install
1 - C-PILLAR
2 - TRIM PANEL
3 - TURNING LOOP
4 - SCREW
5 - TRIM COVER
6 - SEAT BELT
7 - SCREW
8 - LOWER ANCHOR
9 - SCREW
10 - SCREW
11 - RETRACTOR
12 - WEB GUIDE
8O - 42 RESTRAINTSDR
REAR OUTBOARD SEAT BELT & RETRACTOR (Continued)
Page 644 of 2895
WARNING: DURING AND FOLLOWING ANY SEAT
BELT OR CHILD RESTRAINT ANCHOR SERVICE,
CAREFULLY INSPECT ALL SEAT BELTS, BUCKLES,
MOUNTING HARDWARE, RETRACTORS, TETHER
STRAPS, AND ANCHORS FOR PROPER INSTALLA-
TION, OPERATION, OR DAMAGE. REPLACE ANY
BELT THAT IS CUT, FRAYED, OR TORN.
STRAIGHTEN ANY BELT THAT IS TWISTED.
TIGHTEN ANY LOOSE FASTENERS. REPLACE ANY
BELT THAT HAS A DAMAGED OR INOPERATIVE
BUCKLE OR RETRACTOR. REPLACE ANY BELT
THAT HAS A BENT OR DAMAGED LATCH PLATE
OR ANCHOR PLATE. REPLACE ANY CHILD
RESTRAINT ANCHOR OR THE UNIT TO WHICH THE
ANCHOR IS INTEGRAL THAT HAS BEEN BENT OR
DAMAGED. NEVER ATTEMPT TO REPAIR A SEAT
BELT OR CHILD RESTRAINT COMPONENT.
ALWAYS REPLACE DAMAGED OR FAULTY SEAT
BELT AND CHILD RESTRAINT COMPONENTS WITH
THE CORRECT, NEW AND UNUSED REPLACEMENT
PARTS LISTED IN THE DAIMLERCHRYSLER MOPAR
PARTS CATALOG.
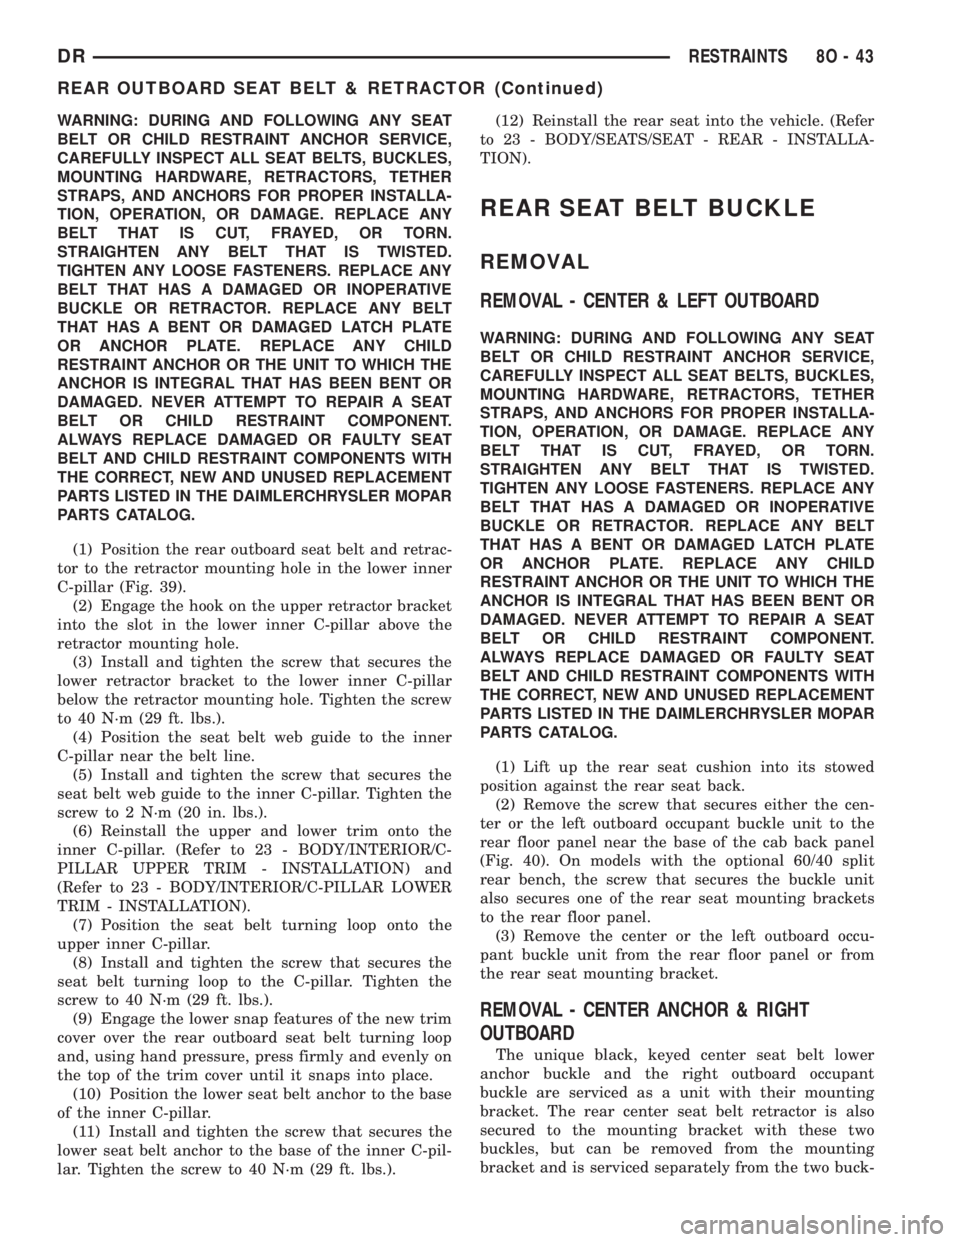
(1) Position the rear outboard seat belt and retrac-
tor to the retractor mounting hole in the lower inner
C-pillar (Fig. 39).
(2) Engage the hook on the upper retractor bracket
into the slot in the lower inner C-pillar above the
retractor mounting hole.
(3) Install and tighten the screw that secures the
lower retractor bracket to the lower inner C-pillar
below the retractor mounting hole. Tighten the screw
to 40 N´m (29 ft. lbs.).
(4) Position the seat belt web guide to the inner
C-pillar near the belt line.
(5) Install and tighten the screw that secures the
seat belt web guide to the inner C-pillar. Tighten the
screw to 2 N´m (20 in. lbs.).
(6) Reinstall the upper and lower trim onto the
inner C-pillar. (Refer to 23 - BODY/INTERIOR/C-
PILLAR UPPER TRIM - INSTALLATION) and
(Refer to 23 - BODY/INTERIOR/C-PILLAR LOWER
TRIM - INSTALLATION).
(7) Position the seat belt turning loop onto the
upper inner C-pillar.
(8) Install and tighten the screw that secures the
seat belt turning loop to the C-pillar. Tighten the
screw to 40 N´m (29 ft. lbs.).
(9) Engage the lower snap features of the new trim
cover over the rear outboard seat belt turning loop
and, using hand pressure, press firmly and evenly on
the top of the trim cover until it snaps into place.
(10) Position the lower seat belt anchor to the base
of the inner C-pillar.
(11) Install and tighten the screw that secures the
lower seat belt anchor to the base of the inner C-pil-
lar. Tighten the screw to 40 N´m (29 ft. lbs.).(12) Reinstall the rear seat into the vehicle. (Refer
to 23 - BODY/SEATS/SEAT - REAR - INSTALLA-
TION).
REAR SEAT BELT BUCKLE
REMOVAL
REMOVAL - CENTER & LEFT OUTBOARD
WARNING: DURING AND FOLLOWING ANY SEAT
BELT OR CHILD RESTRAINT ANCHOR SERVICE,
CAREFULLY INSPECT ALL SEAT BELTS, BUCKLES,
MOUNTING HARDWARE, RETRACTORS, TETHER
STRAPS, AND ANCHORS FOR PROPER INSTALLA-
TION, OPERATION, OR DAMAGE. REPLACE ANY
BELT THAT IS CUT, FRAYED, OR TORN.
STRAIGHTEN ANY BELT THAT IS TWISTED.
TIGHTEN ANY LOOSE FASTENERS. REPLACE ANY
BELT THAT HAS A DAMAGED OR INOPERATIVE
BUCKLE OR RETRACTOR. REPLACE ANY BELT
THAT HAS A BENT OR DAMAGED LATCH PLATE
OR ANCHOR PLATE. REPLACE ANY CHILD
RESTRAINT ANCHOR OR THE UNIT TO WHICH THE
ANCHOR IS INTEGRAL THAT HAS BEEN BENT OR
DAMAGED. NEVER ATTEMPT TO REPAIR A SEAT
BELT OR CHILD RESTRAINT COMPONENT.
ALWAYS REPLACE DAMAGED OR FAULTY SEAT
BELT AND CHILD RESTRAINT COMPONENTS WITH
THE CORRECT, NEW AND UNUSED REPLACEMENT
PARTS LISTED IN THE DAIMLERCHRYSLER MOPAR
PARTS CATALOG.
(1) Lift up the rear seat cushion into its stowed
position against the rear seat back.
(2) Remove the screw that secures either the cen-
ter or the left outboard occupant buckle unit to the
rear floor panel near the base of the cab back panel
(Fig. 40). On models with the optional 60/40 split
rear bench, the screw that secures the buckle unit
also secures one of the rear seat mounting brackets
to the rear floor panel.
(3) Remove the center or the left outboard occu-
pant buckle unit from the rear floor panel or from
the rear seat mounting bracket.
REMOVAL - CENTER ANCHOR & RIGHT
OUTBOARD
The unique black, keyed center seat belt lower
anchor buckle and the right outboard occupant
buckle are serviced as a unit with their mounting
bracket. The rear center seat belt retractor is also
secured to the mounting bracket with these two
buckles, but can be removed from the mounting
bracket and is serviced separately from the two buck-
DRRESTRAINTS 8O - 43
REAR OUTBOARD SEAT BELT & RETRACTOR (Continued)
Page 645 of 2895
les. (Refer to 8 - ELECTRICAL/RESTRAINTS/REAR
CENTER SEAT BELT & RETRACTOR - REMOVAL).
WARNING: DURING AND FOLLOWING ANY SEAT
BELT OR CHILD RESTRAINT ANCHOR SERVICE,
CAREFULLY INSPECT ALL SEAT BELTS, BUCKLES,
MOUNTING HARDWARE, RETRACTORS, TETHER
STRAPS, AND ANCHORS FOR PROPER INSTALLA-
TION, OPERATION, OR DAMAGE. REPLACE ANY
BELT THAT IS CUT, FRAYED, OR TORN.
STRAIGHTEN ANY BELT THAT IS TWISTED.
TIGHTEN ANY LOOSE FASTENERS. REPLACE ANY
BELT THAT HAS A DAMAGED OR INOPERATIVE
BUCKLE OR RETRACTOR. REPLACE ANY BELT
THAT HAS A BENT OR DAMAGED LATCH PLATE
OR ANCHOR PLATE. REPLACE ANY CHILD
RESTRAINT ANCHOR OR THE UNIT TO WHICH THE
ANCHOR IS INTEGRAL THAT HAS BEEN BENT OR
DAMAGED. NEVER ATTEMPT TO REPAIR A SEAT
BELT OR CHILD RESTRAINT COMPONENT.
ALWAYS REPLACE DAMAGED OR FAULTY SEAT
BELT AND CHILD RESTRAINT COMPONENTS WITH
THE CORRECT, NEW AND UNUSED REPLACEMENTPARTS LISTED IN THE DAIMLERCHRYSLER MOPAR
PARTS CATALOG.
(1) Reach between the rear seat cushion and the
rear seat back to access and unbuckle the rear center
seat belt lower anchor latch plate from the unique
black, keyed lower anchor buckle. Use an ignition
key or a small screwdriver to depress the small white
release button on the anchor buckle.
(2) Remove the rear seat from the vehicle. On
models with the optional 60/40 split rear bench, only
the 60 percent section (right side) of the rear seat
must be removed. (Refer to 23 - BODY/SEATS/SEAT
- REAR - REMOVAL).
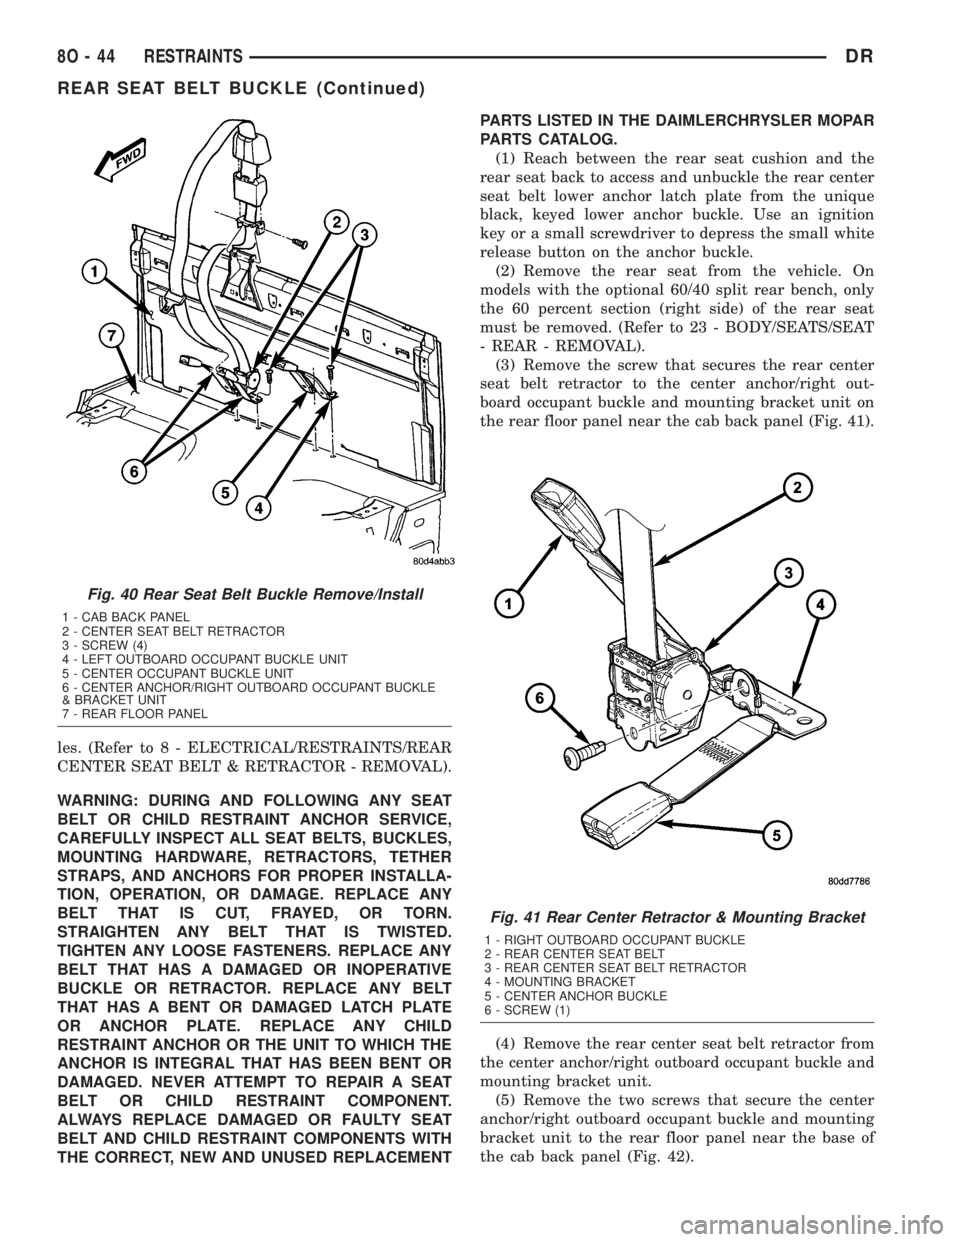
(3) Remove the screw that secures the rear center
seat belt retractor to the center anchor/right out-
board occupant buckle and mounting bracket unit on
the rear floor panel near the cab back panel (Fig. 41).
(4) Remove the rear center seat belt retractor from
the center anchor/right outboard occupant buckle and
mounting bracket unit.
(5) Remove the two screws that secure the center
anchor/right outboard occupant buckle and mounting
bracket unit to the rear floor panel near the base of
the cab back panel (Fig. 42).
Fig. 40 Rear Seat Belt Buckle Remove/Install
1 - CAB BACK PANEL
2 - CENTER SEAT BELT RETRACTOR
3 - SCREW (4)
4 - LEFT OUTBOARD OCCUPANT BUCKLE UNIT
5 - CENTER OCCUPANT BUCKLE UNIT
6 - CENTER ANCHOR/RIGHT OUTBOARD OCCUPANT BUCKLE
& BRACKET UNIT
7 - REAR FLOOR PANEL
Fig. 41 Rear Center Retractor & Mounting Bracket
1 - RIGHT OUTBOARD OCCUPANT BUCKLE
2 - REAR CENTER SEAT BELT
3 - REAR CENTER SEAT BELT RETRACTOR
4 - MOUNTING BRACKET
5 - CENTER ANCHOR BUCKLE
6 - SCREW (1)
8O - 44 RESTRAINTSDR
REAR SEAT BELT BUCKLE (Continued)
Page 646 of 2895
(6) Remove the center anchor/right outboard occu-
pant buckle and mounting bracket unit from the rear
floor panel.
INSTALLATION
INSTALLATION - CENTER & LEFT OUTBOARD
WARNING: DURING AND FOLLOWING ANY SEAT
BELT OR CHILD RESTRAINT ANCHOR SERVICE,
CAREFULLY INSPECT ALL SEAT BELTS, BUCKLES,
MOUNTING HARDWARE, RETRACTORS, TETHERSTRAPS, AND ANCHORS FOR PROPER INSTALLA-
TION, OPERATION, OR DAMAGE. REPLACE ANY
BELT THAT IS CUT, FRAYED, OR TORN.
STRAIGHTEN ANY BELT THAT IS TWISTED.
TIGHTEN ANY LOOSE FASTENERS. REPLACE ANY
BELT THAT HAS A DAMAGED OR INOPERATIVE
BUCKLE OR RETRACTOR. REPLACE ANY BELT
THAT HAS A BENT OR DAMAGED LATCH PLATE
OR ANCHOR PLATE. REPLACE ANY CHILD
RESTRAINT ANCHOR OR THE UNIT TO WHICH THE
ANCHOR IS INTEGRAL THAT HAS BEEN BENT OR
DAMAGED. NEVER ATTEMPT TO REPAIR A SEAT
BELT OR CHILD RESTRAINT COMPONENT.
ALWAYS REPLACE DAMAGED OR FAULTY SEAT
BELT AND CHILD RESTRAINT COMPONENTS WITH
THE CORRECT, NEW AND UNUSED REPLACEMENT
PARTS LISTED IN THE DAIMLERCHRYSLER MOPAR
PARTS CATALOG.
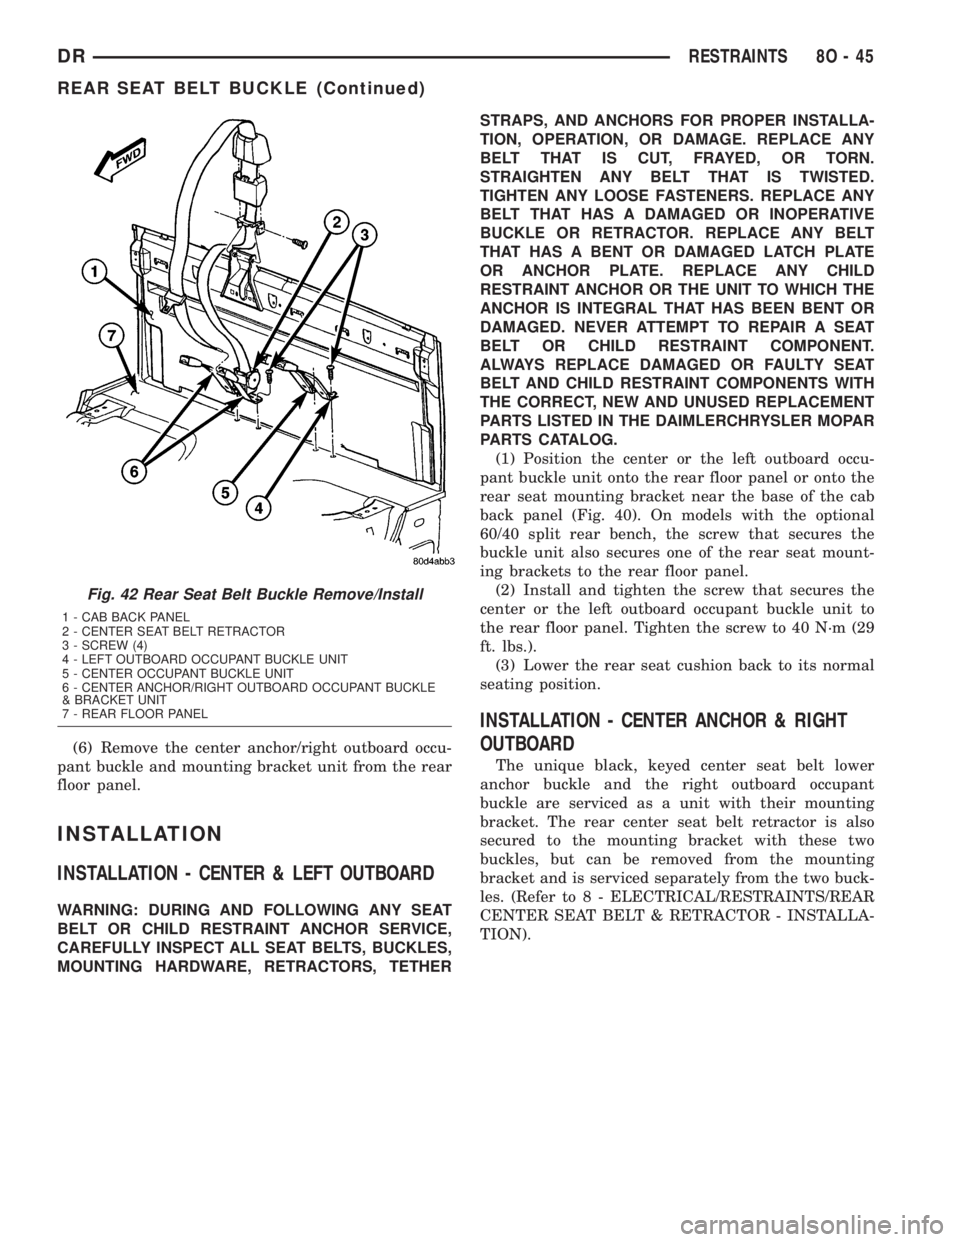
(1) Position the center or the left outboard occu-
pant buckle unit onto the rear floor panel or onto the
rear seat mounting bracket near the base of the cab
back panel (Fig. 40). On models with the optional
60/40 split rear bench, the screw that secures the
buckle unit also secures one of the rear seat mount-
ing brackets to the rear floor panel.
(2) Install and tighten the screw that secures the
center or the left outboard occupant buckle unit to
the rear floor panel. Tighten the screw to 40 N´m (29
ft. lbs.).
(3) Lower the rear seat cushion back to its normal
seating position.
INSTALLATION - CENTER ANCHOR & RIGHT
OUTBOARD
The unique black, keyed center seat belt lower
anchor buckle and the right outboard occupant
buckle are serviced as a unit with their mounting
bracket. The rear center seat belt retractor is also
secured to the mounting bracket with these two
buckles, but can be removed from the mounting
bracket and is serviced separately from the two buck-
les. (Refer to 8 - ELECTRICAL/RESTRAINTS/REAR
CENTER SEAT BELT & RETRACTOR - INSTALLA-
TION).
Fig. 42 Rear Seat Belt Buckle Remove/Install
1 - CAB BACK PANEL
2 - CENTER SEAT BELT RETRACTOR
3 - SCREW (4)
4 - LEFT OUTBOARD OCCUPANT BUCKLE UNIT
5 - CENTER OCCUPANT BUCKLE UNIT
6 - CENTER ANCHOR/RIGHT OUTBOARD OCCUPANT BUCKLE
& BRACKET UNIT
7 - REAR FLOOR PANEL
DRRESTRAINTS 8O - 45
REAR SEAT BELT BUCKLE (Continued)