2003 CHRYSLER CARAVAN boot
[x] Cancel search: bootPage 1528 of 2177
GEARSHIFT CABLE -
SELECTOR
REMOVAL
(1) Disconnect battery negative cable.
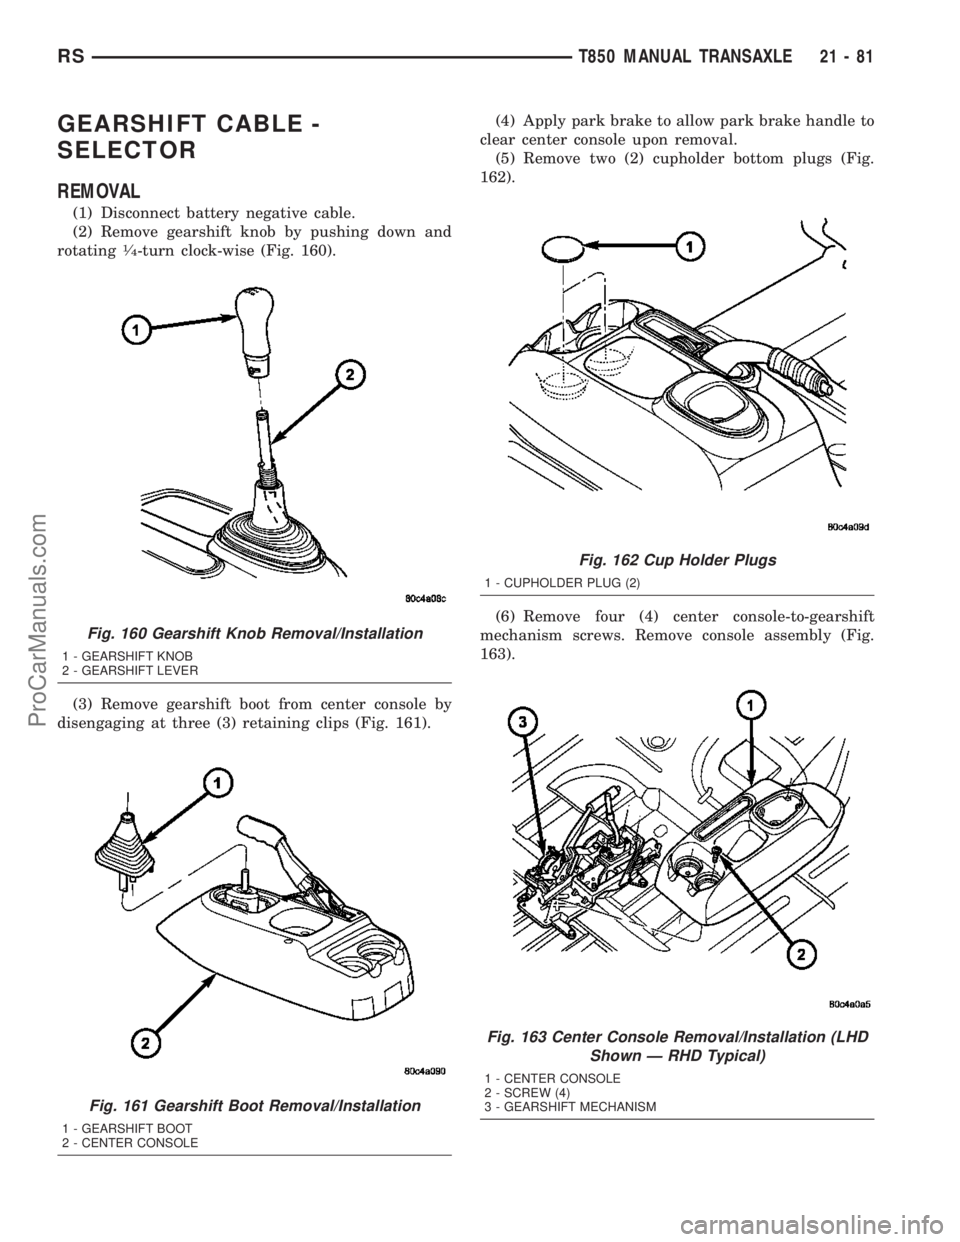
(2) Remove gearshift knob by pushing down and
rotating
1¤4-turn clock-wise (Fig. 160).
(3) Remove gearshift boot from center console by
disengaging at three (3) retaining clips (Fig. 161).(4) Apply park brake to allow park brake handle to
clear center console upon removal.
(5) Remove two (2) cupholder bottom plugs (Fig.
162).
(6) Remove four (4) center console-to-gearshift
mechanism screws. Remove console assembly (Fig.
163).
Fig. 160 Gearshift Knob Removal/Installation
1 - GEARSHIFT KNOB
2 - GEARSHIFT LEVER
Fig. 161 Gearshift Boot Removal/Installation
1 - GEARSHIFT BOOT
2 - CENTER CONSOLE
Fig. 162 Cup Holder Plugs
1 - CUPHOLDER PLUG (2)
Fig. 163 Center Console Removal/Installation (LHD
Shown Ð RHD Typical)
1 - CENTER CONSOLE
2 - SCREW (4)
3 - GEARSHIFT MECHANISM
RST850 MANUAL TRANSAXLE21-81
ProCarManuals.com
Page 1533 of 2177
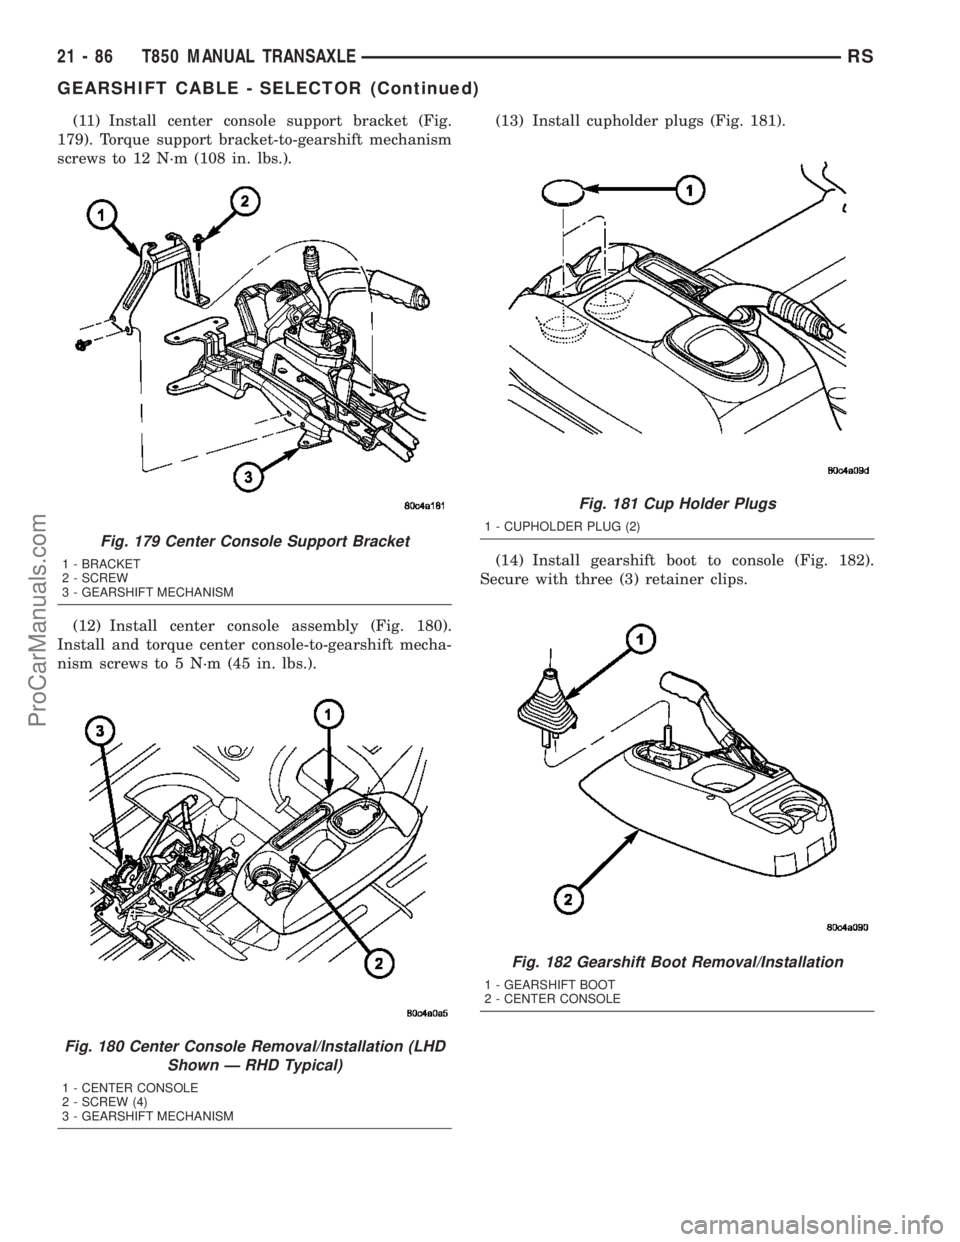
(11) Install center console support bracket (Fig.
179). Torque support bracket-to-gearshift mechanism
screws to 12 N´m (108 in. lbs.).
(12) Install center console assembly (Fig. 180).
Install and torque center console-to-gearshift mecha-
nism screws to 5 N´m (45 in. lbs.).(13) Install cupholder plugs (Fig. 181).
(14) Install gearshift boot to console (Fig. 182).
Secure with three (3) retainer clips.
Fig. 179 Center Console Support Bracket
1 - BRACKET
2 - SCREW
3 - GEARSHIFT MECHANISM
Fig. 180 Center Console Removal/Installation (LHD
Shown Ð RHD Typical)
1 - CENTER CONSOLE
2 - SCREW (4)
3 - GEARSHIFT MECHANISM
Fig. 181 Cup Holder Plugs
1 - CUPHOLDER PLUG (2)
Fig. 182 Gearshift Boot Removal/Installation
1 - GEARSHIFT BOOT
2 - CENTER CONSOLE
21 - 86 T850 MANUAL TRANSAXLERS
GEARSHIFT CABLE - SELECTOR (Continued)
ProCarManuals.com
Page 1534 of 2177
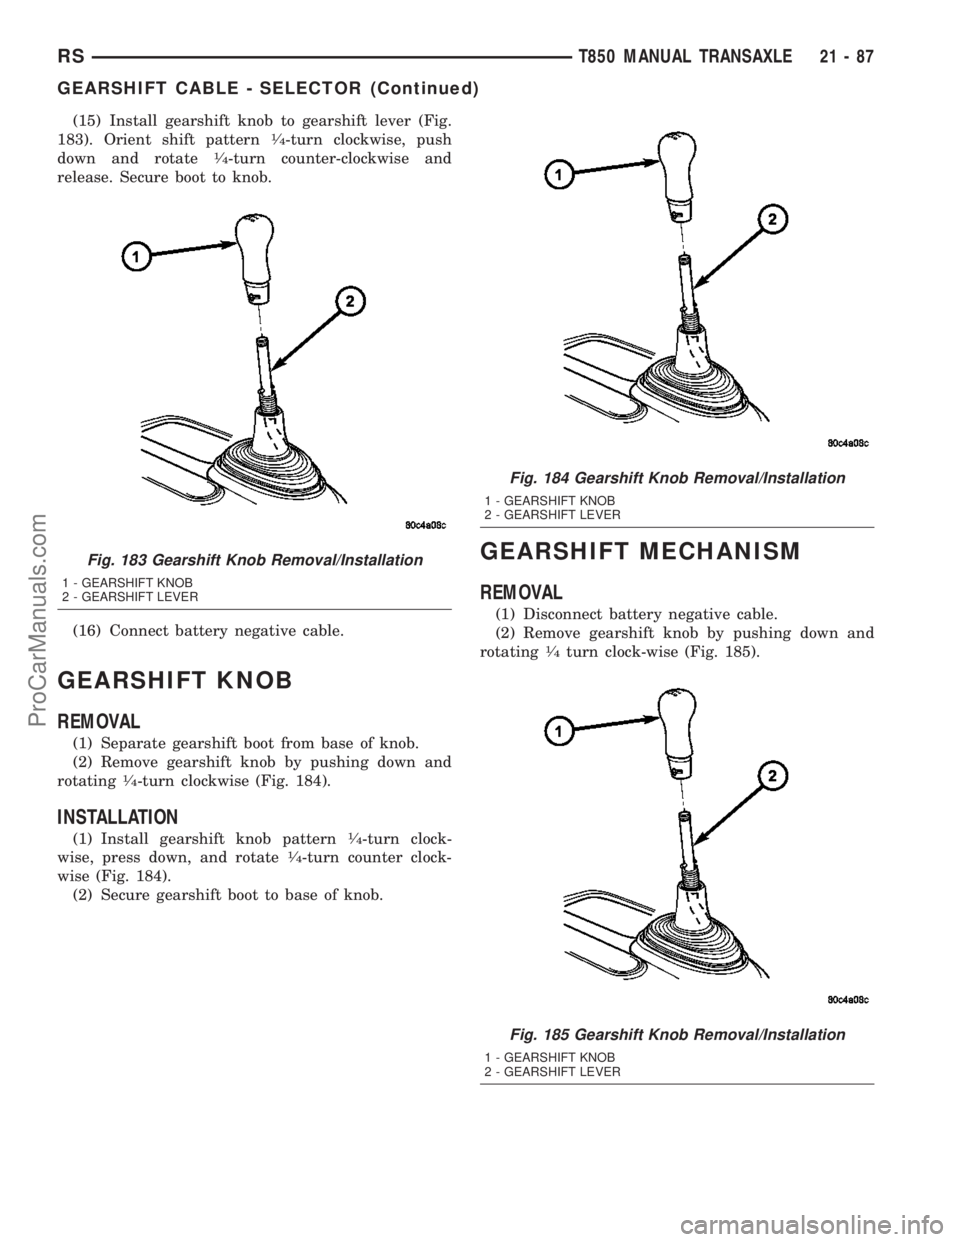
(15) Install gearshift knob to gearshift lever (Fig.
183). Orient shift pattern1¤4-turn clockwise, push
down and rotate1¤4-turn counter-clockwise and
release. Secure boot to knob.
(16) Connect battery negative cable.
GEARSHIFT KNOB
REMOVAL
(1) Separate gearshift boot from base of knob.
(2) Remove gearshift knob by pushing down and
rotating
1¤4-turn clockwise (Fig. 184).
INSTALLATION
(1) Install gearshift knob pattern1¤4-turn clock-
wise, press down, and rotate1¤4-turn counter clock-
wise (Fig. 184).
(2) Secure gearshift boot to base of knob.
GEARSHIFT MECHANISM
REMOVAL
(1) Disconnect battery negative cable.
(2) Remove gearshift knob by pushing down and
rotating
1¤4turn clock-wise (Fig. 185).
Fig. 183 Gearshift Knob Removal/Installation
1 - GEARSHIFT KNOB
2 - GEARSHIFT LEVER
Fig. 184 Gearshift Knob Removal/Installation
1 - GEARSHIFT KNOB
2 - GEARSHIFT LEVER
Fig. 185 Gearshift Knob Removal/Installation
1 - GEARSHIFT KNOB
2 - GEARSHIFT LEVER
RST850 MANUAL TRANSAXLE21-87
GEARSHIFT CABLE - SELECTOR (Continued)
ProCarManuals.com
Page 1535 of 2177
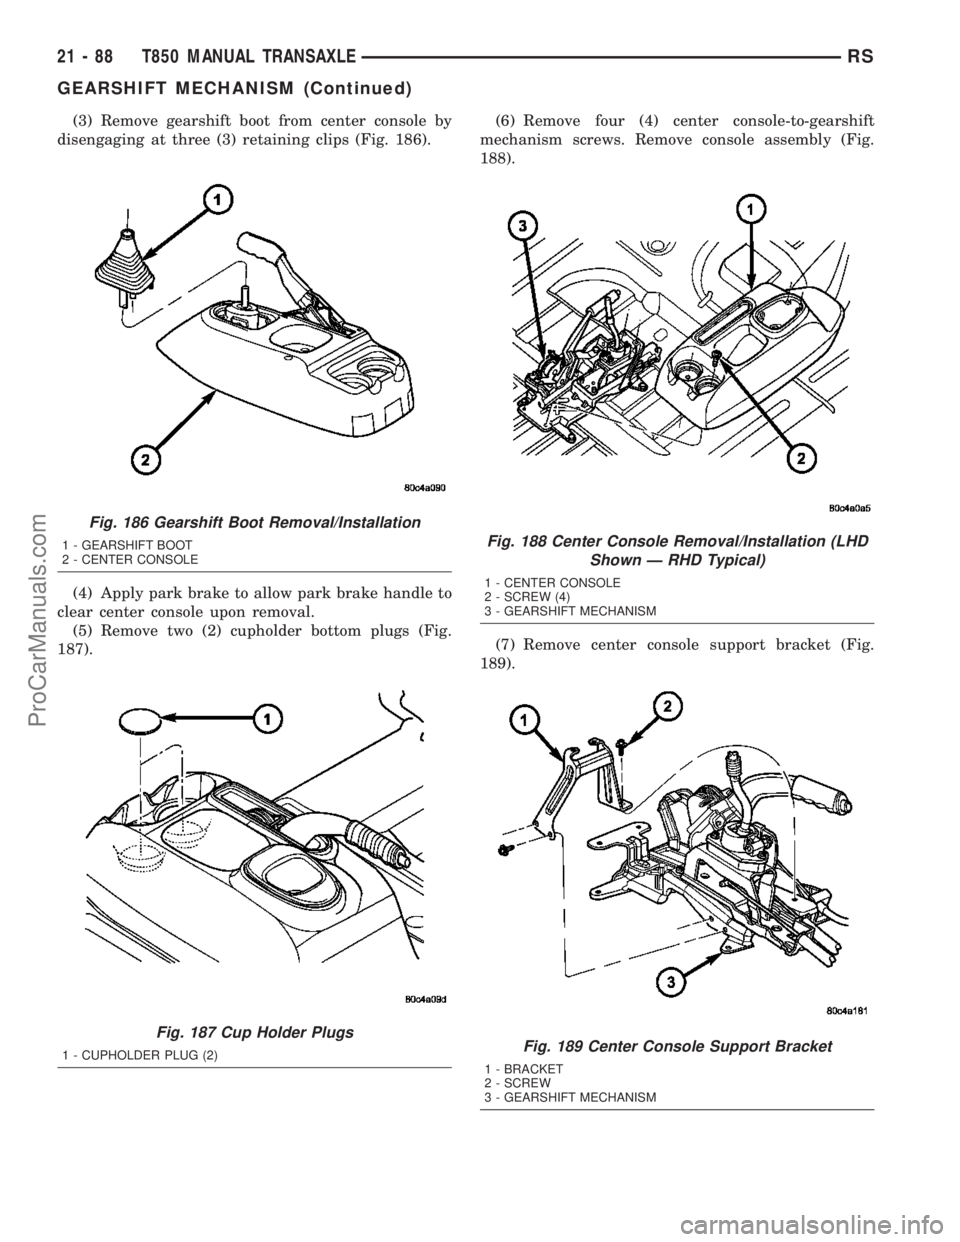
(3) Remove gearshift boot from center console by
disengaging at three (3) retaining clips (Fig. 186).
(4) Apply park brake to allow park brake handle to
clear center console upon removal.
(5) Remove two (2) cupholder bottom plugs (Fig.
187).(6) Remove four (4) center console-to-gearshift
mechanism screws. Remove console assembly (Fig.
188).
(7) Remove center console support bracket (Fig.
189).
Fig. 186 Gearshift Boot Removal/Installation
1 - GEARSHIFT BOOT
2 - CENTER CONSOLE
Fig. 187 Cup Holder Plugs
1 - CUPHOLDER PLUG (2)
Fig. 188 Center Console Removal/Installation (LHD
Shown Ð RHD Typical)
1 - CENTER CONSOLE
2 - SCREW (4)
3 - GEARSHIFT MECHANISM
Fig. 189 Center Console Support Bracket
1 - BRACKET
2 - SCREW
3 - GEARSHIFT MECHANISM
21 - 88 T850 MANUAL TRANSAXLERS
GEARSHIFT MECHANISM (Continued)
ProCarManuals.com
Page 1539 of 2177
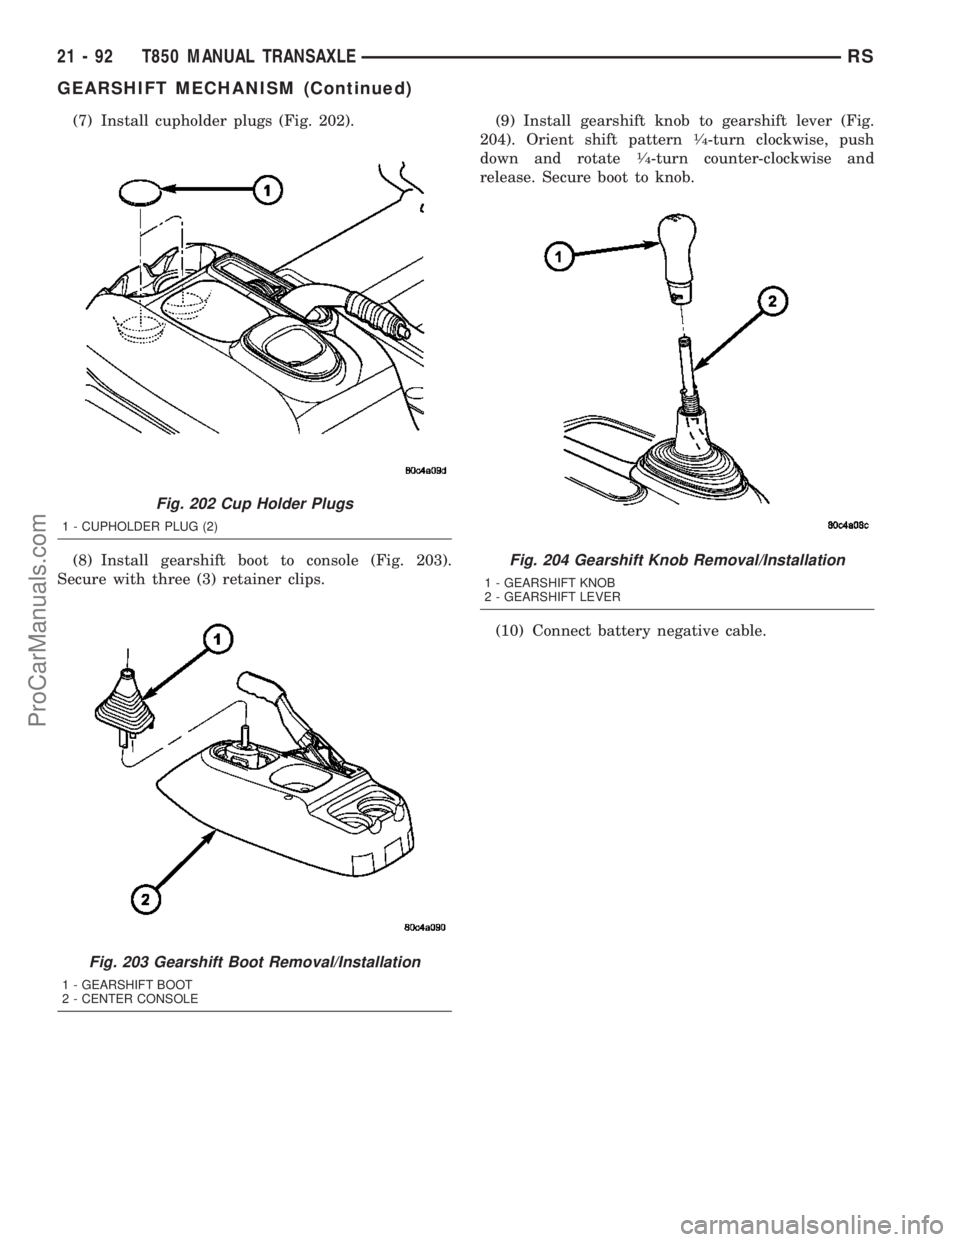
(7) Install cupholder plugs (Fig. 202).
(8) Install gearshift boot to console (Fig. 203).
Secure with three (3) retainer clips.(9) Install gearshift knob to gearshift lever (Fig.
204). Orient shift pattern1¤4-turn clockwise, push
down and rotate1¤4-turn counter-clockwise and
release. Secure boot to knob.
(10) Connect battery negative cable.
Fig. 202 Cup Holder Plugs
1 - CUPHOLDER PLUG (2)
Fig. 203 Gearshift Boot Removal/Installation
1 - GEARSHIFT BOOT
2 - CENTER CONSOLE
Fig. 204 Gearshift Knob Removal/Installation
1 - GEARSHIFT KNOB
2 - GEARSHIFT LEVER
21 - 92 T850 MANUAL TRANSAXLERS
GEARSHIFT MECHANISM (Continued)
ProCarManuals.com
Page 2073 of 2177
(12) Use absorbent toweling to mop up any engine
coolant spills from the preceding operation.
(13) Pull both heater core tubes simultaneously
slightly away from the distribution housing and rear-
ward far enough to disengage the engine compart-
ment ends of the tubes from the dash panel seal.
(14) Remove the heater core tubes and sealing
plate as a unit from beneath the instrument panel.
(15) Use absorbent toweling to clean up any
engine coolant spills from the preceding operation.
REMOVAL - HEATER CORE
WARNING: REFER TO THE APPLICABLE WARN-
INGS AND CAUTIONS FOR THIS SYSTEM BEFORE
PERFORMING THE FOLLOWING OPERATION.
(Refer to 24 - HEATING & AIR CONDITIONING/
PLUMBING FRONT - WARNING - HEATER PLUMB-
ING).
WARNING: ON VEHICLES EQUIPPED WITH AIR-
BAGS, DISABLE THE AIRBAG SYSTEM BEFORE
ATTEMPTING ANY STEERING WHEEL, STEERING
COLUMN, OR INSTRUMENT PANEL COMPONENT
DIAGNOSIS OR SERVICE. DISCONNECT AND ISO-
LATE THE BATTERY NEGATIVE (GROUND) CABLE,
THEN WAIT TWO MINUTES FOR THE AIRBAG SYS-
TEM CAPACITOR TO DISCHARGE BEFORE PER-
FORMING FURTHER DIAGNOSIS OR SERVICE. THIS
IS THE ONLY SURE WAY TO DISABLE THE AIRBAG
SYSTEM. FAILURE TO TAKE THE PROPER PRE-
CAUTIONS COULD RESULT IN ACCIDENTAL AIR-
BAG DEPLOYMENT AND POSSIBLE PERSONAL
INJURY.
(1) Drain the engine cooling system. (Refer to 7 -
COOLING - STANDARD PROCEDURE - COOLING
SYSTEM DRAIN).
(2) Disconnect and isolate the battery negative
cable.
(3) Remove the silencer boot fasteners located
around the base of the lower steering shaft from the
dash panel so that it may be pushed aside.
(4) Remove the brake lamp switch from its mount-
ing bracket. (Refer to 8 - ELECTRICAL/LAMPS/
LIGHTING - EXTERIOR/BRAKE LAMP SWITCH -
REMOVAL).
(5) Disconnect the power brake booster input rod
(push rod) from the pin on the brake pedal arm.
(Refer to 5 - BRAKES - ABS/HYDRAULIC/ME-
CHANICAL/POWER BRAKE BOOSTER - REMOV-
AL).
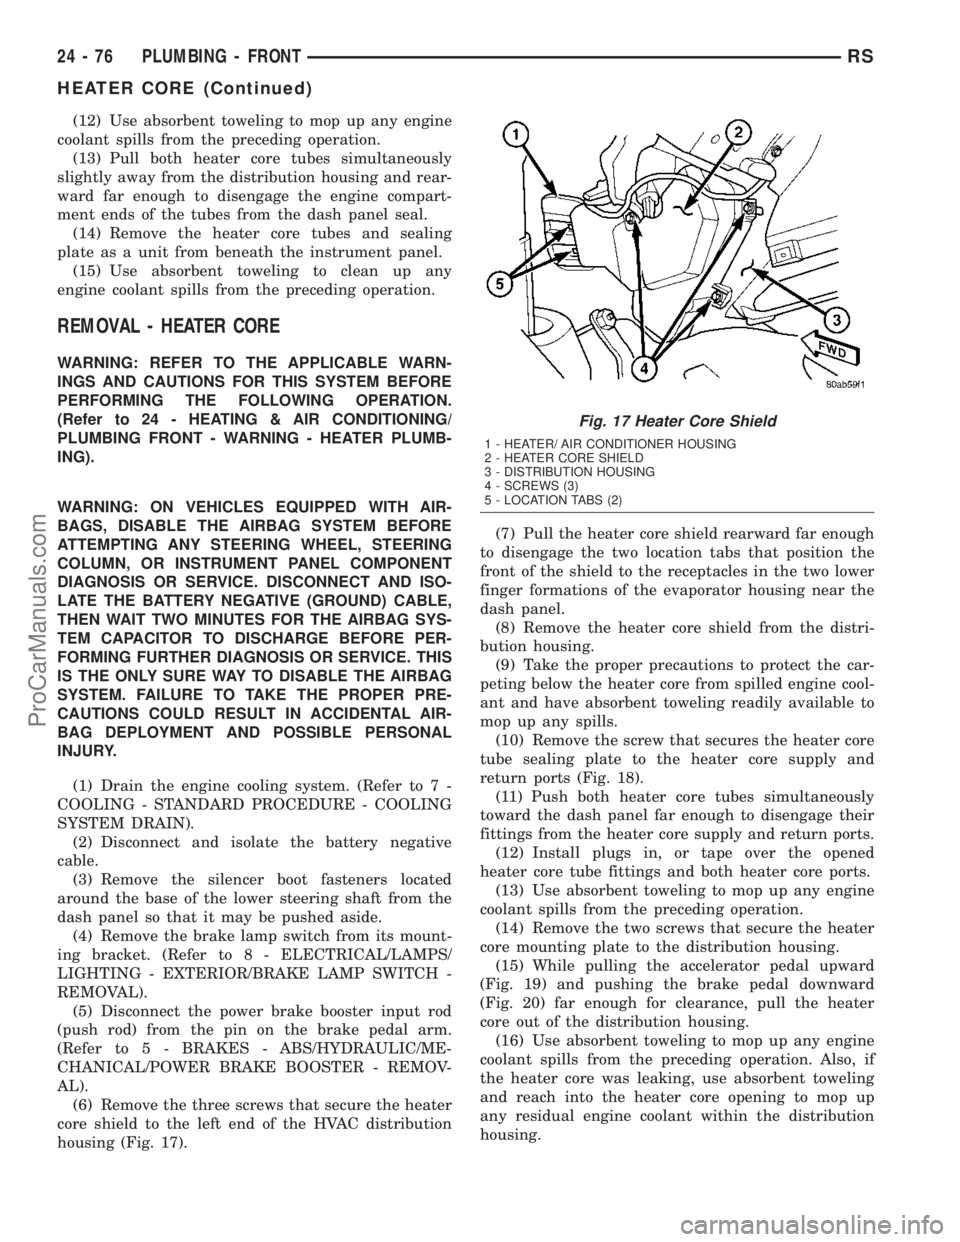
(6) Remove the three screws that secure the heater
core shield to the left end of the HVAC distribution
housing (Fig. 17).(7) Pull the heater core shield rearward far enough
to disengage the two location tabs that position the
front of the shield to the receptacles in the two lower
finger formations of the evaporator housing near the
dash panel.
(8) Remove the heater core shield from the distri-
bution housing.
(9) Take the proper precautions to protect the car-
peting below the heater core from spilled engine cool-
ant and have absorbent toweling readily available to
mop up any spills.
(10) Remove the screw that secures the heater core
tube sealing plate to the heater core supply and
return ports (Fig. 18).
(11) Push both heater core tubes simultaneously
toward the dash panel far enough to disengage their
fittings from the heater core supply and return ports.
(12) Install plugs in, or tape over the opened
heater core tube fittings and both heater core ports.
(13) Use absorbent toweling to mop up any engine
coolant spills from the preceding operation.
(14) Remove the two screws that secure the heater
core mounting plate to the distribution housing.
(15) While pulling the accelerator pedal upward
(Fig. 19) and pushing the brake pedal downward
(Fig. 20) far enough for clearance, pull the heater
core out of the distribution housing.
(16) Use absorbent toweling to mop up any engine
coolant spills from the preceding operation. Also, if
the heater core was leaking, use absorbent toweling
and reach into the heater core opening to mop up
any residual engine coolant within the distribution
housing.
Fig. 17 Heater Core Shield
1 - HEATER/ AIR CONDITIONER HOUSING
2 - HEATER CORE SHIELD
3 - DISTRIBUTION HOUSING
4 - SCREWS (3)
5 - LOCATION TABS (2)
24 - 76 PLUMBING - FRONTRS
HEATER CORE (Continued)
ProCarManuals.com
Page 2075 of 2177
on the front of the shield are engaged in the recepta-
cles in the two lower finger formations of the evapo-
rator housing near the dash panel.
(8) Install and tighten the three screws that secure
the heater core shield to the left end of the HVAC
distribution housing. Tighten the screws to 2 N´m (17
in. lbs.).
(9) Reinstall the silencer under the driver side end
of the instrument panel. (Refer to 23 - BODY/IN-
STRUMENT PANEL/INSTRUMENT PANEL
SILENCER - INSTALLATION).
(10) Reconnect the heater hoses to the heater hose
tubes. (Refer to 24 - HEATING & AIR CONDITION-
ING/PLUMBING - FRONT/HEATER HOSE -
INSTALLATION).
(11) Reconnect the battery negative cable.
(12) Refill the engine cooling system. (Refer to 7 -
COOLING - STANDARD PROCEDURE - COOLING
SYSTEM REFILL).
INSTALLATION - HEATER CORE
WARNING: REFER TO THE APPLICABLE WARN-
INGS AND CAUTIONS FOR THIS SYSTEM BEFORE
PERFORMING THE FOLLOWING OPERATION.
(Refer to 24 - HEATING & AIR CONDITIONING/
PLUMBING FRONT - WARNING - HEATER PLUMB-
ING).
WARNING: ON VEHICLES EQUIPPED WITH AIR-
BAGS, DISABLE THE AIRBAG SYSTEM BEFORE
ATTEMPTING ANY STEERING WHEEL, STEERING
COLUMN, OR INSTRUMENT PANEL COMPONENT
DIAGNOSIS OR SERVICE. DISCONNECT AND ISO-
LATE THE BATTERY NEGATIVE (GROUND) CABLE,
THEN WAIT TWO MINUTES FOR THE AIRBAG SYS-
TEM CAPACITOR TO DISCHARGE BEFORE PER-
FORMING FURTHER DIAGNOSIS OR SERVICE. THIS
IS THE ONLY SURE WAY TO DISABLE THE AIRBAG
SYSTEM. FAILURE TO TAKE THE PROPER PRE-
CAUTIONS COULD RESULT IN ACCIDENTAL AIR-
BAG DEPLOYMENT AND POSSIBLE PERSONAL
INJURY.
(1) While pushing the brake pedal downward and
pulling the accelerator pedal upward far enough for
clearance, slide the heater core into the distribution
housing.
(2) Install and tighten the two screws that secure
the heater core mounting plate to the distribution
housing. Tighten the screws to 2 N´m (17 in. lbs.).
(3) Remove the plugs or tape from the heater core
tube fittings and both heater core ports.
(4) Position both heater core tubes and the sealing
plate simultaneously to the heater core supply and
return ports.(5) The heater core tubes each have a slot that
must be indexed to a location tab within each of the
heater core ports. Adjust the position of the tubes as
required so that the sealing plate fits flush against
the heater core supply and return ports, which indi-
cates that the tubes are properly indexed.
(6) Install and tighten the screw that secures the
heater core tube sealing plate to the heater core sup-
ply and return ports. Tighten the screw to 3 N´m (27
in. lbs.).
(7) Position the heater core shield onto the distri-
bution housing. Be certain that the two location tabs
on the front of the shield are engaged in the recepta-
cles in the two lower finger formations of the evapo-
rator housing near the dash panel.
(8) Install and tighten the three screws that secure
the heater core shield to the left end of the HVAC
distribution housing. Tighten the screws to 2 N´m (17
in. lbs.).
(9) Reconnect the power brake booster input rod
(push rod) to the pin on the brake pedal arm(Refer to
5 - BRAKES/HYDRAULIC/MECHANICAL/POWER
BRAKE BOOSTER - INSTALLATION).
(10) Reinstall the brake lamp switch into its
mounting bracket(Refer to 8 - ELECTRICAL/LAMPS/
LIGHTING - EXTERIOR/BRAKE LAMP SWITCH -
INSTALLATION).
(11) Reinstall the silencer boot around the base of
the lower steering shaft on the dash panel.
(12) Reconnect the battery negative cable.
(13) Refill the engine cooling system. (Refer to 7 -
COOLING - STANDARD PROCEDURE - COOLING
SYSTEM REFILL).
(14) Operate system for two thermostat cycles to
assure elimination of air in the system.
HEATER HOSE
REMOVAL
There are several heater core plumbing configura-
tions used on this model, depending upon the engine
size and other optional equipment. One plumbing
configuration is used for all 2.4L engines (Fig. 21),
while the 3.3L and 3.8L engines have unique heater
return plumbing on the engine for models with or
without an optional engine oil cooler (Fig. 24) or (Fig.
25). There are also unique plumbing configurations
at the heater core for models with or without the
optional rear heater and air conditioner (Fig. 22) or
(Fig. 23). All models use a combination of formed
steel tubing and rubber hoses. In most cases, the
rubber hose is secured to the steel tubing with a
spring tension clamp.
24 - 78 PLUMBING - FRONTRS
HEATER CORE (Continued)
ProCarManuals.com
Page 2141 of 2177
ANTILOCK BRAKE SYSTEM -
DESCRIPTION........................5-75
ANTILOCK BRAKE SYSTEM - OPERATION . . 5-76
ANTILOCK BRAKE SYSTEM BLEEDING -
STANDARD PROCEDURE................5-78
ANTILOCK BRAKE SYSTEM (EXPORT) -
DESCRIPTION........................5-75
A-PILLAR LOWER EXTENSION TRIM -
INSTALLATION.......................23-73
A-PILLAR LOWER EXTENSION TRIM -
REMOVAL..........................23-73
A-PILLAR TRIM - INSTALLATION........23-73
A-PILLAR TRIM - REMOVAL............23-73
A-PILLAR-HEADER, OR B-PILLAR -
INSTALLATION.......................23-17
A-PILLAR-HEADER, OR B-PILLAR -
REMOVAL..........................23-17
APPLIQUE - INSTALLATION.............23-14
APPLIQUE - REMOVAL................23-14
ARM - DESCRIPTION, LOWER CONTROL . . . 2-12
ARM - INSPECTION, LOWER CONTROL....2-14
ARM - INSTALLATION, LOWER CONTROL . . 2-15
ARM - INSTALLATION, REAR WIPER.....8R-14
ARM - INSTALLATION, TORQUE..........3-44
ARM - OPERATION, LOWER CONTROL.....2-12
ARM - REMOVAL, LOWER CONTROL......2-12
ARM - REMOVAL, REAR WIPER.........8R-14
ARM - REMOVAL, TORQUE..............3-44
ARM ALIGNMENT - STANDARD
PROCEDURE, FRONT WIPER............8R-8
ARM (REAR BUSHING - HYDRO) -
ASSEMBLY, LOWER CONTROL...........2-14
ARM (REAR BUSHING - HYDRO) -
DISASSEMBLY, LOWER CONTROL........2-14
ARM (REAR BUSHING - STANDARD) -
ASSEMBLY, LOWER CONTROL...........2-14
ARM (REAR BUSHING - STANDARD) -
DISASSEMBLY, LOWER CONTROL........2-13
ARMREST - INSTALLATION.............23-90
ARMREST - REMOVAL................23-90
ARMS - DESCRIPTION, ROCKER........9-109
ARMS - INSPECTION, ROCKER...........9-35
ARMS - INSTALLATION, FRONT WIPER....8R-9
ARMS - INSTALLATION, ROCKER.........9-35
ARMS - OPERATION, ROCKER..........9-109
ARMS - REMOVAL, FRONT WIPER........8R-9
ARMS - REMOVAL, ROCKER.............9-34
ARMS AND SHAFT - ASSEMBLY,
ROCKER............................9-109
ARMS AND SHAFT - DISASSEMBLY,
ROCKER............................9-109
ARMS AND SHAFT - INSTALLATION,
ROCKER............................9-110
ARMS AND SHAFT - REMOVAL, ROCKER . . 9-109
ASSIST HANDLE - INSTALLATION........23-73
ASSIST HANDLE - REMOVAL...........23-73
ASSIST STRAP - INSTALLATION, FRONT
SEATBACK..........................23-91
ASSIST STRAP - REMOVAL, FRONT
SEATBACK..........................23-91
ATC - OPERATION, THREE ZONE.........24-3
ATC - OPERATION, TWO ZONE.........24-106
ATTACHED - INSTALLATION, EXTERIOR
NAME PLATES - ADHESIVE.............23-50
ATTACHED - INSTALLATION, EXTERIOR
NAME PLATES - TAPE.................23-50
ATTACHED - REMOVAL, EXTERIOR NAME
PLATES - ADHESIVE..................23-50
ATTACHED - REMOVAL, EXTERIOR NAME
PLATES - TAPE ......................23-50
AUDIO - DIAGNOSIS AND TESTING.......8A-2
AUDIO/VIDEO - DESCRIPTION...........8A-1
AUDIO/VIDEO - OPERATION.............8A-2
AUTO SHUT DOWN RELAY -
DESCRIPTION.........................8I-3
AUTO SHUT DOWN RELAY - OPERATION . . . 8I-3
AUTOMATIC ADJUSTER - DIAGNOSIS
AND TESTING, DRUM BRAKE
............5-13
AUTOMATIC ADJUSTER TENSION
RELEASE - STANDARD PROCEDURE,
PARKING BRAKE
......................5-58
AUTOMATIC ADJUSTER TENSION RESET
- STANDARD PROCEDURE, PARKING
BRAKE
..............................5-59
AUTOMATIC DAY / NIGHT MIRROR -
DESCRIPTION
.......................8N-47
AUTOMATIC DAY / NIGHT MIRROR -
DIAGNOSIS AND TESTING
.............8N-47AUTOMATIC DAY / NIGHT MIRROR -
OPERATION.........................8N-47
AUTOMATIC TEMPERATURE CONTROL -
DESCRIPTION........................24-2
AUTOMATIC TRANSAXLE -
DESCRIPTION, 41TE.................21-117
AUTOMATIC TRANSAXLE - OPERATION,
41TE.............................21-119
AUTOMATIC TRANSAXLE, SPECIAL
TOOLS - 41TE......................21-183
AUTOSTICK SWITCH - DESCRIPTION....21-189
AUTOSTICK SWITCH - OPERATION......21-189
AWD - INSTALLATION..............2-39,2-44
AWD - INSTALLATION, REAR WHEEL
SPEED SENSOR.......................5-80
AWD - REMOVAL.................2-38,2-44
AWD - REMOVAL, REAR WHEEL SPEED
SENSOR............................5-80
AWD AND HEAVY DUTY - INSTALLATION . . . 2-35
AWD AND HEAVY DUTY - REMOVAL......2-35
AXLE SEALS - INSTALLATION...........21-61
AXLE SEALS - REMOVAL..............21-61
B OR C-PILLAR - INSTALLATION, SEAT
BELT HEIGHT ADJUSTER..............8O-12
B OR C-PILLAR - REMOVAL, SEAT BELT
HEIGHT ADJUSTER...................8O-12
BACK - INSTALLATION, BENCH SEAT....23-101
BACK - QUAD BUCKET - INSTALLATION,
BUCKET SEAT.......................23-97
BACK - QUAD BUCKET - REMOVAL,
BUCKET SEAT.........................23-97
BACK - REMOVAL, BENCH SEAT........23-101
BACK COVER - INSTALLATION, BENCH
SEAT .............................23-102
BACK COVER - REMOVAL, BENCH SEAT . . 23-102
BACK HINGE - REMOVAL, BENCH SEAT . . 23-100
BACK HINGE COVERS - QUAD BUCKET,
50/50 SPLIT, BENCH - INSTALLATION,
SEAT .............................23-100
BACK HINGE COVERS - QUAD BUCKET,
50/50 SPLIT, BENCH - REMOVAL, SEAT . . 23-100
BACKING PLATE - INSTALLATION,
STEERING COLUMN COVER............23-69
BACKING PLATE - REMOVAL, STEERING
COLUMN COVER.....................23-69
BACK-UP LAMP SWITCH -
INSTALLATION.......................21-62
BACK-UP LAMP SWITCH - REMOVAL.....21-62
BAG RETAINER - INSTALLATION,
PLASTIC GROCERY..................23-103
BAG RETAINER - REMOVAL, PLASTIC
GROCERY.........................23-103
BALANCE - STANDARD PROCEDURE,
TIRE AND WHEEL.....................22-5
BALANCE SHAFTS AND CARRIER
ASSEMBLY - DESCRIPTION.............9-69
BALANCE SHAFTS AND CARRIER
ASSEMBLY - INSTALLATION.............9-72
BALANCE SHAFTS AND CARRIER
ASSEMBLY - OPERATION...............9-69
BALANCE SHAFTS AND CARRIER
ASSEMBLY - REMOVAL.................9-69
BALL BEARING - INSTALLATION, END
COVER.............................21-10
BALL BEARING - REMOVAL, END COVER . . . 21-9
BALL JOINT - DESCRIPTION, LOWER......2-10
BALL JOINT - DIAGNOSIS AND TESTING,
LOWER.............................2-10
BALL JOINT - OPERATION, LOWER.......2-10
BALL JOINT SEAL BOOT - INSTALLATION . . 2-11
BALL JOINT SEAL BOOT - REMOVAL......2-11
BAR - DESCRIPTION, STABILIZER....2-16,2-43
BAR - DESCRIPTION, TRACK............2-44
BAR - INSPECTION, STABILIZER..........2-17
BAR - INSTALLATION, STABILIZER........2-17
BAR - INSTALLATION, TRACK............2-45
BAR - OPERATION, STABILIZER......2-16,2-44
BAR - OPERATION, TRACK..............2-44
BAR - REMOVAL, STABILIZER...........2-17
BAR - REMOVAL, TRACK...............2-44
BAR CUSHION - INSTALLATION,
STABILIZER
...........................2-4
BAR CUSHION - REMOVAL, STABILIZER
....2-4
BASE BRAKE BLEEDING - STANDARD
PROCEDURE
..........................5-7
BASE BRAKE SYSTEM - DIAGNOSIS AND
TESTING
.............................5-4
BASE BRAKE SYSTEM, SPECIAL TOOLS
....5-10BASE BRAKES - DESCRIPTION............5-3
BASE BRAKES - OPERATION..............5-3
BASE BRAKES (EXPORT) - DESCRIPTION . . . 5-3
BASE COAT/CLEARCOAT FINISH -
DESCRIPTION.......................23-84
BATTERY - DESCRIPTION...............8F-7
BATTERY - DIAGNOSIS AND TESTING.....8F-9
BATTERY - OPERATION.................8F-9
BATTERY - REMOVAL.................8F-15
BATTERY CABLE - DIAGNOSIS AND
TESTING...........................8F-16
BATTERY CABLES - DESCRIPTION.......8F-16
BATTERY CABLES - INSTALLATION.......8F-18
BATTERY CABLES - OPERATION.........8F-16
BATTERY CABLES - REMOVAL..........8F-18
BATTERY CHARGING - STANDARD
PROCEDURE, CONVENTIONAL..........8F-11
BATTERY CHARGING - STANDARD
PROCEDURE, SPIRAL PLATE............8F-10
BATTERY ELECTROLYTE LEVEL -
STANDARD PROCEDURE, CHECKING.....8F-14
BATTERY HOLDDOWN - DESCRIPTION....8F-15
BATTERY HOLDDOWN - INSTALLATION . . . 8F-16
BATTERY HOLDDOWN - OPERATION.....8F-15
BATTERY HOLDDOWN - REMOVAL.......8F-16
BATTERY REPLACEMENT - STANDARD
PROCEDURE........................8N-42
BATTERY, SPECIFICATIONS.............8N-43
BATTERY SYSTEM - CLEANING...........8F-5
BATTERY SYSTEM - DESCRIPTION........8F-1
BATTERY SYSTEM - DIAGNOSIS AND
TESTING............................8F-2
BATTERY SYSTEM - INSPECTION.........8F-5
BATTERY SYSTEM - OPERATION.........8F-2
BATTERY SYSTEM - SPECIFICATIONS......8F-6
BATTERY SYSTEM SPECIAL TOOLS,
SPECIAL TOOLS......................8F-7
BATTERY TEMPERATURE SENSOR -
DESCRIPTION.......................8F-23
BATTERY TEMPERATURE SENSOR -
OPERATION.........................8F-23
BATTERY TEMPERATURE SENSOR -
REMOVAL..........................8F-23
BATTERY TEMPERATURE SENSOR -
SPECIFICATIONS.....................8F-22
BATTERY TRAY - DESCRIPTION.........8F-18
BATTERY TRAY - INSTALLATION.........8F-19
BATTERY TRAY - OPERATION...........8F-19
BATTERY TRAY - REMOVAL............8F-19
BEARING - DESCRIPTION, HUB.......2-30,2-5
BEARING - DIAGNOSIS AND TESTING,
HUB.............................2-30,2-5
BEARING - INSTALLATION, CLUTCH
RELEASE LEVER.......................6-7
BEARING - INSTALLATION, END COVER
BALL..............................21-10
BEARING - INSTALLATION, HUB.......2-32,2-5
BEARING - OPERATION, HUB.........2-30,2-5
BEARING - REMOVAL, CLUTCH RELEASE
LEVER...............................6-6
BEARING - REMOVAL, END COVER BALL . . . 21-9
BEARING - REMOVAL, HUB..........2-31,2-5
BEARING CLEARANCE - STANDARD
PROCEDURE, MEASURING
CONNECTING ROD...................9-120
BEARING CLEARANCE USING
PLASTIGAGE - STANDARD
PROCEDURE, MEASURING..........9-12,9-84
BEARING FITTING - STANDARD
PROCEDURE, MAIN...................9-123
BEARING PRELOAD - ADJUSTMENT,
DIFFERENTIAL......................21-199
BEARINGS - INSTALLATION,
CRANKSHAFT MAIN..................9-124
BEARINGS - REMOVAL, CRANKSHAFT
MAIN..............................9-124
BEARINGS (IN BLOCK) - DESCRIPTION,
CAMSHAFT.........................9-115
BEARINGS (IN BLOCK) - INSPECTION,
CAMSHAFT.........................9-115
BEARINGS (IN BLOCK) - INSTALLATION,
CAMSHAFT
.........................9-115
BEARINGS (IN BLOCK) - OPERATION,
CAMSHAFT
.........................9-115
BEARINGS (IN BLOCK) - REMOVAL,
CAMSHAFT
.........................9-115
BELLCRANK - INSTALLATION
...........23-34
BELLCRANK - REMOVAL
...............23-34
2 INDEXRS
Description Group-Page Description Group-Page Description Group-Page
ProCarManuals.com