2003 CHEVROLET TRAIL BLAZER ABS
[x] Cancel search: ABSPage 114 of 436
To slide the crossrails to where you want them, pull up
on the lever on each side of the crossrail. This will
release the crossrail and allow you to slide it. When the
crossrail is where you want it, press down on the
levers to lock it into place.
Notice:Loading cargo on the luggage carrier that
weighs more than 220 lbs (100 kg) or hangs over the
rear or sides of the vehicle may damage your
vehicle. Load cargo so that it rests on the slats as
far forward as possible and against the side
rails, making sure to fasten it securely.
Don't exceed the maximum vehicle capacity when
loading your vehicle. For more information on vehicle
capacity and loading, see
Loading Your Vehicle on
page 4-48.
To prevent damage or loss of cargo as you're driving,
check now and then to make sure the luggage carrier is
locked and cargo is still securely fastened.
When the luggage carrier is not in use, place the
crossrails at the following positions for wind noise
reduction. Place one crossrail at the rear most point of
the vehicle and the other crossrail above the opening
of the rear door.
Rear Floor Storage Lid
{CAUTION:
If any removable convenience item is not
secured properly, it can move around in a
collision or sudden stop. People in the vehicle
could be injured. Be sure to secure any such
item properly.
Your vehicle has a rear cargo area with a removeable
storage lid.
To remove the rear ¯oor storage lid, do the following:
1. Press the latch release and lift up the latch handle.
2. Raise the lid slightly to unhook it.
3. Pull the lid toward you to release it from the forward
mounting tabs.
To reinstall the rear ¯oor storage lid, reverse the
previous steps. Make sure the lid is secure by applying
slight pressure to the latch until you hear it click.
2-48
Page 233 of 436
Anti-lock Brake System
Your vehicle has anti-lock brakes. ABS is an advanced
electronic braking system that will help prevent a
braking skid.
When you start your engine and begin to drive away,
your anti-lock brake system will check itself. You
may hear a momentary motor or clicking noise while
this test is going on. This is normal.
If there is a problem with
the anti-lock brake system,
this warning light will
stay on. See
Anti-Lock
Brake System Warning
Light on page 3-42
.
Along with ABS, your vehicle has a Dynamic Rear
Proportioning (DRP) system. If there is a DRP problem,
both the brake and ABS warning lights will come on
accompanied by a 10-second chime. The lights
and chime will come on each time the ignition is turned
on until the problem is repaired. See your dealer for
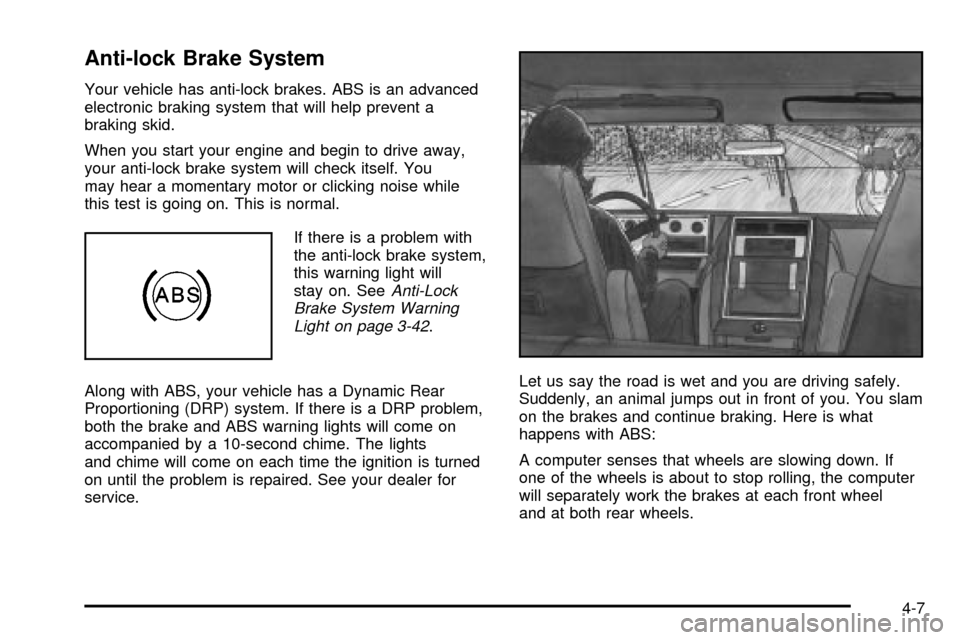
service.Let us say the road is wet and you are driving safely.
Suddenly, an animal jumps out in front of you. You slam
on the brakes and continue braking. Here is what
happens with ABS:
A computer senses that wheels are slowing down. If
one of the wheels is about to stop rolling, the computer
will separately work the brakes at each front wheel
and at both rear wheels.
4-7
Page 241 of 436

If your vehicle starts to slide, ease your foot off the
accelerator pedal and quickly steer the way you want
the vehicle to go. If you start steering quickly enough,
your vehicle may straighten out. Always be ready
for a second skid if it occurs.
Of course, traction is reduced when water, snow, ice,
gravel or other material is on the road. For safety,
you will want to slow down and adjust your driving to
these conditions. It is important to slow down on slippery
surfaces because stopping distance will be longer and
vehicle control more limited.
While driving on a surface with reduced traction, try
your best to avoid sudden steering, acceleration
or braking (including engine braking by shifting to a
lower gear). Any sudden changes could cause the tires
to slide. You may not realize the surface is slippery
until your vehicle is skidding. Learn to recognize warning
clues Ð such as enough water, ice or packed snow
on the road to make a ªmirrored surfaceº Ð and slow
down when you have any doubt.
Remember: Any anti-lock brake system (ABS) helps
avoid only the braking skid.Off-Road Driving with Your
Four-Wheel-Drive Vehicle
This off-road guide is for vehicles that have four-wheel
drive. Also, seeBraking on page 4-6. If your vehicle
does not have four-wheel drive, you should not
drive off-road unless you are on a level, solid surface.
Off-road driving can be great fun. But it does have
some de®nite hazards. The greatest of these is
the terrain itself.
ªOff-roadingº means you have left the great North
American road system behind. Traffic lanes are not
marked. Curves are not banked. There are no
road signs. Surfaces can be slippery, rough, uphill or
downhill. In short, you have gone right back to nature.
Off-road driving involves some new skills. And that
is why it is very important that you read this guide.
You will ®nd many driving tips and suggestions. These
will help make your off-road driving safer and more
enjoyable.
4-15
Page 284 of 436
Driving On Grades
Reduce speed and shift to a lower gearbeforeyou start
down a long or steep downgrade. If you don't shift
down, you might have to use your brakes so much that
they would get hot and no longer work well.
You can tow in DRIVE (D). You may want to shift the
transmission to THIRD (3) or a lower gear, under heavy
loads or hilly conditions.
When towing at high altitude on steep uphill grades,
consider the following: Engine coolant will boil at a lower
temperature than at normal altitudes. If you turn your
engine off immediately after towing at high altitude
on steep uphill grades, your vehicle may show signs
similar to engine overheating. To avoid this, let the
engine run while parked (preferably on level ground)
with the automatic transmission in PARK (P) for a
few minutes before turning the engine off. If you do get
the overheat warning, see
Engine Overheating on
page 5-27.
Parking on Hills
{CAUTION:
You really should not park your vehicle, with a
trailer attached, on a hill. If something goes
wrong, your rig could start to move. People
can be injured, and both your vehicle and the
trailer can be damaged.
But if you ever have to park your rig on a hill, here's
how to do it:
1. Apply your regular brakes, but don't shift into
PARK (P) yet. When parking uphill, turn your wheels
away from the curb. When parking downhill, turn
your wheels into the curb.
2. Have someone place chocks behind the trailer
wheels.
3. When the wheel chocks are in place, release the
regular brakes until the chocks absorb the load.
4. Reapply the regular brakes. Then apply your
parking brake, and then shift into PARK (P).
5. Release the regular brakes.
4-58
Page 337 of 436
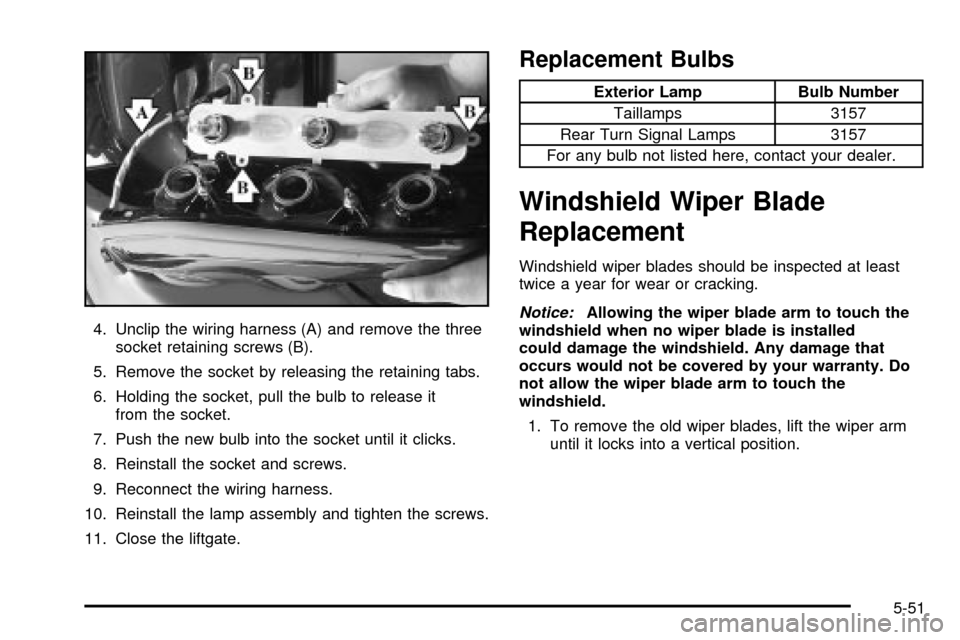
4. Unclip the wiring harness (A) and remove the three
socket retaining screws (B).
5. Remove the socket by releasing the retaining tabs.
6. Holding the socket, pull the bulb to release it
from the socket.
7. Push the new bulb into the socket until it clicks.
8. Reinstall the socket and screws.
9. Reconnect the wiring harness.
10. Reinstall the lamp assembly and tighten the screws.
11. Close the liftgate.
Replacement Bulbs
Exterior Lamp Bulb Number
Taillamps 3157
Rear Turn Signal Lamps 3157
For any bulb not listed here, contact your dealer.
Windshield Wiper Blade
Replacement
Windshield wiper blades should be inspected at least
twice a year for wear or cracking.
Notice:Allowing the wiper blade arm to touch the
windshield when no wiper blade is installed
could damage the windshield. Any damage that
occurs would not be covered by your warranty. Do
not allow the wiper blade arm to touch the
windshield.
1. To remove the old wiper blades, lift the wiper arm
until it locks into a vertical position.
5-51
Page 375 of 436
Fuses and Circuit Breakers
The wiring circuits in your vehicle are protected from
short circuits by a combination of fuses and circuit
breakers. This greatly reduces the chance of ®res
caused by electrical problems.
Look at the silver-colored band inside the fuse. If the
band is broken or melted, replace the fuse. Be sure you
replace a bad fuse with a new one of the identical
size and rating.
If you ever have a problem on the road and don't have
a spare fuse, you can borrow one that has the same
amperage. Just pick some feature of your vehicle
that you can get along without Ð like the radio or
cigarette lighterÐ and use its fuse, if it is the correct
amperage. Replace it as soon as you can.
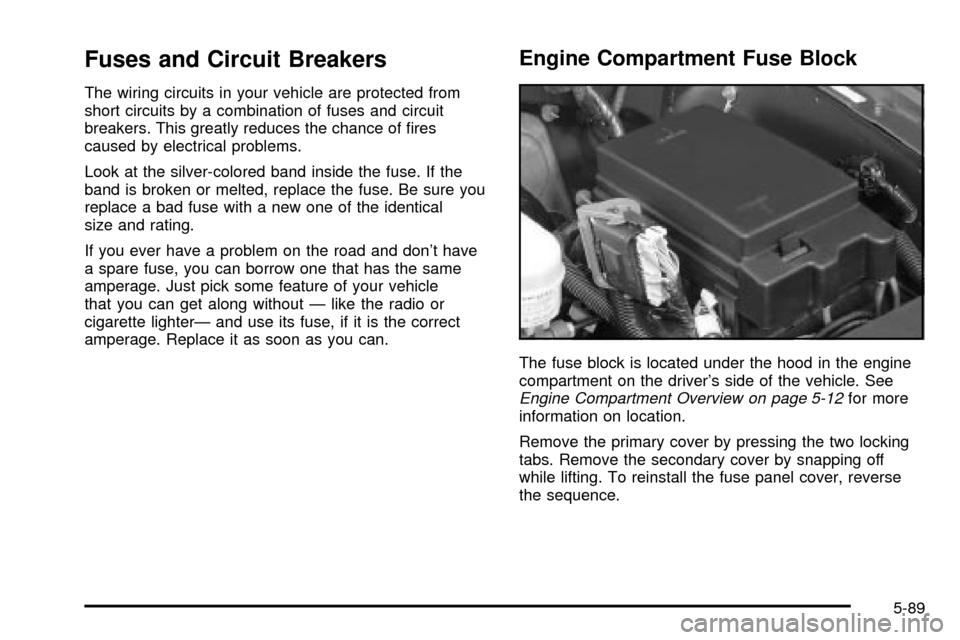
Engine Compartment Fuse Block
The fuse block is located under the hood in the engine
compartment on the driver's side of the vehicle. See
Engine Compartment Overview on page 5-12for more
information on location.
Remove the primary cover by pressing the two locking
tabs. Remove the secondary cover by snapping off
while lifting. To reinstall the fuse panel cover, reverse
the sequence.
5-89
Page 377 of 436

Fuses Usage
1Electrically-Controlled Air
Suspension
2Passenger's Side High-Beam
Headlamp
3Passenger's Side Low-Beam
Headlamp
4 Back-Up-Trailer Lamps
5Driver's Side High-Beam
Headlamp
6Driver's Side Low-Beam
Headlamp
7 Wash
8 Automatic Transfer Case
9 Windshield Wipers
10 Powertrain Control Module B
11 Fog Lamps
12 Stop Lamp
13 Cigarette Lighter
14 Ignition Coils
15 Air Suspension Ride
16 TBD-Ignition 1
17 CrankFuses Usage
18 Air Bag
19 Electric Brake
20 Cooling Fan
21 Horn
22 Ignition E
23 Electronic Throttle Control
24Instrument Panel Cluster, Driver
Information Center
25Automatic Shift Lock Control
System
26 Engine 1
27 Back-Up
28 Powertrain Control Module 1
29 Oxygen Sensor
30 Air Conditioning
31 Truck Body Controller
32 Trailer
33 Anti-Lock Brakes (ABS)
34 Ignition A
35 Blower Motor
36 Ignition B
5-91
Page 380 of 436
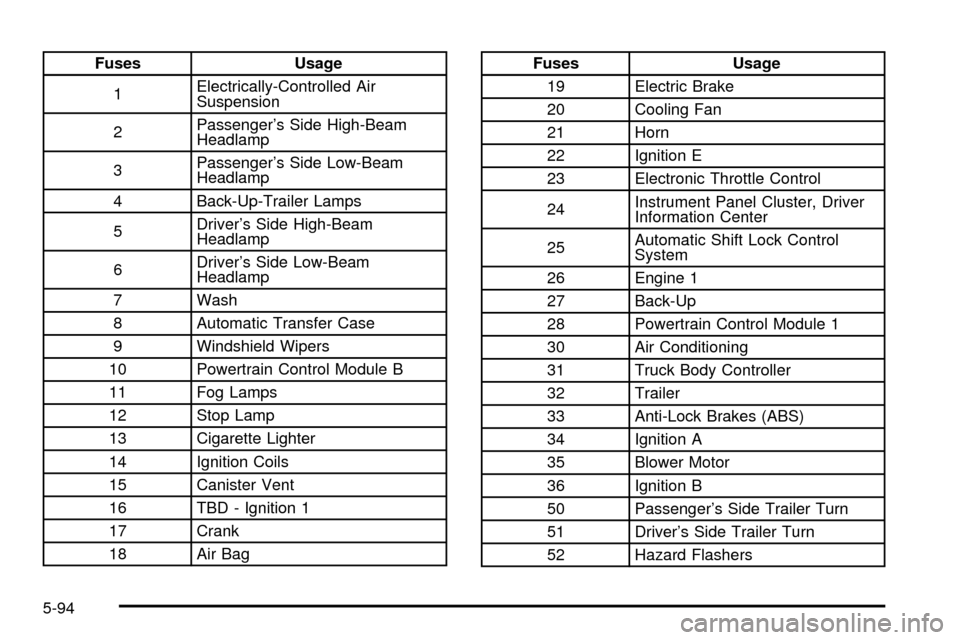
Fuses Usage
1Electrically-Controlled Air
Suspension
2Passenger's Side High-Beam
Headlamp
3Passenger's Side Low-Beam
Headlamp
4 Back-Up-Trailer Lamps
5Driver's Side High-Beam
Headlamp
6Driver's Side Low-Beam
Headlamp
7 Wash
8 Automatic Transfer Case
9 Windshield Wipers
10 Powertrain Control Module B
11 Fog Lamps
12 Stop Lamp
13 Cigarette Lighter
14 Ignition Coils
15 Canister Vent
16 TBD - Ignition 1
17 Crank
18 Air BagFuses Usage
19 Electric Brake
20 Cooling Fan
21 Horn
22 Ignition E
23 Electronic Throttle Control
24Instrument Panel Cluster, Driver
Information Center
25Automatic Shift Lock Control
System
26 Engine 1
27 Back-Up
28 Powertrain Control Module 1
30 Air Conditioning
31 Truck Body Controller
32 Trailer
33 Anti-Lock Brakes (ABS)
34 Ignition A
35 Blower Motor
36 Ignition B
50 Passenger's Side Trailer Turn
51 Driver's Side Trailer Turn
52 Hazard Flashers
5-94