2003 CHEVROLET TRAIL BLAZER horn
[x] Cancel search: hornPage 175 of 436

Remote Lock Feedback
Press the personalization button until REMOTE LOCK
FEEDBACK appears in the display. To select your
personalization for the feedback you will receive when
locking the vehicle with the remote keyless entry
transmitter, press the select button while REMOTE
LOCK FEEDBACK is displayed on the DIC. Pressing
the select button will scroll through the following choices:
·LOCK FEEDBACK: BOTH (default)
·LOCK FEEDBACK: OFF
·LOCK FEEDBACK: HORN
·LOCK FEEDBACK: LAMPSIf you choose both, the parking lamps will ¯ash each
time you press the button with the lock symbol on
the remote keyless entry transmitter and the horn will
chirp the second time you press the lock button.
If you choose off, there will be no feedback when locking
the vehicle.
If you choose horn, the horn will chirp the second time
you press the button with the lock symbol on the
remote keyless entry transmitter.
If you choose lamps, the parking lamps will ¯ash each
time you press the button with the lock symbol on
the remote keyless entry transmitter.
Choose one of the four options and press the
personalization button while it is displayed on the DIC to
select it and move on to the next feature.
3-57
Page 176 of 436

Remote Unlock Feedback
Press the personalization button until REMOTE
UNLOCK FEEDBACK appears in the display. To select
your personalization for the feedback you will receive
when unlocking the vehicle with the remote keyless
entry transmitter, press the select button while REMOTE
UNLOCK FEEDBACK is displayed on the DIC.
Pressing the select button will scroll through the
following choices:
·UNLOCK FEEDBACK: LAMPS (default)
·UNLOCK FEEDBACK: BOTH
·UNLOCK FEEDBACK: OFF
·UNLOCK FEEDBACK: HORN
If you choose lamps, the parking lamps will ¯ash each
time you press the button with the unlock symbol on the
remote keyless entry transmitter.
If you choose both, the parking lamps will ¯ash each
time you press the button with the unlock symbol on the
remote keyless entry transmitter. The horn will chirp
the second time you press the unlock button.
If you choose off, there will be no feedback when
unlocking the vehicle.
If you choose horn, the horn will chirp the second time
you press the button with the unlock symbol on the
remote keyless entry transmitter.
Choose one of the four options and press the
personalization button while it is displayed on the DIC to
select it and move on to the next feature.
Headlamps on at Exit
Press the personalization button until HEADLAMPS ON
AT EXIT appears in the display. To select your
personalization for how long the headlamps will stay on
when you turn off the vehicle, press the select button
while HEADLAMPS ON AT EXIT is displayed on
the DIC. Pressing the select button will scroll through
the following choices:
·HEADLAMP DELAY: 10 SEC (default)
·HEADLAMP DELAY: 20 SEC
·HEADLAMP DELAY: 40 SEC
·HEADLAMP DELAY: 60 SEC
·HEADLAMP DELAY: 120 SEC
·HEADLAMP DELAY: 180 SEC
·HEADLAMP DELAY OFF
The amount of time you choose will be the amount of
time that the headlamps stay on after you turn off
the vehicle. If you choose off, the headlamps will turn
off as soon as you turn off the vehicle.
Choose one of the seven options and press the
personalization button while it is displayed on the DIC to
select it and move on to the next feature.
3-58
Page 247 of 436

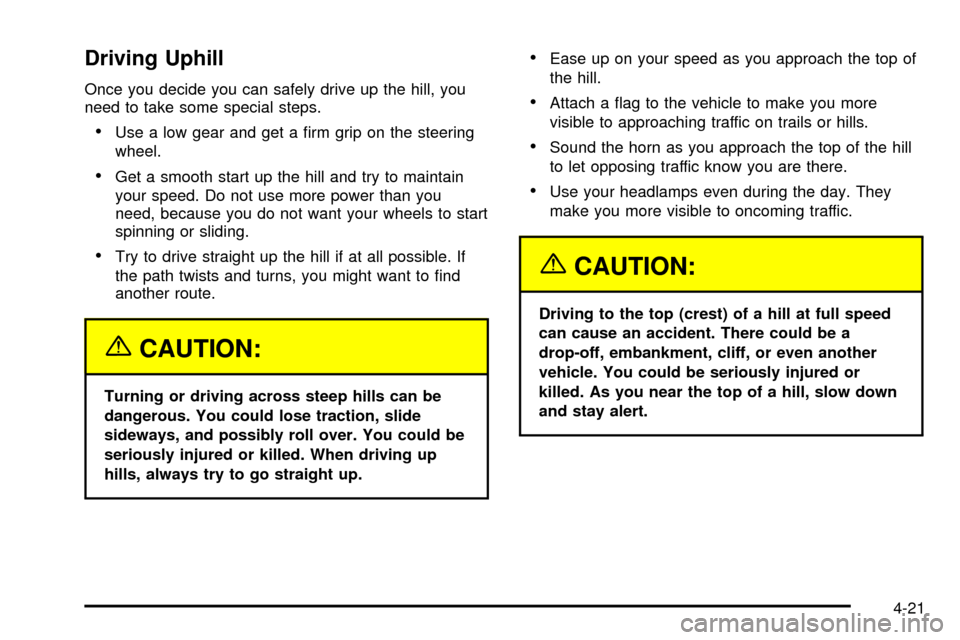
Driving Uphill
Once you decide you can safely drive up the hill, you
need to take some special steps.
·Use a low gear and get a ®rm grip on the steering
wheel.
·Get a smooth start up the hill and try to maintain
your speed. Do not use more power than you
need, because you do not want your wheels to start
spinning or sliding.
·Try to drive straight up the hill if at all possible. If
the path twists and turns, you might want to ®nd
another route.
{CAUTION:
Turning or driving across steep hills can be
dangerous. You could lose traction, slide
sideways, and possibly roll over. You could be
seriously injured or killed. When driving up
hills, always try to go straight up.
·Ease up on your speed as you approach the top of
the hill.
·Attach a ¯ag to the vehicle to make you more
visible to approaching traffic on trails or hills.
·Sound the horn as you approach the top of the hill
to let opposing traffic know you are there.
·Use your headlamps even during the day. They
make you more visible to oncoming traffic.
{CAUTION:
Driving to the top (crest) of a hill at full speed
can cause an accident. There could be a
drop-off, embankment, cliff, or even another
vehicle. You could be seriously injured or
killed. As you near the top of a hill, slow down
and stay alert.
4-21
Page 377 of 436

Fuses Usage
1Electrically-Controlled Air
Suspension
2Passenger's Side High-Beam
Headlamp
3Passenger's Side Low-Beam
Headlamp
4 Back-Up-Trailer Lamps
5Driver's Side High-Beam
Headlamp
6Driver's Side Low-Beam
Headlamp
7 Wash
8 Automatic Transfer Case
9 Windshield Wipers
10 Powertrain Control Module B
11 Fog Lamps
12 Stop Lamp
13 Cigarette Lighter
14 Ignition Coils
15 Air Suspension Ride
16 TBD-Ignition 1
17 CrankFuses Usage
18 Air Bag
19 Electric Brake
20 Cooling Fan
21 Horn
22 Ignition E
23 Electronic Throttle Control
24Instrument Panel Cluster, Driver
Information Center
25Automatic Shift Lock Control
System
26 Engine 1
27 Back-Up
28 Powertrain Control Module 1
29 Oxygen Sensor
30 Air Conditioning
31 Truck Body Controller
32 Trailer
33 Anti-Lock Brakes (ABS)
34 Ignition A
35 Blower Motor
36 Ignition B
5-91
Page 378 of 436

Fuses Usage
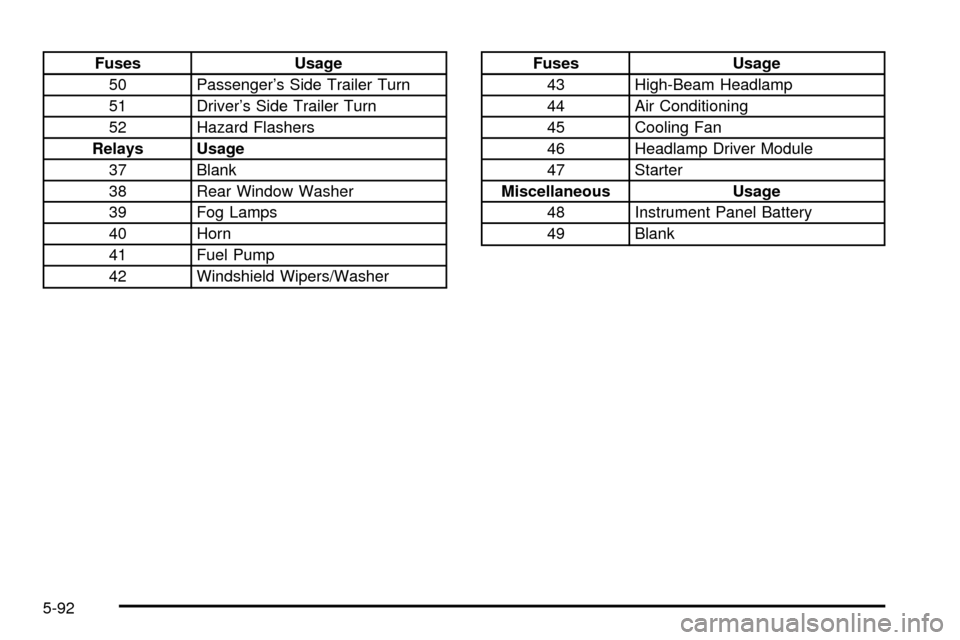
50 Passenger's Side Trailer Turn
51 Driver's Side Trailer Turn
52 Hazard Flashers
Relays Usage
37 Blank
38 Rear Window Washer
39 Fog Lamps
40 Horn
41 Fuel Pump
42 Windshield Wipers/WasherFuses Usage
43 High-Beam Headlamp
44 Air Conditioning
45 Cooling Fan
46 Headlamp Driver Module
47 Starter
Miscellaneous Usage
48 Instrument Panel Battery
49 Blank
5-92
Page 380 of 436

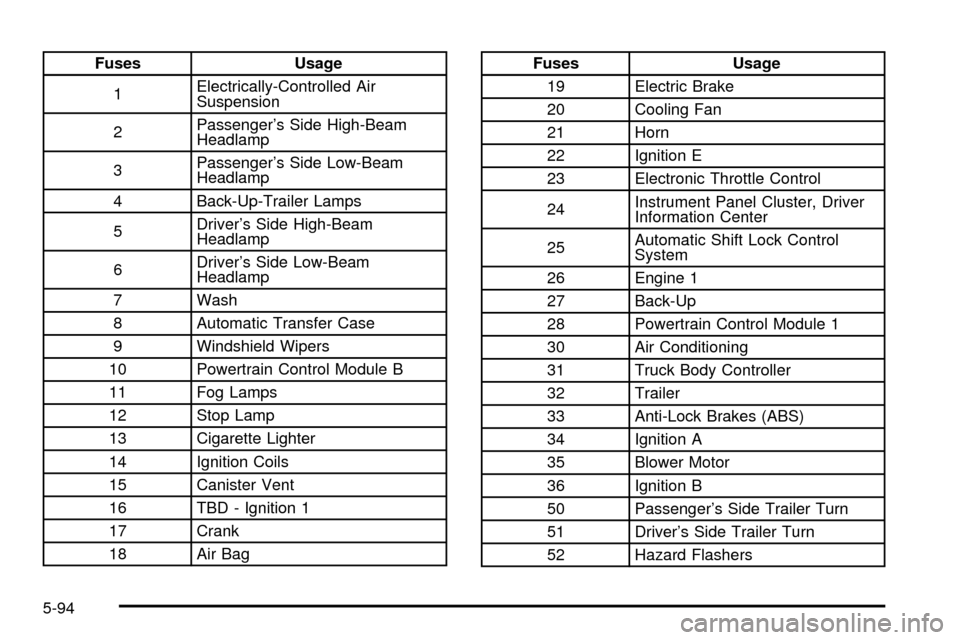
Fuses Usage
1Electrically-Controlled Air
Suspension
2Passenger's Side High-Beam
Headlamp
3Passenger's Side Low-Beam
Headlamp
4 Back-Up-Trailer Lamps
5Driver's Side High-Beam
Headlamp
6Driver's Side Low-Beam
Headlamp
7 Wash
8 Automatic Transfer Case
9 Windshield Wipers
10 Powertrain Control Module B
11 Fog Lamps
12 Stop Lamp
13 Cigarette Lighter
14 Ignition Coils
15 Canister Vent
16 TBD - Ignition 1
17 Crank
18 Air BagFuses Usage
19 Electric Brake
20 Cooling Fan
21 Horn
22 Ignition E
23 Electronic Throttle Control
24Instrument Panel Cluster, Driver
Information Center
25Automatic Shift Lock Control
System
26 Engine 1
27 Back-Up
28 Powertrain Control Module 1
30 Air Conditioning
31 Truck Body Controller
32 Trailer
33 Anti-Lock Brakes (ABS)
34 Ignition A
35 Blower Motor
36 Ignition B
50 Passenger's Side Trailer Turn
51 Driver's Side Trailer Turn
52 Hazard Flashers
5-94
Page 381 of 436

Fuses Usage
53 Oxygen Sensor Bank A
54 Oxygen Sensor Bank B
55 Injector Bank A
56 Injector Bank B
Relays Usage
37 Headlamp Washer
38 Rear Window Washer
39 Fog Lamps
40 Horn
41 Fuel Pump
42 Windshield Wipers/Washer
43 High-Beam Headlamp
44 Air Conditioning
45 Cooling Fan
46 Headlamp Driver Module
47 Starter
58 Ignition 1
Miscellaneous Usage
48 Instrument Panel BatteryRear Underseat Fuse Block
5-95
Page 427 of 436

H
Hazard Warning Flashers................................... 3-6
Head Restraints............................................... 1-5
Headlamp High/Low-Beam Changer.................... 3-9
Headlamp Washer..........................................3-11
Headlamps....................................................5-50
Bulb Replacement.......................................5-50
Electrical System.........................................5-88
Headphones...................................................3-93
Heated Seats................................................... 1-3
Highway Hypnosis...........................................4-36
Hill and Mountain Roads..................................4-36
Hitches..........................................................4-55
HomeLink Transmitter, Programming..................2-40
HomeLink
žTransmitter....................................2-39
Hood............................................................5-10
Checking Things Under................................5-10
Release.....................................................5-10
Horn............................................................... 3-7
How to Add Coolant to the Coolant
Recovery Tank............................................5-31
How to Add Coolant to the Radiator..................5-33
How to Add Fluid............................................5-24
How to Check Lubricant...................................5-47
How to Check Power Steering Fluid..................5-36
How to Check........................................5-22, 5-55
How to Inspect the Engine Air Cleaner/Filter.......5-21How to Use This Manual...................................... ii
How to Wear Safety Belts Properly...................1-14
Hydroplaning..................................................4-32
I
ICE POSSIBLE..............................................3-63
If No Steam Is Coming From Your Engine..........5-28
If Steam Is Coming From Your Engine...............5-27
If the Light Is Flashing.....................................3-44
If the Light Is On Steady.................................3-44
If You Are Stuck in Sand, Mud, Ice or Snow.......4-42
If You Do Decide To Pull A Trailer.....................4-51
If You're Caught in a Blizzard...........................4-40
Ignition Positions.............................................2-19
Ignition Transmission Lock Check......................6-14
Infants and Young Children, Restraints...............1-31
In¯ation -- Tire Pressure..................................5-54
Inspection......................................................6-17
Brake System.............................................6-17
Engine Cooling System................................6-16
Exhaust System..........................................6-16
Fuel System...............................................6-16
Part C - Periodic Maintenance.......................6-16
Steering, Suspension and Front Drive Axle
Boot and Seal.........................................6-16
Transfer Case and Front Axle
(Four-Wheel Drive)...................................6-17
7