2003 CHEVROLET SILVERADO width
[x] Cancel search: widthPage 28 of 556

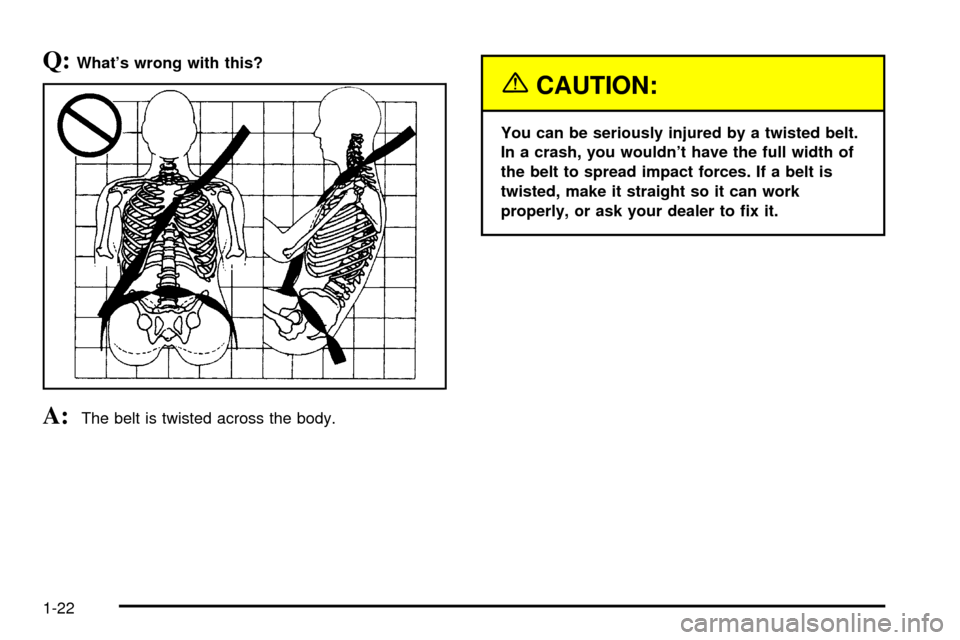
Q:What's wrong with this?
A:The belt is twisted across the body.
{CAUTION:
You can be seriously injured by a twisted belt.
In a crash, you wouldn't have the full width of
the belt to spread impact forces. If a belt is
twisted, make it straight so it can work
properly, or ask your dealer to ®x it.
1-22
Page 316 of 556

Driving Across an Incline
Sooner or later, an off-road trail will probably go across
the incline of a hill. If this happens, you have to
decide whether to try to drive across the incline. Here
are some things to consider:
·A hill that can be driven straight up or down may be
too steep to drive across. When you go straight up
or down a hill, the length of the wheel base (the
distance from the front wheels to the rear wheels)
reduces the likelihood the vehicle will tumble
end over end. But when you drive across an incline,
the much more narrow track width (the distance
between the left and right wheels) may not prevent
the vehicle from tilting and rolling over. Also,
driving across an incline puts more weight on the
downhill wheels. This could cause a downhill
slide or a rollover.
·Surface conditions can be a problem when you drive
across a hill. Loose gravel, muddy spots, or even wet
grass can cause your tires to slip sideways, downhill.
If the vehicle slips sideways, it can hit something that
will trip it (a rock, a rut, etc.) and roll over.
·Hidden obstacles can make the steepness of the
incline even worse. If you drive across a rock with the
uphill wheels, or if the downhill wheels drop into a rut
or depression, your vehicle can tilt even more.For reasons like these, you need to decide carefully
whether to try to drive across an incline. Just because
the trail goes across the incline doesn't mean you
have to drive it. The last vehicle to try it might have
rolled over.
{CAUTION:
Driving across an incline that is too steep will
make your vehicle roll over. You could be
seriously injured or killed. If you have any
doubt about the steepness of the incline, do
not drive across it. Find another route instead.
Q:What if I'm driving across an incline that's not
too steep, but I hit some loose gravel and start
to slide downhill. What should I do?
A:If you feel your vehicle starting to slide sideways,
turn downhill. This should help straighten out the
vehicle and prevent the side slipping. However,
a much better way to prevent this is to get out and
²walk the course²so you know what the surface
is like before you drive it.
4-34
Page 342 of 556

Payload
Payload capacity is the maximum load capacity that your
vehicle can carry. Be sure to include the weight of the
occupants as part of your load. If you added any
accessories or equipment after your vehicle left the
factory, remember to subtract the weight of these things
from the payload. Your dealer can help you with this.
Remember not to exceed the Gross Axle Weight Rating
(GAWR) of the front or rear axle. See
Loading Your
Vehicle on page 4-58.
2-Tiered Loading
By positioning four 2º x 6º wooden planks across the
width of the pickup box, you can create an upper load
platform. The planks must be inserted in the pickup box
depressions. The length of the planks must allow for at
least a 3/4 inch (2 cm) bearing surface on each end of the
plank.
When using this upper load platform, be sure the load is
securely tied down to prevent it from shifting. The load's
center of gravity should be positioned in a zone over the
rear axle. The zone is located in the area between the
front of each wheel well and the rear of each wheel well.
The center of gravity height must not extend above the
top of the pickup box ¯areboard.
Any load that extends beyond the vehicle's taillamp
area must be properly marked according to local laws
and regulations.Remember not to exceed the Gross Axle Weight Rating
(GAWR) of the front or rear axle. See
Loading Your
Vehicle on page 4-58.
Add-On Equipment
When you carry removable items, you may need to put
a limit on how many people you carry inside your
vehicle. Be sure to weigh your vehicle before you buy
and install the new equipment.
Notice:Your warranty does not cover parts or
components that fail because of overloading.
Remember not to exceed the Gross Axle Weight Rating
(GAWR) of the front or rear axle. See
Loading Your
Vehicle on page 4-58.
*Equipment Maximum Weight
Ladder Rack and Cargo 750 lbs. (340 kg)
Cross Toolbox and Cargo 400 lbs. (181 kg)
Side Boxes and Cargo250 lbs. per side (113 kg
per side)
* The combined weight for all rail-mounted equipment
should not exceed 1,000 lbs. (454 kg).
A reinforcement kit for rail-mounted add-on equipment
is recommended. See your dealer.
4-60
Page 407 of 556

·With your foot on the brake pedal, run the engine for
at least once minute and shift to DRIVE (D). Then
shift to NEUTRAL (N) and then REVERSE (R) to ®ll
the hydraulic system. Then, position the shift lever in
PARK (P).
·Allow the engine to run at idle (500±800 rpm). Slowly
release the brake pedal.
Then, without shutting off the engine, follow these steps:
Cold Check Procedure
The purpose of the cold check is to determine if the
transmission has enough ¯uid to be operated safely until
a hot check can be made. The ¯uid level rises as ¯uid
temperature increases. DO NOT ®ll above the COLD
CHECK band if the transmission ¯uid is below normal
operating temperatures.
1. Pull out the dipstick and wipe it with a clean rag or
paper towel.
2. Push it back in all the way, wait three seconds and
then pull it back out again.
3. Check the ¯uid level reading. Repeat the check
procedure to verify the reading.
4. If the ¯uid level is within the COLD CHECK band,
the transmission may be operated until the ¯uid is
hot enough to perform a hot check. If the ¯uid
level is not within the COLD CHECK band, add or
drain ¯uid as necessary to bring the level into
the middle of the COLD CHECK band.5. Perform a hot check at the ®rst opportunity after the
normal operating temperature of 160ÉF (71ÉC) to
200ÉF (93ÉC) is reached.
6. If the ¯uid level is in the acceptable range, push the
dipstick back in all the way.
Hot Check Procedure
The ¯uid must be hot to ensure an accurate check. The
¯uid level rises as temperature increases.
1. Operate the transmission in DRIVE (D) range until
the normal operating temperature of 160ÉF (71ÉC)
to 200ÉF (93ÉC) is reached.
2. Pull out the dipstick and wipe it with a clean rag or
paper towel.
3. Push it back in all the way, wait three seconds and
then pull it back out again. Repeat the check
procedure to verify the reading.
4. Safe operating level is within the HOT RUN band
on the dipstick. The width of the HOT RUN band
represents approximately 1.06 quart (1.0 liter)
of ¯uid at normal operating temperature.
5. If the ¯uid level is not within the HOT RUN band,
add or drain ¯uid as necessary to bring the ¯uid
level to within the HOT RUN band.
6. If the ¯uid level is in the acceptable range, push the
dipstick back in all the way.
5-27
Page 455 of 556

Uniform Tire Quality Grading
Quality grades can be found where applicable on the
tire sidewall between tread shoulder and maximum
section width. For example:
Treadwear 200 Traction AA Temperature A
The following information relates to the system developed
by the United States National Highway Traffic Safety
Administration, which grades tires by treadwear, traction
and temperature performance. (This applies only to
vehicles sold in the United States.) The grades are
molded on the sidewalls of most passenger car tires. The
Uniform Tire Quality Grading system does not apply to
deep tread, winter-type snow tires, space-saver or
temporary use spare tires, tires with nominal rim
diameters of 10 to 12 inches (25 to 30 cm), or to some
limited-production tires.
While the tires available on General Motors passenger
cars and light trucks may vary with respect to these
grades, they must also conform to federal safety
requirements and additional General Motors Tire
Performance Criteria (TPC) standards.
Treadwear
The treadwear grade is a comparative rating based on
the wear rate of the tire when tested under controlled
conditions on a speci®ed government test course. For
example, a tire graded 150 would wear one and a half
(1.5) times as well on the government course as a tire
graded 100. The relative performance of tires depends
upon the actual conditions of their use, however, and may
depart signi®cantly from the norm due to variations in
driving habits, service practices and differences in road
characteristics and climate.
Traction ± AA, A, B, C
The traction grades, from highest to lowest, are AA, A, B,
and C. Those grades represent the tire's ability to stop on
wet pavement as measured under controlled conditions
on speci®ed government test surfaces of asphalt and
concrete. A tire marked C may have poor traction
performance. Warning: The traction grade assigned to
this tire is based on straight-ahead braking traction tests,
and does not include acceleration, cornering,
hydroplaning, or peak traction characteristics.
5-75
Page 456 of 556

Temperature ± A, B, C
The temperature grades are A (the highest), B, and C,
representing the tire's resistance to the generation
of heat and its ability to dissipate heat when tested
under controlled conditions on a speci®ed indoor
laboratory test wheel. Sustained high temperature can
cause the material of the tire to degenerate and
reduce tire life, and excessive temperature can lead to
sudden tire failure. The grade C corresponds to a
level of performance which all passenger car tires must
meet under the Federal Motor Vehicle Safety Standard
No. 109. Grades B and A represent higher levels of
performance on the laboratory test wheel than the
minimum required by law.
Warning: The temperature grade for this tire is
established for a tire that is properly in¯ated and not
overloaded. Excessive speed, underin¯ation, or
excessive loading, either separately or in combination,
can cause heat buildup and possible tire failure.
Wheel Alignment and Tire Balance
The wheels on your vehicle were aligned and balanced
carefully at the factory to give you the longest tire life
and best overall performance.Scheduled wheel alignment and wheel balancing are
not needed. However, if you notice unusual tire wear or
your vehicle pulling one way or the other, the alignment
may need to be reset. If you notice your vehicle
vibrating when driving on a smooth road, your wheels
may need to be rebalanced.
Wheel Replacement
Replace any wheel that is bent, cracked, or badly rusted
or corroded. If wheel nuts keep coming loose, the
wheel, wheel bolts and wheel nuts should be replaced.
If the wheel leaks air, replace it (except some
aluminum wheels, which can sometimes be repaired).
See your dealer if any of these conditions exist.
Your dealer will know the kind of wheel you need.
Each new wheel should have the same load-carrying
capacity, diameter, width, offset and be mounted
the same way as the one it replaces.
If you need to replace any of your wheels, wheel bolts
or wheel nuts, replace them only with new GM
original equipment parts. This way, you will be sure to
have the right wheel, wheel bolts and wheel nuts
for your vehicle.
5-76