2003 CHEVROLET SILVERADO parking brake
[x] Cancel search: parking brakePage 404 of 556
Get the vehicle warmed up by driving about 15 miles
(24 km) when outside temperatures are above 50ÉF
(10ÉC). If it's colder than 50ÉF (10ÉC), drive the vehicle
in THIRD (3) until the engine temperature gage
moves and then remains steady for 10 minutes.
A cold ¯uid check can be made after the vehicle has
been sitting for eight hours or more with the engine off,
but this is used only as a reference. Let the engine
run at idle for ®ve minutes if outside temperatures are
50ÉF (10ÉC) or more. If it's colder than 50ÉF (10ÉC), you
may have to idle the engine longer. Should the ¯uid
level be low during this cold check, you
mustcheck the
¯uid hot before adding ¯uid. Checking the ¯uid hot
will give you a more accurate reading of the ¯uid level.
Checking the Fluid Level
Prepare your vehicle as follows:
·Park your vehicle on a level place. Keep the engine
running.
·With the parking brake applied, place the shift lever
in PARK (P).
·With your foot on the brake pedal, move the shift
lever through each gear range, pausing for about
three seconds in each range. Then, position the shift
lever in PARK (P).
·Let the engine run at idle for three minutes or more.Then, without shutting off the engine, follow these steps:
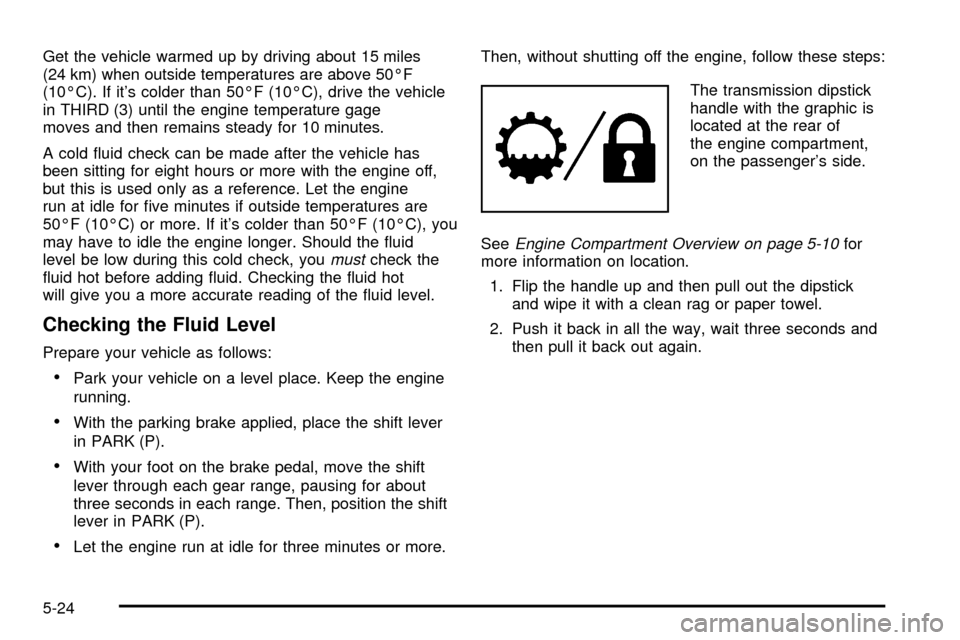
The transmission dipstick
handle with the graphic is
located at the rear of
the engine compartment,
on the passenger's side.
See
Engine Compartment Overview on page 5-10for
more information on location.
1. Flip the handle up and then pull out the dipstick
and wipe it with a clean rag or paper towel.
2. Push it back in all the way, wait three seconds and
then pull it back out again.
5-24
Page 406 of 556

Automatic Transmission Fluid
(Allison Transmission
ž)
When to Check and Change
A good time to check your automatic transmission ¯uid
level is when the engine oil is changed.
Change both the ¯uid and ®lter every 25,000 miles
(41 500 km) if the vehicle is mainly driven under one or
more of these conditions:
·In heavy city traffic where the outside temperature
regularly reaches 90ÉF (32ÉC) or higher.
·In hilly or mountainous terrain.
·When doing frequent trailer towing.
·Uses such as found in taxi, police or delivery
service.
If you do not use your vehicle under any of these
conditions, change the ¯uid and ®lter every
50,000 miles (83 000 km).
See
Part A: Scheduled Maintenance Services on
page 6-4.
How to Check
Because this operation can be a little difficult, you may
choose to have this done at the dealership service
department.If you do it yourself, be sure to follow all the instructions
here, or you could get a false reading on the dipstick.
Notice:Too much or too little ¯uid can damage
your transmission. Too much can mean that some
of the ¯uid could come out and fall on hot engine
part or exhaust system parts, starting a ®re.
Too little ¯uid could cause the transmission to
overheat. Be sure to get an accurate reading if you
check your transmission ¯uid.
Wait at least 30 minutes before checking the
transmission ¯uid level if you have been driving:
·When outside temperatures are above 90ÉF (32ÉC).
·At high speed for quite a while.
·In heavy traffic ± especially in hot weather.
·While pulling a trailer.
Checking the Fluid Level
Prepare your vehicle as follows:
·Park your vehicle on a level place. Keep the engine
running.
·With the parking brake applied, place the shift lever
in PARK (P).
5-26
Page 429 of 556

Notice:If the other system isn't a 12-volt system
with a negative ground, both vehicles can be
damaged.
2. If you have a vehicle with a diesel engine with two
batteries (or more), you should know before you
begin that, especially in cold weather, you may not
be able to get enough power from a single
battery in another vehicle to start your diesel engine.
If your vehicle has more than one battery, use
the battery that's closer to the starter ± this
will reduce electrical resistance.
3. Get the vehicles close enough so the jumper cables
can reach, but be sure the vehicles aren't touching
each other. If they are, it could cause a ground
connection you don't want. You wouldn't be able to
start your vehicle, and the bad grounding could
damage the electrical systems.
To avoid the possibility of the vehicles rolling, set
the parking brake ®rmly on both vehicles involved in
the jump start procedure. Put an automatic
transmission in PARK (P) or a manual transmission
in NEUTRAL before setting the parking brake. If
you have a four-wheel-drive vehicle, be sure
the transfer case is in a drive gear not in NEUTRAL.Notice:If you leave your radio on, it could be badly
damaged. The repairs wouldn't be covered by
your warranty.
4. Turn off the ignition on both vehicles. Unplug
unnecessary accessories plugged into the cigarette
lighter or accessory power outlets. Turn off the
radio and all lamps that aren't needed. This
will avoid sparks and help save both batteries. And
it could save your radio!
5. Open the hoods and locate the positive (+) and
negative (-) terminal locations of the other vehicle.
Your vehicle has a remote positive (+) jump
starting terminal and a remote negative (-) jump
starting terminal. You should always use these
remote terminals instead of the terminals on the
battery.
The remote positive (+) terminal is located behind a
red plastic cover near the engine accessory drive
bracket. To uncover the remote positive (+) terminal,
open the red plastic cover.
The remote negative (-) terminal is located on the
engine drive bracket on all V8 and diesel engines,
and on the thermostat housing on the 8.1L engine.
On V8 engines it is marked ªGND.²
5-49
Page 460 of 556
Changing a Flat Tire
If a tire goes ¯at, avoid further tire and wheel damage
by driving slowly to a level place. Turn on your
hazard warning ¯ashers.
{CAUTION:
Changing a tire can cause an injury. The
vehicle can slip off the jack and roll over you
or other people. You and they could be badly
injured. Find a level place to change your tire.
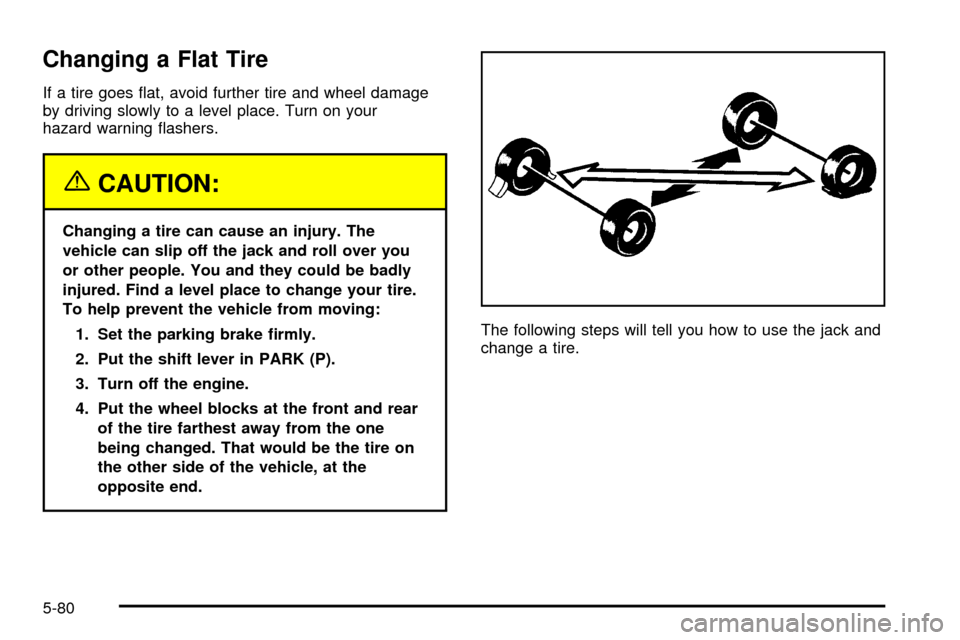
To help prevent the vehicle from moving:
1. Set the parking brake ®rmly.
2. Put the shift lever in PARK (P).
3. Turn off the engine.
4. Put the wheel blocks at the front and rear
of the tire farthest away from the one
being changed. That would be the tire on
the other side of the vehicle, at the
opposite end.The following steps will tell you how to use the jack and
change a tire.
5-80
Page 495 of 556
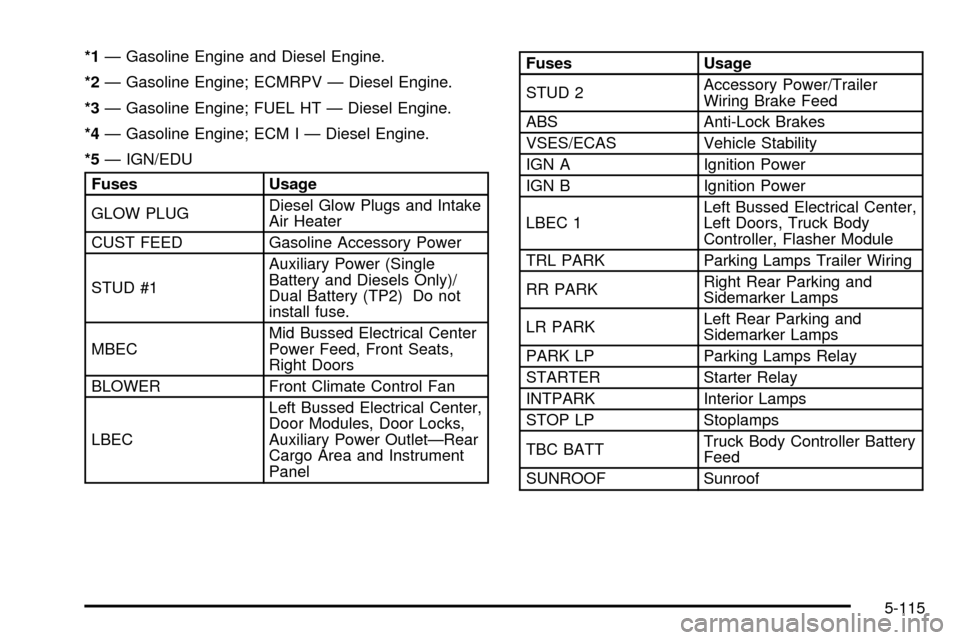
*1Ð Gasoline Engine and Diesel Engine.
*2Ð Gasoline Engine; ECMRPV Ð Diesel Engine.
*3Ð Gasoline Engine; FUEL HT Ð Diesel Engine.
*4Ð Gasoline Engine; ECM I Ð Diesel Engine.
*5Ð IGN/EDU
Fuses Usage
GLOW PLUGDiesel Glow Plugs and Intake
Air Heater
CUST FEED Gasoline Accessory Power
STUD #1Auxiliary Power (Single
Battery and Diesels Only)/
Dual Battery (TP2) Do not
install fuse.
MBECMid Bussed Electrical Center
Power Feed, Front Seats,
Right Doors
BLOWER Front Climate Control Fan
LBECLeft Bussed Electrical Center,
Door Modules, Door Locks,
Auxiliary Power OutletÐRear
Cargo Area and Instrument
Panel
Fuses Usage
STUD 2Accessory Power/Trailer
Wiring Brake Feed
ABS Anti-Lock Brakes
VSES/ECAS Vehicle Stability
IGN A Ignition Power
IGN B Ignition Power
LBEC 1Left Bussed Electrical Center,
Left Doors, Truck Body
Controller, Flasher Module
TRL PARK Parking Lamps Trailer Wiring
RR PARKRight Rear Parking and
Sidemarker Lamps
LR PARKLeft Rear Parking and
Sidemarker Lamps
PARK LP Parking Lamps Relay
STARTER Starter Relay
INTPARK Interior Lamps
STOP LP Stoplamps
TBC BATTTruck Body Controller Battery
Feed
SUNROOF Sunroof
5-115
Page 496 of 556
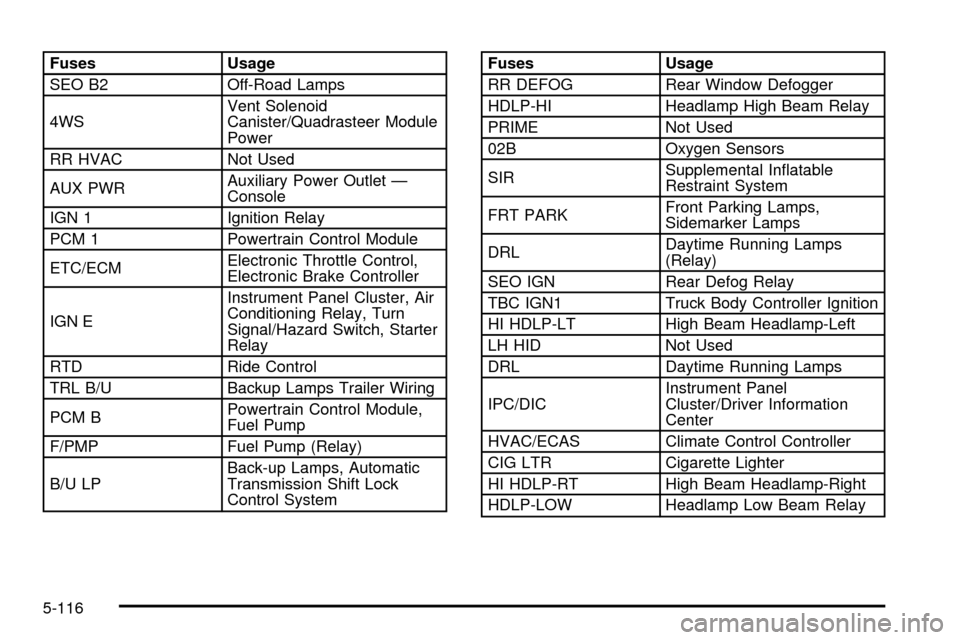
Fuses Usage
SEO B2 Off-Road Lamps
4WSVent Solenoid
Canister/Quadrasteer Module
Power
RR HVAC Not Used
AUX PWRAuxiliary Power Outlet Ð
Console
IGN 1 Ignition Relay
PCM 1 Powertrain Control Module
ETC/ECMElectronic Throttle Control,
Electronic Brake Controller
IGN EInstrument Panel Cluster, Air
Conditioning Relay, Turn
Signal/Hazard Switch, Starter
Relay
RTD Ride Control
TRL B/U Backup Lamps Trailer Wiring
PCM BPowertrain Control Module,
Fuel Pump
F/PMP Fuel Pump (Relay)
B/U LPBack-up Lamps, Automatic
Transmission Shift Lock
Control SystemFuses Usage
RR DEFOG Rear Window Defogger
HDLP-HI Headlamp High Beam Relay
PRIME Not Used
02B Oxygen Sensors
SIRSupplemental In¯atable
Restraint System
FRT PARKFront Parking Lamps,
Sidemarker Lamps
DRLDaytime Running Lamps
(Relay)
SEO IGN Rear Defog Relay
TBC IGN1 Truck Body Controller Ignition
HI HDLP-LT High Beam Headlamp-Left
LH HID Not Used
DRL Daytime Running Lamps
IPC/DICInstrument Panel
Cluster/Driver Information
Center
HVAC/ECAS Climate Control Controller
CIG LTR Cigarette Lighter
HI HDLP-RT High Beam Headlamp-Right
HDLP-LOW Headlamp Low Beam Relay
5-116
Page 508 of 556

It is also important to check your oil regularly and keep
it at the proper level.
If the system is ever reset accidentally, you must
change your oil at 3,000 miles (5 000 km) since your
last oil change. Remember to reset the oil life system
whenever the oil is changed. See
Engine Oil on
page 5-16for information on resetting the system.
An Emission Control Service.
Lubricate chassis components with each engine oil
and ®lter change. Vehicles used under severe
commercial operating conditions require lubrication
on a regular basis every 3,000 miles (5 000 km).
Lubricate the front suspension, ball joints, steering
linkage, transmission shift linkage and parking brake
cable guides. Ball joints should not be lubricated unless
their temperature is 10ÉF (-12ÉC) or higher or they
could be damaged.
See the mileage intervals following for additional
services that may be performed with an engine oil
change and chassis lubrication. After the services are
performed, record the date, odometer reading and
who performed the service on the maintenance record
pages in Part E of this schedule.
7,500 Miles (12 500 km)
qCheck rear/front axle ¯uid level and add ¯uid as
needed. Check constant velocity joints and axle seals
for leaking.
qRotate tires. See
Tire Inspection and Rotation on
page 5-71for proper rotation pattern and additional
information.(See footnote +.)
qAllison TransmissionžOnly: Replace the external
control-main ®lter.
15,000 Miles (25 000 km)
qInspect engine air cleaner ®lter or change indicator (if
equipped). If necessary, replace the ®lter. If vehicle is
driven in dusty/dirty conditions, inspect ®lter or
change indicator (if equipped) at every engine oil
change. See
Engine Air Cleaner/Filter on page 5-21for more information.An Emission Control Service.
(See footnote ².)
qCheck rear/front axle ¯uid level and add ¯uid as
needed. Check constant velocity joints and axle seals
for leaking.
qRotate tires. See
Tire Inspection and Rotation on
page 5-71for proper rotation pattern and additional
information.(See footnote +.)
6-6
Page 516 of 556
Hydraulic Clutch System Check
Check the ¯uid level in the clutch reservoir. SeeHydraulic Clutch on page 5-29. A ¯uid loss in this
system could indicate a problem. Have the system
inspected and repaired at once.
At Least Once a Year
Key Lock Cylinders Service
Lubricate the key lock cylinders with the lubricant
speci®ed in Part D.
Body Lubrication Service
Lubricate all body door hinges, hood latch assembly,
secondary latch, pivots, spring anchor, release
pawl, tailgate hinge, tailgate linkage, tailgate handle
pivot points, latch bolt, fuel door hinge, locks and folding
seat hardware. Part D tells you what to use. More
frequent lubrication may be required when exposed to a
corrosive environment.
Starter Switch Check
{CAUTION:
When you are doing this inspection, the
vehicle could move suddenly. If the vehicle
moves, you or others could be injured.
1. Before you start, be sure you have enough room
around the vehicle.
2. Firmly apply both the parking brake and the regular
brake. See
Parking Brake on page 2-44if
necessary.
Do not use the accelerator pedal, and be ready to
turn off the engine immediately if it starts.
3. On automatic transmission vehicles, try to start the
engine in each gear. The starter should work only
in PARK (P) or NEUTRAL (N). If the starter works in
any other position, your vehicle needs service.
On manual transmission vehicles, put the shift lever
in NEUTRAL (N), push the clutch down halfway
and try to start the engine. The starter should work
only when the clutch is pushed down all the way
to the ¯oor. If the starter works when the clutch isn't
pushed all the way down, your vehicle needs
service.
6-14