Page 271 of 556

c(Stop):Press this button to stop the play of a DVD
or CD. Press this button twice to return to the beginning
of the DVD.
t(Previous Track/Chapter):Press this button to
return to the start of the current track or chapter. Press
this button again to return to the previous track or
chapter. This button may not work when the DVD is
playing the copyright or the previews.
1 through 0 (Numeric Keypad):The remote control
numeric keypad provides you with the capability of direct
chapter, title and track number selection.
Press the button, located on the bottom left of the
numeric key pad, within 3 seconds of inputting a numeric
selection to clear all numeric inputs.
Press the button, located on the bottom left of the
numeric key pad, to select chapter, title, and track
numbers greater than 9.
P(Illumination):Press this button to turn the remote
control backlight on.
y(Menu):Press this button to access the DVD menu
(this button only operates with a DVD).
r(Enter):Press this button to select items within
a menu.
q(Return):Press this button to exit the current
active menu and return to the previous menu. This
button will operate only when a DVD is being played
and a menu is active.
|(Angle):Press this button to call-up a menu that
will operate only when a DVD is being played. The
format and content of this function is de®ned by the disc
and is dependent of the disc.
{(Subtitle):Press this button to call-up a menu that
will operate only when a DVD is being played. The
format and content of this function is de®ned by the disc
and is dependent of the disc.
[(Fast Forward):Press this button to fast forward
the DVD or CD. To stop fast forwarding, press this
button again. This button may not work when the DVD
is playing the copyright or the previews.
s(Play/Pause):Press this button to turn the DVD
player on, to start play of a DVD or CD and to toggle
between play and pause of a DVD or CD.
Slow Play:When the DVD is playing, press the pause
button then press the fast forward button. The DVD
will continue playing in a slow play mode. To cancel slow
play mode, press the play/pause button.
3-115
Page 274 of 556

The RSE system is capable of outputting audio to the
vehicle speakers by using the radio. The RSE system
may be selected as an audio source on the radio if the
RSE system power is on. Once the RSE system is
selected as an audio source on the radio you may adjust
the speaker volume on the radio. If the RSE system
power is not on, the RSE system will not be an available
source on the radio. Refer to the radio information for the
radio that your vehicle has for more information.
The RSE system is capable of outputting audio to the
wired headphone jacks on the Rear Seat Audio system
(if equipped). The RSE system may be selected as
an audio source on the Rear Seat Audio system if the
RSE system power is on. Refer to
Rear Seat Audio
(RSA) on page 3-120for more information.
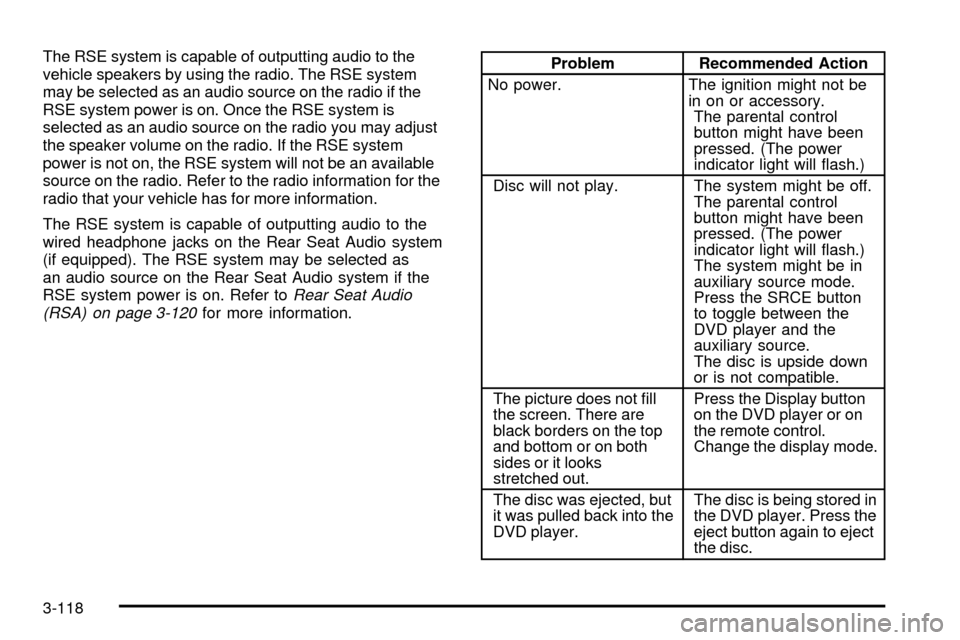
Problem Recommended Action
No power. The ignition might not be
in on or accessory.
The parental control
button might have been
pressed. (The power
indicator light will ¯ash.)
Disc will not play. The system might be off.
The parental control
button might have been
pressed. (The power
indicator light will ¯ash.)
The system might be in
auxiliary source mode.
Press the SRCE button
to toggle between the
DVD player and the
auxiliary source.
The disc is upside down
or is not compatible.
The picture does not ®ll
the screen. There are
black borders on the top
and bottom or on both
sides or it looks
stretched out.Press the Display button
on the DVD player or on
the remote control.
Change the display mode.
The disc was ejected, but
it was pulled back into the
DVD player.The disc is being stored in
the DVD player. Press the
eject button again to eject
the disc.
3-118
Page 275 of 556

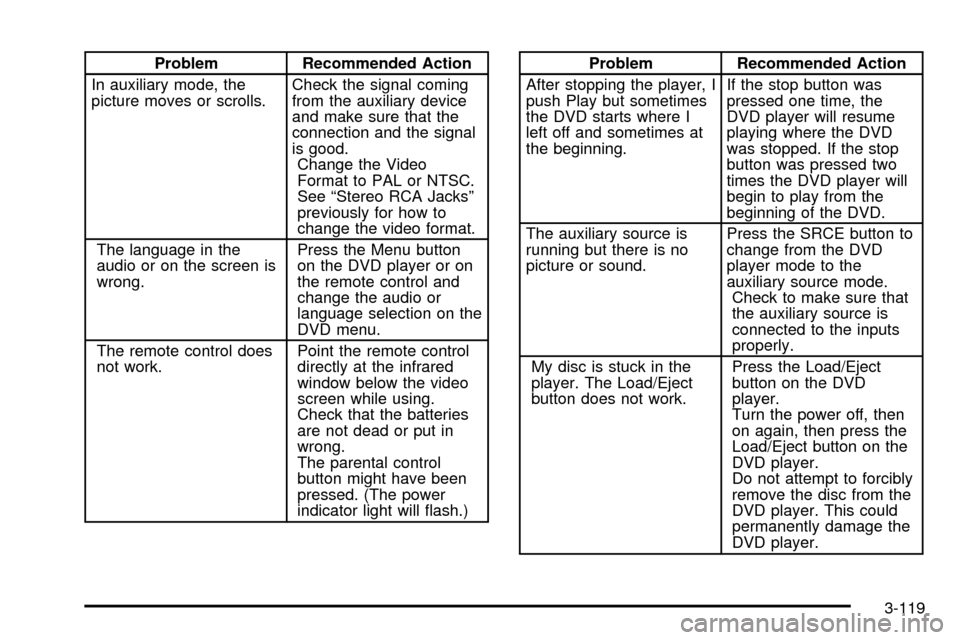
Problem Recommended Action
In auxiliary mode, the
picture moves or scrolls.Check the signal coming
from the auxiliary device
and make sure that the
connection and the signal
is good.
Change the Video
Format to PAL or NTSC.
See ªStereo RCA Jacksº
previously for how to
change the video format.
The language in the
audio or on the screen is
wrong.Press the Menu button
on the DVD player or on
the remote control and
change the audio or
language selection on the
DVD menu.
The remote control does
not work.Point the remote control
directly at the infrared
window below the video
screen while using.
Check that the batteries
are not dead or put in
wrong.
The parental control
button might have been
pressed. (The power
indicator light will ¯ash.)Problem Recommended Action
After stopping the player, I
push Play but sometimes
the DVD starts where I
left off and sometimes at
the beginning.If the stop button was
pressed one time, the
DVD player will resume
playing where the DVD
was stopped. If the stop
button was pressed two
times the DVD player will
begin to play from the
beginning of the DVD.
The auxiliary source is
running but there is no
picture or sound.Press the SRCE button to
change from the DVD
player mode to the
auxiliary source mode.
Check to make sure that
the auxiliary source is
connected to the inputs
properly.
My disc is stuck in the
player. The Load/Eject
button does not work.Press the Load/Eject
button on the DVD
player.
Turn the power off, then
on again, then press the
Load/Eject button on the
DVD player.
Do not attempt to forcibly
remove the disc from the
DVD player. This could
permanently damage the
DVD player.
3-119
Page 297 of 556

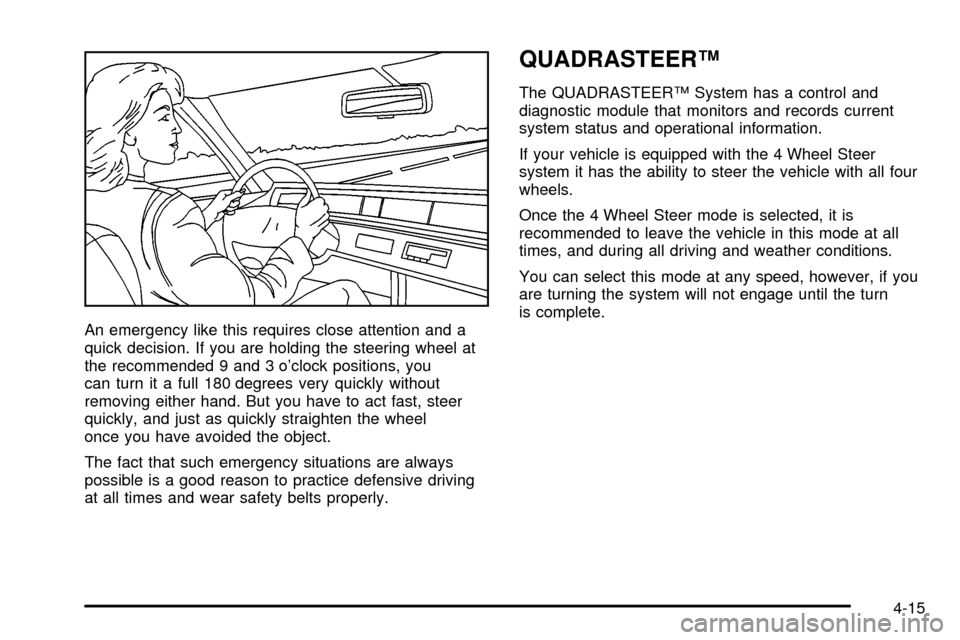
An emergency like this requires close attention and a
quick decision. If you are holding the steering wheel at
the recommended 9 and 3 o'clock positions, you
can turn it a full 180 degrees very quickly without
removing either hand. But you have to act fast, steer
quickly, and just as quickly straighten the wheel
once you have avoided the object.
The fact that such emergency situations are always
possible is a good reason to practice defensive driving
at all times and wear safety belts properly.
QUADRASTEERŸ
The QUADRASTEERŸ System has a control and
diagnostic module that monitors and records current
system status and operational information.
If your vehicle is equipped with the 4 Wheel Steer
system it has the ability to steer the vehicle with all four
wheels.
Once the 4 Wheel Steer mode is selected, it is
recommended to leave the vehicle in this mode at all
times, and during all driving and weather conditions.
You can select this mode at any speed, however, if you
are turning the system will not engage until the turn
is complete.
4-15
Page 299 of 556
At slower speeds the front and rear wheels will turn in
opposite directions. This helps the vehicle make
tighter turns, such as during parking, cornering and
turning into tight spaces.At higher speeds the front and rear wheels will turn in
the same direction. This improves stability of the vehicle
during lane changes and sweeping turns.
_(4 Wheel Steer tow mode):When towing a
trailer the 4 wheel steer tow mode provides enhanced
stability allowing the trailer to follow the path of the
tow vehicle more closely, especially during lane
changes.
In this mode the system operates much like the 4 mode,
but is enhanced for trailer towing. It is recommended
for all types and weights of trailers. Slower Speeds (below 40 m.p.h./ 64 km/h )
Higher Speeds (40 m.p.h./64 km/h, and above)
4-17
Page 352 of 556

Tow/haul is designed to be most effective when the
vehicle and trailer combined weight is at least 75% of
the vehicle's Gross Combined Weight Rating (GCWR).
See
Weight of the Trailerlater in the section. Tow/haul
is most useful under the following driving conditions:
·When pulling a heavy trailer or a large or heavy load
through rolling terrain.
·When pulling a heavy trailer or a large or heavy
load in stop and go traffic.
·When pulling a heavy trailer or a large or heavy
load in busy parking lots where improved low
speed control of the vehicle is desired.
Operating the vehicle in tow/haul when lightly loaded or
with no trailer at all will not cause damage. However,
there is no bene®t to the selection of tow/haul when the
vehicle is unloaded. Such a selection when unloaded
may result in unpleasant engine and transmission driving
characteristics and reduced fuel economy. Tow/haul
is recommended only when pulling a heavy trailer or a
large or heavy load.
Weight of the Trailer
How heavy can a trailer safely be?
It depends on how you plan to use your rig. For
example, speed, altitude, road grades, outside
temperature and how much your vehicle is used to pull
a trailer are all important. And, it can also depend
on any special equipment that you have on your vehicle.
Use one of the following charts to determine how
much your vehicle can weigh, based upon your vehicle
model and options.
Maximum trailer weight is calculated assuming the
driver and one passenger are in the tow vehicle and it
has all the required trailering equipment. The weight
of additional optional equipment, passengers and cargo
in the tow vehicle must be subtracted from the
maximum trailer weight.
Above the 5,000 lbs. (2 268 kg) trailer rating, the
handling/trailering suspension is required on
C-1500 models and the handling/trailering or off-road
suspension is required on K-1500 models.
4-70
Page 462 of 556
The equipment you'll need is behind the passenger's
seat. For Extended and Crew Cabžmodels, the
equipment is under the passenger's side second
row seat.1. If there is a cover, move the seats forward and turn
the wing nut on the cover counterclockwise to
remove it. For Crew Cab
žmodels, pull up
the second row seat with the loop at the base of
the seat cushion to access the tools.
2. To release the bottle jack from its holder, turn the
knob on the bottle jack counterclockwise to lower
the jack head.
3. The wheel blocks and the wheel block retainer can
be removed by turning the wing nut
counterclockwise.
4. There is also a wing nut used to retain the storage
bag and tools. To remove it, turn the wing nut
counterclockwise.
Short Short Box Crew Cab
5-82
Page 498 of 556
Capacities and Speci®cations
Please refer toPart D: Recommended Fluids and Lubricants on page 6-19for more information. All capacities are
approximate. When adding see the refrigerant charge label under the hood for charge capacity information and
requirements.
Capacities and Speci®cations
Engine Type VIN Code Spark Plug Gap
VORTECŸ 4300 V6 V6 W 0.060 inches (1.52 mm)
VORTECŸ 4800 V8 V8 V 0.060 inches (1.52 mm)
VORTECŸ 5300 V8 V8 T 0.060 inches (1.52 mm)
VORTECŸ 6000 V8 V8 U 0.060 inches (1.52 mm)
VORTECŸ 6000 V8 V8 N 0.060 inches (1.52 mm)
VORTECŸ 8100 V8 V8 G 0.060 inches (1.52 mm)
Model Description Torque
C/K 1500 & C/K 2500 6 Bolts (14 mm) 140 lb ft (190Y)
C/K 3500 8 bolts (14 mm) 140 lb ft (190Y)
Tire PressureSee the Certi®cation/Tire label on the rear edge of the driver's
door or the incomplete vehicle document in the cab.
5-118