2003 CHEVROLET SILVERADO trailer
[x] Cancel search: trailerPage 137 of 556

Shifting Out of Park (P)
Your vehicle has an automatic transmission shift lock
control system which locks the shift lever in PARK when
the ignition is the LOCK position. You have to fully
apply your regular brakes before you can shift from
PARK (P) when the ignition is in RUN. See
Automatic
Transmission Operation on page 2-25.
If you cannot shift out of PARK (P), ease pressure on
the shift lever and push the shift lever all the way up into
PARK (P) as you maintain brake application. Then,
move the shift lever into the gear you want.
If you ever hold the brake pedal down but still can't shift
out of PARK (P), try this:
1. Turn the key to ACCESSORY. (There is no shift
interlock in this key position.)
2. Apply and hold the brake until the end of Step 4.
3. Shift the transmission to NEUTRAL (N).
4. Start the vehicle and then shift to the gear
you want.
5. Have the system ®xed as soon as you can.
Parking Your Vehicle
{CAUTION:
Shifting the transfer case to NEUTRAL can
cause your vehicle to roll even if the manual
transmission is in gear. Your or someone else
could be seriously injured. Be sure to set the
parking brake before placing the transfer case
in NEUTRAL. See²Parking Brakeº in the Index.
Before you get out of your vehicle, move the shift lever
into REVERSE (R), and ®rmly apply the parking
brake. Once the shift lever has been placed into
REVERSE (R) with the clutch pedal pressed in, you can
turn the ignition key to LOCK, remove the key and
release the clutch.
If you are parking on a hill, or if you are pulling a trailer,
see
Towing a Trailer on page 4-68.
2-49
Page 141 of 556

{CAUTION:
Four-wheel drive vehicles with the transfer
case in NEUTRAL will allow the vehicle to roll,
even if your shift lever is in PARK (P). So, be
sure the transfer case is in a drive gear Ð not
in NEUTRAL. Always set your parking brake.
Follow the proper steps to be sure your vehicle won't
move. See
Shifting Into Park (P) on page 2-46.
If you're pulling a trailer, see
Towing a Trailer on
page 4-68.
Mirrors
Manual Rearview Mirror
Pull the tab under the mirror toward you to reduce glare
from headlamps behind you after dark. Push the tab
away from you for normal daytime operation.
Automatic Dimming Rearview Mirror
with OnStar
ž, Compass and
Temperature Display
Your vehicle may have this feature. When on, an
electrochromic mirror automatically dims to the proper
level to minimize glare from lights behind you after dark.
The mirror also includes a duel display in the upper
right corner of the mirror face. The compass reading and
the outside temperature will both appear in the display
at the same time.
P(On/Off):This is the on/off button.
2-53
Page 147 of 556

Outside Manual Mirrors
Adjust your outside mirrors so you can just see the side
of your vehicle and have a clear view of objects
behind you. The mirrors can be folded in to enter narrow
areas.
The use of hood-mounted air de¯ectors and add-on
convex mirror attachments may adversely affect mirror
performance.
Outside Camper-Type Mirrors
If your vehicle is equipped with camper-type mirrors,
they can be adjusted so you can have a clear view
of the objects behind you.
Pull out the mirror head to extend it for better visibility
when towing a trailer.
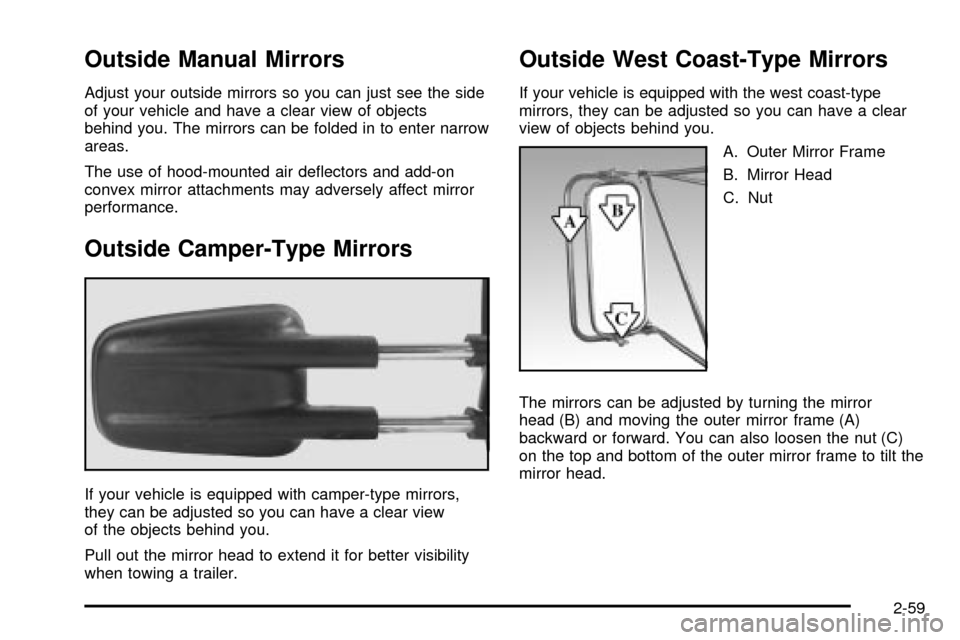
Outside West Coast-Type Mirrors
If your vehicle is equipped with the west coast-type
mirrors, they can be adjusted so you can have a clear
view of objects behind you.
A. Outer Mirror Frame
B. Mirror Head
C. Nut
The mirrors can be adjusted by turning the mirror
head (B) and moving the outer mirror frame (A)
backward or forward. You can also loosen the nut (C)
on the top and bottom of the outer mirror frame to tilt the
mirror head.
2-59
Page 204 of 556

SeeDriver Information Center (DIC) on page 3-54for
further information.
If your vehicle has an Allison transmission, and the ¯uid
reaches temperatures of approximately 275ÉF (135ÉC)
or greater, the driver information center will display
a TRANS HOT IDLE ENGINE warning message and a
chime will sound until the temperature falls below
265ÉF (129ÉC) degrees. Pull the vehicle off the roadway
when it is safe to do so. Set the parking brake, place
the transmission in PARK (P) and allow the engine
to idle until the transmission temperature falls below
265ÉF (129ÉC). If the transmission continues to operate
above 265ÉF (130ÉC), contact your nearest dealer or
the GM Roadside Assistance Center. See
Roadside
Assistance Program on page 7-5.
Notice:If you keep driving your vehicle with the
transmission temperature gage above the normal
operating range, you can damage the transmission.
This could lead to costly repairs that may not be
covered under your warranty.The following situations can cause the transmission to
operate at higher temperatures:
·Towing a trailer
·Hot outside air temperatures
·Hauling a large or heavy load
·Low transmission ¯uid level
·High transmission ¯uid level
·Restricted air ¯ow to the radiator and the auxiliary
transmission oil cooler (if equipped).
A temporary solution to hotter transmission operating
temperatures may be to let the transmission cool down.
If the transmission is operated at higher temperatures
on a frequent basis, see
Scheduled Maintenance
on page 6-5for the proper transmission maintenance
intervals.
3-48
Page 206 of 556

If the Light is Flashing
The following may prevent more serious damage to
your vehicle:
·Reducing vehicle speed.
·Avoiding hard accelerations.
·Avoiding steep uphill grades.
·If you are towing a trailer, reduce the amount of
cargo being hauled as soon as it is possible.
If the light stops ¯ashing and remains on steady, see ªIf
the Light Is On Steadyº following.
If the light continues to ¯ash, when it is safe to do so,
stop the vehicle.Find a safe place to park your vehicle.
Turn the key off, wait at least 10 seconds and restart
the engine. If the light remains on steady, see ªIf
the Light Is On Steadyº following. If the light is still
¯ashing, follow the previous steps, and see your dealer
for service as soon as possible.
If the Light Is On Steady
You may be able to correct the emission system
malfunction by considering the following:
Did you recently put fuel into your vehicle?
If so, reinstall the fuel cap, making sure to fully install
the cap. See
Filling Your Tank on page 5-6. The
diagnostic system can determine if the fuel cap hasbeen left off or improperly installed. A loose or missing
fuel cap will allow fuel to evaporate into the atmosphere.
A few driving trips with the cap properly installed
should turn the light off.
Did you just drive through a deep puddle of water?
If so, your electrical system may be wet. The condition
will usually be corrected when the electrical system
dries out. A few driving trips should turn the light off.
Have you recently changed brands of fuel?
If so, be sure to fuel your vehicle with quality fuel. See
Gasoline Octane on page 5-4. Poor fuel quality will
cause your engine not to run as efficiently as designed.
You may notice this as stalling after start-up, stalling
when you put the vehicle into gear, mis®ring, hesitation
on acceleration or stumbling on acceleration. (These
conditions may go away once the engine is warmed up.)
This will be detected by the system and cause the
light to turn on.
If you experience one or more of these conditions,
change the fuel brand you use. It will require at least
one full tank of the proper fuel to turn the light off.
If none of the above steps have made the light turn off,
your dealer can check the vehicle. Your dealer has
the proper test equipment and diagnostic tools to ®x any
mechanical or electrical problems that may have
developed.
3-50
Page 209 of 556

Tow/Haul Mode Light
This light is displayed
when the tow/haul mode
has been activated.
For more information, see
Towing a Trailer on
page 4-68.
Overdrive Disable
This light will illuminate
when the overdrive disable
feature is activated. The
overdrive disable
feature will prevent your
vehicle from shifting
into ®fth (5) gear.
Fuel Gage
When the ignition is on, the fuel gage tells you about
how much fuel you have left in your tank.
The gage will ®rst indicate empty before you are out of
fuel, and you should get more fuel as soon as
possible.
When the fuel tank is low the Low Fuel message will
appear. See
Driver Information Center (DIC) on
page 3-54.
United StatesCanada
3-53
Page 226 of 556

TIGHTEN FUEL CAP
If the vehicle's fuel cap is not tightened properly thsi
message may appear along with the check engine light
on the instrument panel. See
Malfunction Indicator
Lamp on page 3-49. Fully reinstall the fuel cap.
SeeFilling Your Tank on page 5-6. The diagnostic
system can determine if the fuel cap has been left off or
improperly installed. A loose or missing fuel cap will
allow fuel to evaporate into the atmosphere. A few
driving trips with the cap properly installed should turn
the light and message off.
TRACTION ACTIVE
When the traction control system had detected that any
of the vehicle's wheels are slipping, the traction
control system will activate and this message will appear
on the DIC. For more information see ªTraction Assistº
in the Index.
TRANSMISSION HOT
If the transmission ¯uid temperature becomes high, the
message center will display this message.
When the transmission enters the protection mode, you
may notice a change in the transmission shifting
patterns. When the transmission ¯uid temperature
returns to normal, the display will turn off and the
transmission shifting patterns will return to normal.
Notice:If you keep driving your vehicle with the
transmission TRANS FLUID HOT message
displayed, you can damage the transmission. This
could lead to costly repairs that may not be covered
under your warranty.
The following situations can cause the transmission to
operate at higher temperatures:
·Towing a trailer
·Hot outside air temperatures
·Hauling a large or heavy load
·Low transmission ¯uid level
·High transmission ¯uid level
·Restricted air ¯ow to the radiator and the auxiliary
transmission oil cooler.
A temporary solution to hotter transmission operating
temperatures may be to let the transmission cool down.
If the transmission is operated at higher temperatures
on a frequent basis, see
Scheduled Maintenance
on page 6-5for the proper transmission maintenance
intervals.
3-70
Page 283 of 556

Your Driving, the Road, and Your Vehicle..........4-2
Defensive Driving...........................................4-2
Drunken Driving.............................................4-2
Control of a Vehicle........................................4-5
Braking.........................................................4-6
Traction Assist System (TAS).........................4-10
Manual Selectable Ride.................................4-12
Locking Rear Axle........................................4-13
Steering......................................................4-13
QUADRASTEERŸ........................................4-15
Off-Road Recovery.......................................4-19
Passing.......................................................4-19
Loss of Control.............................................4-21
Off-Road Driving with Your Four-Wheel-Drive
Vehicle....................................................4-22
Driving at Night............................................4-38
Driving in Rain and on Wet Roads..................4-39
City Driving..................................................4-42Freeway Driving...........................................4-43
Before Leaving on a Long Trip.......................4-44
Highway Hypnosis........................................4-45
Hill and Mountain Roads................................4-46
Winter Driving..............................................4-48
If You Are Stuck: In Sand, Mud, Ice or Snow . . .4-52
Towing..........................................................4-55
Towing Your Vehicle.....................................4-55
Recreational Vehicle Towing...........................4-55
Loading Your Vehicle....................................4-58
Adding a Snow Plow or Similar Equipment.......4-61
Truck-Camper Loading Information..................4-65
Trailer Recommendations...............................4-67
Pickup Conversion to Chassis Cab..................4-67
Towing a Trailer...........................................4-68
Power Take-Off (PTO)...................................4-95
Section 4 Driving Your Vehicle
4-1