2003 CHEVROLET MONTE CARLO wheel
[x] Cancel search: wheelPage 237 of 394
Rocking Your Vehicle To Get It Out
First, turn your steering wheel left and right. That will
clear the area around your front wheels. If your vehicle
has traction control, you should turn the system off.
See
Traction Control System (TCS) on page 4-8. Then
shift back and forth between REVERSE (R) and a
forward gear, spinning the wheels as little as possible.
Release the accelerator pedal while you shift, and press
lightly on the accelerator pedal when the transaxle is
in gear. By slowly spinning your wheels in the forward
and reverse directions, you will cause a rocking
motion that may free your vehicle. If that doesn't get
you out after a few tries, you may need to be towed out.
If you do need to be towed out, see ªTowing Your
Vehicleº following.
Towing
Towing Your Vehicle
Consult your dealer or a professional towing service if
you need to have your disabled vehicle towed. See
Roadside Assistance Program on page 7-5.
If you want to tow your vehicle behind another vehicle
for recreational purposes (such as behind a motorhome),
see ªRecreational Vehicle Towingº following.
4-29
Page 238 of 394
Recreational Vehicle Towing
Recreational vehicle towing means towing your vehicle
behind another vehicle ± such as behind a motorhome.
The two most common types of recreational vehicle
towing are known as ªdinghy towingº (towing your
vehicle with all four wheels on the ground) and ªdolly
towingº (towing your vehicle with two wheels on
the ground and two wheels up on a device known as
a ªdollyº).
With the proper preparation and equipment, many
vehicles can be towed in these ways. See ªDinghy
Towingº and ªDolly Towing,º following.
Here are some important things to consider before you
do recreational vehicle towing:
·What's the towing capacity of the towing vehicle?
Be sure you read the tow vehicle manufacturer's
recommendations.
·How far will you tow? Some vehicles have
restrictions on how far and how long they can tow.
·Do you have the proper towing equipment?
See your dealer or trailering professional for
additional advice and equipment recommendations.
·Is your vehicle ready to be towed? Just as you
would prepare your vehicle for a long trip, you'll
want to make sure your vehicle is prepared to be
towed. See
Before Leaving on a Long Trip on
page 4-21.
Dinghy Towing
Notice:Towing your vehicle with all four wheels on
the ground will damage drivetrain components.
Your vehicle was not designed to be towed with all four
wheels on the ground. If your vehicle must be towed,
you should use a dolly. See ªDolly Towingº following for
more information.
4-30
Page 239 of 394
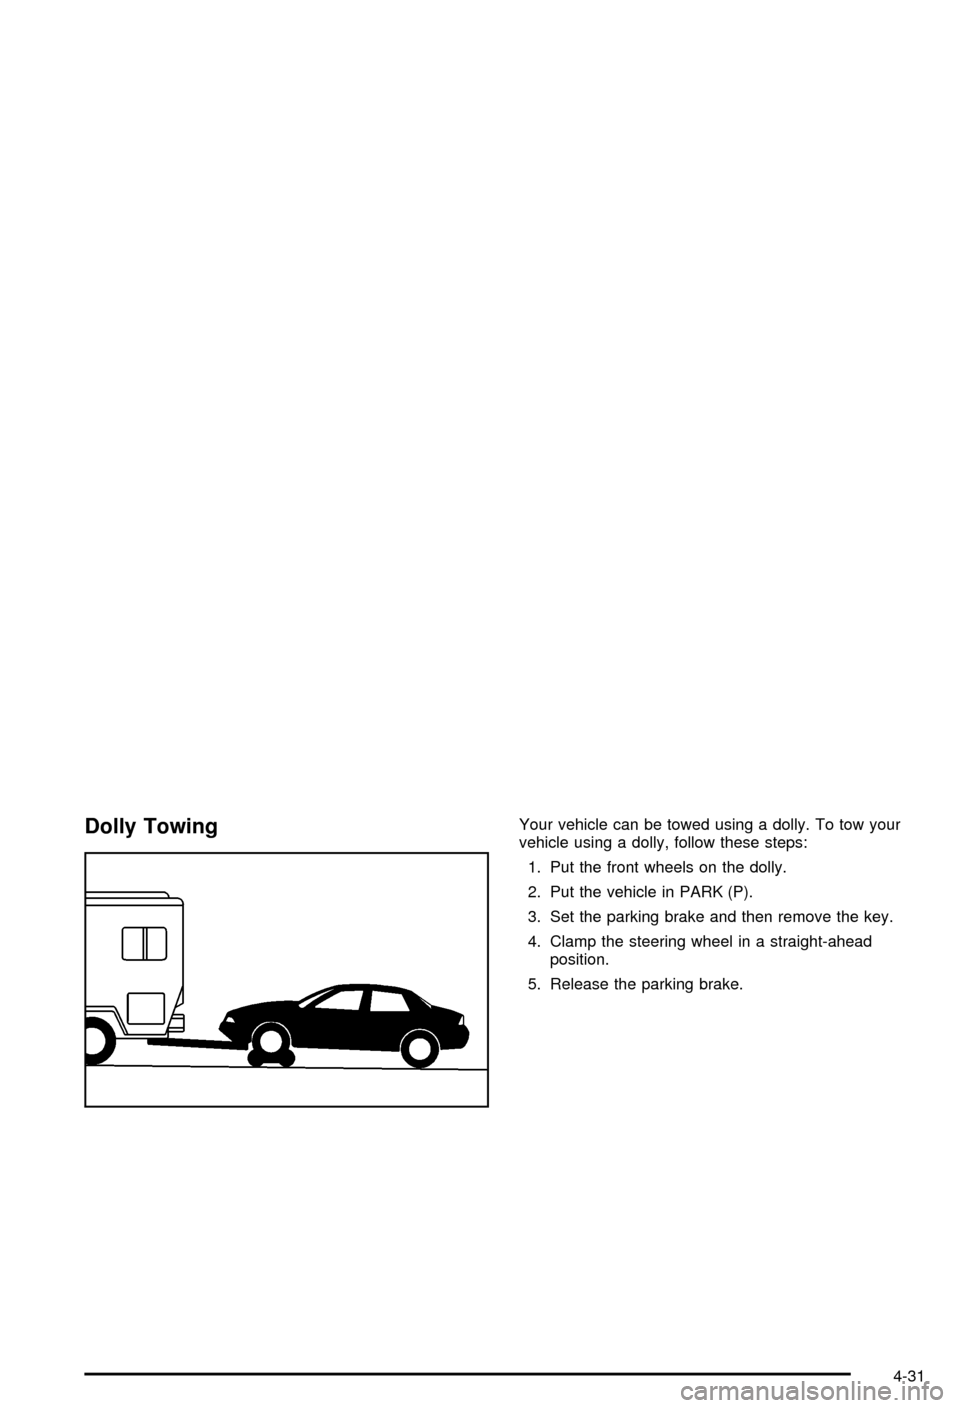
Dolly TowingYour vehicle can be towed using a dolly. To tow your
vehicle using a dolly, follow these steps:
1. Put the front wheels on the dolly.
2. Put the vehicle in PARK (P).
3. Set the parking brake and then remove the key.
4. Clamp the steering wheel in a straight-ahead
position.
5. Release the parking brake.
4-31
Page 242 of 394

Towing a Trailer
{CAUTION:
If you do not use the correct equipment and
drive properly, you can lose control when you
pull a trailer. For example, if the trailer is too
heavy, the brakes may not work well Ð or even
at all. You and your passengers could be
seriously injured. You may also damage your
vehicle; the resulting repairs would not be
covered by your warranty. Pull a trailer only if
you have followed all the steps in this section.
Ask your dealer for advice and information
about towing a trailer with your vehicle.Your vehicle can tow a trailer if it is equipped with the
proper trailer towing equipment. To identify what
the vehicle trailering capacity is for your vehicle, you
should read the information in ªWeight of the Trailerº that
appears later in this section. But trailering is different
than just driving your vehicle by itself. Trailering means
changes in handling, durability and fuel economy.
Successful, safe trailering takes correct equipment, and
it has to be used properly.
That's the reason for this part. In it are many time-tested,
important trailering tips and safety rules. Many of
these are important for your safety and that of your
passengers. So please read this section carefully before
you pull a trailer.
Load-pulling components such as the engine, transaxle,
wheel assemblies and tires are forced to work harder
against the drag of the added weight. The engine
is required to operate at relatively higher speeds and
under greater loads, generating extra heat. What's more,
the trailer adds considerably to wind resistance,
increasing the pulling requirements.
4-34
Page 246 of 394
Driving with a Trailer
Towing a trailer requires a certain amount of experience.
Before setting out for the open road, you'll want to get
to know your rig. Acquaint yourself with the feel of
handling and braking with the added weight of the trailer.
And always keep in mind that the vehicle you are
driving is now a good deal longer and not nearly as
responsive as your vehicle is by itself.
Before you start, check the trailer hitch and platform
(and attachments), safety chains, electrical connector,
lamps, tires and mirror adjustment. If the trailer has
electric brakes, start your vehicle and trailer moving and
then apply the trailer brake controller by hand to be
sure the brakes are working. This lets you check your
electrical connection at the same time.
During your trip, check occasionally to be sure that the
load is secure, and that the lamps and any trailer
brakes are still working.
Following Distance
Stay at least twice as far behind the vehicle ahead as
you would when driving your vehicle without a trailer.
This can help you avoid situations that require
heavy braking and sudden turns.
Passing
You'll need more passing distance up ahead when
you're towing a trailer. And, because you're a good deal
longer, you'll need to go much farther beyond the
passed vehicle before you can return to your lane.
Backing Up
Hold the bottom of the steering wheel with one hand.
Then, to move the trailer to the left, just move that hand
to the left. To move the trailer to the right, move your
hand to the right. Always back up slowly and, if possible,
have someone guide you.
Making Turns
Notice:Making very sharp turns while trailering
could cause the trailer to come in contact with the
vehicle. Your vehicle could be damaged. Avoid
making very sharp turns while trailering.
When you're turning with a trailer, make wider turns
than normal. Do this so your trailer won't strike
soft shoulders, curbs, road signs, trees or other objects.
Avoid jerky or sudden maneuvers. Signal well in
advance.
4-38
Page 247 of 394

Turn Signals When Towing a Trailer
When you tow a trailer, your vehicle may need additional
wiring. Check with your dealer. The arrows on your
instrument panel will ¯ash whenever you signal a turn or
lane change. Properly hooked up, the trailer lamps
will also ¯ash, telling other drivers you're about to turn,
change lanes or stop.
When towing a trailer, the arrows on your instrument
panel will ¯ash for turns even if the bulbs on the trailer
are burned out. Thus, you may think drivers behind
you are seeing your signal when they are not. It's
important to check occasionally to be sure the trailer
bulbs are still working.
Driving On Grades
Reduce speed and shift to a lower gearbeforeyou start
down a long or steep downgrade. If you don't shift
down, you might have to use your brakes so much that
they would get hot and no longer work well.
On a long uphill grade, shift down and reduce your
speed to around 45 mph (70 km/h) to reduce the
possibility of engine and transaxle overheating.
If you have overdrive, you may want to drive in
THIRD (3), instead of AUTOMATIC OVERDRIVE (
X).
Parking on Hills
{CAUTION:
You really should not park your vehicle, with a
trailer attached, on a hill. If something goes
wrong, your rig could start to move. People
can be injured, and both your vehicle and the
trailer can be damaged.
But if you ever have to park your rig on a hill, here's
how to do it:
1. Apply your regular brakes, but don't shift into
PARK (P) yet.
2. Have someone place chocks under the trailer
wheels.
3. When the wheel chocks are in place, release the
regular brakes until the chocks absorb the load.
4. Reapply the regular brakes. Then apply your
parking brake, and then shift to PARK (P).
5. Release the regular brakes.
4-39
Page 249 of 394

Service............................................................5-3
Doing Your Own Service Work.........................5-3
Adding Equipment to the Outside of
Your Vehicle..............................................5-4
Fuel................................................................5-4
Gasoline Octane............................................5-4
Gasoline Speci®cations....................................5-5
California Fuel...............................................5-5
Additives.......................................................5-6
Fuels in Foreign Countries...............................5-6
Filling Your Tank............................................5-7
Filling a Portable Fuel Container.......................5-9
Checking Things Under
the Hood....................................................5-10
Hood Release..............................................5-10
Engine Compartment Overview.......................5-12
Engine Oil...................................................5-16
Engine Air Cleaner/Filter................................5-22
Automatic Transaxle Fluid..............................5-24
Engine Coolant.............................................5-26
Radiator Pressure Cap..................................5-29
Engine Overheating.......................................5-29
Cooling System............................................5-32
Power Steering Fluid.....................................5-42
Windshield Washer Fluid................................5-43
Brakes........................................................5-44Battery........................................................5-47
Jump Starting...............................................5-48
Headlamp Aiming...........................................5-53
Bulb Replacement..........................................5-54
Halogen Bulbs..............................................5-54
Headlamps, Front Turn Signal, Sidemarker,
and Parking Lamps....................................5-54
Taillamps, Turn Signal, Stoplamps and
Sidemarker Lamps.....................................5-56
Back-Up Lamps............................................5-57
Replacement Bulbs.......................................5-57
Windshield Wiper Blade Replacement..............5-58
Tires..............................................................5-59
In¯ation -- Tire Pressure................................5-60
Tire Pressure Monitor System.........................5-61
Tire Inspection and Rotation...........................5-63
When It Is Time for New Tires.......................5-64
Buying New Tires.........................................5-65
Uniform Tire Quality Grading..........................5-66
Wheel Alignment and Tire Balance..................5-67
Wheel Replacement......................................5-67
Tire Chains..................................................5-69
If a Tire Goes Flat........................................5-69
Changing a Flat Tire.....................................5-70
Compact Spare Tire......................................5-81
Section 5 Service and Appearance Care
5-1
Page 294 of 394

Brake Wear
Your vehicle has four-wheel disc brakes.
Disc brake pads have built-in wear indicators that make
a high-pitched warning sound when the brake pads
are worn and new pads are needed. The sound
may come and go or be heard all the time your vehicle
is moving (except when you are pushing on the
brake pedal ®rmly).
{CAUTION:
The brake wear warning sound means that
soon your brakes will not work well. That
could lead to an accident. When you hear the
brake wear warning sound, have your vehicle
serviced.
Notice:Continuing to drive with worn-out brake
pads could result in costly brake repair.
Some driving conditions or climates may cause a brake
squeal when the brakes are ®rst applied or lightly
applied. This does not mean something is wrong with
your brakes.
Properly torqued wheel nuts are necessary to help
prevent brake pulsation. When tires are rotated, inspect
brake pads for wear and evenly tighten wheel nuts in
the proper sequence to GM torque speci®cations.
Brake linings should always be replaced as complete
axle sets.
See
Brake System Inspection on page 6-15.
Brake Pedal Travel
See your dealer if the brake pedal does not return to
normal height, or if there is a rapid increase in
pedal travel. This could be a sign of brake trouble.
Brake Adjustment
Every time you apply the brakes, with or without the
vehicle moving, your brakes adjust for wear.
5-46