2003 CHEVROLET MONTE CARLO AUX
[x] Cancel search: AUXPage 115 of 394

Instrument Panel Overview...............................3-4
Hazard Warning Flashers................................3-6
Other Warning Devices...................................3-6
Horn.............................................................3-7
Tilt Wheel.....................................................3-7
Turn Signal/Multifunction Lever.........................3-7
Exterior Lamps.............................................3-15
Interior Lamps..............................................3-17
Accessory Power Outlets...............................3-20
Auxiliary Power Connection (Power Drop).........3-21
Ashtrays and Cigarette Lighter........................3-21
Climate Controls............................................3-22
Dual Climate Control System..........................3-22
Passenger Compartment Air Filter...................3-28
Warning Lights, Gages and Indicators.............3-30
Instrument Panel Cluster................................3-31
Speedometer and Odometer...........................3-33
Tachometer.................................................3-33
Safety Belt Reminder Light.............................3-34
Air Bag Readiness Light................................3-34
Voltmeter Gage............................................3-35
Brake System Warning Light..........................3-36
Anti-Lock Brake System Warning Light.............3-37Traction Control System (TCS)
Warning Light...........................................3-37
Engine Coolant Temperature Gage..................3-38
Malfunction Indicator Lamp.............................3-38
Oil Pressure Indicator Light............................3-42
Cruise Control Light......................................3-43
Fuel Gage...................................................3-43
Message Center.............................................3-44
Service Traction System Warning Message......3-44
Traction Active Message................................3-45
Battery Warning Message..............................3-45
Hot Coolant Temperature Warning Message.....3-46
Low Oil Pressure Message............................3-46
Low Engine Oil Level Message.......................3-47
Change Engine Oil Message..........................3-47
Low Tire Message........................................3-48
Door Ajar Warning Message...........................3-48
Trunk Ajar Warning Message.........................3-49
Security Message.........................................3-49
Low Washer Fluid Warning Message...............3-50
Low Fuel Warning Message...........................3-50
Low Brake Fluid Warning Message.................3-51
Service Vehicle Soon Message.......................3-51
Highbeam Out Warning Message....................3-52
Section 3 Instrument Panel
3-1
Page 135 of 394

Auxiliary Power Connection
(Power Drop)
Your vehicle is equipped with an auxiliary power
connection. This feature provides power, ground and
accessory wires which can be accessed to add
aftermarket electrical equipment to your vehicle.
It is located on the
passenger's side of the
vehicle, under the
glove box, and is labeled
with a wire function
and fuse rating.
Notice:Adding some electrical equipment to your
vehicle can damage it or keep other things from
working as they should. This wouldn't be covered by
your warranty. Check with your dealer before
adding electrical equipment, and never use anything
that exceeds the amperage rating.For information on accessing the connection and
electrical hookup, please refer to your service manual.
To order a service manual, see
Service Publications
Ordering Information on page 7-9.
Ashtrays and Cigarette Lighter
Notice:Don't put papers or other ¯ammable items
into your ashtrays. Hot cigarettes or other smoking
materials could ignite them, causing a damaging ®re.
Your vehicle may have a cigarette lighter and ashtray
located on the console. The ashtray is removable
and has a cupholder and liner underneath. To remove
the ashtray, lift it up with the liner and pull it out.
The rear ashtray is located behind a small door at the
rear of the console. Push on the right side of the
door. The ashtray will then turn to the right for usage.
You can only access the ashtray by pushing on the
door's right side. To remove the ashtray, push down on
the snuffer located in the middle of the ashtray and
lift it out.
Notice:Don't hold a cigarette lighter in with your
hand while it is heating. If you do, it won't be able to
back away from the heating element when it's
ready. That can make it overheat, damaging the
lighter and the heating element.
To activate the cigarette lighter, push it into the heating
element. When the lighter is ready it will pop out.
3-21
Page 180 of 394

3 REV (Reverse):Press this pushbutton to reverse the
tape rapidly. Press it again to return to playing speed.
The radio will play while the tape reverses. The
station frequency and REV will appear on the display.
You may select stations during reverse operation
using TUNE and the SEEK arrows.
4 FWD (Forward):Press this pushbutton to advance
quickly. Press the pushbutton again to return to playing
speed. The radio will play while the tape advances.
The station frequency and FWD will appear on
the display. You may select stations during forward
operation using TUNE and the SEEK arrows.
5
XSIDE:Press this pushbutton to play the other side
of the tape.
qSEEKr:If the right or the left arrow is held or
pressed more than once, the player will continue moving
forward or backward through the tape. SEEK and a
positive or a negative number will appear on the display.
BAND:Press this button to listen to the radio when a
tape is playing. The tape will stop but remain in the
player.TAPE AUX (Auxiliary):Press this button to play a
cassette tape when listening to the radio.
ZEJT (Eject):Press this button to eject a tape.
Eject may be activated with the radio off. Cassette tapes
may be loaded with the radio off if this button is
pressed ®rst.
Cassette Tape Messages
CHK TAPE (Check Tape):If this message appears on
the radio display, the tape won't play because of one
of the following errors.
·The tape is tight and the player can't turn the tape
hubs. Remove the tape. Hold the tape with the
open end down and try to turn the right hub
counterclockwise with a pencil. Turn the tape over
and repeat. If the hubs do not turn easily, your
tape may be damaged and should not be used in
the player. Try a new tape to make sure your player
is working properly.
·The tape is broken. Try a new tape.
·The tape is wrapped around the tape head. Attempt
to get the cassette out. Try a new tape.
3-66
Page 181 of 394

CLEAN:If this message appears on the display, the
cassette tape player needs to be cleaned. It will still play
tapes, but you should clean it as soon as possible to
prevent damage to the tapes and player. See
Care
of Your Cassette Tape Player on page 3-91.
If any error occurs repeatedly or if an error can't be
corrected, contact your dealer.
CD Adapter Kits
It is possible to use a portable CD player adapter kit
with your cassette tape player after activating the bypass
feature on your tape player.
To activate the bypass feature, use the following steps:
1. Turn the radio off.
2. Press and hold the TAPE AUX button for
®ve seconds. READY will appear on the display
for ®ve seconds, indicating the feature is active.
3. Insert the adapter into the cassette slot. It will
power up the radio and begin playing.
The override feature will remain active until EJT is
pressed.
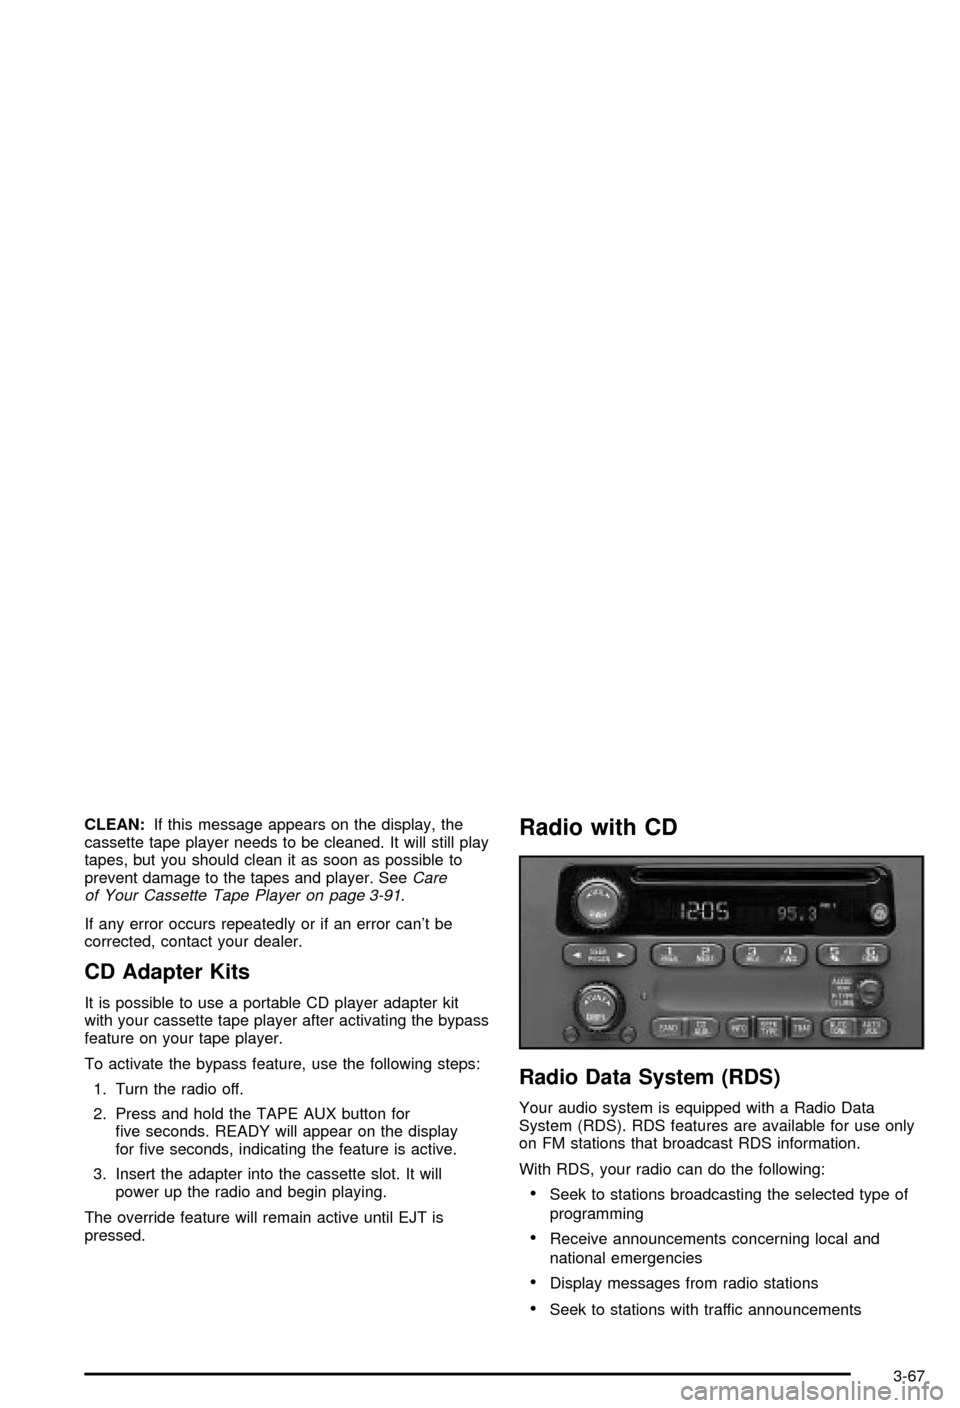
Radio with CD
Radio Data System (RDS)
Your audio system is equipped with a Radio Data
System (RDS). RDS features are available for use only
on FM stations that broadcast RDS information.
With RDS, your radio can do the following:
·Seek to stations broadcasting the selected type of
programming
·Receive announcements concerning local and
national emergencies
·Display messages from radio stations
·Seek to stations with traffic announcements
3-67
Page 191 of 394

6 RDM (Random):Press this pushbutton to hear the
tracks in random, rather than sequential, order. RDM ON
will appear on the display. RDM T and the track
number will appear on the display when each track
starts to play. Press RDM again to turn off random play.
RDM OFF will appear on the display.
qSEEKr:Press the left arrow to go to the start of
the current or of the previous track. Press the right
arrow to go to the start of the next track. If either of the
arrows is held or pressed more than once, the player
will continue moving backward or forward through
the CD.
DISPL (Display):Press this knob to see how long the
current track has been playing. ET and the elapsed
time will appear on the display. To change the default
on the display (track or elapsed time), press the
knob until you see the display you want, then hold the
knob for two seconds. The radio will produce one
beep and selected display will now be the default.
BAND:Press this button to listen to the radio when a
CD is playing. The CD will stop but remain in the player.
CD AUX (Auxiliary):Press this button to play a CD
when listening to the radio.
ZEJT (Eject):Press this button to eject a CD. Eject
may be activated with either the ignition or radio off.
CDs may be loaded with the radio and ignition off if this
button is pressed ®rst.
Compact Disc Messages
If the disc comes out or CHECK CD appears on the
display, it could be for one of the following reasons:
·You're driving on a very rough road. When the road
becomes smoother, the disc should play.
·It's very hot. When the temperature returns to
normal, the disc should play.
·The disc is dirty, scratched, wet, or upside down.
·The air is very humid. If so, wait about an hour and
try again.
·There may have been a problem while burning
the CD.
·The label may be caught in the CD player.
If the CD is not playing correctly, for any other reason,
try a known good CD.
If any error occurs repeatedly or if an error can not be
corrected, contact your dealer.
3-77
Page 340 of 394

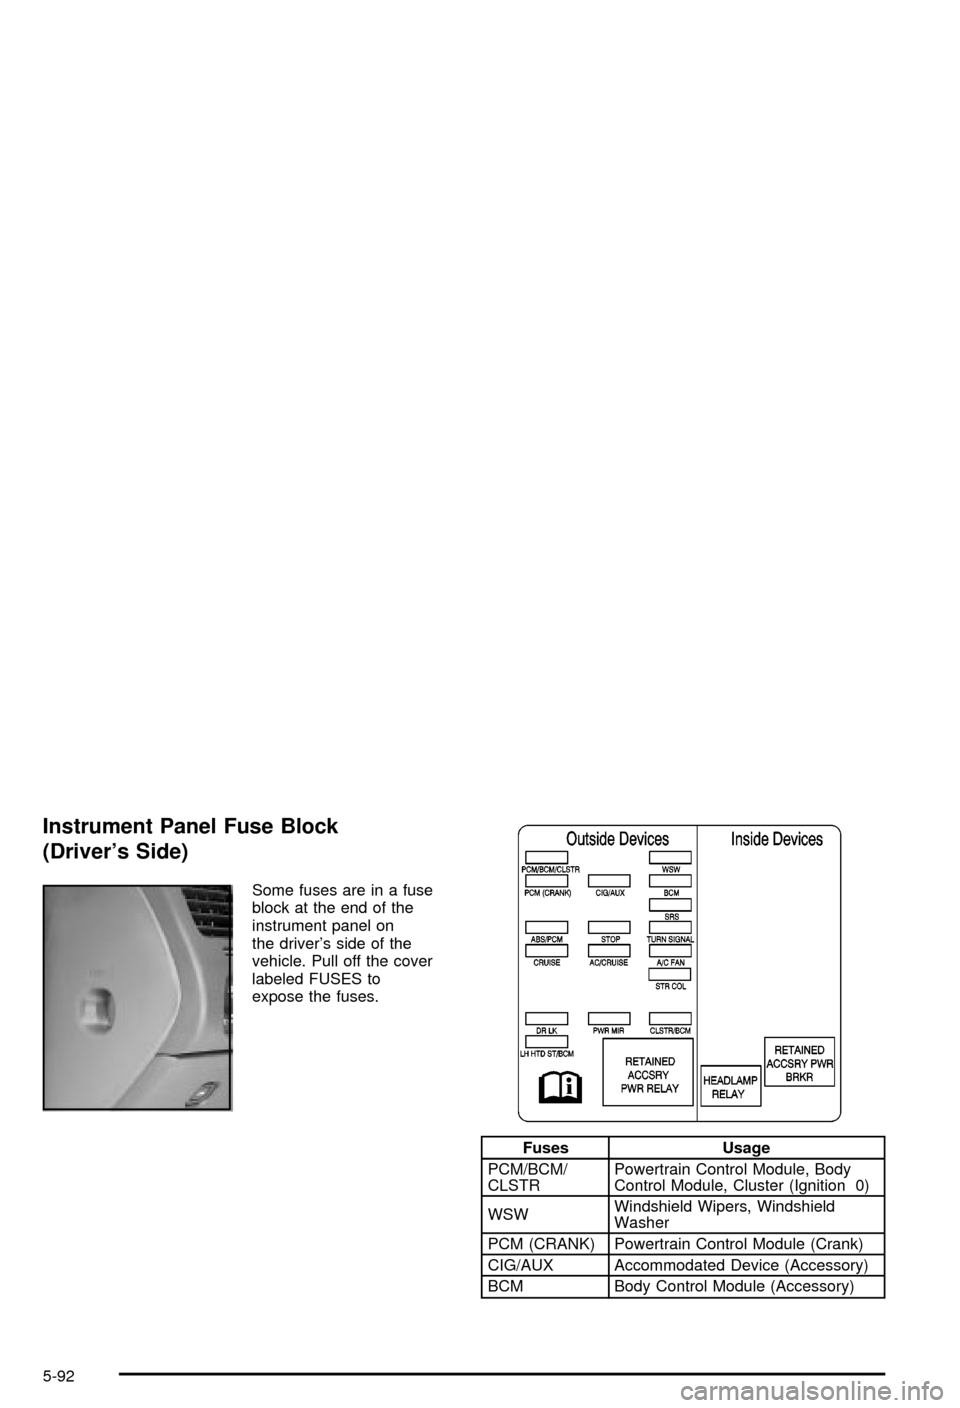
Instrument Panel Fuse Block
(Driver's Side)
Some fuses are in a fuse
block at the end of the
instrument panel on
the driver's side of the
vehicle. Pull off the cover
labeled FUSES to
expose the fuses.
Fuses Usage
PCM/BCM/
CLSTRPowertrain Control Module, Body
Control Module, Cluster (Ignition 0)
WSWWindshield Wipers, Windshield
Washer
PCM (CRANK) Powertrain Control Module (Crank)
CIG/AUX Accommodated Device (Accessory)
BCM Body Control Module (Accessory)
5-92
Page 343 of 394

Fuses Usage
HVAC BLO HVAC Blower Relay
I/P BRPInstrument Panel Footwell Lamps,
Glovebox Lamps
HTD MIR Heated Mirrors
BRK SW Brake Switch
HAZ SW Hazard Switch
REAR PRK LP Rear Parking Lamps
AUX PWR Accessory Power Outlet (Battery)
C/LTR Cigarette Lighter
RADIORadio, Radio Ampli®er, Remote
Digital Radio Receiver
FRT PARK LPFront Parking Lamps,
Instrumentation LightingRelays Usage
PARK LP
RELAYParking Lamp Relay
BACKUP LP
RELAYBack-up Lamps Relay
BATT RUN
DOWN
PROTECTION
RELAYBattery Run Down Protection Relay
REAR DEFOG
RELAYRear Defogger Relay, Heated
Mirror Relay
Breakers Usage
PWR SEATS
BRKRPower Seat Circuit Breaker
REAR DEFOG
BRKRRear Defogger Breaker
5-95
Page 380 of 394

AUTOLOCK (Automatic Door Lock
and Unlock)................................................2-44
Automatic Transaxle Check..............................6-11
Automatic Transaxle Shift Lock Control
System Check.............................................6-12
Automatic Transaxle........................................5-24
Fluid..........................................................5-24
Operation...................................................2-21
Auxiliary Power Connection (Power Drop)...........3-21
B
Backglass Antenna..........................................3-93
Backing Up....................................................4-38
Battery Replacement......................................... 2-7
Battery Rundown Protection.............................3-19
Battery Warning Message................................3-45
Battery..........................................................5-47
Before Leaving on a Long Trip.........................4-21
Body Lubrication Service..................................6-11
Brake Fluid....................................................5-44
Brake Wear...................................................5-46
Brake............................................................3-51
Low Fluid Warning Message.........................3-51
Parking......................................................2-24
System Inspection.......................................6-15
System Warning Light..................................3-36Brakes..........................................................5-44
Braking in Emergencies..................................... 4-7
Braking........................................................... 4-5
Break-In, New Vehicle.....................................2-16
Bulb Replacement...........................................5-54
Back-Up Lamps...........................................5-57
Halogen Bulbs............................................5-54
Headlamp Aiming........................................5-53
Headlamps, Front Turn Signal, Sidemarker,
and Parking Lamps..................................5-54
Replacement Bulbs......................................5-57
Taillamps, Turn Signal, Stoplamps and
Sidemarker Lamps...................................5-56
Buying New Tires...........................................5-65
C
California Fuel.................................................. 5-5
Canada ± Customer Assistance.......................... 7-4
Canadian Owners................................................ ii
Canadian Roadside Assistance........................... 7-6
Capacities and Speci®cations............................5-98
Carbon Monoxide...................4-24, 4-34, 2-10, 2-28
Care of.........................................................5-85
Safety Belts................................................5-85
Your Cassette Tape Player............................3-91
Your CD Player...........................................3-92
Your CDs ...................................................3-92
2