2003 CHEVROLET MONTE CARLO trunk
[x] Cancel search: trunkPage 319 of 394

Removing the Spare Tire and Tools
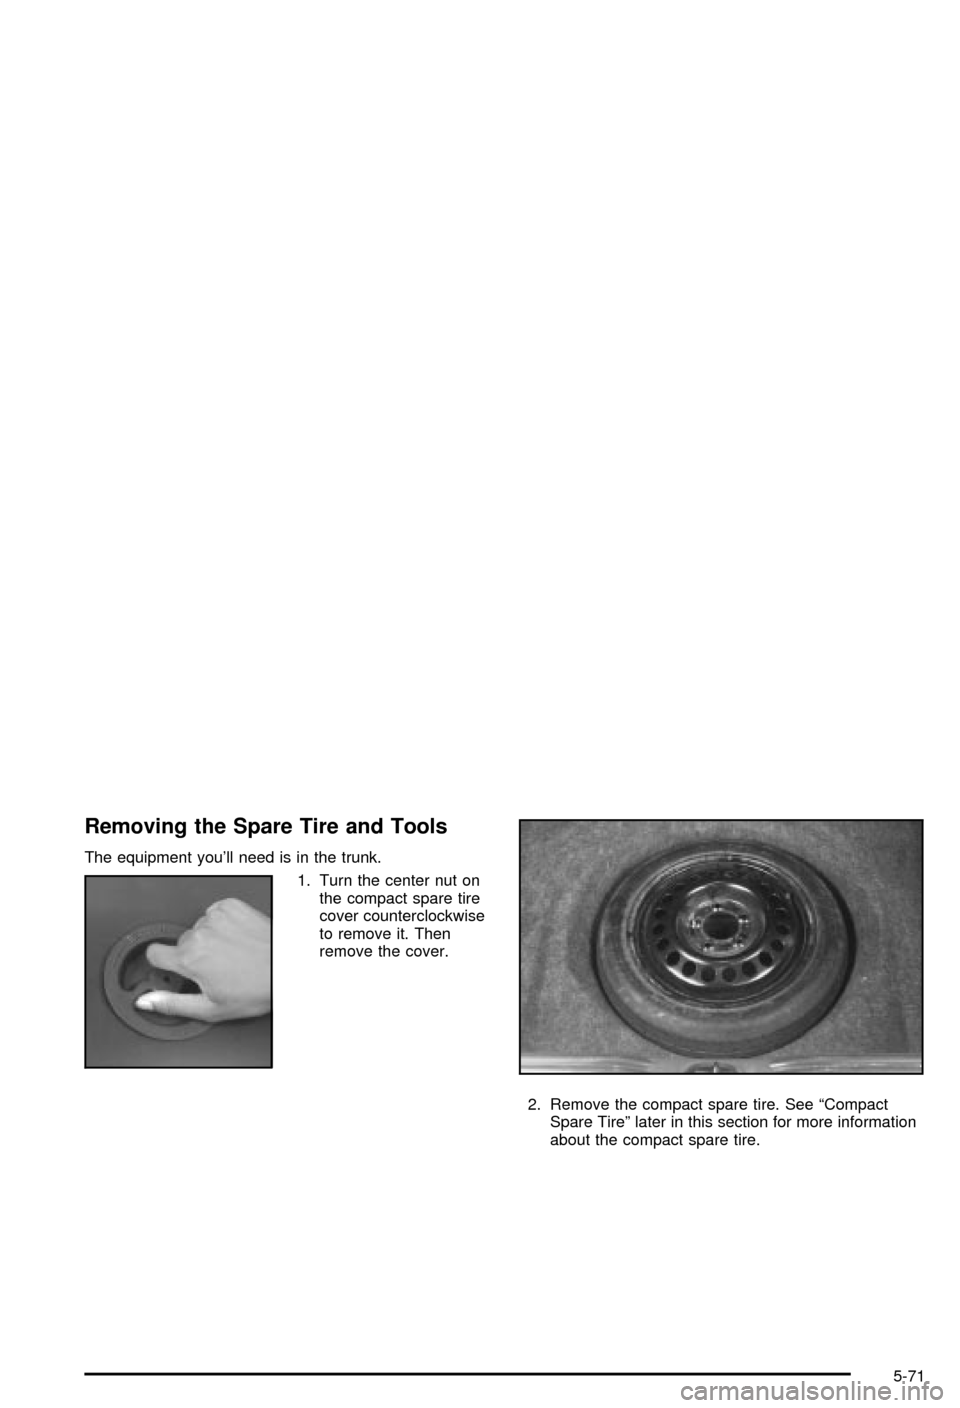
The equipment you'll need is in the trunk.
1. Turn the center nut on
the compact spare tire
cover counterclockwise
to remove it. Then
remove the cover.
2. Remove the compact spare tire. See ªCompact
Spare Tireº later in this section for more information
about the compact spare tire.
5-71
Page 327 of 394

Notice:Improperly tightened wheel nuts can lead
to brake pulsation and rotor damage. To avoid
expensive brake repairs, evenly tighten the wheel
nuts in the proper sequence and to the proper
torque speci®cation. See ªCapacities and
Speci®cationsº in the index for the wheel nut torque
speci®cation.
Don't try to put the wheel cover on your compact spare
tire. It won't ®t. Store the wheel cover and wheel
center cap, if applicable, in the trunk until you have the
¯at tire repaired or replaced.
Notice:Wheel covers won't ®t on your compact
spare. If you try to put a wheel cover on your
compact spare, you could damage the cover or the
spare.
Storing the Flat Tire and Tools
{CAUTION:
Storing a jack, a tire, or other equipment in the
passenger compartment of the vehicle could
cause injury. In a sudden stop or collision,
loose equipment could strike someone. Store
all these in the proper place.After you've put the compact spare tire on your vehicle,
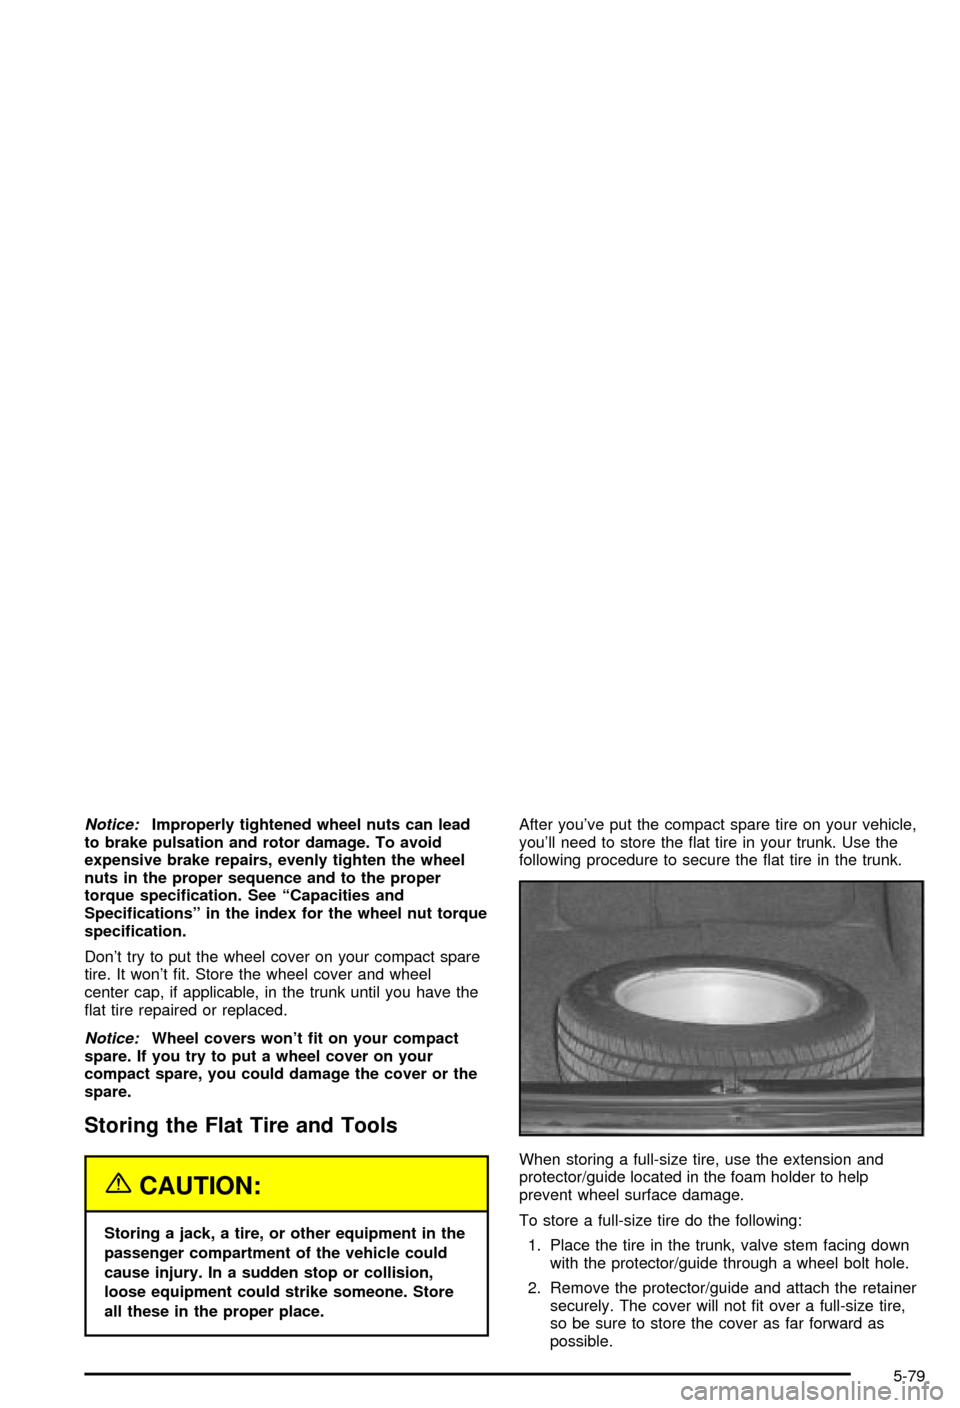
you'll need to store the ¯at tire in your trunk. Use the
following procedure to secure the ¯at tire in the trunk.
When storing a full-size tire, use the extension and
protector/guide located in the foam holder to help
prevent wheel surface damage.
To store a full-size tire do the following:
1. Place the tire in the trunk, valve stem facing down
with the protector/guide through a wheel bolt hole.
2. Remove the protector/guide and attach the retainer
securely. The cover will not ®t over a full-size tire,
so be sure to store the cover as far forward as
possible.
5-79
Page 328 of 394

Storing the Spare Tire and Tools
{CAUTION:
Storing a jack, a tire, or other equipment in the
passenger compartment of the vehicle could
cause injury. In a sudden stop or collision,
loose equipment could strike someone. Store
all these in the proper place.
The compact spare tire is for temporary use only.
Replace the compact spare tire with a full-size tire as
soon as you can. See
Compact Spare Tire on
page 5-81.
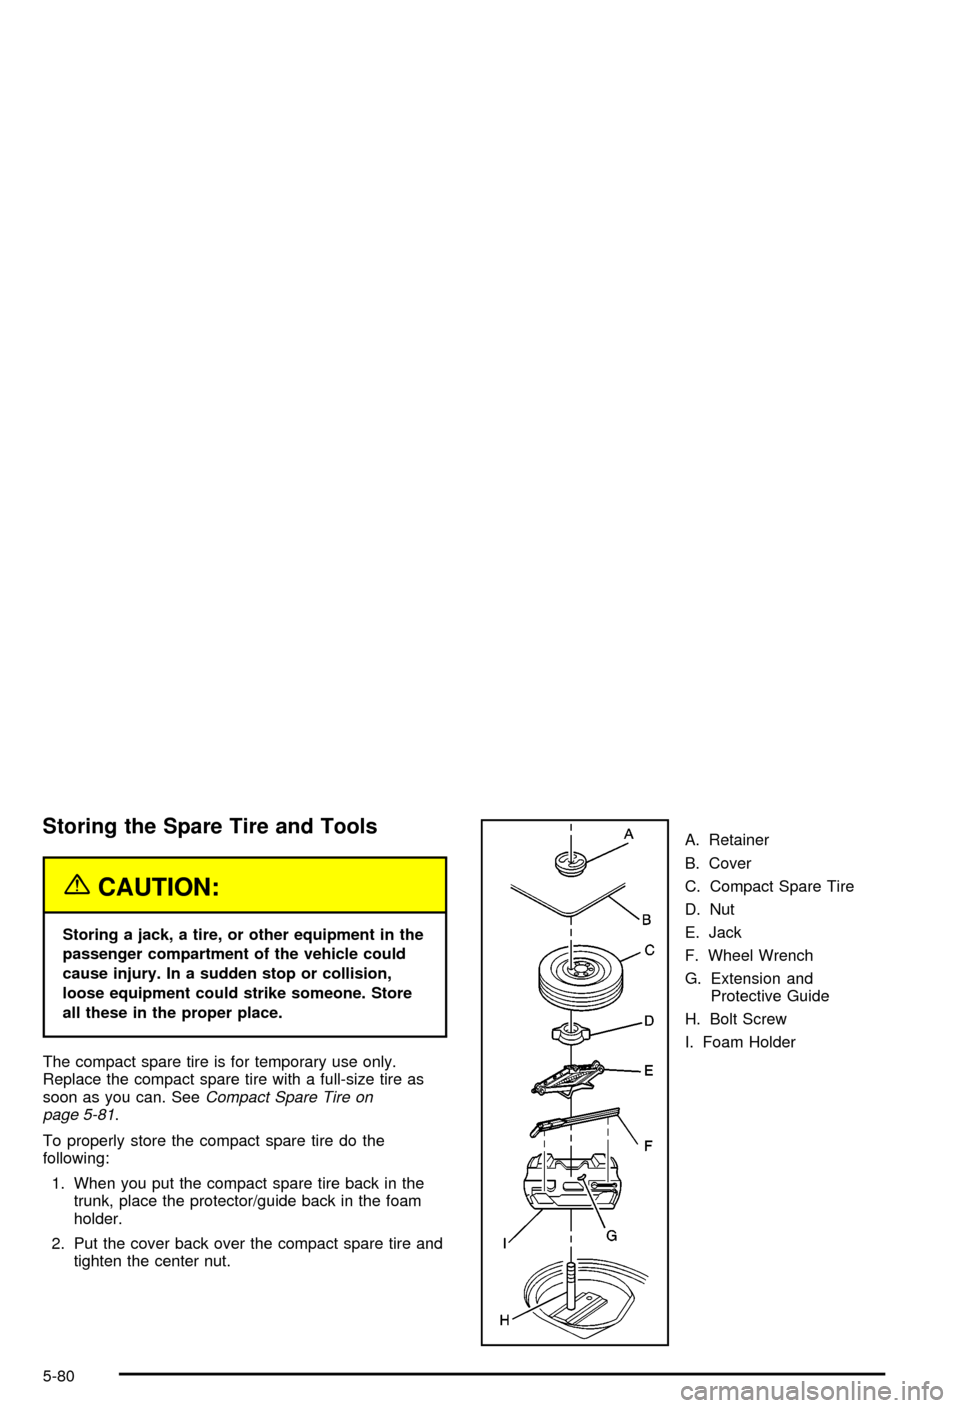
To properly store the compact spare tire do the
following:
1. When you put the compact spare tire back in the
trunk, place the protector/guide back in the foam
holder.
2. Put the cover back over the compact spare tire and
tighten the center nut.A. Retainer
B. Cover
C. Compact Spare Tire
D. Nut
E. Jack
F. Wheel Wrench
G. Extension and
Protective Guide
H. Bolt Screw
I. Foam Holder
5-80
Page 338 of 394

Vehicle Identi®cation
Vehicle Identi®cation Number (VIN)
This is the legal identi®er for your vehicle. It appears on
a plate in the front corner of the instrument panel, on
the driver's side. You can see it if you look through the
windshield from outside your vehicle. The VIN also
appears on the Vehicle Certi®cation and Service Parts
labels and the certi®cates of title and registration.
Engine Identi®cation
The 8th character in your VIN is the engine code. This
code will help you identify your engine, speci®cations
and replacement parts.
Service Parts Identi®cation Label
You'll ®nd this label on the inside of your trunk lid.
It's very helpful if you ever need to order parts.
On this label is:
·your VIN,
·the model designation,
·paint information and
·a list of all production options and special
equipment.
Be sure that this label is not removed from the vehicle.
Electrical System
Add-On Electrical Equipment
Notice:Don't add anything electrical to your
vehicle unless you check with your dealer ®rst.
Some electrical equipment can damage your vehicle
and the damage wouldn't be covered by your
warranty. Some add-on electrical equipment can
keep other components from working as they
should.
Your vehicle has an air bag system. Before attempting
to add anything electrical to your vehicle, see
Servicing Your Air Bag-Equipped Vehicle on page 1-56.
5-90
Page 342 of 394

Instrument Panel Fuse Block
(Passenger's Side)
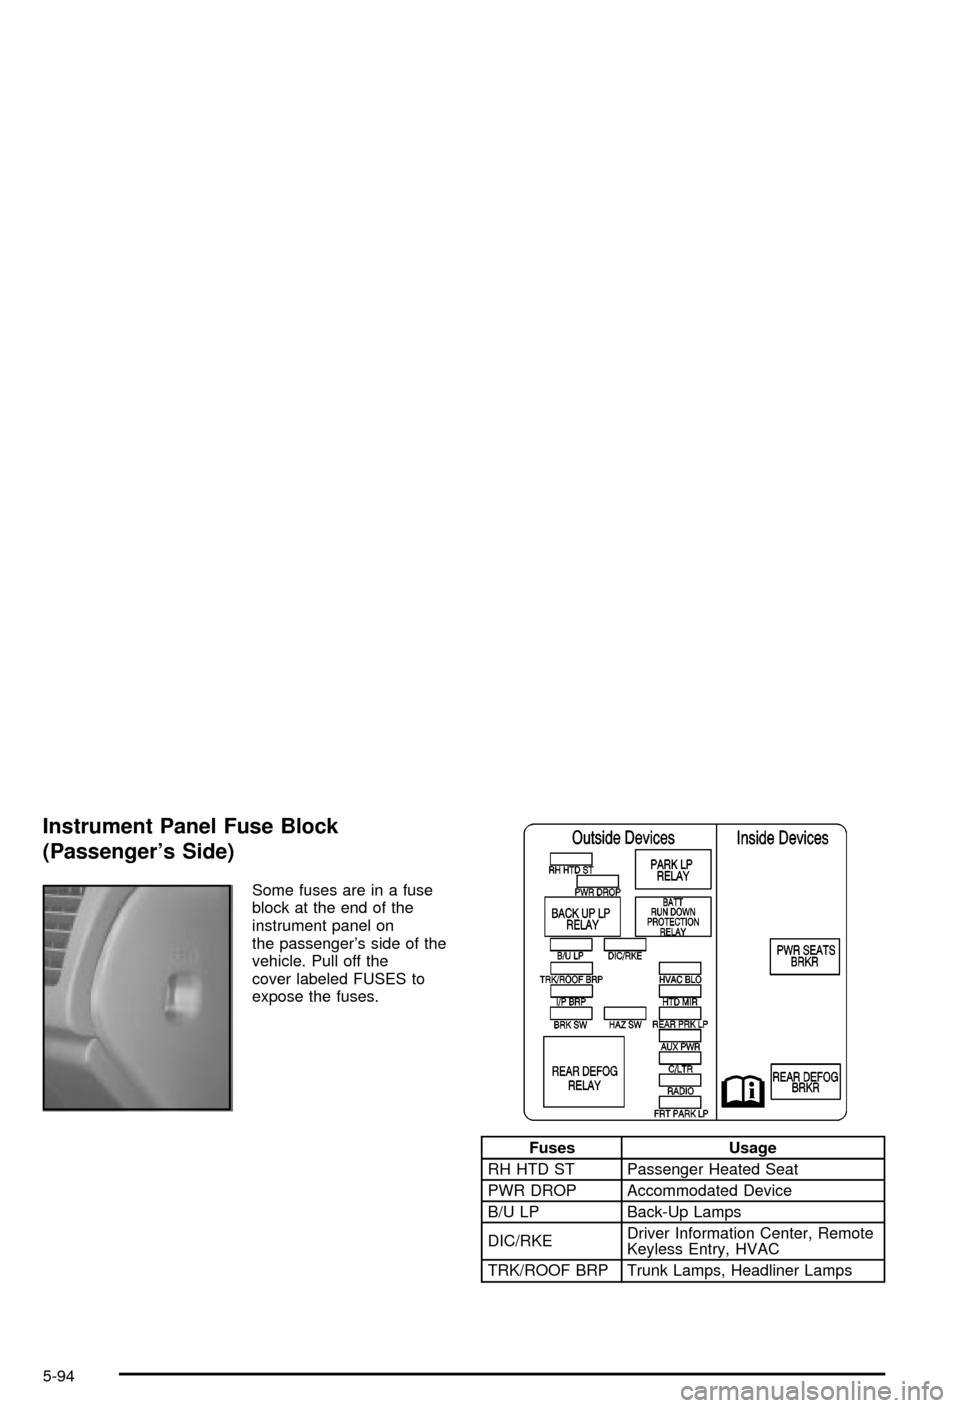
Some fuses are in a fuse
block at the end of the
instrument panel on
the passenger's side of the
vehicle. Pull off the
cover labeled FUSES to
expose the fuses.
Fuses Usage
RH HTD ST Passenger Heated Seat
PWR DROP Accommodated Device
B/U LP Back-Up Lamps
DIC/RKEDriver Information Center, Remote
Keyless Entry, HVAC
TRK/ROOF BRP Trunk Lamps, Headliner Lamps
5-94
Page 383 of 394

Driving On Grades..........................................4-39
Driving on Snow or Ice....................................4-25
Driving Through Deep Standing Water...............4-18
Driving Through Flowing Water.........................4-18
Driving with a Trailer.......................................4-38
Driving..........................................................4-15
At Night.....................................................4-15
City...........................................................4-19
Defensive..................................................... 4-2
Drunken....................................................... 4-2
Freeway.....................................................4-20
Hill and Mountain Roads..............................4-22
In Rain and on Wet Roads...........................4-16
Winter........................................................4-24
Dual Climate Control System............................3-22
E
Easy Entry Seat............................................... 1-7
Electrical System............................................5-90
Add-On Equipment......................................5-90
Fuses and Circuit Breakers...........................5-91
Headlamp Wiring.........................................5-91
Power Windows and Other Power Options......5-91
Windshield Wiper Fuses...............................5-91
Emergency Trunk Release Handle.....................2-12Emissions Inspection and Maintenance
Programs...................................................3-41
Engine Coolant Level Check.............................6-10
Engine Cooling When Trailer Towing..................4-40
Engine Oil Additives........................................5-20
Engine Oil Level Check...................................6-10
Engine..........................................................5-22
Air Cleaner/Filter.........................................5-22
Battery.......................................................5-47
Change Oil Message...................................3-47
Check and Service Engine Soon Light............3-38
Compartment Overview................................5-12
Coolant Heater............................................2-20
Coolant Temperature Gage...........................3-38
Coolant......................................................5-26
Cooling System Inspection............................6-15
Exhaust.....................................................2-28
Low Oil Level Message................................3-47
Oil .............................................................5-16
Overheating................................................5-29
Starting......................................................2-18
Entry Lighting.................................................3-18
Erasing HomeLink
žButtons..............................2-38
EXIT (Exit Feature Customization Mode)............2-50
Express-Down Window....................................2-14
Extender, Safety Belt.......................................1-28
Exterior Lamps...............................................3-15
5
Page 388 of 394

Message (cont.)
Low Engine Oil Level...................................3-47
Low Fuel Warning.......................................3-50
Low Oil Pressure.........................................3-46
Low Tire .....................................................3-48
Low Washer Fluid Warning...........................3-50
Security.....................................................3-49
Service Traction System Warning...................3-44
Service Vehicle Soon...................................3-51
Traction Active............................................3-45
Trunk Ajar Warning......................................3-49
Mexico, Central America and Caribbean Islands/
Countries (Except Puerto Rico and U.S. Virgin
Islands) ± Customer Assistance....................... 7-4
Mirrors..........................................................2-32
Automatic Dimming Rearview with OnStar
ž.....2-32
Automatic Dimming Rearview........................2-31
Manual Rearview Mirror with OnStar
ž.............2-30
Manual Rearview Mirror................................2-29
Outside Convex Mirror.................................2-33
Outside Heated Mirrors................................2-34
Outside Power Mirrors..................................2-33
MyGMLink.com................................................ 7-3
N
New Vehicle Break-In......................................2-16
Normal Maintenance Replacement Parts...........5-100
O
Odometer......................................................3-33
Off-Road Recovery..........................................4-12
OIL LIFE (GM Oil Life System Reset)................2-42
Oil ................................................................5-16
Engine.......................................................5-16
Pressure Indicator Light................................3-42
Pressure Message.......................................3-46
Older Children, Restraints................................1-29
Online Owner Center........................................ 7-3
OnStar
žPersonal Calling.................................2-35
OnStaržServices............................................2-34
OnStaržSystem.............................................2-34
OnStaržVirtual Advisor....................................2-35
ORIG. SET (Return to the Original Settings).......2-49
Other Warning Devices...................................... 3-6
Outlet Adjustment............................................3-27
Outside.........................................................2-33
Convex Mirror.............................................2-33
Heated Mirrors............................................2-34
Power Mirrors.............................................2-33
Overheated Engine Protection
Operating Mode..........................................5-29
Overseas ± Customer Assistance........................ 7-4
Owners, Canadian............................................... ii
Owner's Information........................................7-10
10
Page 390 of 394

Radios (cont.)
Setting the Time..........................................3-56
Theft-Deterrent............................................3-89
Understanding Reception..............................3-91
RDS Messages..............................3-61, 3-72, 3-81
Reading Lamps..............................................3-19
Rear Safety Belt Comfort Guides......................1-26
Rear Seat Passenger Positions.........................1-23
Rear Seat Passengers, Safety Belts..................1-23
Rear Storage Area..........................................2-39
Rear Window Defogger....................................3-27
Rearview Mirror, Automatic Dimming
with OnStar
ž..............................................2-32
Rearview Mirror, Automatic Dimming..................2-31
Rearview Mirror with OnStar
ž...........................2-30
Rearview Mirrors.............................................2-29
Reclining Seatbacks.......................................... 1-4
Recreational Vehicle Towing.............................4-30
Remote Keyless Entry System, Operation............ 2-4
Remote Keyless Entry System............................ 2-3
Remote Trunk Release....................................2-11
Removing the Flat Tire and Installing the
Spare Tire..................................................5-74
Removing the Spare Tire and Tools...................5-71
Removing the Wheel Covers and the Wheel
Nut Caps...................................................5-73
Replacement Bulbs.........................................5-57
Replacing Brake System Parts..........................5-47
Replacing Restraint System Parts After
a Crash.....................................................1-57Reporting Safety Defects................................... 7-9
Canadian Government................................... 7-9
General Motors............................................. 7-9
United States Government.............................. 7-8
Reprogramming a Single HomeLink
žButton.......2-38
Resetting Defaults...........................................2-39
Resetting the Trip Computer.............................3-55
Restraint System Check...................................6-11
Checking Your Restraint Systems...................1-56
Replacing Restraint System Parts After
a Crash..................................................1-57
Restraint Systems...........................................1-56
Checking....................................................1-56
Replacing Parts...........................................1-57
Resynchronization............................................. 2-7
Retained Accessory Power (RAP)......................2-17
Right Front Passenger Position, Safety Belts......1-23
Roadside......................................................... 7-5
Assistance Program....................................... 7-5
Rocking Your Vehicle To Get It Out...................4-29
Running Your Engine While You Are Parked.......2-28
S
Safety Belt.....................................................3-34
Reminder Light............................................3-34
Safety Belts...................................................5-85
Care of......................................................5-85
Driver Position............................................1-16
12