2003 CHEVROLET MONTE CARLO change wheel
[x] Cancel search: change wheelPage 247 of 394

Turn Signals When Towing a Trailer
When you tow a trailer, your vehicle may need additional
wiring. Check with your dealer. The arrows on your
instrument panel will ¯ash whenever you signal a turn or
lane change. Properly hooked up, the trailer lamps
will also ¯ash, telling other drivers you're about to turn,
change lanes or stop.
When towing a trailer, the arrows on your instrument
panel will ¯ash for turns even if the bulbs on the trailer
are burned out. Thus, you may think drivers behind
you are seeing your signal when they are not. It's
important to check occasionally to be sure the trailer
bulbs are still working.
Driving On Grades
Reduce speed and shift to a lower gearbeforeyou start
down a long or steep downgrade. If you don't shift
down, you might have to use your brakes so much that
they would get hot and no longer work well.
On a long uphill grade, shift down and reduce your
speed to around 45 mph (70 km/h) to reduce the
possibility of engine and transaxle overheating.
If you have overdrive, you may want to drive in
THIRD (3), instead of AUTOMATIC OVERDRIVE (
X).
Parking on Hills
{CAUTION:
You really should not park your vehicle, with a
trailer attached, on a hill. If something goes
wrong, your rig could start to move. People
can be injured, and both your vehicle and the
trailer can be damaged.
But if you ever have to park your rig on a hill, here's
how to do it:
1. Apply your regular brakes, but don't shift into
PARK (P) yet.
2. Have someone place chocks under the trailer
wheels.
3. When the wheel chocks are in place, release the
regular brakes until the chocks absorb the load.
4. Reapply the regular brakes. Then apply your
parking brake, and then shift to PARK (P).
5. Release the regular brakes.
4-39
Page 311 of 394

Tire Inspection and Rotation
Tires should be rotated every 7,500 miles (12 500 km).
Any time you notice unusual wear, rotate your tires
as soon as possible and check wheel alignment. Also
check for damaged tires or wheels. See
When It Is Time
for New Tires on page 5-64andWheel Replacement
on page 5-67for more information.
The purpose of regular rotation is to achieve more
uniform wear for all tires on the vehicle. The ®rst rotation
is the most important. See ªPart A: Scheduled
Maintenance Services,º in Section 6, for scheduled
rotation intervals.
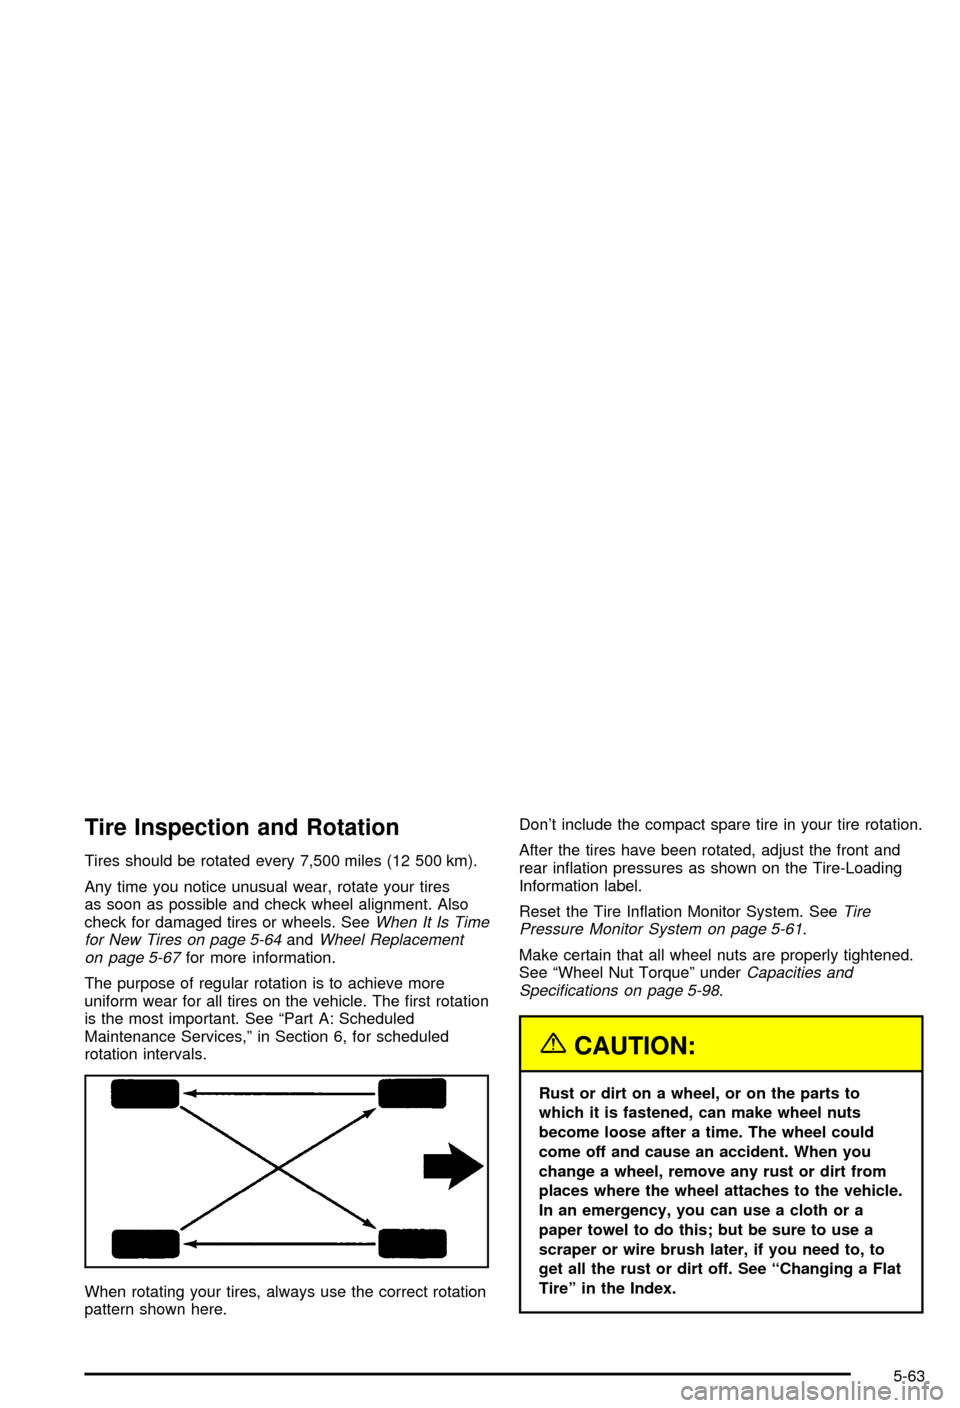
When rotating your tires, always use the correct rotation
pattern shown here.Don't include the compact spare tire in your tire rotation.
After the tires have been rotated, adjust the front and
rear in¯ation pressures as shown on the Tire-Loading
Information label.
Reset the Tire In¯ation Monitor System. See
Tire
Pressure Monitor System on page 5-61.
Make certain that all wheel nuts are properly tightened.
See ªWheel Nut Torqueº under
Capacities and
Speci®cations on page 5-98.
{CAUTION:
Rust or dirt on a wheel, or on the parts to
which it is fastened, can make wheel nuts
become loose after a time. The wheel could
come off and cause an accident. When you
change a wheel, remove any rust or dirt from
places where the wheel attaches to the vehicle.
In an emergency, you can use a cloth or a
paper towel to do this; but be sure to use a
scraper or wire brush later, if you need to, to
get all the rust or dirt off. See ªChanging a Flat
Tireº in the Index.
5-63
Page 317 of 394

Tire Chains
Notice:Use tire chains only where legal and only
when you must. Use only SAE Class ªSº type chains
that are the proper size for your tires. Install them
on the front tires and tighten them as tightly as
possible with the ends securely fastened. Drive
slowly and follow the chain manufacturer's
instructions. If you can hear the chains contacting
your vehicle, stop and retighten them. If the contact
continues, slow down until it stops. Driving too
fast or spinning the wheels with chains on will
damage your vehicle.
If a Tire Goes Flat
It's unusual for a tire to ªblowoutº while you're driving,
especially if you maintain your tires properly. If air goes
out of a tire, it's much more likely to leak out slowly.
But if you should ever have a ªblowout,º here are a few
tips about what to expect and what to do:
If a front tire fails, the ¯at tire will create a drag that
pulls the vehicle toward that side. Take your foot off the
accelerator pedal and grip the steering wheel ®rmly.
Steer to maintain lane position, and then gently brake to
a stop well out of the traffic lane.A rear blowout, particularly on a curve, acts much like a
skid and may require the same correction you'd use
in a skid. In any rear blowout, remove your foot from the
accelerator pedal. Get the vehicle under control by
steering the way you want the vehicle to go. It may be
very bumpy and noisy, but you can still steer. Gently
brake to a stop, well off the road if possible.
{CAUTION:
Lifting a vehicle and getting under it to do
maintenance or repairs is dangerous without
the appropriate safety equipment and training.
The jack provided with your vehicle is
designed only for changing a ¯at tire. If it is
used for anything else, you or others could be
badly injured or killed if the vehicle slips off
the jack. Use the jack provided with your
vehicle only for changing a ¯at tire.
If a tire goes ¯at, the next part shows how to use your
jacking equipment to change a ¯at tire safely.
5-69
Page 318 of 394

Changing a Flat Tire
If a tire goes ¯at, avoid further tire and wheel damage
by driving slowly to a level place. Turn on your
hazard warning ¯ashers.
{CAUTION:
Changing a tire can cause an injury. The
vehicle can slip off the jack and roll over you
or other people. You and they could be badly
injured. Find a level place to change your tire.
To help prevent the vehicle from moving:
1. Set the parking brake ®rmly.
2. Put the shift lever in PARK (P).
3. Turn off the engine.
To be even more certain the vehicle won't
move, you can put blocks at the front and rear
of the tire farthest away from the one being
changed. That would be the tire on the other
side of the vehicle, at the opposite end.The following steps will tell you how to use the jack and
change a tire.
5-70
Page 323 of 394

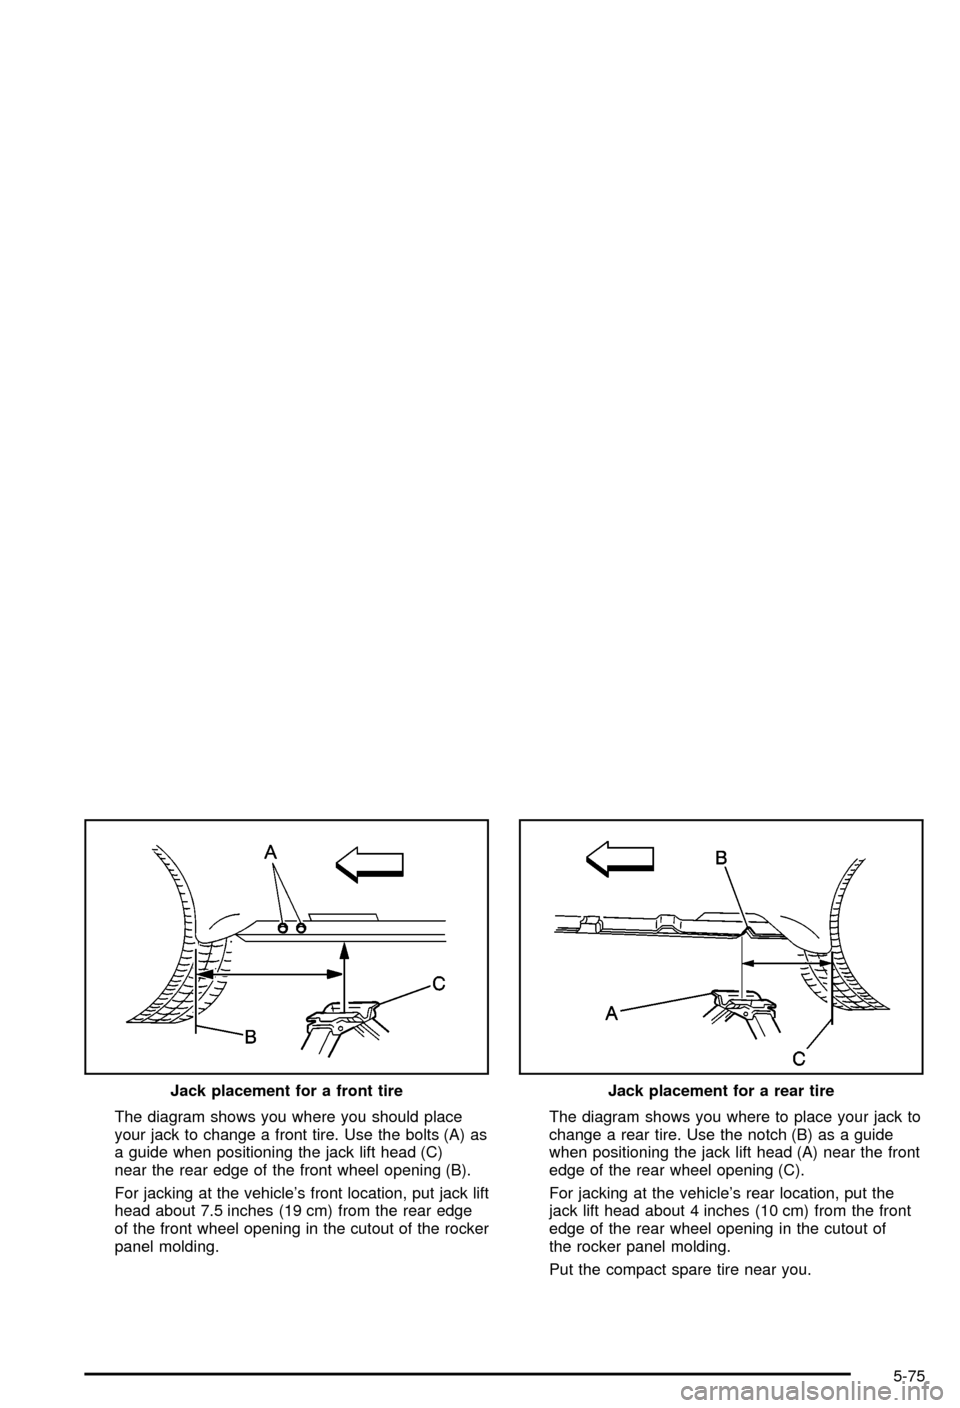
The diagram shows you where you should place
your jack to change a front tire. Use the bolts (A) as
a guide when positioning the jack lift head (C)
near the rear edge of the front wheel opening (B).
For jacking at the vehicle's front location, put jack lift
head about 7.5 inches (19 cm) from the rear edge
of the front wheel opening in the cutout of the rocker
panel molding.The diagram shows you where to place your jack to
change a rear tire. Use the notch (B) as a guide
when positioning the jack lift head (A) near the front
edge of the rear wheel opening (C).
For jacking at the vehicle's rear location, put the
jack lift head about 4 inches (10 cm) from the front
edge of the rear wheel opening in the cutout of
the rocker panel molding.
Put the compact spare tire near you. Jack placement for a front tire
Jack placement for a rear tire
5-75
Page 324 of 394

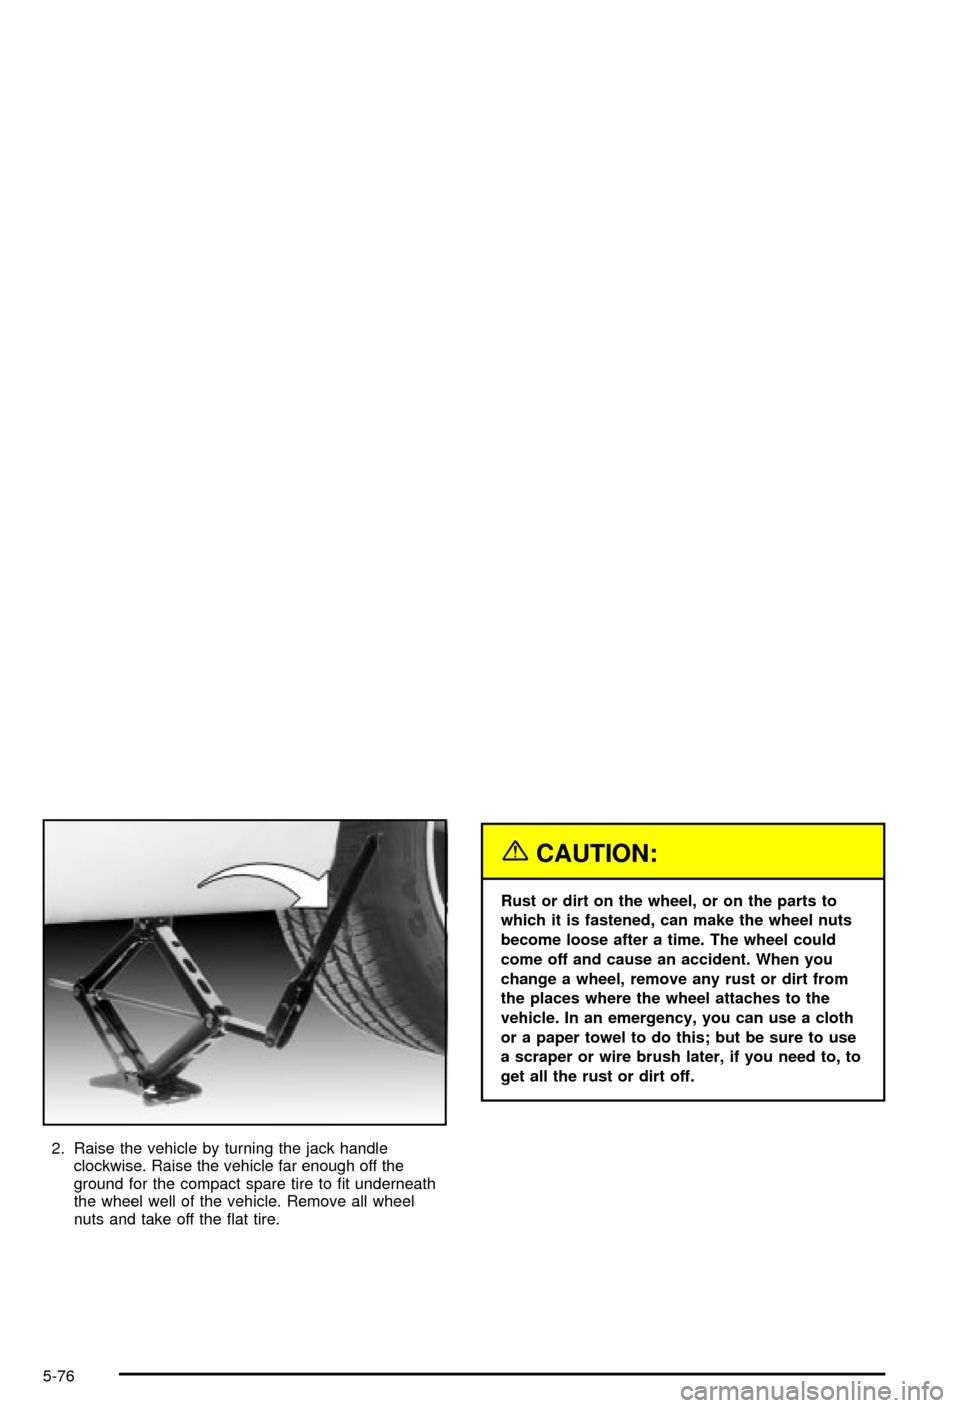
2. Raise the vehicle by turning the jack handle
clockwise. Raise the vehicle far enough off the
ground for the compact spare tire to ®t underneath
the wheel well of the vehicle. Remove all wheel
nuts and take off the ¯at tire.
{CAUTION:
Rust or dirt on the wheel, or on the parts to
which it is fastened, can make the wheel nuts
become loose after a time. The wheel could
come off and cause an accident. When you
change a wheel, remove any rust or dirt from
the places where the wheel attaches to the
vehicle. In an emergency, you can use a cloth
or a paper towel to do this; but be sure to use
a scraper or wire brush later, if you need to, to
get all the rust or dirt off.
5-76
Page 381 of 394

Cassette Tape Messages.........................3-66, 3-86
Cassette Tape Player Service...........................6-10
CD Adapter Kits.....................................3-67, 3-87
Center Console Storage Area...........................2-39
Chains, Tires..................................................5-69
Change Engine Oil Message............................3-47
Check Engine Light.........................................3-38
Checking Coolant............................................5-28
Checking Engine Oil........................................5-16
Checking Things Under the Hood......................5-10
Checking Your Restraint Systems......................1-56
Check...........................................................3-38
Engine Light...............................................3-38
Chemical Paint Spotting...................................5-88
Child Restraints..............................................1-35
Child Restraint Systems...............................1-35
Infants and Young Children...........................1-32
Lower Anchorages and Top Tethers for
Children (LATCH System)..........................1-41
Older Children.............................................1-29
Securing a Child Restraint Designed for the
LATCH System........................................1-43
Securing a Child Restraint in a Rear Seat
Position..................................................1-43
Securing a Child Restraint in the Right
Front Seat Position...................................1-46
Top Strap Anchor Location............................1-40
Top Strap...................................................1-39
Where to Put the Restraint...........................1-38Chime Level Adjustment..................................3-94
CHIRP (Horn Chirp Timer)...............................2-49
Cigarette Lighter.............................................3-21
Cleaning Aluminum Wheels..............................5-87
Cleaning Exterior Lamps/Lenses.......................5-86
Cleaning Fabric/Carpet....................................5-82
Cleaning Glass Surfaces..................................5-84
Cleaning Interior Plastic Components.................5-84
Cleaning Leather............................................5-84
Cleaning the Top of the Instrument Panel...........5-84
Cleaning Tires................................................5-87
Cleaning Vinyl................................................5-84
Cleaning Windshield and Wiper Blades..............5-86
Cleaning........................................................5-82
Inside of Your Vehicle..................................5-82
Outside of Your Vehicle................................5-85
Underbody Maintenance...............................5-88
Weatherstrips..............................................5-85
Climate Control System...................................3-28
Air Filter, Passenger Compartment.................3-28
Dual..........................................................3-22
Compact Disc Messages..........................3-77, 3-89
Compact Spare Tire........................................5-81
Compass Variance..........................................3-54
Content Theft-Deferrent....................................2-14
Control of a Vehicle.......................................... 4-5
Convenience Net............................................2-40
3
Page 393 of 394

Traction.........................................................3-45
Active Message...........................................3-45
Control System (TCS).................................... 4-8
Control System Warning Light.......................3-37
Service Traction System Warning
Message.................................................3-44
Trailer Brakes.................................................4-37
Transaxle Operation, Automatic.........................2-21
Transaxle.......................................................5-24
Fluid, Automatic...........................................5-24
Transmission, Transaxle, Transfer Case Unit
Repair Manual............................................7-10
Transmitter Veri®cation...................................... 2-5
Transportation Options...................................... 7-7
Trip Computer................................................3-55
Trip Odometer................................................3-33
TRNKJAMB (Trunk Jamb)................................2-48
Trunk Ajar Warning Message............................3-49
Trunk Assist Handle........................................2-11
Trunk Lock....................................................2-11
Trunk............................................................2-10
Turn and Lane-Change Signals.......................... 3-8
Turn Signal/Multifunction Lever........................... 3-7
Turn Signals When Towing a Trailer..................4-39U
Underbody Flushing Service.............................6-13
Underhood Fuse Block (Lower).........................5-97
Underhood Fuse Block (Upper).........................5-96
Understanding Radio Reception........................3-91
Uniform Tire Quality Grading............................5-66
United States ± Customer Assistance.................. 7-4
Used Replacement Wheels..............................5-68
Using Cleaner on Fabric..................................5-83
Using HomeLink
ž...........................................2-38
V
Vehicle Identi®cation........................................5-90
Number (VIN).............................................5-90
Service Parts Identi®cation Label...................5-90
Vehicle Personalization....................................2-41
Vehicle Storage..............................................5-47
Vehicle............................................................ 4-5
Control........................................................ 4-5
Customization Settings.................................3-94
Damage Warnings........................................... iv
Loading......................................................4-32
Service Soon Message.................................3-51
Symbols......................................................... iv
Visor Vanity Mirrors.........................................2-14
Visors...........................................................2-14
Voltmeter Gage..............................................3-35
15