2003 CHEVROLET IMPALA set clock
[x] Cancel search: set clockPage 139 of 408
Interior Lamps
Instrument Panel Brightness
This feature controls the instrument panel lights.
The control for this feature is located on the exterior
lamps control. Your parking lamps must be on for this
feature to work. Turn the control clockwise to brighten
the lights or counterclockwise to dim them.
Courtesy Lamps
When any door is opened, several lamps come on.
These lamps are courtesy lamps. They make it easy for
you to enter and leave your vehicle. You can also
turn these lamps on by turning the exterior lamps control
all the way clockwise.
Some of the lamps have switches so you can turn them
on, even when the doors are closed. These lamps
are reading lamps.
Entry Lighting
Your vehicle may be equipped with courtesy lamps that
will come on and stay on for a set time whenever
you press UNLOCK on the remote keyless entry
transmitter (if equipped).
If you open a door, the lamps will stay on while it's open
and then turn off automatically about 25 seconds after
you close it. If you press UNLOCK and don't open
a door, the lamps will turn off after about 40 seconds.Entry lighting includes a feature called theater dimming.
With theater dimming, the lamps don't just turn off at
the end of the delay time. Instead, they slowly dim after
the delay time until they go out. The delay time is
canceled if you turn the ignition key to ON or press
the power door lock switch. The lamps will dim
right away.
When the ignition is on, illuminated entry is inactive,
which means the courtesy lamps won't come on unless
a door is opened.
Delayed Entry Lighting
Delayed entry lighting illuminates the interior for a
period of time after all the doors have been closed.
The ignition must be off for delayed entry lighting
to work. Immediately after all the doors have been
closed, the delayed entry lighting feature will continue to
work until one of the following occurs:
·The ignition is moved to ON,
·the doors are locked, or
·an illumination period of 25 seconds has elapsed.
If during the illumination period a door is opened,
the timed illumination period will be canceled and the
interior lamps will remain on because a door is open.
3-17
Page 144 of 408
Climate Controls
Dual Climate Control System
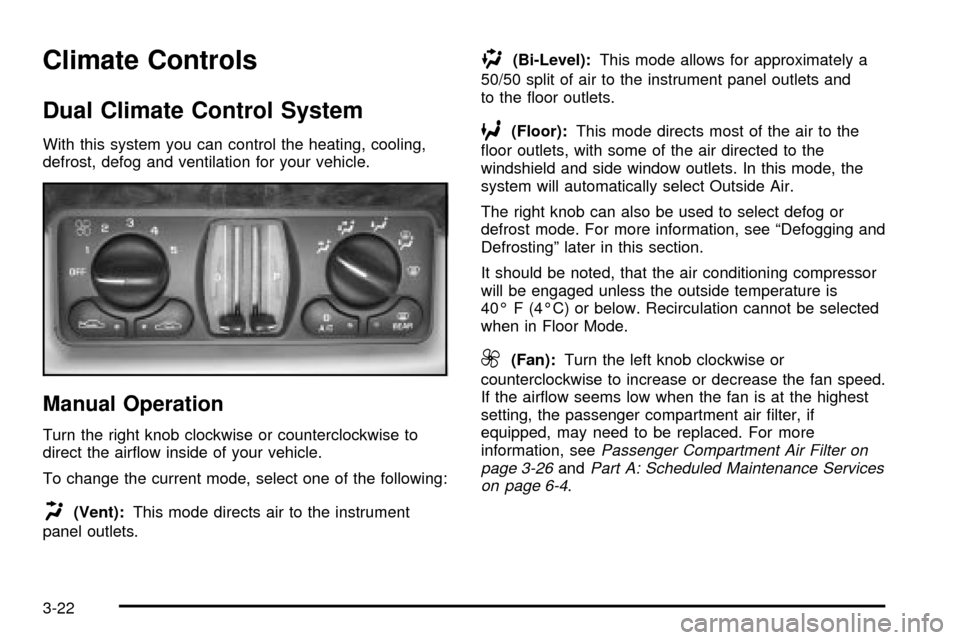
With this system you can control the heating, cooling,
defrost, defog and ventilation for your vehicle.
Manual Operation
Turn the right knob clockwise or counterclockwise to
direct the air¯ow inside of your vehicle.
To change the current mode, select one of the following:
H(Vent):This mode directs air to the instrument
panel outlets.
)(Bi-Level):This mode allows for approximately a
50/50 split of air to the instrument panel outlets and
to the ¯oor outlets.
6(Floor):This mode directs most of the air to the
¯oor outlets, with some of the air directed to the
windshield and side window outlets. In this mode, the
system will automatically select Outside Air.
The right knob can also be used to select defog or
defrost mode. For more information, see ªDefogging and
Defrostingº later in this section.
It should be noted, that the air conditioning compressor
will be engaged unless the outside temperature is
40É F (4ÉC) or below. Recirculation cannot be selected
when in Floor Mode.
9(Fan):Turn the left knob clockwise or
counterclockwise to increase or decrease the fan speed.
If the air¯ow seems low when the fan is at the highest
setting, the passenger compartment air ®lter, if
equipped, may need to be replaced. For more
information, see
Passenger Compartment Air Filter on
page 3-26andPart A: Scheduled Maintenance Services
on page 6-4.
3-22
Page 146 of 408
On hot days, open the windows to let hot inside air
escape; then close them. This helps to reduce the time
it takes for your vehicle to cool down. It also helps
the system to operate more efficiently.
For quick cool down on hot days, do the following:
1. Select the vent mode.
2. Select the recirculation mode.
3. Select A/C.
4. Select the coolest temperature for both zones.
5. Select the highest fan speeds.
Using these settings together for long periods of time
may cause the air inside of your vehicle to become too
dry. To prevent this from happening, after the air
inside of your vehicle has cooled, turn the recirculation
mode off.
The air-conditioning system removes moisture from the
air, so you may sometimes notice a small amount of
water dripping underneath your vehicle while idling
or after turning off the engine. This is normal.Defogging and Defrosting
Fog on the inside of the windows is a result of high
humidity (moisture) condensing on the cool window
glass. This can be minimized if the climate control
system is used properly. There are two modes to clear
fog or frost from your windshield. Use the defog
mode to clear the windows of fog or moisture and warm
the passengers. Use the defrost mode to remove fog
or frost from the windshield more quickly.
Turn the right knob clockwise to select the defog or
defrost mode.
-(Defog):This mode directs air equally to the
windshield and the ¯oor outlets. When you select this
mode, the system turns off recirculation and runs
the air-conditioning compressor unless the outside
temperature is below 40ÉF (4ÉC). The recirculation mode
cannot be selected while in the defog mode.
Do not drive the vehicle until all the windows are clear.
0(Defrost):This mode directs half of the air to
the windshield and side window vents and half to the
¯oor vents. In this mode, the system will automatically
force outside air into your vehicle. The recirculation
mode cannot be selected while in the defog mode. The
air conditioning compressor will run automatically in
this setting, unless the outside temperature is below
40ÉF (4ÉC).
Do not drive the vehicle until all the windows are clear.
3-24
Page 175 of 408
Audio System(s)
Notice:Before you add any sound equipment to
your vehicle ± like a tape player, CB radio, mobile
telephone or two-way radio ± be sure you can
add what you want. If you can, it's very important to
do it properly. Added sound equipment may
interfere with the operation of your vehicle's engine,
radio or other systems, and even damage them.
Your vehicle's systems may interfere with the
operation of sound equipment that has been added
improperly.
So, before adding sound equipment, check with
your dealer and be sure to check federal rules
covering mobile radio and telephone units.
Your audio system has been designed to operate easily
and to give years of listening pleasure. You will get
the most enjoyment out of it if you acquaint yourself with
it ®rst. Figure out which radio you have in your vehicle,
®nd out what your audio system can do and how to
operate all of its controls to be sure you're getting the
most out of the advanced engineering that went into it.
Your vehicle has a feature called Retained Accessory
Power (RAP). With RAP, you can play your audio
system even after the ignition is turned off. See
ªRetained Accessory Power (RAP)º under
Ignition
Positions on page 2-18.
Setting the Time
Press and hold the HR or MN buttons, located below
the tune knob, for two seconds. Then press and hold HR
until the correct hour appears on the display. AM or
PM will also appear. Press and hold MN until the correct
minute appears on the display. The time may be set
with the ignition on or off. The clock symbol will appear
on the display in time-set mode.
To synchronize the time with an FM station broadcasting
Radio Data System (RDS) information, press and
hold HR and MN at the same time for two seconds until
UPDATED and the clock symbol appear on the
display. If the time is not available from the station, NO
UPDAT will appear on the display instead.
3-53
Page 185 of 408
pressed more than once, the player will continue
moving forward or backward through the tape. SEEK
and a positive or a negative number will appear on the
display.
BAND:Press this button to listen to the radio when a
tape is playing. The tape will stop but remain in the
player.
TAPE AUX (Auxiliary):Press this button to play a
cassette tape when listening to the radio.
ZEJT (Eject):Press this button to eject a tape.
Eject may be activated with the radio off. Cassette tapes
may be loaded with the radio off if this button is
pressed ®rst.
Cassette Tape Messages
CHK TAPE (Check Tape):If this message appears on
the radio display, the tape won't play because of one
of the following errors.
·The tape is tight and the player can't turn the tape
hubs. Remove the tape. Hold the tape with the
open end down and try to turn the right hub
counterclockwise with a pencil. Turn the tape over
and repeat. If the hubs do not turn easily, your
tape may be damaged and should not be used in
the player. Try a new tape to make sure your player
is working properly.
·The tape is broken. Try a new tape.
·The tape is wrapped around the tape head. Attempt
to get the cassette out. Try a new tape.
CLEAN:If this message appears on the display, the
cassette tape player needs to be cleaned. It will still play
tapes, but you should clean it as soon as possible to
prevent damage to the tapes and player. See
Care
of Your Cassette Tape Player on page 3-91.
If any error occurs repeatedly or if an error can't be
corrected, contact your dealer.
CD Adapter Kits
It is possible to use a portable CD player adapter kit
with your cassette tape player after activating the bypass
feature on your tape player.
To activate the bypass feature, use the following steps:
1. Turn the radio off.
2. Press and hold the TAPE AUX button for ®ve
seconds. READY will appear on the display for
®ve seconds, indicating the feature is active.
3. Insert the adapter into the cassette slot. It will
power up the radio and begin playing.
The override feature will remain active until EJT
is pressed.
3-63
Page 208 of 408
5XSIDE:Press this pushbutton to play the other side
of the tape.
qSEEKr:The right arrow is the same as the
NEXT pushbutton, and the left arrow is the same as the
PREV pushbutton. If the arrows are held or pressed
more than once, the player will continue moving forward
or backward through the tape. SEEK and a positive
or a negative number will appear on the display.
BAND:Press this button to listen to the radio when
a tape is playing. The tape will stop but remain in
the player.
TAPE CD:Press this button to play a tape when
listening to the radio. Press TAPE CD to switch between
the tape and compact disc if both are loaded. The
inactive tape or CD will remain safely inside the radio
for future listening.
ZEJT (Eject):Press this button, located to the right
of the cassette tape slot, to eject a tape. Eject may
be activated with the radio off. Cassette tapes may be
loaded with the radio off if this button is pressed ®rst.
Cassette Tape Messages
CHK TAPE (Check Tape):If this message appears on
the radio display, the tape won't play because of one
of the following errors.
·The tape is tight and the player can't turn the tape
hubs. Remove the tape. Hold the tape with the
open end down and try to turn the right hub
counterclockwise with a pencil. Turn the tape over
and repeat. If the hubs do not turn easily, your
tape may be damaged and should not be used in
the player. Try a new tape to make sure your player
is working properly.
·The tape is broken. Try a new tape.
·The tape is wrapped around the tape head. Attempt
to get the cassette out. Try a new tape.
CLEAN:If this message appears on the display, the
cassette tape player needs to be cleaned. It will still play
tapes, but you should clean it as soon as possible to
prevent damage to the tapes and player. See
Care
of Your Cassette Tape Player on page 3-91.
If any error occurs repeatedly or if an error can not be
corrected, contact your dealer.
3-86