2003 CHEVROLET CORVETTE change
[x] Cancel search: changePage 2 of 368

GENERAL MOTORS, GM, the GM Emblem,
CHEVROLET, the CHEVROLET Emblem and the name
CORVETTE and the CORVETTE Emblem are
registered trademarks of General Motors Corporation.
This manual includes the latest information at the time it
was printed. We reserve the right to make changes
after that time without further notice. For vehicles ®rst
sold in Canada, substitute the name ªGeneral Motors of
Canada Limitedº for Chevrolet Motor Division whenever
it appears in this manual.
Please keep this manual in your vehicle, so it will be
there if you ever need it when you're on the road. If you
sell the vehicle, please leave this manual in it so the
new owner can use it.
Litho in U.S.A.
Part No. 10323873 A First Edition
Copyright General Motors Corporation 06/20/02
All Rights Reserved
Canadian Owners
You can obtain a French copy of this manual from your
dealer or from:
Helm, Incorporated
P.O. Box 07130
Detroit, MI 48207
How to Use This Manual
Many people read their owner's manual from beginning
to end when they ®rst receive their new vehicle. If
you do this, it will help you learn about the features and
controls for your vehicle. In this manual, you'll ®nd
that pictures and words work together to explain things.
Index
A good place to look for what you need is the Index in
back of the manual. It's an alphabetical list of what's
in the manual, and the page number where you'll ®nd it.
ii
Page 12 of 368
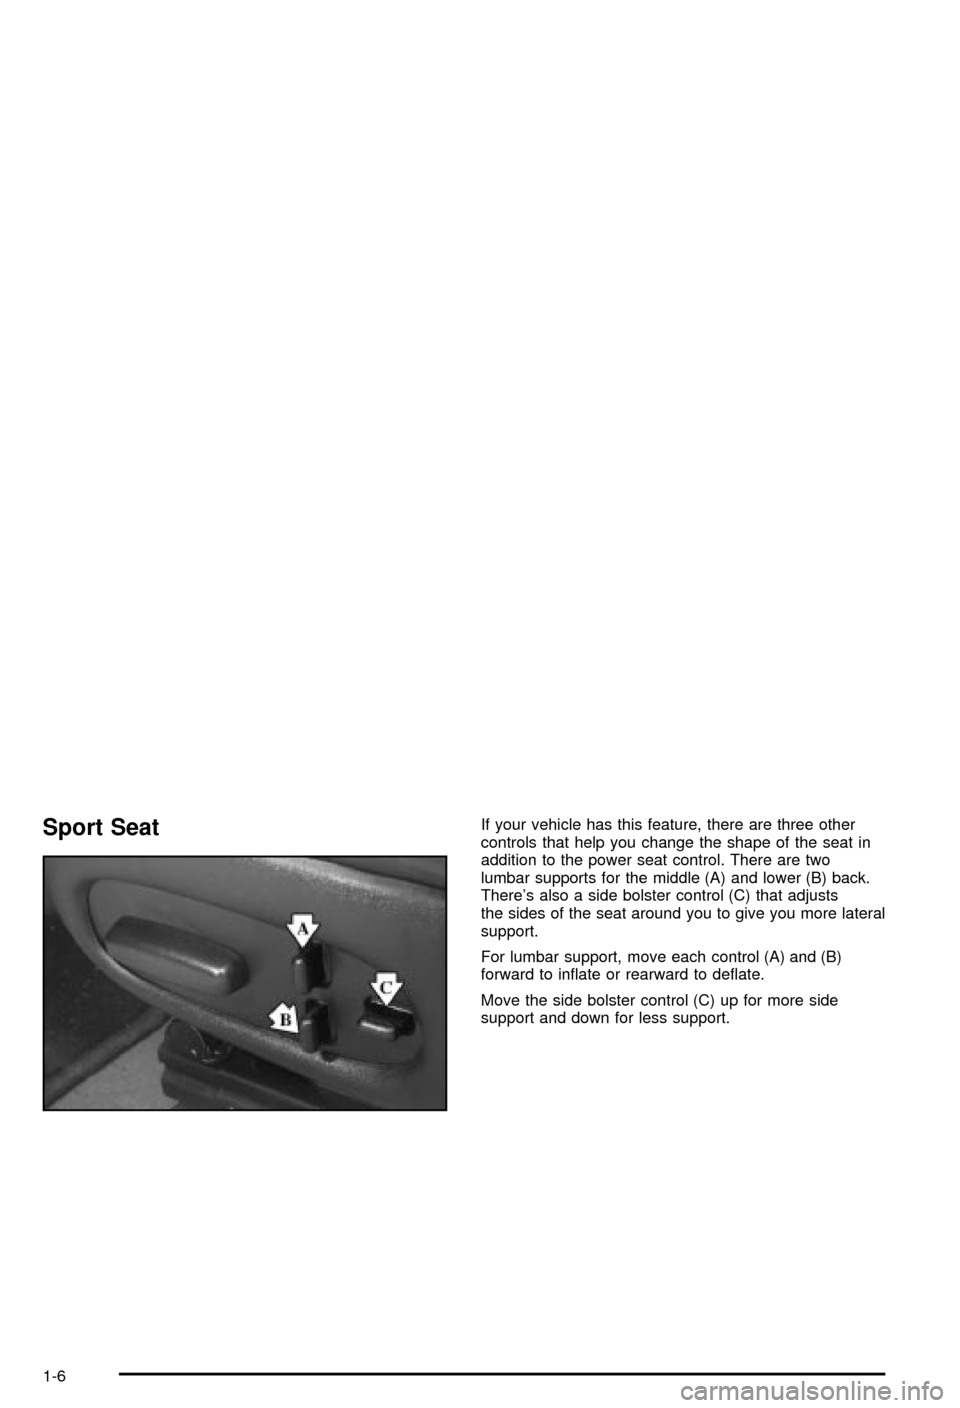
Sport SeatIf your vehicle has this feature, there are three other
controls that help you change the shape of the seat in
addition to the power seat control. There are two
lumbar supports for the middle (A) and lower (B) back.
There's also a side bolster control (C) that adjusts
the sides of the seat around you to give you more lateral
support.
For lumbar support, move each control (A) and (B)
forward to in¯ate or rearward to de¯ate.
Move the side bolster control (C) up for more side
support and down for less support.
1-6
Page 29 of 368
{CAUTION:
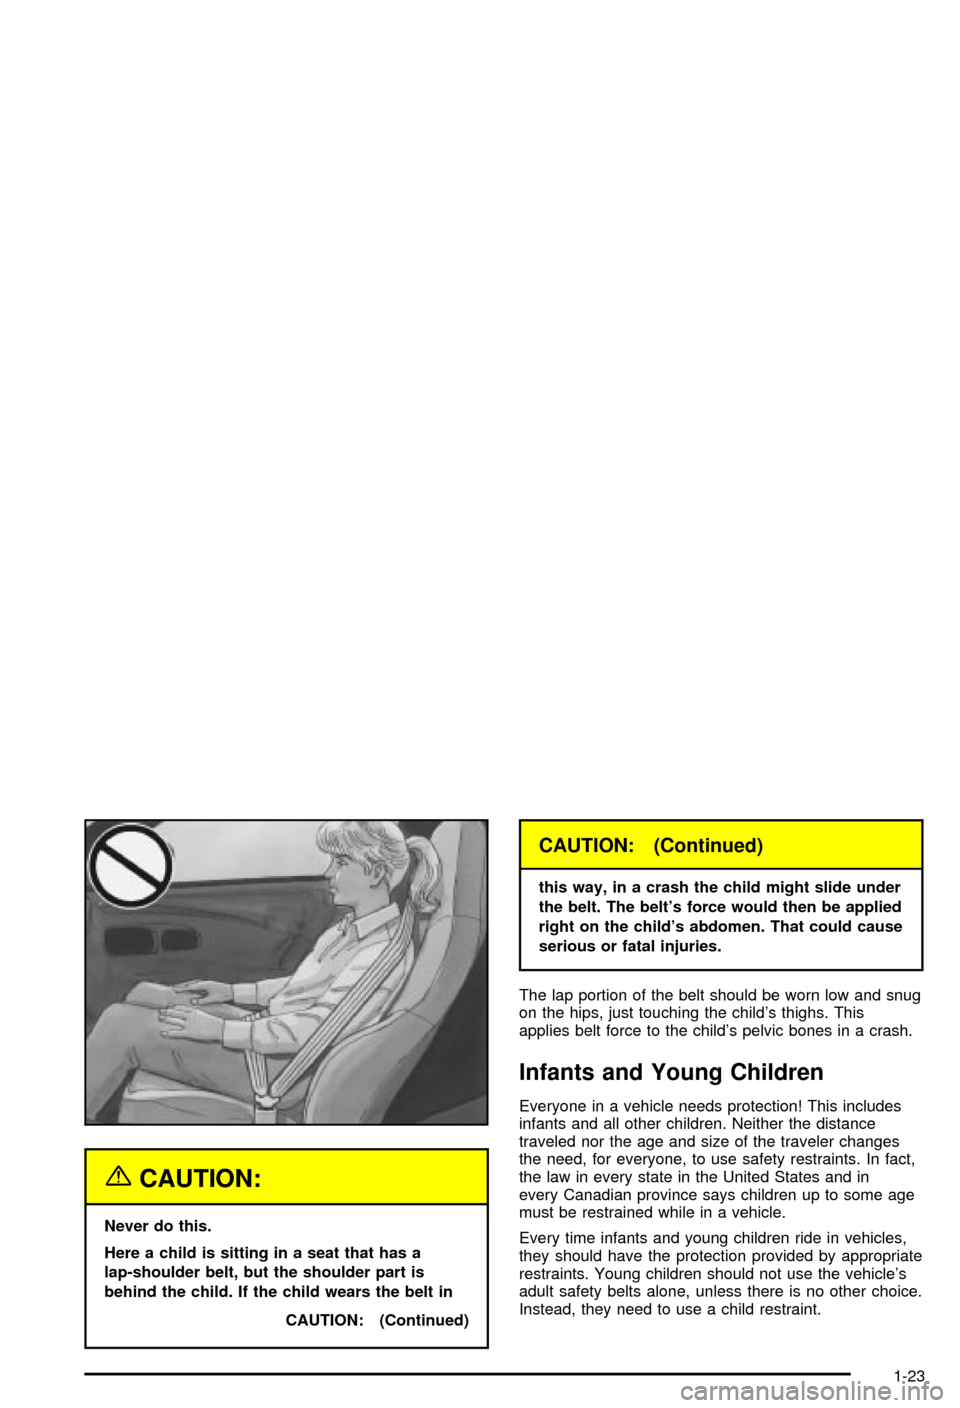
Never do this.
Here a child is sitting in a seat that has a
lap-shoulder belt, but the shoulder part is
behind the child. If the child wears the belt in
CAUTION: (Continued)
CAUTION: (Continued)
this way, in a crash the child might slide under
the belt. The belt's force would then be applied
right on the child's abdomen. That could cause
serious or fatal injuries.
The lap portion of the belt should be worn low and snug
on the hips, just touching the child's thighs. This
applies belt force to the child's pelvic bones in a crash.
Infants and Young Children
Everyone in a vehicle needs protection! This includes
infants and all other children. Neither the distance
traveled nor the age and size of the traveler changes
the need, for everyone, to use safety restraints. In fact,
the law in every state in the United States and in
every Canadian province says children up to some age
must be restrained while in a vehicle.
Every time infants and young children ride in vehicles,
they should have the protection provided by appropriate
restraints. Young children should not use the vehicle's
adult safety belts alone, unless there is no other choice.
Instead, they need to use a child restraint.
1-23
Page 61 of 368

Changes or modi®cations to this system by other than
an authorized service facility could void authorization to
use this equipment.
If you ever notice a decrease in the remote keyless
entry transmitter range, try doing one of the following:
·Check the distance. You may be too far from
your vehicle. You may need to stand closer during
rainy or snowy weather.
·Check the location. Other vehicles or objects may
be blocking the signal. Take a few steps to the
left or right, hold the transmitter higher, and
try again.
·Check to determine if battery replacement is
necessary. See ªBattery Replacementº under
Remote Keyless Entry System Operation on
page 2-5.
·Check to make sure that an electronic device such
as a cellular phone or lap top computer is not
causing interference.
·If you're still having trouble, see your dealer or a
quali®ed technician for service.
Remote Keyless Entry System
Operation
Your vehicle has a Remote Keyless Entry (RKE) system
that allows you to lock and unlock your doors, unlock
your hatch/trunk lid, turn the panic alarm on and off and
disarm or arm your theft-deterrent system. The range
distance is as much as 100 feet (30 m) away.
Your vehicle comes
standard with two
transmitters, and up to
three can be matched to
your vehicle.
See ªMatching Transmitter(s) to Your Vehicleº later in
this section.
2-5
Page 62 of 368

The driver's door will unlock when the unlock button on
the remote keyless entry transmitter is pressed, or
press the unlock button again within ®ve seconds to
unlock both doors. Also, by pressing the unlock button,
it may automatically disarm your theft-deterrent
system, depending on how the theft-deterrent system is
programmed. If it's dark enough outside, your interior
lamps will come on.
Your memory settings will also be recalled when you
press the unlock button on the remote keyless entry
transmitter. See
Memory on page 2-55for more
information.
The hatch/trunk lid will release when the button with the
trunk symbol is pressed, as long as the ignition is
turned to OFF.
The system has a feature that makes it difficult for you
to lock your key in your vehicle. If you leave your
key in the ignitionand attempt to lock the doors, the
vehicle will not lock and a chime will sound to remind
you that the key is in the ignition. If the door lock
is pressed again, within ®ve seconds, the doors will lock
and the keys can be locked in the vehicle. This
system can't guarantee that you will never be locked out
of your vehicle. Always remember to take your key
with you.
Remote Alarm
When you press the horn button on the remote keyless
entry transmitter, the horn will sound. This panic
alarm button will allow you to attract attention, if needed.
If the horn alarm sounds, there are three ways to turn
it off:
·Press the panic alarm button again on the remote
keyless entry transmitter.
·Wait 90 seconds, and the horn will turn off by itself.
·Turn the key to any position in the ignition,
except OFF.
Remote Keyless Entry Settings
You can adjust the settings on the system through the
Driver Information Center (DIC). You can change
the type of alarm used by the theft-deterrent system.
See
DIC Controls and Displays on page 3-45for more
information.
2-6
Page 64 of 368
Battery Replacement
Under normal use, the battery in your remote keyless
entry transmitter should last about three years.
You can tell the battery is weak if the transmitter won't
work at the normal range in any location. If you have
to get close to your vehicle before the transmitter works,
it's probably time to change the battery.
Notice:When replacing the battery, use care not to
touch any of the circuitry. Static from your body
transferred to these surfaces may damage the
transmitter.
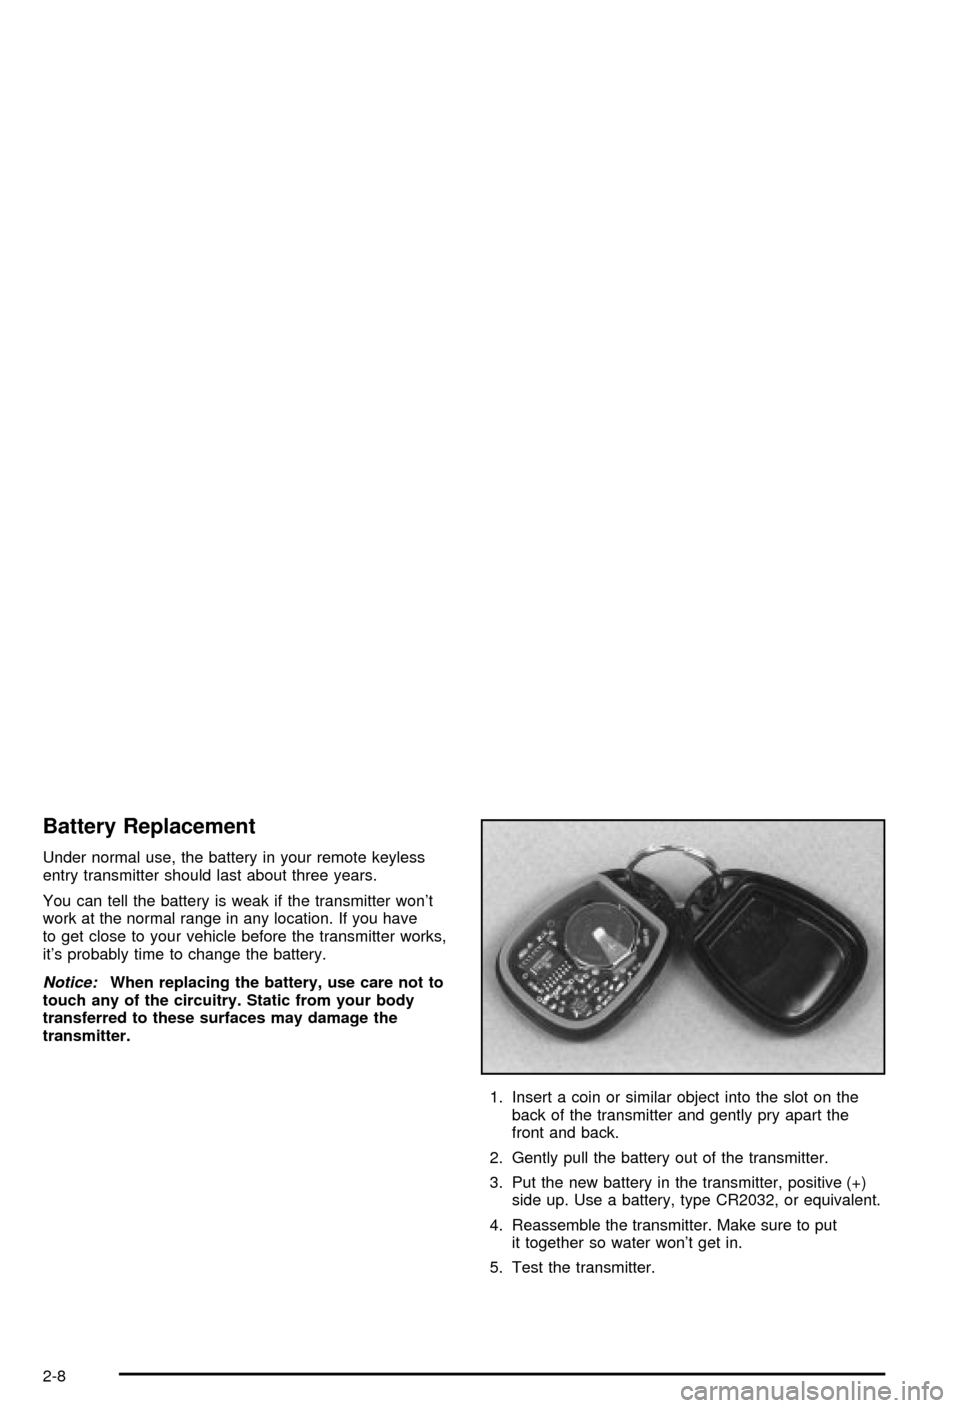
1. Insert a coin or similar object into the slot on the
back of the transmitter and gently pry apart the
front and back.
2. Gently pull the battery out of the transmitter.
3. Put the new battery in the transmitter, positive (+)
side up. Use a battery, type CR2032, or equivalent.
4. Reassemble the transmitter. Make sure to put
it together so water won't get in.
5. Test the transmitter.
2-8
Page 78 of 368

When starting your engine in very cold weather (below
0ÉF or-18ÉC), do this:
1. With your foot off the accelerator pedal, turn the
ignition key to START and hold it there up to
15 seconds. When the engine starts, let go of
the key.
2. If your engine still won't start (or starts but then
stops), it could be ¯ooded with too much gasoline.
Try pushing your accelerator pedal all the way to the
¯oor and holding it there as you hold the key in
START for about three seconds. When the engine
starts, let go of the key and accelerator. If the
vehicle starts brie¯y but then stops again, do the
same thing, but this time keep the pedal down
for ®ve or six seconds. This clears the extra
gasoline from the engine.
Notice:Your engine is designed to work with the
electronics in your vehicle. If you add electrical
parts or accessories, you could change the way the
engine operates. Before adding electrical equipment,
check with your dealer. If you don't, your engine
might not perform properly.
Starter Interlock Feature
For your convenience and to avoid damage to your
starter, your vehicle is equipped with a starter interlock
feature. This feature will not allow you to crank the
engine while the vehicle is already running.
Racing or Other Competitive Driving
See your warranty book before using your vehicle
for racing or other competitive driving.
Notice:If you use your vehicle for racing or other
competitive driving, your engine may use more
oil than it would with normal use. Low oil levels can
damage the engine. Be sure to check the oil level
often during racing or other competitive driving and
keep the level at or near 1 quart (1 L) above the
upper mark that shows the proper operating range
on the engine oil dipstick. For information on
how to add oil, see ªEngine Oilº in the Index. After
the competitive driving, remove excess oil so
that the level on the dipstick is not above the upper
mark that shows the proper operating range.
2-22
Page 93 of 368
Mirrors
Manual Rearview Mirror
An inside rearview mirror is attached above the
windshield. The mirror pivots so that you can adjust it.
You can adjust the mirror for day or night driving.
Pull the tab for night driving to reduce glare. Push the
tab forward for daytime driving.
Automatic Dimming Rearview Mirror
Your vehicle may have an automatic dimming rearview
mirror with map lamps.
This mirror automatically changes to reduce glare from
headlamps behind you. A time delay feature prevents
rapid changing from the day to night positions while
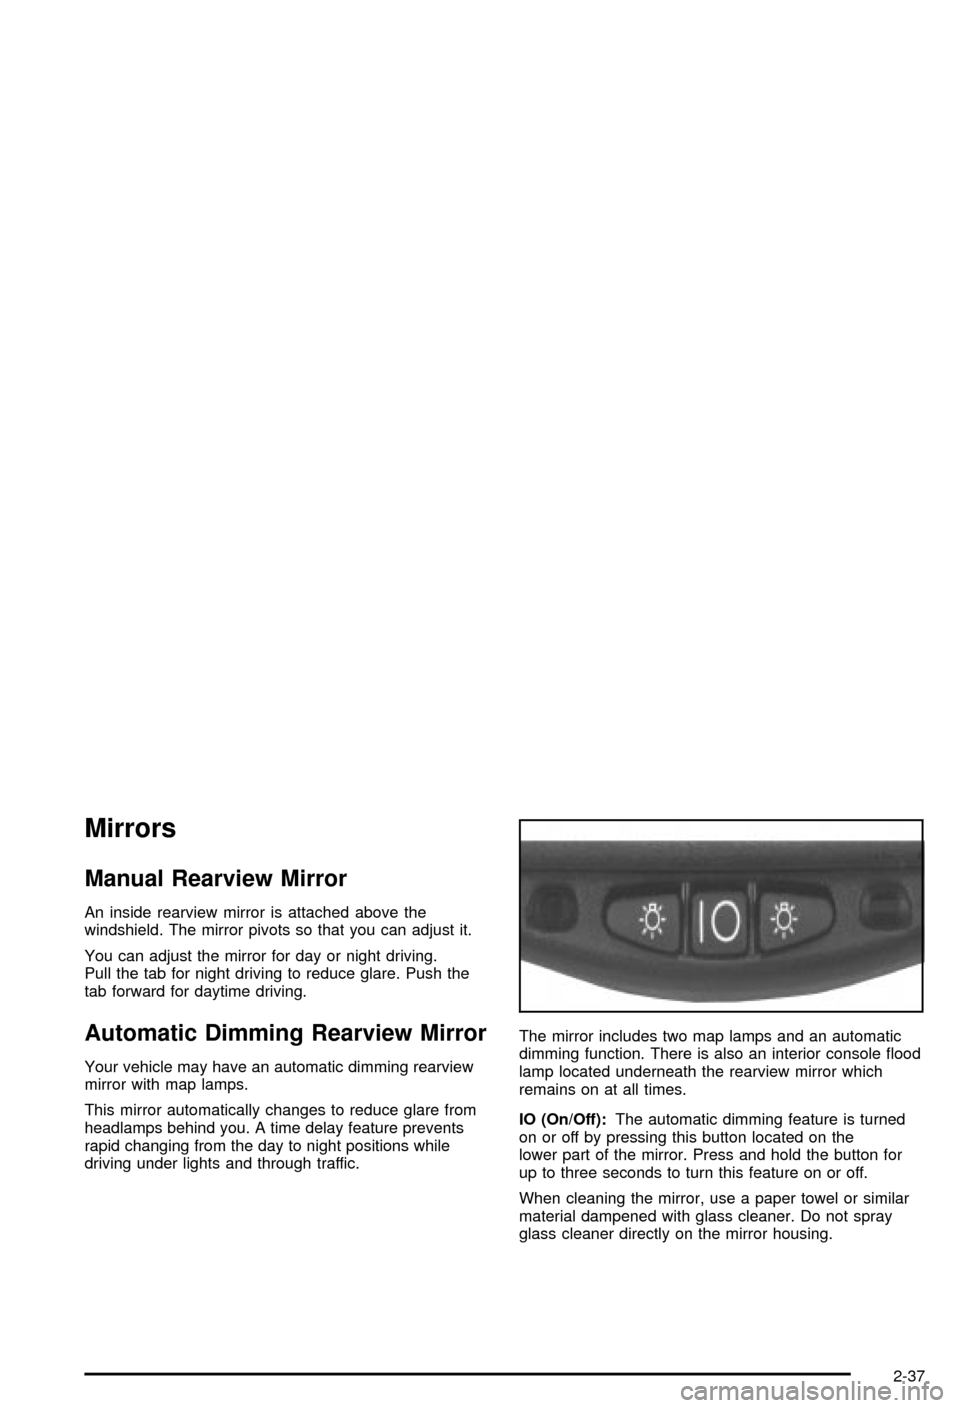
driving under lights and through traffic.The mirror includes two map lamps and an automatic
dimming function. There is also an interior console ¯ood
lamp located underneath the rearview mirror which
remains on at all times.
IO (On/Off):The automatic dimming feature is turned
on or off by pressing this button located on the
lower part of the mirror. Press and hold the button for
up to three seconds to turn this feature on or off.
When cleaning the mirror, use a paper towel or similar
material dampened with glass cleaner. Do not spray
glass cleaner directly on the mirror housing.
2-37