2003 CHEVROLET CORVETTE trunk
[x] Cancel search: trunkPage 185 of 368

Whenever a CD magazine with discs is loaded in the
changer, the compact disc symbol will appear on
the radio display. If the CD changer is checking the
magazine for CDs, the compact disc symbol will ¯ash on
the display until the changer is ready to play. When a
CD begins playing, CD will appear in the bottom
left corner and a disc and track number will be
displayed. The disc numbers are listed on the front of
the magazine.
All of the CD functions are controlled by the radio
pushbuttons except for ejecting the magazine.
Operating the Trunk-Mounted CD
Changer with the AM-FM Radio with
Cassette
If an error appears on the display, see ªCompact Disc
Messagesº later in this section.
The following pushbuttons are used for the
trunk-mounted CD changer.
1 PREV (Previous):Press this pushbutton to go to the
previous track if the current track has been playing
for less than eight seconds. If pressed when the current
track has been playing for more than eight seconds,
it will go to the beginning of the current track. If you hold
or press this pushbutton more than once, the player
will continue moving back through the disc.2 PROG (Program):Press this pushbutton to select
the next disc in the magazine. If a CD cannot be played,
its number will be skipped when selecting discs while
using this pushbutton.
3 NEXT:Press this pushbutton to advance to the next
track. If you press and hold this pushbutton or press
it more than once, the player will continue moving
forward through the disc.
REV 4 (Reverse):Press and hold this pushbutton to
quickly reverse within a track. Release this pushbutton
to resume play.
W5 (Dolbyž):This pushbutton has no function when
playing a CD.
FWD 6 (Forward):Press and hold this pushbutton to
quickly advance within a track. Release this pushbutton
to resume play.
RECALL:Press this button to see what track is
currently playing. Press it again within ®ve seconds to
see how long the track has been playing. When a
new track starts to play, the track number will also
appear. Press it a third time and the time of day will be
displayed.
oSEEKp:The left arrow works the same as the
PREV pushbutton and the right arrow works the
same as the NEXT pushbutton.
3-73
Page 186 of 368

P.SCAN (Preset Scan):Press this button to play the
compact discs in random, rather than sequential, order.
RDM will appear on the display. Press this button
again to turn off random play.
AM/FM:Press this button to listen to the radio when
playing a cassette tape or a compact disc.
TAPE AUX (Auxiliary):Press this button to play a CD
when listening to the radio. You can also press this
button to switch between playing a tape in the cassette
tape player and playing a CD in the trunk-mounted
CD changer, if both are loaded.
Operating the Trunk-Mounted CD
Changer with the AM-FM Radio
with CD
If an error appears on the display, see ªCompact Disc
Messagesº later in this section.
The following pushbuttons are used for the
trunk-mounted CD changer.
1 PREV (Previous):Press this pushbutton to go to the
previous track if the current track has been playing
for less than eight seconds. If pressed when the current
track has been playing for more than eight seconds,
it will go to the beginning of the current track. If you hold
or press this pushbutton more than once, the player
will continue moving back through the disc.2 RDM (Random):Press this pushbutton to play the
compact discs in random, rather than sequential, order.
RDM will appear on the display. Press this pushbutton
again to turn off random play.
3 NEXT:Press this pushbutton to advance to the next
track. If you press and hold this pushbutton or press
it more than once, the player will continue moving
forward through the disc.
REV 4 (Reverse):Press and hold this pushbutton to
quickly reverse within a track. Release this pushbutton
to resume play.
5:Press this pushbutton to select the next disc in the
magazine. If a CD cannot be played, its number
will be skipped when selecting discs while using this
pushbutton.
FWD 6 (Forward):Press and hold this pushbutton to
quickly advance within a track. Release this pushbutton
to resume play.
RECALL:Press this button to see what track is
currently playing. Press it again within ®ve seconds to
see how long the track has been playing. When a
new track starts to play, the track number will also
appear. Press it a third time and the time of day will be
displayed.
3-74
Page 187 of 368

oSEEKp:The left arrow works the same as the
PREV pushbutton and the right arrow works the
same as the NEXT pushbutton.
AM/FM:Press this button to listen to the radio when
playing a compact disc.
CD AUX (Auxiliary):Press this button to play a CD
when listening to the radio. You can also press
this button to switch between playing a CD in the
compact disc player and playing a CD in the
trunk-mounted CD changer, if both are loaded.
Compact Disc Messages
If an error occurs while trying to play a CD in the
compact disc player or changer, the following conditions
may have caused the error:
·You're driving on a very rough road. When the road
becomes smoother, the disc should play.
·The disc is dirty, scratched, wet or upside down.
·The air is very humid. If so, wait about an hour and
try again.
·The CD changer door is open. Completely close the
changer door to restore normal operation.
·An empty magazine is in the CD changer. Try the
magazine again with a disc loaded on one of the
trays.If the CD is not playing correctly, for any other reason,
try a known good CD.
If any error occurs repeatedly or if an error can't be
corrected, contact your dealer. If your radio displays an
error message, write it down and provide it to your
dealer when reporting the problem.
Theft-Deterrent Feature
THEFTLOCKžis designed to discourage theft of your
radio. It works by using a secret code to disable all radio
functions whenever battery power is interrupted.
The THEFTLOCK feature for the radio may be used or
ignored. If ignored, the system plays normally and
the radio is not protected by the feature. If THEFTLOCK
is activated, your radio will not operate if stolen.
When THEFTLOCK is activated, the radio will display
LOC to indicate a locked condition anytime battery
power has been interrupted. If your battery loses power
for any reason, you must unlock the radio with the
secret code before it will operate.
3-75
Page 237 of 368

{CAUTION:
If you get fuel on yourself and then something
ignites it, you could be badly burned. Fuel can
spray out on you if you open the fuel cap too
quickly. This spray can happen if your tank is
nearly full, and is more likely in hot weather.
Open the fuel cap slowly and wait for any
ªhissº noise to stop. Then unscrew the cap all
the way.
Be careful not to spill fuel. Clean fuel from painted
surfaces as soon as possible. See
Cleaning the Outside
of Your Vehicle on page 5-78.
When you put the fuel cap back on, turn it to the right
(clockwise) until you hear a clicking sound. Make
sure you fully install the cap. The diagnostic system can
determine if the fuel cap has been left off or improperly
installed.
This would allow fuel to evaporate into the atmosphere.
See
Malfunction Indicator Lamp on page 3-38.
Notice:If you need a new fuel cap, be sure to get
the right type. Your dealer can get one for you.
If you get the wrong type, it may not ®t properly.This may cause your malfunction indicator lamp
to light and may damage your fuel tank and
emissions system. See ªMalfunction Indicator
Lampº in the Index.
Filling a Portable Fuel Container
{CAUTION:
Never ®ll a portable fuel container while it is in
your vehicle. Static electricity discharge from
the container can ignite the gasoline vapor.
You can be badly burned and your vehicle
damaged if this occurs. To help avoid injury to
you and others:
·Dispense gasoline only into approved
containers.
·Do not ®ll a container while it is inside a
vehicle, in a vehicle's trunk, pickup bed or
on any surface other than the ground.
·Bring the ®ll nozzle in contact with the
inside of the ®ll opening before operating
the nozzle. Contact should be maintained
until the ®lling is complete.
·Don't smoke while pumping gasoline.
5-9
Page 301 of 368

The maximum speed label
reminds you to drive
cautiously and not to
exceed 55 mph (90 km/h)
until you have the
damaged tire inspected
and repaired.
Place the air compressor pump and accessories into the
in¯ator kit case and store in the hatch/trunk
compartment area of your vehicle.Tire In¯ator Kit Storage
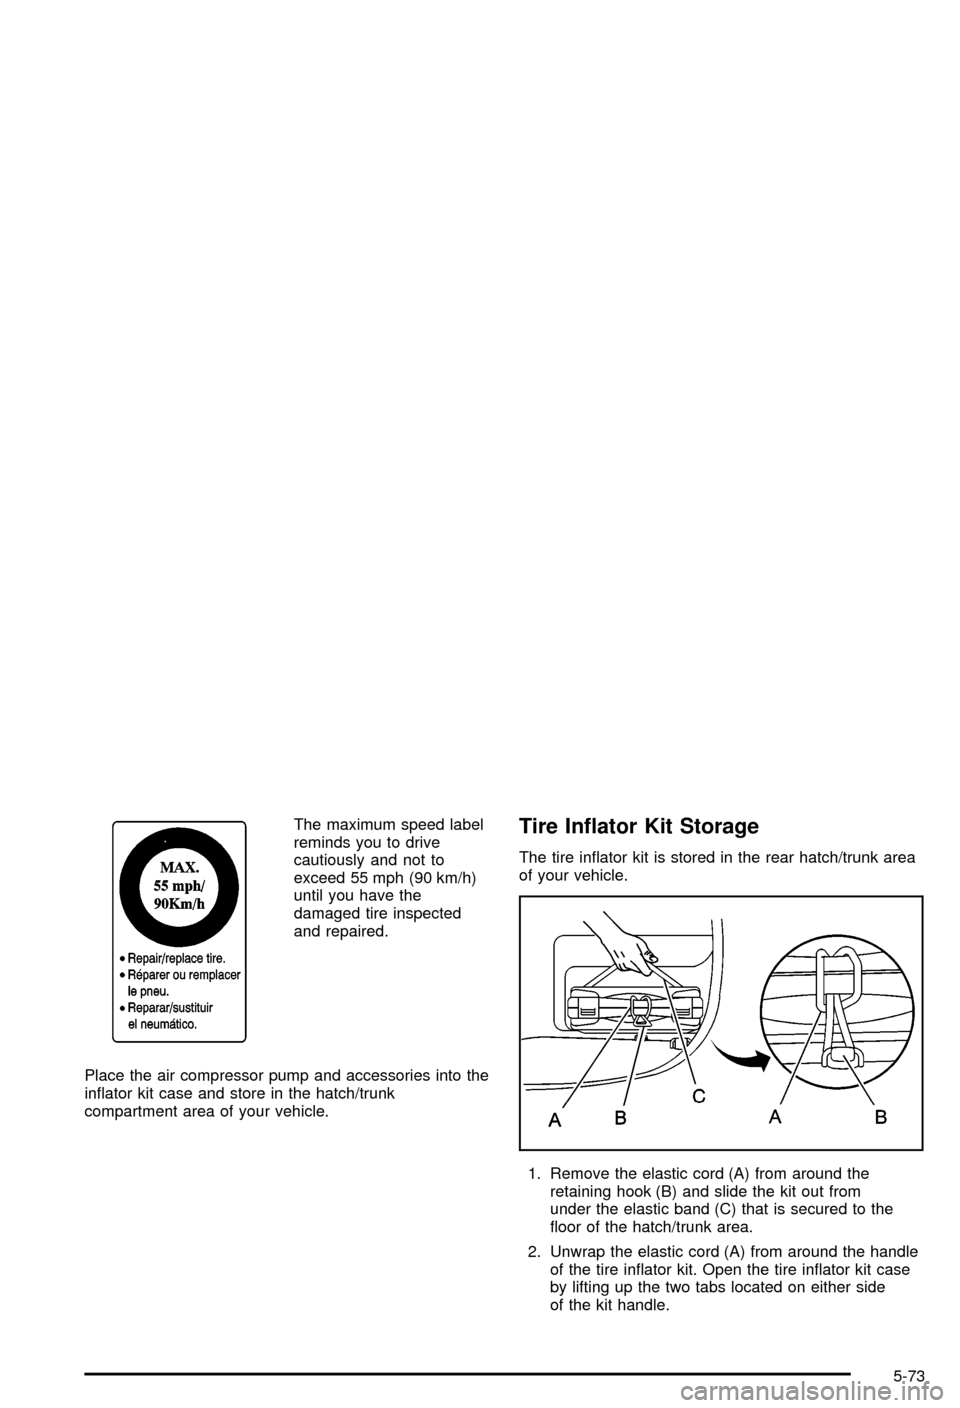
The tire in¯ator kit is stored in the rear hatch/trunk area
of your vehicle.
1. Remove the elastic cord (A) from around the
retaining hook (B) and slide the kit out from
under the elastic band (C) that is secured to the
¯oor of the hatch/trunk area.
2. Unwrap the elastic cord (A) from around the handle
of the tire in¯ator kit. Open the tire in¯ator kit case
by lifting up the two tabs located on either side
of the kit handle.
5-73
Page 302 of 368

To Stow the Tire In¯ator Kit:
{CAUTION:
Storing the tire in¯ator kit or other equipment
in the passenger compartment of the vehicle
could cause injury. In a sudden stop or
collision, loose equipment could strike
someone. Store the tire in¯ator kit in the
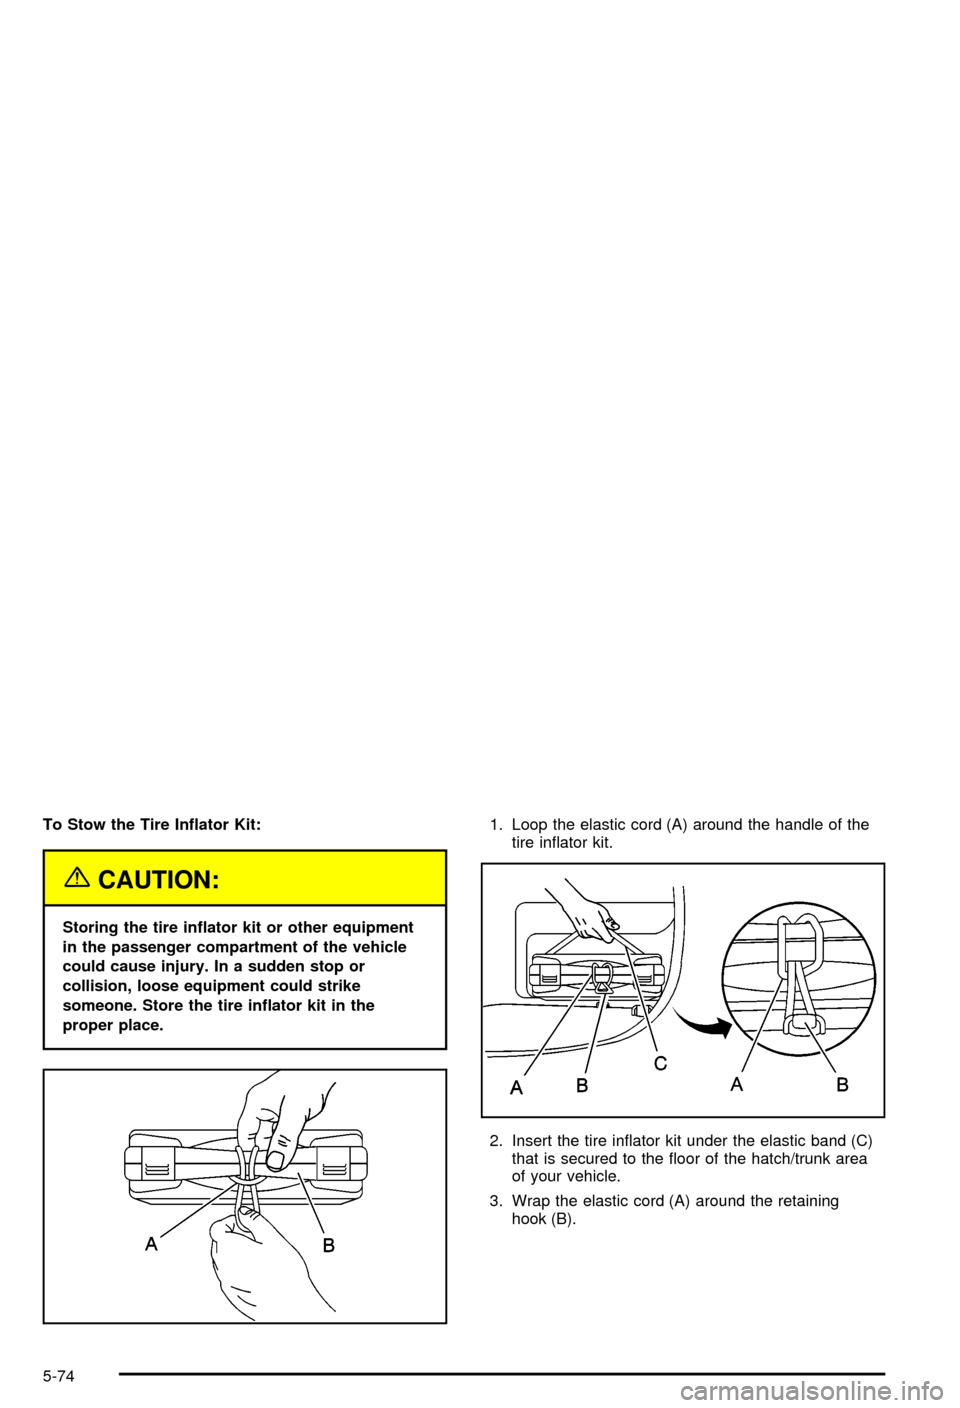
proper place.1. Loop the elastic cord (A) around the handle of the
tire in¯ator kit.
2. Insert the tire in¯ator kit under the elastic band (C)
that is secured to the ¯oor of the hatch/trunk area
of your vehicle.
3. Wrap the elastic cord (A) around the retaining
hook (B).
5-74
Page 316 of 368

Fuse Usage
26 Hatch/Trunk Release
27 HVAC Controls
28 Bose Speakers
29 Diagnostic
30 Right Door Control Module
31 Power Feed Door Right
32 Fuel Tank Door
33 Door Control Module Left
34 Power Feed Door Left
47 Ignition 1
48 Rear Defogger
49 Blank
50 Ignition 2
51 Blower Motor
52 Starter
53 BlankRelay Usage
37Monitored (Inadvertent) Load
Control
38 Right Daytime Running Lamp
39 Hatch/Trunk Release
40 Left Daytime Running Lamp
41 Tonneau Release
42 Courtesy Lamps
43Automatic Lamp Control Parking
Lamps
44 Automatic Lamp Control Headlamps
45 Bose Speakers
46 Rear Defogger
Circuit Breaker Usage
35 Driver Power Seat
36 Passenger Power Seat
54 Headlamps
5-88
Page 355 of 368

A
Accessory Power Outlets.................................3-20
Accessory Power Plug.....................................5-84
Activating the Theft-Deterrent Feature................3-76
Active Handling System Light...........................3-37
Active Handling System...................................4-10
Adding Washer Fluid.......................................5-36
Additional Program Information........................... 7-9
Additives, Fuel................................................. 5-6
Add-On Electrical Equipment............................5-84
Adjusting the Speakers (Balance/Fade)......3-65, 3-69
Air Bag System..............................................1-39
Air Bag Off Switch.......................................1-44
How Does an Air Bag Restrain?....................1-42
Servicing Your Air Bag-Equipped Vehicle.........1-47
What Makes an Air Bag In¯ate?....................1-42
What Will You See After an
Air Bag In¯ates?......................................1-43
When Should an Air Bag In¯ate?...................1-42
Where Are the Air Bags?..............................1-40
Air Bag .........................................................3-33
Off Light.....................................................3-33
Readiness Light..........................................3-32
Air Cleaner/Filter, Engine.................................5-18
Air Compressor..............................................5-71
Air Dam, Front...............................................2-19
AM ...............................................................3-77
Antenna, Fixed Mast.......................................3-79
Antenna, Power Antenna Mast Care..................3-79Antennas, Integrated Windshield and Rear
Window......................................................3-80
Anti-lock Brake System (ABS)............................ 4-7
Anti-Lock Brake, System Warning Light..............3-36
Appearance Care............................................5-75
Care of Safety Belts....................................5-77
Chemical Paint Spotting...............................5-81
Cleaning the Inside of Your Vehicle................5-75
Cleaning the Outside of Your Vehicle..............5-78
Fiberglass Springs.......................................5-81
Finish Damage............................................5-81
Titanium Exhaust System..............................5-81
Underbody Maintenance...............................5-81
Vehicle Care/Appearance Materials................5-82
Weatherstrips..............................................5-77
Arming the System.........................................2-16
Ashtrays........................................................3-21
Audio System(s).............................................3-62
Care of Your Cassette Tape Player................3-78
Care of Your CD Player...............................3-79
Care of Your CDs........................................3-79
Fixed Mast Antenna.....................................3-79
Integrated Windshield and Rear Window
Antennas................................................3-80
Power Antenna Mast Care............................3-79
Radio with Cassette.....................................3-63
Radio with CD............................................3-67
Setting the Time..........................................3-62
Theft-Deterrent Feature................................3-75
Trunk-Mounted CD Changer..........................3-71
1