2003 CHEVROLET BLAZER torque
[x] Cancel search: torquePage 97 of 420
Automatic Transfer Case
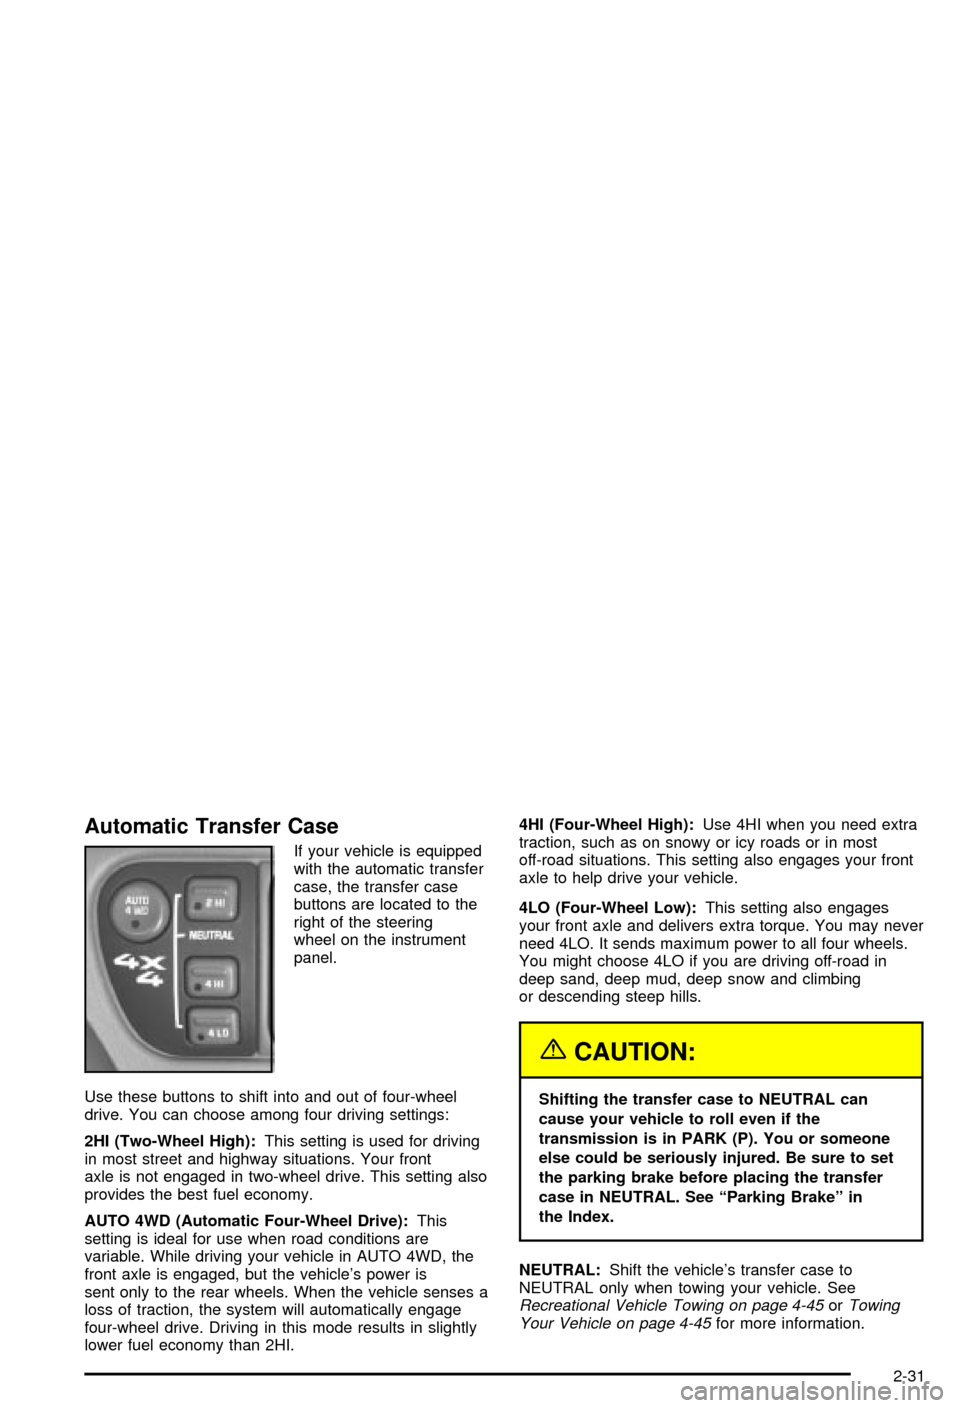
If your vehicle is equipped
with the automatic transfer
case, the transfer case
buttons are located to the
right of the steering
wheel on the instrument
panel.
Use these buttons to shift into and out of four-wheel
drive. You can choose among four driving settings:
2HI (Two-Wheel High):This setting is used for driving
in most street and highway situations. Your front
axle is not engaged in two-wheel drive. This setting also
provides the best fuel economy.
AUTO 4WD (Automatic Four-Wheel Drive):This
setting is ideal for use when road conditions are
variable. While driving your vehicle in AUTO 4WD, the
front axle is engaged, but the vehicle's power is
sent only to the rear wheels. When the vehicle senses a
loss of traction, the system will automatically engage
four-wheel drive. Driving in this mode results in slightly
lower fuel economy than 2HI.4HI (Four-Wheel High):Use 4HI when you need extra
traction, such as on snowy or icy roads or in most
off-road situations. This setting also engages your front
axle to help drive your vehicle.
4LO (Four-Wheel Low):This setting also engages
your front axle and delivers extra torque. You may never
need 4LO. It sends maximum power to all four wheels.
You might choose 4LO if you are driving off-road in
deep sand, deep mud, deep snow and climbing
or descending steep hills.
{CAUTION:
Shifting the transfer case to NEUTRAL can
cause your vehicle to roll even if the
transmission is in PARK (P). You or someone
else could be seriously injured. Be sure to set
the parking brake before placing the transfer
case in NEUTRAL. See ªParking Brakeº in
the Index.
NEUTRAL:Shift the vehicle's transfer case to
NEUTRAL only when towing your vehicle. See
Recreational Vehicle Towing on page 4-45orTowing
Your Vehicle on page 4-45for more information.
2-31
Page 103 of 420
Leaving Your Vehicle With the Engine
Running
{CAUTION:
It can be dangerous to leave your vehicle
with the engine running. Your vehicle could
move suddenly if the shift lever is not fully in
PARK (P) with the parking brake ®rmly set.
If you have four-wheel drive, your vehicle
will be free to roll ± even if your lever is in
PARK (P) ± if your transfer case is in
NEUTRAL. So be sure the transfer case is in a
drive gear ± not NEUTRAL. See ªFour-Wheel
Drive (Automatic Transfer Case)º in the Index.
And, if you leave the vehicle with the engine
running, it could overheat and even catch ®re.
You or others could be injured. Don't leave
your vehicle with the engine running unless
you have to.
If you have to leave your vehicle with the engine
running, be sure your vehicle is in PARK (P) and your
parking brake is ®rmly set before you leave it. After
you've moved the shift lever into PARK (P), holdthe regular brake pedal down. Then, see if you can
move the shift lever away from PARK (P) without ®rst
pulling it toward you (or pressing the button on a console
shift lever). If you can, it means that the shift lever
wasn't fully locked into PARK (P).
Torque Lock
If you are parking on a hill and you don't shift your
transmission into PARK (P) properly, the weight of the
vehicle may put too much force on the parking pawl in the
transmission. You may ®nd it difficult to pull the shift lever
out of PARK (P). This is called torque lock. To prevent
torque lock, set the parking brake and then shift into
PARK (P) properly before you leave the driver's seat. To
®nd out how, see
Shifting Into Park (P) on page 2-35.
When you are ready to drive, move the shift lever out of
PARK (P)
beforeyou release the parking brake.
If torque lock does occur, you may need to have another
vehicle push yours a little uphill to take some of the
pressure from the parking pawl in the transmission, so
you can pull the shift lever out of PARK (P).
Shifting Out of Park (P)
Your vehicle has an automatic transmission shift lock
control system. You have to fully apply the regular
brakes before you can shift from PARK (P) when the
ignition is in RUN. See
Automatic Transmission
Operation on page 2-23.
2-37
Page 303 of 420

Brake Wear
If you have four-wheel drive, your vehicle has four-wheel
disc brakes. If not, your vehicle has front disc brakes
and rear drum brakes.
Disc brake pads have built-in wear indicators that make
a high-pitched warning sound when the brake pads
are worn and new pads are needed. The sound
may come and go or be heard all the time your vehicle
is moving (except when you are pushing on the
brake pedal ®rmly).
{CAUTION:
The brake wear warning sound means that
soon your brakes won't work well. That could
lead to an accident. When you hear the brake
wear warning sound, have your vehicle
serviced.
Notice:Continuing to drive with worn-out brake
pads could result in costly brake repair.
Some driving conditions or climates may cause a brake
squeal when the brakes are ®rst applied or lightly
applied. This does not mean something is wrong with
your brakes.Properly torqued wheel nuts are necessary to help
prevent brake pulsation. When tires are rotated, inspect
brake pads for wear and evenly tighten wheel nuts in
the proper sequence to GM torque speci®cations.
If you have rear drum brakes, they don't have wear
indicators, but if you ever hear a rear brake rubbing
noise, have the rear brake linings inspected immediately.
Also, the rear brake drums should be removed and
inspected each time the tires are removed for rotation or
changing. When you have the front brake pads
replaced, have the rear brakes inspected, too.
Brake linings should always be replaced as complete
axle sets.
See
Brake System Inspection on page 6-32.
Brake Pedal Travel
See your dealer if the brake pedal does not return to
normal height, or if there is a rapid increase in
pedal travel. This could be a sign of brake trouble.
Brake Adjustment
Every time you make a brake stop, your disc brakes
adjust for wear.
If you don't have four-wheel drive and your brake pedal
goes down farther than normal, your rear drum
brakes may need adjustment. Adjust them by backing
up and ®rmly applying the brakes a few times.
5-39
Page 321 of 420
After the tires have been rotated, adjust the front and
rear in¯ation pressures as shown on the
Certi®cation/Tire label. Make certain that all wheel nuts
are properly tightened. See ªWheel Nut Torqueº
under
Capacities and Speci®cations on page 5-91.
{CAUTION:
Rust or dirt on a wheel, or on the parts to
which it is fastened, can make wheel nuts
become loose after a time. The wheel could
come off and cause an accident. When you
change a wheel, remove any rust or dirt from
places where the wheel attaches to the vehicle.
In an emergency, you can use a cloth or a
paper towel to do this; but be sure to use a
scraper or wire brush later, if you need to, to
get all the rust or dirt off. See ªChanging a Flat
Tireº in the Index.
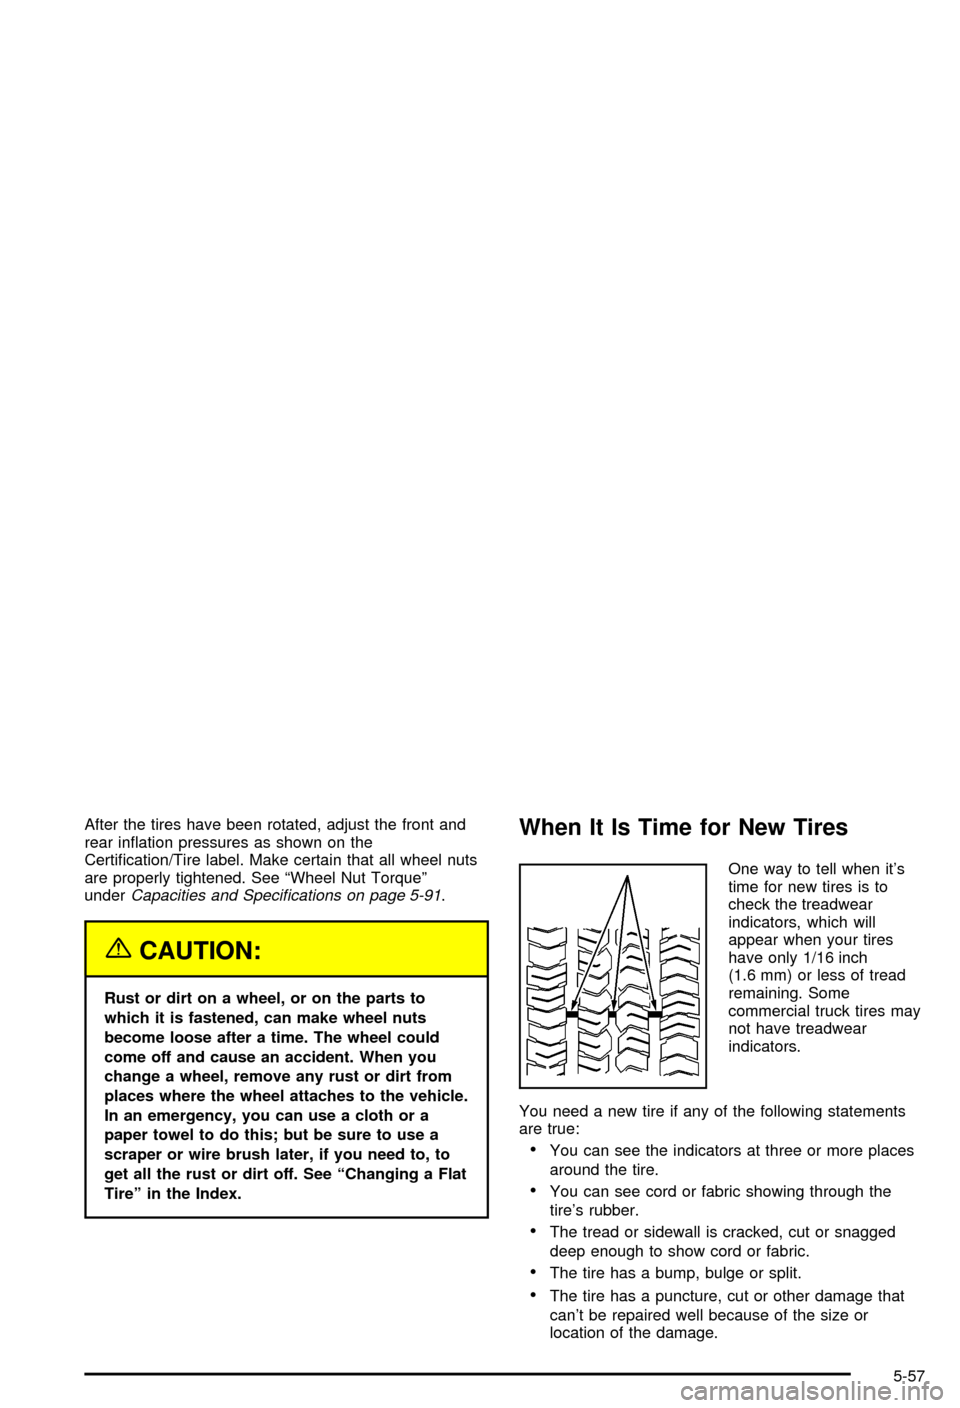
When It Is Time for New Tires
One way to tell when it's
time for new tires is to
check the treadwear
indicators, which will
appear when your tires
have only 1/16 inch
(1.6 mm) or less of tread
remaining. Some
commercial truck tires may
not have treadwear
indicators.
You need a new tire if any of the following statements
are true:
·You can see the indicators at three or more places
around the tire.
·You can see cord or fabric showing through the
tire's rubber.
·The tread or sidewall is cracked, cut or snagged
deep enough to show cord or fabric.
·The tire has a bump, bulge or split.
·The tire has a puncture, cut or other damage that
can't be repaired well because of the size or
location of the damage.
5-57
Page 335 of 420
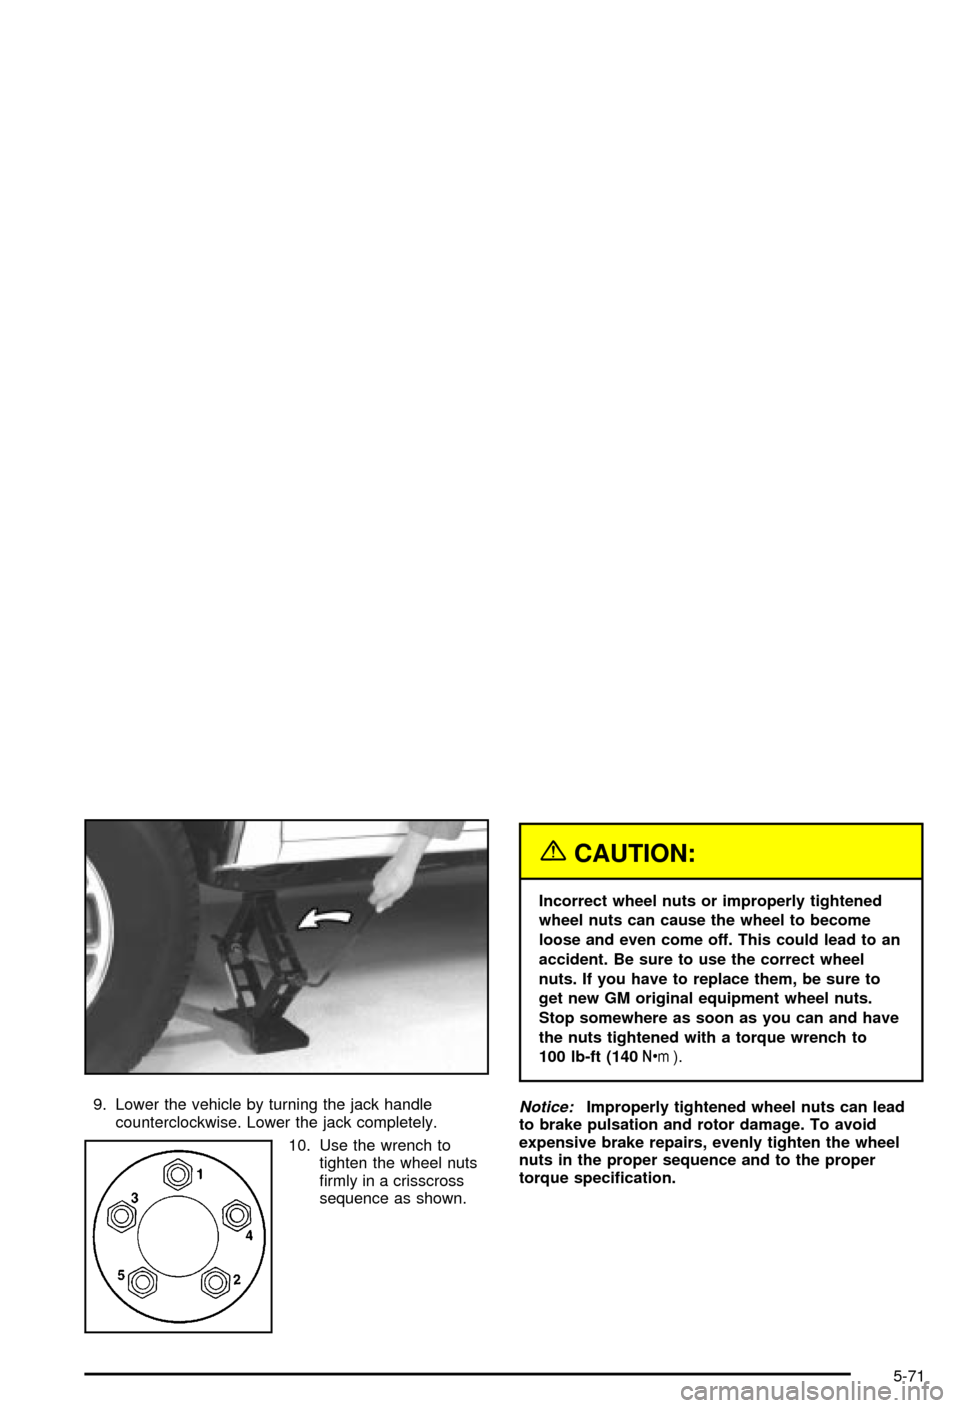
9. Lower the vehicle by turning the jack handle
counterclockwise. Lower the jack completely.
10. Use the wrench to
tighten the wheel nuts
®rmly in a crisscross
sequence as shown.
{CAUTION:
Incorrect wheel nuts or improperly tightened
wheel nuts can cause the wheel to become
loose and even come off. This could lead to an
accident. Be sure to use the correct wheel
nuts. If you have to replace them, be sure to
get new GM original equipment wheel nuts.
Stop somewhere as soon as you can and have
the nuts tightened with a torque wrench to
100 lb-ft (140Y).
Notice:Improperly tightened wheel nuts can lead
to brake pulsation and rotor damage. To avoid
expensive brake repairs, evenly tighten the wheel
nuts in the proper sequence and to the proper
torque speci®cation.
5-71
Page 355 of 420
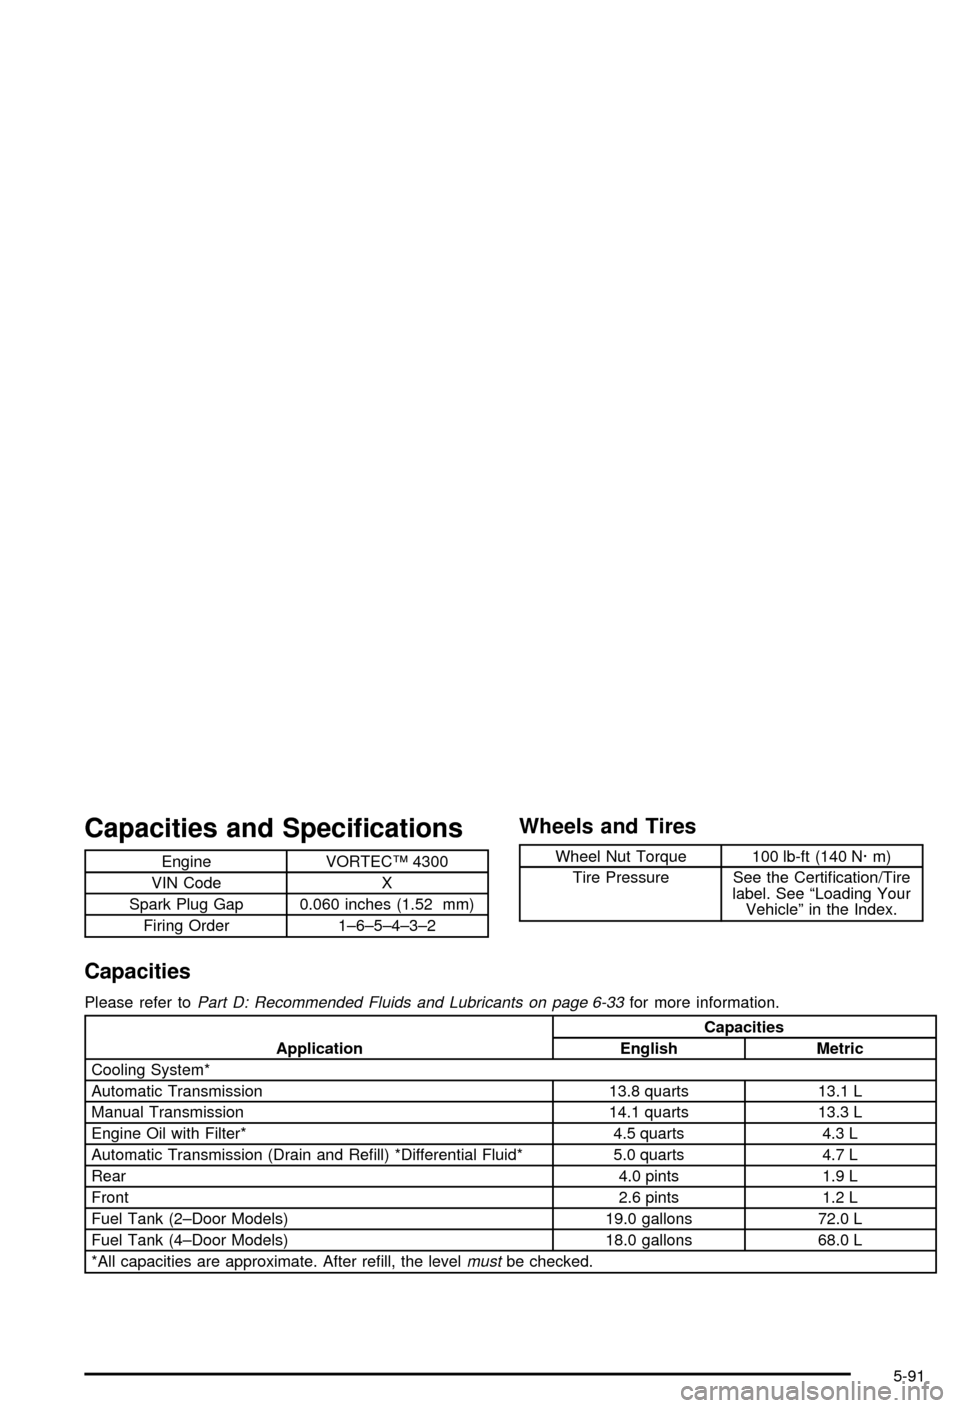
Capacities and Speci®cations
Engine VORTECŸ 4300
VIN Code X
Spark Plug Gap 0.060 inches (1.52 mm)
Firing Order 1±6±5±4±3±2
Wheels and Tires
Wheel Nut Torque 100 lb-ft (140 N´ m)
Tire Pressure See the Certi®cation/Tire
label. See ªLoading Your
Vehicleº in the Index.
Capacities
Please refer toPart D: Recommended Fluids and Lubricants on page 6-33for more information.
ApplicationCapacities
English Metric
Cooling System*
Automatic Transmission 13.8 quarts 13.1 L
Manual Transmission 14.1 quarts 13.3 L
Engine Oil with Filter* 4.5 quarts 4.3 L
Automatic Transmission (Drain and Re®ll) *Differential Fluid* 5.0 quarts 4.7 L
Rear 4.0 pints 1.9 L
Front 2.6 pints 1.2 L
Fuel Tank (2±Door Models) 19.0 gallons 72.0 L
Fuel Tank (4±Door Models) 18.0 gallons 68.0 L
*All capacities are approximate. After re®ll, the level
mustbe checked.
5-91
Page 418 of 420

Stalling on an Incline.......................................4-25
Starter Switch Check.......................................6-28
Starting Your Engine.......................................2-21
Starting Your V6 Engine..................................2-21
Steering in Emergencies..................................4-11
Steering, Suspension and Front Drive Axle
Boot and Seal Inspection..............................6-31
Steering Tips..................................................4-11
Steering........................................................4-10
Storage Areas................................................2-57
Convenience Net.........................................2-57
Front Storage Area......................................2-55
Glove Box..................................................2-48
Luggage Carrier..........................................2-56
Overhead Console.......................................2-48
Rear Convenience System............................2-59
Storage.........................................................2-56
Garment Hooks...........................................2-56
Storing a Flat or Spare Tire and Tools...............5-72
Stuck in Sand, Mud, Ice or Snow......................4-42
Sun Visors.....................................................2-16
Sunglasses Storage Compartment.....................2-52
Swing-Out Windows........................................2-13
T
Tachometer....................................................3-24
Tailgate Release.............................................2-14
Tailgate-Mounted Spare...................................2-16Taillamps.......................................................5-51
Temperature and Compass Display....................2-51
Testing the Alarm............................................2-18
Theft-Deterrent, Radio.....................................3-68
Theft-Deterrent Systems...................................2-17
Content Theft-Deterrent................................2-17
Passlock
ž...................................................2-18
Throttle System Inspection...............................6-32
Tilt Wheel........................................................ 3-4
Time Delay....................................................2-41
Tire In¯ation Check.........................................6-26
Tires.............................................................5-54
Buying New Tires........................................5-58
Chains.......................................................5-62
Changing a Flat Tire....................................5-63
Compact Spare Tire.....................................5-75
If a Tire Goes Flat.......................................5-62
In¯ation -- Tire Pressure...............................5-55
Inspection and Rotation................................5-56
Spare Tire..................................................5-76
Uniform Tire Quality Grading.........................5-59
Wheel Alignment and Tire Balance.................5-60
Wheel Replacement.....................................5-60
When It Is Time for New Tires......................5-57
To Use the Engine Coolant Heater....................2-22
Top Strap Anchor Location...............................1-43
Top Strap......................................................1-42
Torque Lock...................................................2-37
Total Weight on Your Vehicle's Tires..................4-59
Tow/Haul Mode Light.......................................3-35
14